
Quick Installation Guide
Page 2
How to Connect 2 3. Using the Print Server 3 Troubleshooting 7 Version 12.13.05 TTaabblleeoof Cf oCnotennttesnts English ...1 1. Before You Start 1 2.
How to Connect 2 3. Using the Print Server 3 Troubleshooting 7 Version 12.13.05 TTaabblleeoof Cf oCnotennttesnts English ...1 1. Before You Start 1 2.
Quick Installation Guide
Page 4
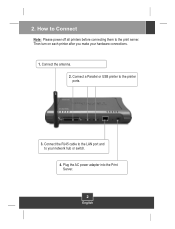
Connect a Parallel or USB printer to the print server. 2. How to Connect Note: Please power off all printers before connecting them to the printer ports. 3. Connect the antenna. 2. Then turn on each printer after you make your network hub or switch. 4. Connect the RJ45 cable to the LAN port and to your hardware connections. 1. Plug the AC power adapter into the Print Server. 2 English
Connect a Parallel or USB printer to the print server. 2. How to Connect Note: Please power off all printers before connecting them to the printer ports. 3. Connect the antenna. 2. Then turn on each printer after you make your network hub or switch. 4. Connect the RJ45 cable to the LAN port and to your hardware connections. 1. Plug the AC power adapter into the Print Server. 2 English
Quick Installation Guide
Page 5
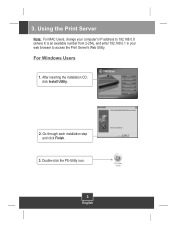
After inserting the installation CD, click Install Utility. 2. PS-Utility V3.00 3 English 3. Go through each installation step and click Finish. 3. Using the Print Server Note: For MAC Users, change your computer's IP address to 192.168.0.X (where X is an available number from 2-254), and enter 192.168.0.1 in your web browser to access the Print Server's Web Utility. For Windows Users 1. Double-click the PS-Utility icon.
After inserting the installation CD, click Install Utility. 2. PS-Utility V3.00 3 English 3. Go through each installation step and click Finish. 3. Using the Print Server Note: For MAC Users, change your computer's IP address to 192.168.0.X (where X is an available number from 2-254), and enter 192.168.0.1 in your web browser to access the Print Server's Web Utility. For Windows Users 1. Double-click the PS-Utility icon.
Quick Installation Guide
Page 6
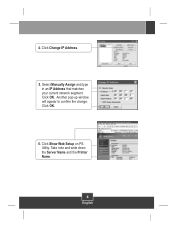
4. Take note and write down the Server Name and the Printer Name. 4 English Click Show Web Setup on PSUtility. Click OK. Click OK. 6. Another pop-up window will appear to confirm the change. Click Change IP Address. 5. Select Manually Assign and type in an IP Address that matches your current network segment.
4. Take note and write down the Server Name and the Printer Name. 4 English Click Show Web Setup on PSUtility. Click OK. Click OK. 6. Another pop-up window will appear to confirm the change. Click Change IP Address. 5. Select Manually Assign and type in an IP Address that matches your current network segment.
Quick Installation Guide
Page 7
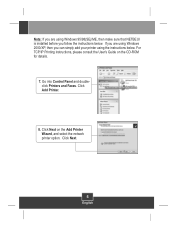
Click Add Printer. 8. Go into Control Panel and doubleclick Printers and Faxes. Note: If you are using Windows 2000/XP, then you can simply add your printer using Windows 95/98(SE)/ME, then make sure that NETBEUI is installed before you are using the instructions below . For TCP/IP Printing instructions, please consult the User's Guide on the Add Printer Wizard, and select the network printer option. Click Next. 5 English If you follow the instructions below . Click Next on the CD-ROM for details. 7.
Click Add Printer. 8. Go into Control Panel and doubleclick Printers and Faxes. Note: If you are using Windows 2000/XP, then you can simply add your printer using Windows 95/98(SE)/ME, then make sure that NETBEUI is installed before you are using the instructions below . For TCP/IP Printing instructions, please consult the User's Guide on the Add Printer Wizard, and select the network printer option. Click Next. 5 English If you follow the instructions below . Click Next on the CD-ROM for details. 7.
Quick Installation Guide
Page 8
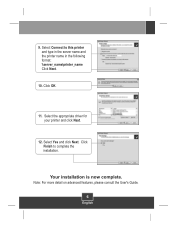
Select Yes and click Next. Your installation is now complete. Click Finish to this printer and type in the server name and the printer name in the following format: \\server_name\printer_name Click Next. 10. 9. Click OK. 11. Select the appropriate driver for your printer and click Next. 12. Select Connect to complete the installation. Note: For more detail on advanced features, please consult the User's Guide. 6 English
Select Yes and click Next. Your installation is now complete. Click Finish to this printer and type in the server name and the printer name in the following format: \\server_name\printer_name Click Next. 10. 9. Click OK. 11. Select the appropriate driver for your printer and click Next. 12. Select Connect to complete the installation. Note: For more detail on advanced features, please consult the User's Guide. 6 English
Quick Installation Guide
Page 9
... your Print Server's IP address. Make sure that the hardware installation is connected to your printer is properly connected to my computer, and my printer is by turning the printer on. I typed in the web configuration utility. A6. I successfully added a network printer to a power outlet. I can 't print a test page. Q4. A4. I verified that the printer is entered correctly. Make sure the power adapter of this "\\", instead of your default printer. A5. Make sure to set...
... your Print Server's IP address. Make sure that the hardware installation is connected to your printer is properly connected to my computer, and my printer is by turning the printer on. I typed in the web configuration utility. A6. I successfully added a network printer to a power outlet. I can 't print a test page. Q4. A4. I verified that the printer is entered correctly. Make sure the power adapter of this "\\", instead of your default printer. A5. Make sure to set...
Quick Installation Guide
Page 10
I pressed the reset button and held it for your Wireless Printer is the SAME as my Access Point, but I still cannot access my print server. I also typed in http://192.168.0.1 in a web browser, but I configured my Wireless Print Server to have any interference received. A7. I still cannot print from my Wireless Print Server. Q8. Also make sure that may cause undesired operation. Including interference that the format (HEX or...
I pressed the reset button and held it for your Wireless Printer is the SAME as my Access Point, but I still cannot access my print server. I also typed in http://192.168.0.1 in a web browser, but I configured my Wireless Print Server to have any interference received. A7. I still cannot print from my Wireless Print Server. Q8. Also make sure that may cause undesired operation. Including interference that the format (HEX or...

Quick Installation Guide
Page 11
... 3135 Kashiwa Street Torrance, CA 90505 USA Copyright ©2005. Go to register your product online. TRENDnet. TRENDnet Technical Support US/Canada Support Center Contact Telephone: 1(866) 845-3673 Email: support@trendnet.com Tech Support Hours 24/7 Toll Free Tech Support European Support Center Contact Telephone: Deutsch : +49 (0) 6331 / 268-460 Français : +49 (0) 6331 / ...6331 / 268-462 English : +49 (0) 6331 / 268-463 Italiano : +49 (0) 6331 / 268-464 Dutch : +49 (0) 6331 / 268-465 Fax: +49 (0) 6331 / 268-466 Tech Support Hours 8:00am - 6:00pm Middle European Time Monday -
... 3135 Kashiwa Street Torrance, CA 90505 USA Copyright ©2005. Go to register your product online. TRENDnet. TRENDnet Technical Support US/Canada Support Center Contact Telephone: 1(866) 845-3673 Email: support@trendnet.com Tech Support Hours 24/7 Toll Free Tech Support European Support Center Contact Telephone: Deutsch : +49 (0) 6331 / 268-460 Français : +49 (0) 6331 / ...6331 / 268-462 English : +49 (0) 6331 / 268-463 Italiano : +49 (0) 6331 / 268-464 Dutch : +49 (0) 6331 / 268-465 Fax: +49 (0) 6331 / 268-466 Tech Support Hours 8:00am - 6:00pm Middle European Time Monday -


