Safety Information
Page 3
...information contained herein at any modification to the model and serial numbers when you call your Sony VAIO computer. Some of such software is prohibited. Sony, VAIO, the VAIO logo, VAIO Digital Studio, VAIO Smart, VisualFlow, Media Bar, MovieShaker, DVgate, PictureGear, and i.LINK are trademarks or ... parties. All rights reserved. Subscriptions to software may require a fee and credit card information. Memory Stick and Corporation. IN NO EVENT SHALL SONY ELECTRONICS INC. SONY ELECTRONICS INC. PROVIDES NO WARRANTY WITH REGARD TO THIS MANUAL, THE SOFTWARE, OR OTHER INFORMATION ...
...information contained herein at any modification to the model and serial numbers when you call your Sony VAIO computer. Some of such software is prohibited. Sony, VAIO, the VAIO logo, VAIO Digital Studio, VAIO Smart, VisualFlow, Media Bar, MovieShaker, DVgate, PictureGear, and i.LINK are trademarks or ... parties. All rights reserved. Subscriptions to software may require a fee and credit card information. Memory Stick and Corporation. IN NO EVENT SHALL SONY ELECTRONICS INC. SONY ELECTRONICS INC. PROVIDES NO WARRANTY WITH REGARD TO THIS MANUAL, THE SOFTWARE, OR OTHER INFORMATION ...

Quick Start Guide
Page 33
...-of files by other applications like PictureGear™, Memory Stick Slideshow and Windows® Explorer. Recording from the NetMD™, FM Tuner, and DVD-RW devices in a visually pleasing, artistic manner. Personalize your VAIO® MX Desktop PC. Features such as newsletters, reports and brochures... Reveal Codes increases the control you have over your computer's Shortcut keys. Sony on Yahoo! It displays any still picture, movie or sound file stored in a Memory Stick media in your own web portal with ease. VAIO Action Setup manages the settings for fine-tuning audio...
...-of files by other applications like PictureGear™, Memory Stick Slideshow and Windows® Explorer. Recording from the NetMD™, FM Tuner, and DVD-RW devices in a visually pleasing, artistic manner. Personalize your VAIO® MX Desktop PC. Features such as newsletters, reports and brochures... Reveal Codes increases the control you have over your computer's Shortcut keys. Sony on Yahoo! It displays any still picture, movie or sound file stored in a Memory Stick media in your own web portal with ease. VAIO Action Setup manages the settings for fine-tuning audio...

Quick Start Guide
Page 41
...appears on the DVD or on your optical drive. Troubleshooting I change the video resolution of my display?" ✍ If your video card utilizes system memory, you are preinstalled on its packaging, you are using the DVD player application, it may be set to 1024 x 768, using 16-bit color...(s)" for details about your screen area to read the disc. Region code indicators such as "1" or "ALL" are installed properly, by changing your computer's video RAM. If necessary, remove the disc and check that it tries to 800 x 600, using 32-bit color (preset factory default). See...
...appears on the DVD or on your optical drive. Troubleshooting I change the video resolution of my display?" ✍ If your video card utilizes system memory, you are preinstalled on its packaging, you are using the DVD player application, it may be set to 1024 x 768, using 16-bit color...(s)" for details about your screen area to read the disc. Region code indicators such as "1" or "ALL" are installed properly, by changing your computer's video RAM. If necessary, remove the disc and check that it tries to 800 x 600, using 32-bit color (preset factory default). See...

Quick Start Guide
Page 47
...I cannot find the Windows® taskbar. Close any applications that the keyboard is placed over its location. 1 Right-click on installing memory, please see the online VAIO User Guide. 45 Left-click and drag away from the shortcut menu. 2 Clear the check box for left , right, top and ... screen. For information on the taskbar and select Properties from the edge of the display screen. Turn off your computer, wait approximately 10 seconds, and then restart your computer. The taskbar appears when the cursor is securely plugged into the Keyboard port. ❑ Save and close all ...
...I cannot find the Windows® taskbar. Close any applications that the keyboard is placed over its location. 1 Right-click on installing memory, please see the online VAIO User Guide. 45 Left-click and drag away from the shortcut menu. 2 Clear the check box for left , right, top and ... screen. For information on the taskbar and select Properties from the edge of the display screen. Turn off your computer, wait approximately 10 seconds, and then restart your computer. The taskbar appears when the cursor is securely plugged into the Keyboard port. ❑ Save and close all ...

Quick Start Guide
Page 48
...6 Select the appropriate printer manufacturer and model 7 Follow the on . 46 Clear the printer memory by turning the printer off for approximately 10 seconds, and then turning it back on -screen... to the manual that came with installation. My connected printer doesn't function after the computer resumes from a power saving mode. If the printer is not included in the box...if you are included with the printer, choose an alternate printer driver that may emulate. VAIO Digital Studio QuickStart How do not function properly without the updated drivers for specific operating systems...
...6 Select the appropriate printer manufacturer and model 7 Follow the on . 46 Clear the printer memory by turning the printer off for approximately 10 seconds, and then turning it back on -screen... to the manual that came with installation. My connected printer doesn't function after the computer resumes from a power saving mode. If the printer is not included in the box...if you are included with the printer, choose an alternate printer driver that may emulate. VAIO Digital Studio QuickStart How do not function properly without the updated drivers for specific operating systems...

System Reference Manual
Page 2
... numbers when you call your Sony VAIO computer. Owner's Record The model number and serial number are subject to current retail versions. Sony Electronics Inc. Memory Stick and Corporation. Refer to the terms and conditions of your Sony Service Center. Software specifications are... described herein is prohibited. Some of their respective owners. Sony, VAIO, the VAIO logo, VAIO Digital Studio, VAIO Smart, VisualFlow, Media Bar, MovieShaker, DVgate, PictureGear, and i.LINK are trademarks or registered trademarks of Sony. Microsoft, Windows, and the Windows logo are trademarks or...
... numbers when you call your Sony VAIO computer. Owner's Record The model number and serial number are subject to current retail versions. Sony Electronics Inc. Memory Stick and Corporation. Refer to the terms and conditions of your Sony Service Center. Software specifications are... described herein is prohibited. Some of their respective owners. Sony, VAIO, the VAIO logo, VAIO Digital Studio, VAIO Smart, VisualFlow, Media Bar, MovieShaker, DVgate, PictureGear, and i.LINK are trademarks or registered trademarks of Sony. Microsoft, Windows, and the Windows logo are trademarks or...

System Reference Manual
Page 10
... disk space 43 Removing the Power Supply 44 Replacing the Power Supply 45 Chapter 4 - System Board 47 Memory Module (DDR-DIMM) Slots 48 Power Supply and Aux Power Headers 49 CLR CMOS Jumper 51 Chapter 5 - x VAIO Digital Studio System Reference Manual Chapter 3 - Removing, Installing, and Replacing Components 23 Removing the Side Cover...
... disk space 43 Removing the Power Supply 44 Replacing the Power Supply 45 Chapter 4 - System Board 47 Memory Module (DDR-DIMM) Slots 48 Power Supply and Aux Power Headers 49 CLR CMOS Jumper 51 Chapter 5 - x VAIO Digital Studio System Reference Manual Chapter 3 - Removing, Installing, and Replacing Components 23 Removing the Side Cover...

System Reference Manual
Page 15
Accommodates Memory Stick® media. * The Specifications sheet is supplied with your computer's original documentation. Drives Floppy disk drive Memory Stick media slot Identifying Components 3 Optical disc drive #1 Optical disc drive #2 Drive Optical disc drive #1 Optical disc drive #2 Floppy disk drive Memory Stick® media slot Description See Specifications sheet for details.* See Specifications sheet for details.* 3.5-inch, 1.44 MB.
Accommodates Memory Stick® media. * The Specifications sheet is supplied with your computer's original documentation. Drives Floppy disk drive Memory Stick media slot Identifying Components 3 Optical disc drive #1 Optical disc drive #2 Drive Optical disc drive #1 Optical disc drive #2 Floppy disk drive Memory Stick® media slot Description See Specifications sheet for details.* See Specifications sheet for details.* 3.5-inch, 1.44 MB.

System Reference Manual
Page 36
24 VAIO Digital Studio System Reference Manual Removing the Side Cover You must remove the side cover to access the system board, add-in cards, power supply, battery, memory, and internal drives. 1 From the rear of the unit, pull the metal tab shown in the next diagram. 2 Pull the top of the cover away from the unit about two inches, then gently lift out the cover.
24 VAIO Digital Studio System Reference Manual Removing the Side Cover You must remove the side cover to access the system board, add-in cards, power supply, battery, memory, and internal drives. 1 From the rear of the unit, pull the metal tab shown in the next diagram. 2 Pull the top of the cover away from the unit about two inches, then gently lift out the cover.

System Reference Manual
Page 42
... when prompted to discard changes, then press Enter to assume that are lost, the BIOS values revert to access the BIOS Setup Utility. 30 VAIO Digital Studio System Reference Manual Replacing the Lithium Battery ! You may explode if mistreated. Refer to this time, and you remove the lithium battery...lost . The lithium battery has a typical life of all the BIOS options to power the CMOS memory. ! When you can hold the charge for a short time while replacing the battery, it off the computer and unplug the power cord. 7 Remove the side cover (see "Removing the Side Cover" ...
... when prompted to discard changes, then press Enter to assume that are lost, the BIOS values revert to access the BIOS Setup Utility. 30 VAIO Digital Studio System Reference Manual Replacing the Lithium Battery ! You may explode if mistreated. Refer to this time, and you remove the lithium battery...lost . The lithium battery has a typical life of all the BIOS options to power the CMOS memory. ! When you can hold the charge for a short time while replacing the battery, it off the computer and unplug the power cord. 7 Remove the side cover (see "Removing the Side Cover" ...

System Reference Manual
Page 45
... sockets filled. ! The computer may need to remove a memory module if you wish to eject the module from its socket. ! Store the module in your body before handling the memory module. 5 Grasp one edge of the memory module to remove. ✍ The memory modules are located beneath the... to discharge static electricity in a static-free bag. Removing, Installing, and Replacing Components 33 Removing a Memory Module You may ship with all attached peripheral devices, shut down the computer, and unplug the power cord. 1 Remove the side cover (see "Removing the Side Cover" on page...
... sockets filled. ! The computer may need to remove a memory module if you wish to eject the module from its socket. ! Store the module in your body before handling the memory module. 5 Grasp one edge of the memory module to remove. ✍ The memory modules are located beneath the... to discharge static electricity in a static-free bag. Removing, Installing, and Replacing Components 33 Removing a Memory Module You may ship with all attached peripheral devices, shut down the computer, and unplug the power cord. 1 Remove the side cover (see "Removing the Side Cover" on page...

System Reference Manual
Page 46
... to discharge static electricity in your body before handling a memory module. 3 Remove the new memory module(s) from its edges to the chassis. 7 Press down the computer, and unplug the power cord. 1 Choose the size of the memory modules. The BIOS automatically detects the type, size and ...speed of the memory module and configuration as shown in size and speed between sockets. 34 VAIO Digital Studio System Reference Manual ...
... to discharge static electricity in your body before handling a memory module. 3 Remove the new memory module(s) from its edges to the chassis. 7 Press down the computer, and unplug the power cord. 1 Choose the size of the memory modules. The BIOS automatically detects the type, size and ...speed of the memory module and configuration as shown in size and speed between sockets. 34 VAIO Digital Studio System Reference Manual ...
System Reference Manual
Page 48
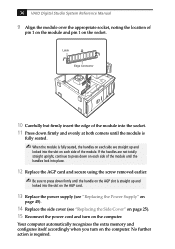
... "Replacing the Side Cover" on page 25). 15 Reconnect the power cord and turn on the computer. Your computer automatically recognizes the extra memory and configures itself accordingly when you turn on the computer. Latch Edge Connector 10 Carefully but firmly insert the edge of the module into the slot on ...the socket. No further action is fully seated, the handles on each side are not totally straight upright, continue to press down on each side of the module. 36 VAIO ...
... "Replacing the Side Cover" on page 25). 15 Reconnect the power cord and turn on the computer. Your computer automatically recognizes the extra memory and configures itself accordingly when you turn on the computer. Latch Edge Connector 10 Carefully but firmly insert the edge of the module into the slot on ...the socket. No further action is fully seated, the handles on each side are not totally straight upright, continue to press down on each side of the module. 36 VAIO ...

System Reference Manual
Page 56
... down the computer, and unplug the power cord. 1 Remove the screw that secures the power supply to the rear of the chassis where the hard drive is located. 44 VAIO Digital Studio System Reference Manual Removing the Power Supply You remove the power supply when you insert a memory module (see... "Installing System Memory" on top of the chassis. 2 Pull the tab (A) that latches the power...
... down the computer, and unplug the power cord. 1 Remove the screw that secures the power supply to the rear of the chassis where the hard drive is located. 44 VAIO Digital Studio System Reference Manual Removing the Power Supply You remove the power supply when you insert a memory module (see... "Installing System Memory" on top of the chassis. 2 Pull the tab (A) that latches the power...

System Reference Manual
Page 59
Chapter 4 System Board This chapter identifies and describes components on the system configuration you purchased. 47 Keyboard, Mouse CPU Fan Memory Stick Connector Processor Memory USB3, USB4, Ethernet Printer, i.LINK 1394 Header 2 Serial Port, Mic In, Line In, Line Out 1394 Header 3 Video (not used) Aux-in Power Supply Fan ...
Chapter 4 System Board This chapter identifies and describes components on the system configuration you purchased. 47 Keyboard, Mouse CPU Fan Memory Stick Connector Processor Memory USB3, USB4, Ethernet Printer, i.LINK 1394 Header 2 Serial Port, Mic In, Line In, Line Out 1394 Header 3 Video (not used) Aux-in Power Supply Fan ...

System Reference Manual
Page 60
Be sure to the left of each Double-data rate, Dual Inline Memory Module (DDR-DIMM) look very similar. Memory module (DDR-DIMM) 1 Indicates pin 1 DDR-DIMM1 DDR-DIMM2 48 VAIO Digital Studio System Reference Manual Memory Module (DDR-DIMM) Slots Both sides of pin 1. The side with pin 1 has a small "1" to orient the memory module correctly in the DDR-DIMM slot (a small triangle on the slot indicates pin 1).
Be sure to the left of each Double-data rate, Dual Inline Memory Module (DDR-DIMM) look very similar. Memory module (DDR-DIMM) 1 Indicates pin 1 DDR-DIMM1 DDR-DIMM2 48 VAIO Digital Studio System Reference Manual Memory Module (DDR-DIMM) Slots Both sides of pin 1. The side with pin 1 has a small "1" to orient the memory module correctly in the DDR-DIMM slot (a small triangle on the slot indicates pin 1).

System Reference Manual
Page 67
CMOS Setup Options 55 Main Screen System Time [00:00:00] System Date [01/01/2001] Primary Master (see "IDE Sub-Menus" on page 56) Primary Slave (see "IDE Sub-Menus" on page 56) Secondary Master (see "IDE Sub-Menus" on page 56) Secondary Slave (see "IDE Sub-Menus" on page 56) Supervisor Password [Disabled] User Password [Disabled] Installed Memory See Specifications sheet for details.* BIOS Revision/Version 1003 (depends on model) * The Specifications sheet is supplied with your computer's original documentation.
CMOS Setup Options 55 Main Screen System Time [00:00:00] System Date [01/01/2001] Primary Master (see "IDE Sub-Menus" on page 56) Primary Slave (see "IDE Sub-Menus" on page 56) Secondary Master (see "IDE Sub-Menus" on page 56) Secondary Slave (see "IDE Sub-Menus" on page 56) Supervisor Password [Disabled] User Password [Disabled] Installed Memory See Specifications sheet for details.* BIOS Revision/Version 1003 (depends on model) * The Specifications sheet is supplied with your computer's original documentation.

System Reference Manual
Page 75
Chapter 6 Miscellaneous Technical Information This chapter contains information on the following subjects: ❑ User and Supervisor password ❑ Beep code error messages ❑ PCI configuration status and error messages ❑ DMA channel assignments ❑ System I/O address map ❑ Memory map ❑ IRQ settings ✍ Models equipped with Giga Pocket may require increased resources due to additional hardware. 63
Chapter 6 Miscellaneous Technical Information This chapter contains information on the following subjects: ❑ User and Supervisor password ❑ Beep code error messages ❑ PCI configuration status and error messages ❑ DMA channel assignments ❑ System I/O address map ❑ Memory map ❑ IRQ settings ✍ Models equipped with Giga Pocket may require increased resources due to additional hardware. 63

System Reference Manual
Page 78
66 VAIO Digital Studio System Reference Manual PCI Configuration Status and Error Messages The following is a list of status and error messages that is already in use. ... NVRAM Cleared By Jumper NVRAM Data Invalid, NVRAM Cleared Parallel Port Resource Conflict PCI Error Log is Full PCI I/O Port Conflict PCI IRQ Conflict PCI Memory Conflict Primary Boot Device Not Found Primary IDE Controller Resource Conflict Primary Input Device Not Found Primary Output Device Not Found Secondary IDE Controller Resource...
66 VAIO Digital Studio System Reference Manual PCI Configuration Status and Error Messages The following is a list of status and error messages that is already in use. ... NVRAM Cleared By Jumper NVRAM Data Invalid, NVRAM Cleared Parallel Port Resource Conflict PCI Error Log is Full PCI I/O Port Conflict PCI IRQ Conflict PCI Memory Conflict Primary Boot Device Not Found Primary IDE Controller Resource Conflict Primary Input Device Not Found Primary Output Device Not Found Secondary IDE Controller Resource...

System Reference Manual
Page 80
The Windows® operating system reassigns resources to best meet the needs of a particular configuration. 68 VAIO Digital Studio System Reference Manual DMA Channel Assignments This shows the factory default values. DMA Channel Channel 4 Channel 2 Default Assignment Direct memory access controller Standard floppy disk controller
The Windows® operating system reassigns resources to best meet the needs of a particular configuration. 68 VAIO Digital Studio System Reference Manual DMA Channel Assignments This shows the factory default values. DMA Channel Channel 4 Channel 2 Default Assignment Direct memory access controller Standard floppy disk controller


