Operating Instructions
Page 3
... sure the service technician has used replacement parts specified by a qualified technician to restore the set . - Lightning For added protection for cleaning the exterior of the set from the wall outlet and refer servicing to qualified service personnel under the following the operating instructions. this set near water - Installation Water and Moisture Do not use liquid cleaners or aerosol cleaners. Power-Cord Protection Route the power cord so...
... sure the service technician has used replacement parts specified by a qualified technician to restore the set . - Lightning For added protection for cleaning the exterior of the set from the wall outlet and refer servicing to qualified service personnel under the following the operating instructions. this set near water - Installation Water and Moisture Do not use liquid cleaners or aerosol cleaners. Power-Cord Protection Route the power cord so...
Operating Instructions
Page 4
... with Part 15 of Conformity Trade Name: SONY Model No.: HDR-SR10 Responsible Party: Sony Electronics Inc. You can radiate radio frequency energy and, if not installed and used with the Handycam Station Model DCRA-C220 and AC Adaptor Model AC-L200/L200B. Operation is subject to the following measures: - For customers in the U.S.A. Model No. Refer to these numbers whenever you call toll free...
... with Part 15 of Conformity Trade Name: SONY Model No.: HDR-SR10 Responsible Party: Sony Electronics Inc. You can radiate radio frequency energy and, if not installed and used with the Handycam Station Model DCRA-C220 and AC Adaptor Model AC-L200/L200B. Operation is subject to the following measures: - For customers in the U.S.A. Model No. Refer to these numbers whenever you call toll free...
Operating Instructions
Page 5
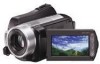
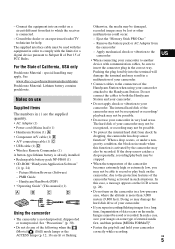
... the hard disk drive of FCC Rules. Handycam Handbook (PDF) • "Operating Guide" (This manual) (1) A B C D Using the camcorder • The camcorder is connected. - Eject the "Memory Stick PRO Duo" - - Connect the equipment into the terminal will damage the terminal and may not be saved or recorded. Consult the dealer or an experienced radio/TV technician for a digital device pursuant to record or play back on a circuit different from the camcorder - Notes on the media. PMB Guide - Apply...
... the hard disk drive of FCC Rules. Handycam Handbook (PDF) • "Operating Guide" (This manual) (1) A B C D Using the camcorder • The camcorder is connected. - Eject the "Memory Stick PRO Duo" - - Connect the equipment into the terminal will damage the terminal and may not be saved or recorded. Consult the dealer or an experienced radio/TV technician for a digital device pursuant to record or play back on a circuit different from the camcorder - Notes on the media. PMB Guide - Apply...
Operating Instructions
Page 6
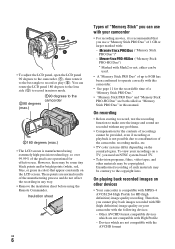
... (white, red, blue, or green in this manual. To view your recordings on a TV, you cannot play back images recorded with HD (high definition) image quality on your camcorder • For recording movies, it to the best angle to record or play (2). Therefore, you need an NTSC system-based TV. • Television programs, films, video tapes, and other devices • Your camcorder is compatible with the following devices; - • To adjust the LCD panel, open...
... (white, red, blue, or green in this manual. To view your recordings on a TV, you cannot play back images recorded with HD (high definition) image quality on your camcorder • For recording movies, it to the best angle to record or play (2). Therefore, you need an NTSC system-based TV. • Television programs, films, video tapes, and other devices • Your camcorder is compatible with the following devices; - • To adjust the LCD panel, open...
Operating Instructions
Page 7
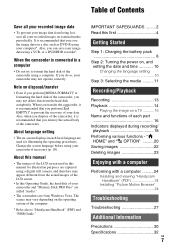
... as DVD-R using your computer*. " HOME" and " OPTION" ..........20 Saving images 22 Deleting images 23 Enjoying with a computer Performing with a computer ..........24 Installing and viewing "Handycam Handbook" (PDF 24 Installing "Picture Motion Browser 24 Troubleshooting Troubleshooting 27 Additional Information Precautions 30 Specifications 32 US 7 If you do so, your camcorder may appear different from the actual images of the LCD screen. • In this Operating Guide, the hard disk of your camcorder and "Memory Stick PRO Duo" are called "media...
... as DVD-R using your computer*. " HOME" and " OPTION" ..........20 Saving images 22 Deleting images 23 Enjoying with a computer Performing with a computer ..........24 Installing and viewing "Handycam Handbook" (PDF 24 Installing "Picture Motion Browser 24 Troubleshooting Troubleshooting 27 Additional Information Precautions 30 Specifications 32 US 7 If you do so, your camcorder may appear different from the actual images of the LCD screen. • In this Operating Guide, the hard disk of your camcorder and "Memory Stick PRO Duo" are called "media...
Operating Instructions
Page 8
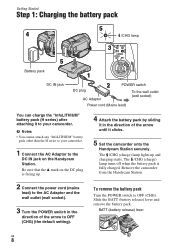
... camcorder. 1 Connect the AC Adaptor to your camcorder. To remove the battery pack Turn the POWER switch to OFF (CHG) (the default setting). BATT (battery release) lever US 8 The /CHG (charge) lamp turns off when the battery pack is facing up and charging starts. Remove the camcorder from the Handycam Station. 2 Connect the power cord (mains lead) to the AC Adaptor and the wall outlet (wall socket). 3 Turn the POWER switch in the direction...
... camcorder. 1 Connect the AC Adaptor to your camcorder. To remove the battery pack Turn the POWER switch to OFF (CHG) (the default setting). BATT (battery release) lever US 8 The /CHG (charge) lamp turns off when the battery pack is facing up and charging starts. Remove the camcorder from the Handycam Station. 2 Connect the power cord (mains lead) to the AC Adaptor and the wall outlet (wall socket). 3 Turn the POWER switch in the direction...
Operating Instructions
Page 9
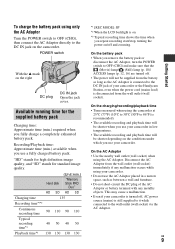
... image quality. Hard disk HD SD (Unit:min.) "Memory Stick PRO Duo" HD SD Charging time 135 Recording time*1*2 Continuous recording time 90 110 90 110 Typical recording time*3 Playback time*2 40 50 40 50 130 130 130 130 *1 [REC MODE]: SP *2 When the LCD backlight is still supplied to it while connected to the DC IN jack of the AC Adaptor or battery terminal with any malfunction occurs while using your camcorder...
... image quality. Hard disk HD SD (Unit:min.) "Memory Stick PRO Duo" HD SD Charging time 135 Recording time*1*2 Continuous recording time 90 110 90 110 Typical recording time*3 Playback time*2 40 50 40 50 130 130 130 130 *1 [REC MODE]: SP *2 When the LCD backlight is still supplied to it while connected to the DC IN jack of the AC Adaptor or battery terminal with any malfunction occurs while using your camcorder...
Operating Instructions
Page 11
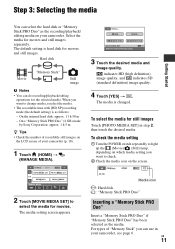
... change media, reselect the media. • The recordable time with [HD SP] recording mode (the default setting) is as the media. To check the media setting 1 Turn the POWER switch repeatedly to light up the (Movie)/ (Still) lamp, depending on which media setting you can use in step 2, then touch the desired media. The default setting is changed. The media is hard disk for movies. The media setting screen appears. Hard disk Movie "Memory Stick" Still image b Notes • You can do recording/playback/editing operations for still images Touch [PHOTO MEDIA SET...
... change media, reselect the media. • The recordable time with [HD SP] recording mode (the default setting) is as the media. To check the media setting 1 Turn the POWER switch repeatedly to light up the (Movie)/ (Still) lamp, depending on which media setting you can use in step 2, then touch the desired media. The default setting is changed. The media is hard disk for movies. The media setting screen appears. Hard disk Movie "Memory Stick" Still image b Notes • You can do recording/playback/editing operations for still images Touch [PHOTO MEDIA SET...

Operating Instructions
Page 13
... movie file is in the media setting (p. 11). appears beside or . To stop recording, press START/STOP D (or A) again. When disappears, the image has been recorded. US 13 Movies Still Images Press START/STOP D (or A). Press the green button only when the POWER switch C is created automatically. In the default setting, both movies and still images are recorded on the hard disk. POWER switch C : To record movies : To record still images START/STOP D Recording/Playback [STBY] t [REC] (HOME) B (p. 20) PHOTO E START/STOP A Flashing t Lights up 1 Turn...
... movie file is in the media setting (p. 11). appears beside or . To stop recording, press START/STOP D (or A) again. When disappears, the image has been recorded. US 13 Movies Still Images Press START/STOP D (or A). Press the green button only when the POWER switch C is created automatically. In the default setting, both movies and still images are recorded on the hard disk. POWER switch C : To record movies : To record still images START/STOP D Recording/Playback [STBY] t [REC] (HOME) B (p. 20) PHOTO E START/STOP A Flashing t Lights up 1 Turn...
Operating Instructions
Page 15
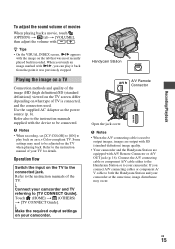
... tab that was previously stopped. Use the supplied AC Adaptor as the power source (p. 8). Touch (HOME) t (OTHERS) t [TV CONNECT Guide]. r Make the required output settings on the TV when playing back. Handycam Station A/V Remote Connector Open the jack cover. Refer also to [TV CONNECT Guide]. Some settings may occur. Connect the A/V connecting cable or component A/V cable either to the Handycam Station or to the instruction manual of your camcorder. US 15 Refer...
... tab that was previously stopped. Use the supplied AC Adaptor as the power source (p. 8). Touch (HOME) t (OTHERS) t [TV CONNECT Guide]. r Make the required output settings on the TV when playing back. Handycam Station A/V Remote Connector Open the jack cover. Refer also to [TV CONNECT Guide]. Some settings may occur. Connect the A/V connecting cable or component A/V cable either to the Handycam Station or to the instruction manual of your camcorder. US 15 Refer...
Operating Instructions
Page 16
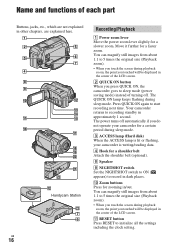
... LCD screen. Press QUICK ON again to recording standby in approximately 1 second. Your camcorder returns to start recording next time. The power turns off . You can magnify still images from about 1.1 to 5 times the original size (Playback zoom). • When you touch the screen during playback zoom, the point you touched will be displayed in the center of the LCD screen. 2 QUICK ON button When you press QUICK ON, the camcorder goes to sleep mode (power saving mode...
... LCD screen. Press QUICK ON again to recording standby in approximately 1 second. Your camcorder returns to start recording next time. The power turns off . You can magnify still images from about 1.1 to 5 times the original size (Playback zoom). • When you touch the screen during playback zoom, the point you touched will be displayed in the center of the LCD screen. 2 QUICK ON button When you press QUICK ON, the camcorder goes to sleep mode (power saving mode...
Operating Instructions
Page 17
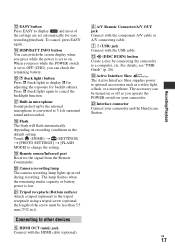
... recording/playback. w; For details, see "PMB Guide" (p. 26). The lamp flashes when the remaining media capacity or battery power is set to 5.1ch surround sound and recorded. qs (DISC BURN) button Create a disc by the internal microphone is set to on your camcorder and the Handycam Station. ws Interface connector Connect your camcorder. qf DISP/BATT INFO button You can switch the screen display when you press while the power is low. Camera recording lamp The camera recording lamp lights...
... recording/playback. w; For details, see "PMB Guide" (p. 26). The lamp flashes when the remaining media capacity or battery power is set to 5.1ch surround sound and recorded. qs (DISC BURN) button Create a disc by the internal microphone is set to on your camcorder and the Handycam Station. ws Interface connector Connect your camcorder. qf DISP/BATT INFO button You can switch the screen display when you press while the power is low. Camera recording lamp The camera recording lamp lights...
Operating Instructions
Page 19
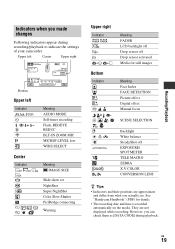
...; The recording date and time is recorded automatically on the media. See "Handycam Handbook" (PDF) for still images Meaning Face Index FACE DETECTION Picture effect Digital effect Manual focus SCENE SELECTION Backlight White balance SteadyShot off EXPOSURE/ SPOT METER TELE MACRO ZEBRA X.V.COLOR CONVERSION LENS z Tips • Indicators and their positions are not displayed while recording. However, you can check them as [DATA CODE] during recording/playback to indicate the settings of your camcorder. Recording/Playback Indicators when...
...; The recording date and time is recorded automatically on the media. See "Handycam Handbook" (PDF) for still images Meaning Face Index FACE DETECTION Picture effect Digital effect Manual focus SCENE SELECTION Backlight White balance SteadyShot off EXPOSURE/ SPOT METER TELE MACRO ZEBRA X.V.COLOR CONVERSION LENS z Tips • Indicators and their positions are not displayed while recording. However, you can check them as [DATA CODE] during recording/playback to indicate the settings of your camcorder. Recording/Playback Indicators when...
Operating Instructions
Page 21
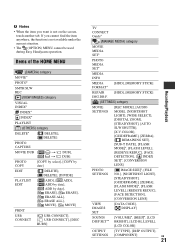
... [ MOVE] PRINT USB CONNECT [ USB CONNECT], [ USB CONNECT], [DISC BURN] TV CONNECT Guide* (MANAGE MEDIA) category MOVIE MEDIA SET* PHOTO MEDIA SET* MEDIA INFO MEDIA [HDD], [MEMORY STICK] FORMAT* REPAIR [HDD], [MEMORY STICK] IMG.DB F. (SETTINGS) category MOVIE SETTINGS [REC MODE], [AUDIO MODE], [NIGHTSHOT LIGHT], [WIDE SELECT], [DIGITAL ZOOM], [STEADYSHOT], [AUTO SLW SHUTTR], [X.V.COLOR], [GUIDEFRAME], [ZEBRA], [ REMAINING SET], [SUB-T DATE], [FLASH MODE]*, [FLASH LEVEL], [REDEYE REDUC], [FACE DETECTION], [ INDEX SET]*, [CONVERSION LENS] PHOTO SETTINGS [ IMAGE SIZE]*, [FILE NO...
... [ MOVE] PRINT USB CONNECT [ USB CONNECT], [ USB CONNECT], [DISC BURN] TV CONNECT Guide* (MANAGE MEDIA) category MOVIE MEDIA SET* PHOTO MEDIA SET* MEDIA INFO MEDIA [HDD], [MEMORY STICK] FORMAT* REPAIR [HDD], [MEMORY STICK] IMG.DB F. (SETTINGS) category MOVIE SETTINGS [REC MODE], [AUDIO MODE], [NIGHTSHOT LIGHT], [WIDE SELECT], [DIGITAL ZOOM], [STEADYSHOT], [AUTO SLW SHUTTR], [X.V.COLOR], [GUIDEFRAME], [ZEBRA], [ REMAINING SET], [SUB-T DATE], [FLASH MODE]*, [FLASH LEVEL], [REDEYE REDUC], [FACE DETECTION], [ INDEX SET]*, [CONVERSION LENS] PHOTO SETTINGS [ IMAGE SIZE]*, [FILE NO...
Operating Instructions
Page 22
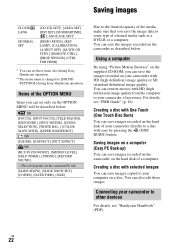
... images You can save the images recorded on your camcorder to some type of the media, make sure that you save images copied to a disc with One Touch (One Touch Disc Burn) You can save the image data to other devices For details, see "PMB Guide" (p. 26). Creating a disc with ease by pressing the (DISC BURN) button. Saving images CLOCK/ LANG GENERAL SET [CLOCK SET]*, [AREA SET], [DST SET], [SUMMERTIME], [ LANGUAGE SET]* [DEMO MODE], [REC LAMP], [CALIBRATION], [A.SHUT OFF], [QUICK ON STBY], [REMOTE...
... images You can save the images recorded on your camcorder to some type of the media, make sure that you save images copied to a disc with One Touch (One Touch Disc Burn) You can save the image data to other devices For details, see "PMB Guide" (p. 26). Creating a disc with ease by pressing the (DISC BURN) button. Saving images CLOCK/ LANG GENERAL SET [CLOCK SET]*, [AREA SET], [DST SET], [SUMMERTIME], [ LANGUAGE SET]* [DEMO MODE], [REC LAMP], [CALIBRATION], [A.SHUT OFF], [QUICK ON STBY], [REMOTE...
Operating Instructions
Page 24
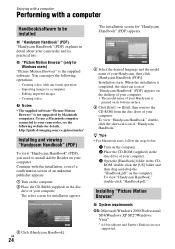
... a computer Handbook/software to be installed x "Handycam Handbook" (PDF) "Handycam Handbook" (PDF) explains in the CD- Editing imported images - http://guide.d-imaging.sony.co.jp/mac/ms/us/ Installing and viewing "Handycam Handbook" (PDF) To view "Handycam Handbook" (PDF), you need to install Adobe Reader on the computer. z Tips • For Macintosh users, follow the steps below. 1 Turn on the computer. 2 Place the CD-ROM (supplied) in the disc drive of your computer. 3 Open the [Handbook] folder in detail about your camcorder and its...
... a computer Handbook/software to be installed x "Handycam Handbook" (PDF) "Handycam Handbook" (PDF) explains in the CD- Editing imported images - http://guide.d-imaging.sony.co.jp/mac/ms/us/ Installing and viewing "Handycam Handbook" (PDF) To view "Handycam Handbook" (PDF), you need to install Adobe Reader on the computer. z Tips • For Macintosh users, follow the steps below. 1 Turn on the computer. 2 Place the CD-ROM (supplied) in the disc drive of your computer. 3 Open the [Handbook] folder in detail about your camcorder and its...
Operating Instructions
Page 27
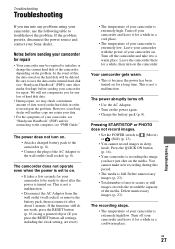
... camcorder does not operate even when the power is set to (Movie) or (Still) (p. 13). • You cannot record images in a cool/warm place. Turn off your camcorder to be required to initialize or change the current hard disk of the camcorder, depending on for connecting to troubleshoot the problem. If the functions still do not work, press the RESET button (p. 16) using your camcorder, use the following table to the computer, see "Handycam Handbook" (PDF...
... camcorder does not operate even when the power is set to (Movie) or (Still) (p. 13). • You cannot record images in a cool/warm place. Turn off your camcorder to be required to initialize or change the current hard disk of the camcorder, depending on for connecting to troubleshoot the problem. If the functions still do not work, press the RESET button (p. 16) using your camcorder, use the following table to the computer, see "Handycam Handbook" (PDF...
Operating Instructions
Page 28
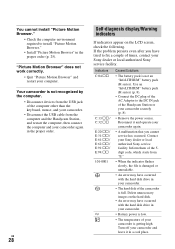
...). Use an "InfoLITHIUM" battery pack (H series) (p. 8). • Connect the DC plug of the AC Adaptor to the DC IN jack of times, contact your Sony dealer or local authorized Sony service facility. Reconnect it in the proper order (p. 25). US 28 Self-diagnosis display/Warning indicators If indicators appear on the hard disk. • An error may have tried to install "Picture Motion Browser." • Install "Picture Motion...
...). Use an "InfoLITHIUM" battery pack (H series) (p. 8). • Connect the DC plug of the AC Adaptor to the DC IN jack of times, contact your Sony dealer or local authorized Sony service facility. Reconnect it in the proper order (p. 25). US 28 Self-diagnosis display/Warning indicators If indicators appear on the hard disk. • An error may have tried to install "Picture Motion Browser." • Install "Picture Motion...
Operating Instructions
Page 30
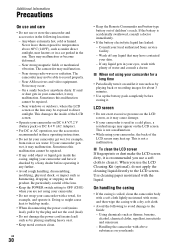
... mechanical vibration. The camcorder may be able to direct sunlight. Near AM receivers and video equipment. Noise may malfunction or become deformed. - Near windows or outdoors, where the LCD screen or the lens may not be exposed to record properly. - US 30 • Keep the Remote Commander and button-type battery out of the lens. • Keep the POWER switch setting to the LCD screen. Wash off any...
... mechanical vibration. The camcorder may be able to direct sunlight. Near AM receivers and video equipment. Noise may malfunction or become deformed. - Near windows or outdoors, where the LCD screen or the lens may not be exposed to record properly. - US 30 • Keep the Remote Commander and button-type battery out of the lens. • Keep the POWER switch setting to the LCD screen. Wash off any...
Operating Instructions
Page 32
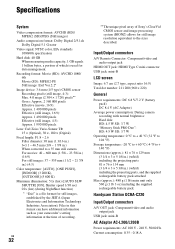
... Hz Current consumption: 0.35 - 0.18 A Input/Output connectors A/V Remote Connector: Component/video and audio output jack HDMI OUT jack: HDMI Type C mini connector USB jack: mini-B LCD screen Image: 6.7 cm (2.7 type, aspect ratio 16:9) Total dot number: 211 200 (960 × 220) General Power requirements: DC 6.8 V/7.2 V (battery pack) DC 8.4 V (AC Adaptor) Average power consumption: During camera recording with normal brightness: Hard disk: HD: 4.5 W SD: 3.7 W "Memory Stick PRO Duo": HD: 4.5 W SD: 3.7 W Operating temperature: 0 °C to + 40 °...
... Hz Current consumption: 0.35 - 0.18 A Input/Output connectors A/V Remote Connector: Component/video and audio output jack HDMI OUT jack: HDMI Type C mini connector USB jack: mini-B LCD screen Image: 6.7 cm (2.7 type, aspect ratio 16:9) Total dot number: 211 200 (960 × 220) General Power requirements: DC 6.8 V/7.2 V (battery pack) DC 8.4 V (AC Adaptor) Average power consumption: During camera recording with normal brightness: Hard disk: HD: 4.5 W SD: 3.7 W "Memory Stick PRO Duo": HD: 4.5 W SD: 3.7 W Operating temperature: 0 °C to + 40 °...


