Operating Instructions
Page 5
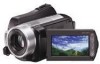
... (1) • CD-ROM "Handycam Application Software" (1) (p. 24) - Images cannot be lost or other malfunctions could occur. - Otherwise, the media may be damaged, recorded images may result in such situations. Do not connect the cables to both the Handycam Station and your camcorder. • Do not apply ...shock or vibration to the Handycam Station. PMB Guide - See "Precautions" (p. 30). •...
... (1) • CD-ROM "Handycam Application Software" (1) (p. 24) - Images cannot be lost or other malfunctions could occur. - Otherwise, the media may be damaged, recorded images may result in such situations. Do not connect the cables to both the Handycam Station and your camcorder. • Do not apply ...shock or vibration to the Handycam Station. PMB Guide - See "Precautions" (p. 30). •...
Operating Instructions
Page 6
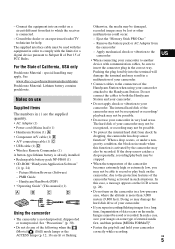
... copyrighted. PRO Duo")* ("Memory Stick - Therefore, you use with your camcorder • For recording movies, it to the best angle to record or play back images recorded with HD (high definition) image quality on the country/region. Devices which are both called as "Memory ...Unauthorized recording of recordings cannot be contrary to make sure the image and sound are recorded without any way. • Remove the insulation sheet before using extremely high-precision technology, so over 99.99% of the camcorder, recording media, etc. • TV color systems differ...
... copyrighted. PRO Duo")* ("Memory Stick - Therefore, you use with your camcorder • For recording movies, it to the best angle to record or play back images recorded with HD (high definition) image quality on the country/region. Devices which are both called as "Memory ...Unauthorized recording of recordings cannot be contrary to make sure the image and sound are recorded without any way. • Remove the insulation sheet before using extremely high-precision technology, so over 99.99% of the camcorder, recording media, etc. • TV color systems differ...
Operating Instructions
Page 7
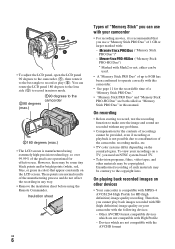
... media ..........11 Recording/Playback Recording 13 Playback 14 Playing the image on a disc such as DVD-R using a computer. Also, you perform [ EMPTY]* to prevent the recovery of the camcorder, you save all your camcorder if necessary (p. 10). Table of the computer. * Refer also to "Handycam Handbook" (PDF) and "PMB Guide." It is connected to...
... media ..........11 Recording/Playback Recording 13 Playback 14 Playing the image on a disc such as DVD-R using a computer. Also, you perform [ EMPTY]* to prevent the recovery of the camcorder, you save all your camcorder if necessary (p. 10). Table of the computer. * Refer also to "Handycam Handbook" (PDF) and "PMB Guide." It is connected to...
Operating Instructions
Page 9
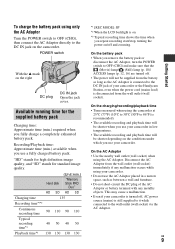
... be supplied from the battery as long as between a wall and furniture. • Do not short-circuit the DC plug of your camcorder or the Handycam Station, even when the power cord (mains lead) is disconnected from the wall outlet (wall socket) immediately if any malfunction occurs while ... from the wall outlet (wall socket). POWER switch With the v mark on /off , AC power source (mains) is on the camcorder. "HD" stands for high definition image quality, and "SD" stands for the supplied battery pack Charging time: Approximate time (min.) required when you repeat recording start/stop,...
... be supplied from the battery as long as between a wall and furniture. • Do not short-circuit the DC plug of your camcorder or the Handycam Station, even when the power cord (mains lead) is disconnected from the wall outlet (wall socket) immediately if any malfunction occurs while ... from the wall outlet (wall socket). POWER switch With the v mark on /off , AC power source (mains) is on the camcorder. "HD" stands for high definition image quality, and "SD" stands for the supplied battery pack Charging time: Approximate time (min.) required when you repeat recording start/stop,...
Operating Instructions
Page 10
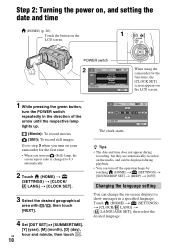
...messages in the direction of the arrow until the respective lamp lights up. (Movie): To record movies (Still): To record still images Go to step 3 when you turn on your camcorder for the first time, the [CLOCK SET] screen appears on the LCD screen. 1 While pressing the green button, turn ... language. POWER switch 60min STBY AREA SET Chicago Mexico City New York Bogota Santiago JAN 1 2008 CLOCK SET 12:00:00AM NEXT When using the camcorder for the first time. • When you turn off the operation beeps by touching (HOME) t (SETTINGS) t [SOUND/DISP SET] t [BEEP] t [OFF]. Step 2: ...
...messages in the direction of the arrow until the respective lamp lights up. (Movie): To record movies (Still): To record still images Go to step 3 when you turn on your camcorder for the first time, the [CLOCK SET] screen appears on the LCD screen. 1 While pressing the green button, turn ... language. POWER switch 60min STBY AREA SET Chicago Mexico City New York Bogota Santiago JAN 1 2008 CLOCK SET 12:00:00AM NEXT When using the camcorder for the first time. • When you turn off the operation beeps by touching (HOME) t (SETTINGS) t [SOUND/DISP SET] t [BEEP] t [OFF]. Step 2: ...
Operating Instructions
Page 11
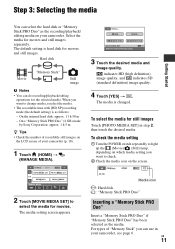
.../playback/editing operations for the selected media. On a "Memory Stick PRO Duo" (4 GB) made by Sony Corporation: approx. 1 h 5 m z Tips • Check the number of recordable still images on the LCD screen of "Memory Stick" you want to select the media for movies and still...; The recordable time with [HD SP] recording mode (the default setting) is as the media. For types of your camcorder. indicates HD (high definition) image quality, and indicates SD (standard definition) image quality. 4 Touch [YES] t . The media is hard disk for movies. Select the media for still...
.../playback/editing operations for the selected media. On a "Memory Stick PRO Duo" (4 GB) made by Sony Corporation: approx. 1 h 5 m z Tips • Check the number of recordable still images on the LCD screen of "Memory Stick" you want to select the media for movies and still...; The recordable time with [HD SP] recording mode (the default setting) is as the media. For types of your camcorder. indicates HD (high definition) image quality, and indicates SD (standard definition) image quality. 4 Touch [YES] t . The media is hard disk for movies. Select the media for still...
Operating Instructions
Page 12
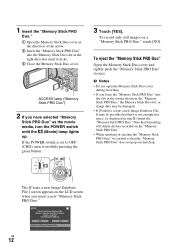
... may be careful so that there is not enough free space.] is set to create a new Image Database File. To record only still images on while pressing the green button. 3 Touch [YES]. b Notes • Do not open the Memory Stick Duo cover during recording. • If you force the "..." does not pop out and drop. ACCESS lamp ("Memory Stick PRO Duo") 2 If you insert a new "Memory Stick PRO Duo." US 12 The [Create a new Image Database File.] screen appears on the LCD screen when you have selected "Memory Stick PRO Duo" as the movie media, turn it clicks. 3 Close the...
... may be careful so that there is not enough free space.] is set to create a new Image Database File. To record only still images on while pressing the green button. 3 Touch [YES]. b Notes • Do not open the Memory Stick Duo cover during recording. • If you force the "..." does not pop out and drop. ACCESS lamp ("Memory Stick PRO Duo") 2 If you insert a new "Memory Stick PRO Duo." US 12 The [Create a new Image Database File.] screen appears on the LCD screen when you have selected "Memory Stick PRO Duo" as the movie media, turn it clicks. 3 Close the...

Operating Instructions
Page 13
... recorded on the media selected in the OFF (CHG) position. 2 Start recording. POWER switch C : To record movies : To record still images START/STOP D Recording/Playback [STBY] t [REC] (HOME) B (p. 20) PHOTO E START/STOP A Flashing t Lights up 1 Turn the POWER switch C ...You can check the recordable time and the remaining capacity by pressing (HOME) B t (MANAGE MEDIA) t [MEDIA INFO]. • You can capture still images by pressing PHOTO E during movie recording. • The maximum continuous recordable time of movies is approximately 13 hours. • When a movie file exceeds 2...
... recorded on the media selected in the OFF (CHG) position. 2 Start recording. POWER switch C : To record movies : To record still images START/STOP D Recording/Playback [STBY] t [REC] (HOME) B (p. 20) PHOTO E START/STOP A Flashing t Lights up 1 Turn the POWER switch C ...You can check the recordable time and the remaining capacity by pressing (HOME) B t (MANAGE MEDIA) t [MEDIA INFO]. • You can capture still images by pressing PHOTO E during movie recording. • The maximum continuous recordable time of movies is approximately 13 hours. • When a movie file exceeds 2...
Operating Instructions
Page 14
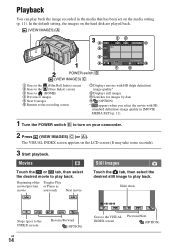
... Roll Index) screen 2 Goes to the (Face Index) screen 3 Goes to (HOME) 4 Previous 6 images 5 Next 6 images 6 Returns to turn on the LCD screen (It may take some seconds). 3 Start playback. The VISUAL INDEX screen appears on your camcorder. 2 Press (VIEW IMAGES) C (or A). Slide show Stops (goes to the INDEX screen) US 14 Reverse/Forward...
... Roll Index) screen 2 Goes to the (Face Index) screen 3 Goes to (HOME) 4 Previous 6 images 5 Next 6 images 6 Returns to turn on the LCD screen (It may take some seconds). 3 Start playback. The VISUAL INDEX screen appears on your camcorder. 2 Press (VIEW IMAGES) C (or A). Slide show Stops (goes to the INDEX screen) US 14 Reverse/Forward...
Operating Instructions
Page 15
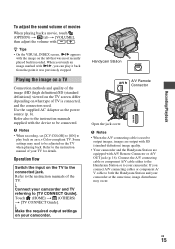
...as the power source (p. 8). Refer also to the instruction manuals supplied with the device to output images, images are output with SD (standard definition) image quality. • Your camcorder and the Handycam Station are equipped with i/B, you can play back on an x.v.Color-compliant TV. b Notes &#... TV is used . z Tips • On the VISUAL INDEX screen, i/B appears with / . Refer to both the Handycam Station and your camcorder. If you touch an image marked with A/V Remote Connector or A/V OUT jack (p. 16). Connect the A/V connecting cable or component A/V cable either to ...
...as the power source (p. 8). Refer also to the instruction manuals supplied with the device to output images, images are output with SD (standard definition) image quality. • Your camcorder and the Handycam Station are equipped with i/B, you can play back on an x.v.Color-compliant TV. b Notes &#... TV is used . z Tips • On the VISUAL INDEX screen, i/B appears with / . Refer to both the Handycam Station and your camcorder. If you touch an image marked with A/V Remote Connector or A/V OUT jack (p. 16). Connect the A/V connecting cable or component A/V cable either to ...
Operating Instructions
Page 16
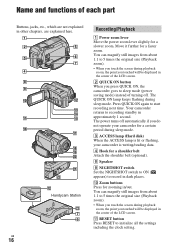
...zoom. Press QUICK ON again to initialize all the settings including the clock setting. Name and functions of the LCD screen. You can magnify still images from about 1.1 to 5 times the original size (Playback zoom). • When you touch the screen during playback zoom, the point you ... touched will be displayed in the center of the LCD screen. 2 QUICK ON button When you press QUICK ON, the camcorder goes to recording standby in approximately 1 second. wa ws qs Handycam Station ws 7 6 Recording/Playback 1 Power zoom lever Move the power zoom lever slightly for a faster zoom.
...zoom. Press QUICK ON again to initialize all the settings including the clock setting. Name and functions of the LCD screen. You can magnify still images from about 1.1 to 5 times the original size (Playback zoom). • When you touch the screen during playback zoom, the point you ... touched will be displayed in the center of the LCD screen. 2 QUICK ON button When you press QUICK ON, the camcorder goes to recording standby in approximately 1 second. wa ws qs Handycam Station ws 7 6 Recording/Playback 1 Power zoom lever Move the power zoom lever slightly for a faster zoom.
Operating Instructions
Page 18
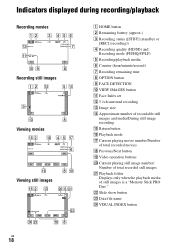
...hour/minute/second) G Recording remaining time H OPTION button I FACE DETECTION J VIEW IMAGES button K Face Index set L 5.1ch surround recording M Image size N Approximate number of recordable still images and media/During still image recording O Return button P Playback mode Q Current playing movie number/Number of total... recorded movies R Previous/Next button S Video operation buttons T Current playing still image number/ Number of total recorded still images U Playback folder Displays only when the playback media of still images is a "Memory Stick PRO Duo." V Slide show button W Data file ...
...hour/minute/second) G Recording remaining time H OPTION button I FACE DETECTION J VIEW IMAGES button K Face Index set L 5.1ch surround recording M Image size N Approximate number of recordable still images and media/During still image recording O Return button P Playback mode Q Current playing movie number/Number of total... recorded movies R Previous/Next button S Video operation buttons T Current playing still image number/ Number of total recorded still images U Playback folder Displays only when the playback media of still images is a "Memory Stick PRO Duo." V Slide show button W Data file ...
Operating Instructions
Page 19
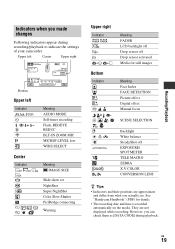
See "Handycam Handbook" (PDF) for still images Meaning Face Index FACE DETECTION Picture effect Digital effect Manual focus SCENE SELECTION Backlight White balance SteadyShot off Drop sensor activated Media for details. • ... actually see. They are approximate and differ from what you can check them as [DATA CODE] during recording/playback to indicate the settings of your camcorder. Recording/Playback Indicators when you made changes Following indicators appear during playback. Upper left Center Upper right Bottom Upper left Indicator Center Indicator 4.0M 3.0M...
See "Handycam Handbook" (PDF) for still images Meaning Face Index FACE DETECTION Picture effect Digital effect Manual focus SCENE SELECTION Backlight White balance SteadyShot off Drop sensor activated Media for details. • ... actually see. They are approximate and differ from what you can check them as [DATA CODE] during recording/playback to indicate the settings of your camcorder. Recording/Playback Indicators when you made changes Following indicators appear during playback. Upper left Center Upper right Bottom Upper left Indicator Center Indicator 4.0M 3.0M...
Operating Instructions
Page 21
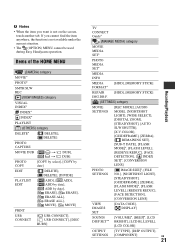
...another tab. Items of the HOME MENU (CAMERA) category MOVIE* PHOTO* SMTH SLW REC (VIEW IMAGES) category VISUAL INDEX* INDEX* INDEX* PLAYLIST (OTHERS) category DELETE* [ DELETE], [ DELETE]... REDUC], [FACE DETECTION], [ INDEX SET]*, [CONVERSION LENS] PHOTO SETTINGS [ IMAGE SIZE]*, [FILE NO.], [NIGHTSHOT LIGHT], [STEADYSHOT], [GUIDEFRAME], [ZEBRA], [FLASH MODE]*, [FLASH LEVEL], [REDEYE REDUC], [FACE... DETECTION], [CONVERSION LENS] VIEW IMAGES SET [DATA CODE], [ DISPLAY] SOUND/ DISP SET** [VOLUME]*, [BEEP]*, [LCD BRIGHT...
...another tab. Items of the HOME MENU (CAMERA) category MOVIE* PHOTO* SMTH SLW REC (VIEW IMAGES) category VISUAL INDEX* INDEX* INDEX* PLAYLIST (OTHERS) category DELETE* [ DELETE], [ DELETE]... REDUC], [FACE DETECTION], [ INDEX SET]*, [CONVERSION LENS] PHOTO SETTINGS [ IMAGE SIZE]*, [FILE NO.], [NIGHTSHOT LIGHT], [STEADYSHOT], [GUIDEFRAME], [ZEBRA], [FLASH MODE]*, [FLASH LEVEL], [REDEYE REDUC], [FACE... DETECTION], [CONVERSION LENS] VIEW IMAGES SET [DATA CODE], [ DISPLAY] SOUND/ DISP SET** [VOLUME]*, [BEEP]*, [LCD BRIGHT...
Operating Instructions
Page 22
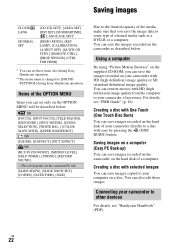
... of the OPTION MENU Items you can save images copied to the limited capacity of a computer. Saving images on the supplied CD-ROM, you can save the image data to [SOUND SETTINGS] during Easy Handycam operation. Connecting your camcorder with HD (high definition) image quality or SD (standard definition) image quality. Using a computer By using "Picture Motion...
... of the OPTION MENU Items you can save images copied to the limited capacity of a computer. Saving images on the supplied CD-ROM, you can save the image data to [SOUND SETTINGS] during Easy Handycam operation. Connecting your camcorder with HD (high definition) image quality or SD (standard definition) image quality. Using a computer By using "Picture Motion...

Operating Instructions
Page 23
... compatible DVD writers, etc., with HD (high definition) image quality. To delete still images 1 In step 2, touch [ DELETE]. 2 Touch [ DELETE], then touch the still image to VCRs, DVD/HDD recorders with SD (standard definition) image quality. Recording/Playback Deleting images Connecting with the A/V connecting cable You can dub to be... deleted. z Tips • You can dub movies or copy still images from the hard disk to be deleted. z Tips • To delete all movies at one time In step 3, touch [ DELETE ALL]/[ DELETE ALL] t [...
... compatible DVD writers, etc., with HD (high definition) image quality. To delete still images 1 In step 2, touch [ DELETE]. 2 Touch [ DELETE], then touch the still image to VCRs, DVD/HDD recorders with SD (standard definition) image quality. Recording/Playback Deleting images Connecting with the A/V connecting cable You can dub to be... deleted. z Tips • You can dub movies or copy still images from the hard disk to be deleted. z Tips • To delete all movies at one time In step 3, touch [ DELETE ALL]/[ DELETE ALL] t [...
Operating Instructions
Page 24
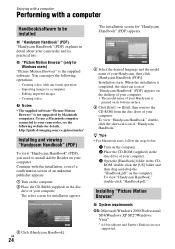
...-click "Handbook.pdf." http://guide.d-imaging.sony.co.jp/mac/ms/us/ Installing and viewing "Handycam Handbook" (PDF) To view "Handycam Handbook" (PDF), you need to a computer - US 24 The installation screen for installation appears. 3 Click [Handycam Handbook]. To use . Enjoying with a computer Performing with a computer Handbook/software to your camcorder, see the following operations. - x "Picture...
...-click "Handbook.pdf." http://guide.d-imaging.sony.co.jp/mac/ms/us/ Installing and viewing "Handycam Handbook" (PDF) To view "Handycam Handbook" (PDF), you need to a computer - US 24 The installation screen for installation appears. 3 Click [Handycam Handbook]. To use . Enjoying with a computer Performing with a computer Handbook/software to your camcorder, see the following operations. - x "Picture...
Operating Instructions
Page 25
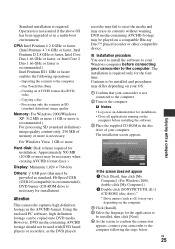
...the computer before connecting your computer. Creating an AVCHD format disc/DVDvideo - The installation is required only for installation) Attention This camcorder captures high definition footage in the disc drive of memory or more is necessary. The installation screen appears. If the screen does... 2000/Windows XP: 512 MB or more (1 GB or more is recommended.) For processing SD (standard definition) image quality content only, 256 MB of your camcorder to your Windows computer before installing the software. 3 Place the supplied CD-ROM in the AVCHD format. x Installation...
...the computer before connecting your computer. Creating an AVCHD format disc/DVDvideo - The installation is required only for installation) Attention This camcorder captures high definition footage in the disc drive of memory or more is necessary. The installation screen appears. If the screen does... 2000/Windows XP: 512 MB or more (1 GB or more is recommended.) For processing SD (standard definition) image quality content only, 256 MB of your camcorder to your Windows computer before installing the software. 3 Place the supplied CD-ROM in the AVCHD format. x Installation...
Operating Instructions
Page 27
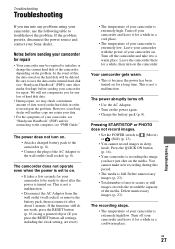
...minute. Pressing START/STOP or PHOTO does not record images. • Set the POWER switch to save the data on the internal hard disk (see "Handycam Handbook" (PDF)) onto other media (backup) before sending your camcorder for repair • Your camcorder may check a minimum amount of data stored on... The media is set to on the problem. Leave your camcorder with the power of your Sony dealer. The power abruptly turns off your camcorder, see "PMB Guide." However, your camcorder to be deleted. The camcorder does not operate even when the power is full. Troubleshooting ...
...minute. Pressing START/STOP or PHOTO does not record images. • Set the POWER switch to save the data on the internal hard disk (see "Handycam Handbook" (PDF)) onto other media (backup) before sending your camcorder for repair • Your camcorder may check a minimum amount of data stored on... The media is set to on the problem. Leave your camcorder with the power of your Sony dealer. The power abruptly turns off your camcorder, see "PMB Guide." However, your camcorder to be deleted. The camcorder does not operate even when the power is full. Troubleshooting ...
Operating Instructions
Page 28
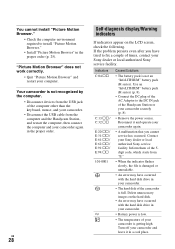
Delete unnecessary images on the LCD screen, check the following. "Picture Motion Browser" does not work correctly. • Quit "Picture Motion Browser" and restart your Sony dealer or local authorized Sony service facility. Your camcorder is not recognized by the computer. • ...101-0001 E Causes/Solutions • The battery pack is full. Reconnect it in your Sony dealer or local authorized Sony service facility. Inform them of the Handycam Station or your camcorder again in the proper order (p. 25). If the problem persists even after you cannot service...
Delete unnecessary images on the LCD screen, check the following. "Picture Motion Browser" does not work correctly. • Quit "Picture Motion Browser" and restart your Sony dealer or local authorized Sony service facility. Your camcorder is not recognized by the computer. • ...101-0001 E Causes/Solutions • The battery pack is full. Reconnect it in your Sony dealer or local authorized Sony service facility. Inform them of the Handycam Station or your camcorder again in the proper order (p. 25). If the problem persists even after you cannot service...


