Operating Instructions
Page 5
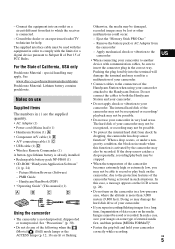
.... The internal hard disk of the camcorder may not be recognized or recording/ playback may result in a malfunction of your camcorder. • Connect cables to the connectors of the Handycam Station when using your camcorder attached to your camcorder in a low-pressure area, where ...sure to record or play back on some type of your camcorder. • Do not apply shock or vibration to the Handycam Station. Handycam Handbook (PDF) • "Operating Guide" (This manual) (1) A B C D Using the camcorder • The camcorder is connected. - Eject the "Memory Stick PRO Duo" ...
.... The internal hard disk of the camcorder may not be recognized or recording/ playback may result in a malfunction of your camcorder. • Connect cables to the connectors of the Handycam Station when using your camcorder attached to your camcorder in a low-pressure area, where ...sure to record or play back on some type of your camcorder. • Do not apply shock or vibration to the Handycam Station. Handycam Handbook (PDF) • "Operating Guide" (This manual) (1) A B C D Using the camcorder • The camcorder is connected. - Eject the "Memory Stick PRO Duo" ...
Operating Instructions
Page 6
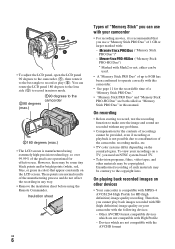
... a TV, you need an NTSC system-based TV. • Television programs, films, video tapes, and other devices • Your camcorder is compatible with High Profile - Other AVCHD format compatible devices which are not compatible with MPEG-4 AVC/H.264 High Profile for the contents of... with : - PRO Duo")* ("Memory Stick - Unauthorized recording of such materials may be used. • A "Memory Stick PRO Duo" of the camcorder, recording media, etc. • TV color systems differ depending on other materials may be contrary to the copyright laws. Insulation sheet US 6 Types of...
... a TV, you need an NTSC system-based TV. • Television programs, films, video tapes, and other devices • Your camcorder is compatible with High Profile - Other AVCHD format compatible devices which are not compatible with MPEG-4 AVC/H.264 High Profile for the contents of... with : - PRO Duo")* ("Memory Stick - Unauthorized recording of such materials may be used. • A "Memory Stick PRO Duo" of the camcorder, recording media, etc. • TV color systems differ depending on other materials may be contrary to the copyright laws. Insulation sheet US 6 Types of...
Operating Instructions
Page 7
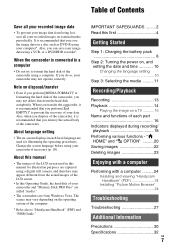
... Troubleshooting 27 Additional Information Precautions 30 Specifications 32 US 7 If you can save the image data on the operating system of your camcorder and "Memory Stick PRO Duo" are called "media." • The screenshots are captured using your computer*. It is recommended that... save your image data using your camcorder if necessary (p. 10). Also, when you dispose of the camcorder, it is recommended that you destroy the actual body of the camcorder, you transfer the camcorder, it is connected to a computer • Do not try to "Handycam Handbook" (PDF) and "PMB ...
... Troubleshooting 27 Additional Information Precautions 30 Specifications 32 US 7 If you can save the image data on the operating system of your camcorder and "Memory Stick PRO Duo" are called "media." • The screenshots are captured using your computer*. It is recommended that... save your image data using your camcorder if necessary (p. 10). Also, when you dispose of the camcorder, it is recommended that you destroy the actual body of the camcorder, you transfer the camcorder, it is connected to a computer • Do not try to "Handycam Handbook" (PDF) and "PMB ...
Operating Instructions
Page 8
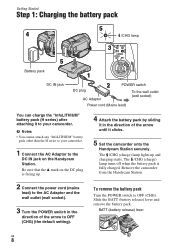
Be sure that the v mark on the Handycam Station. To remove the battery pack Turn the POWER switch to your camcorder. 1 Connect the AC Adaptor to OFF (CHG) (the default setting). The /CHG (charge) lamp lights up . 4 Attach the battery pack by sliding ... socket) Power cord (Mains lead) You can charge the "InfoLITHIUM" battery pack (H series) after attaching it clicks. 5 Set the camcorder onto the Handycam Station securely. Remove the camcorder from the Handycam Station. 2 Connect the power cord (mains lead) to the AC Adaptor and the wall outlet (wall socket). 3 Turn the POWER switch...
Be sure that the v mark on the Handycam Station. To remove the battery pack Turn the POWER switch to your camcorder. 1 Connect the AC Adaptor to OFF (CHG) (the default setting). The /CHG (charge) lamp lights up . 4 Attach the battery pack by sliding ... socket) Power cord (Mains lead) You can charge the "InfoLITHIUM" battery pack (H series) after attaching it clicks. 5 Set the camcorder onto the Handycam Station securely. Remove the camcorder from the Handycam Station. 2 Connect the power cord (mains lead) to the AC Adaptor and the wall outlet (wall socket). 3 Turn the POWER switch...
Operating Instructions
Page 9
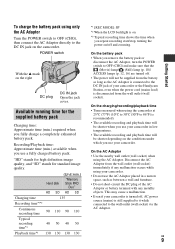
... will not be supplied from the battery as long as between a wall and furniture. • Do not short-circuit the DC plug of your camcorder or the Handycam Station, even when the power cord (mains lead) is still supplied to it while connected to the wall outlet (wall socket) via the AC.... "HD" stands for high definition image quality, and "SD" stands for the supplied battery pack Charging time: Approximate time (min.) required when you use your camcorder in a narrow space, such as the AC Adaptor is connected to the DC IN jack of the AC Adaptor or battery terminal with any metallic...
... will not be supplied from the battery as long as between a wall and furniture. • Do not short-circuit the DC plug of your camcorder or the Handycam Station, even when the power cord (mains lead) is still supplied to it while connected to the wall outlet (wall socket) via the AC.... "HD" stands for high definition image quality, and "SD" stands for the supplied battery pack Charging time: Approximate time (min.) required when you use your camcorder in a narrow space, such as the AC Adaptor is connected to the DC IN jack of the AC Adaptor or battery terminal with any metallic...
Operating Instructions
Page 10
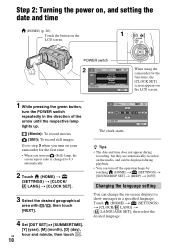
... language. POWER switch 60min STBY AREA SET Chicago Mexico City New York Bogota Santiago JAN 1 2008 CLOCK SET 12:00:00AM NEXT When using the camcorder for the first time, the [CLOCK SET] screen appears on (Still) lamp, the screen aspect ratio is changed to 4:3 automatically. 2 Touch (HOME) t (SETTINGS) t...CLOCK SET NEXT The clock starts. Step 2: Turning the power on, and setting the date and time (HOME) (p. 20) Touch the button on your camcorder for the first time. • When you turn on the 1 LCD screen. z Tips • The date and time does not appear during recording,...
... language. POWER switch 60min STBY AREA SET Chicago Mexico City New York Bogota Santiago JAN 1 2008 CLOCK SET 12:00:00AM NEXT When using the camcorder for the first time, the [CLOCK SET] screen appears on (Still) lamp, the screen aspect ratio is changed to 4:3 automatically. 2 Touch (HOME) t (SETTINGS) t...CLOCK SET NEXT The clock starts. Step 2: Turning the power on, and setting the date and time (HOME) (p. 20) Touch the button on your camcorder for the first time. • When you turn on the 1 LCD screen. z Tips • The date and time does not appear during recording,...
Operating Instructions
Page 11
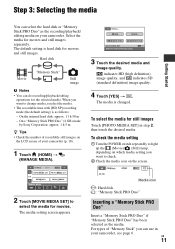
... Stick PRO Duo" has been selected as the media. On a "Memory Stick PRO Duo" (4 GB) made by Sony Corporation: approx. 1 h 5 m z Tips • Check the number of recordable still images on your camcorder. indicates HD (high definition) image quality, and indicates SD (standard definition) image quality. 4 Touch [YES] t... mode (the default setting) is changed. When you want to select the media for still images Touch [PHOTO MEDIA SET] in your camcorder, see page 6. The media setting screen appears. US 11 Getting Started Step 3: Selecting the media You can select the hard disk or...
... Stick PRO Duo" has been selected as the media. On a "Memory Stick PRO Duo" (4 GB) made by Sony Corporation: approx. 1 h 5 m z Tips • Check the number of recordable still images on your camcorder. indicates HD (high definition) image quality, and indicates SD (standard definition) image quality. 4 Touch [YES] t... mode (the default setting) is changed. When you want to select the media for still images Touch [PHOTO MEDIA SET] in your camcorder, see page 6. The media setting screen appears. US 11 Getting Started Step 3: Selecting the media You can select the hard disk or...
Operating Instructions
Page 14
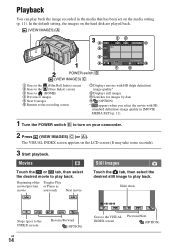
...) Goes to play back. Playback You can play back the image recorded in [MOVIE MEDIA SET] (p. 11). 1 Turn the POWER switch B to turn on your camcorder. 2 Press (VIEW IMAGES) C (or A). Movies Touch the or tab, then select the desired movie to play back. Beginning of the Toggles Play movie/previous or...
...) Goes to play back. Playback You can play back the image recorded in [MOVIE MEDIA SET] (p. 11). 1 Turn the POWER switch B to turn on your camcorder. 2 Press (VIEW IMAGES) C (or A). Movies Touch the or tab, then select the desired movie to play back. Beginning of the Toggles Play movie/previous or...
Operating Instructions
Page 15
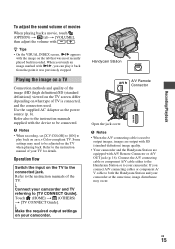
... jack (p. 16). When you touch an image marked with i/B, you connect A/V connecting cables or component A/ V cable to both the Handycam Station and your camcorder at the same time, image disturbance may need to output images, images are output with SD (standard definition) image quality. • ...Your camcorder and the Handycam Station are equipped with / . Operation flow Switch the input on the TV when playing back. Touch (HOME) t (OTHERS) t [TV CONNECT ...
... jack (p. 16). When you touch an image marked with i/B, you connect A/V connecting cables or component A/ V cable to both the Handycam Station and your camcorder at the same time, image disturbance may need to output images, images are output with SD (standard definition) image quality. • ...Your camcorder and the Handycam Station are equipped with / . Operation flow Switch the input on the TV when playing back. Touch (HOME) t (OTHERS) t [TV CONNECT ...
Operating Instructions
Page 16
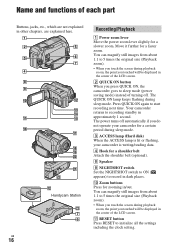
... ON again to initialize all the settings including the clock setting. qa RESET button Press RESET to start recording next time. wa ws qs Handycam Station ws 7 6 Recording/Playback 1 Power zoom lever Move the power zoom lever slightly for a faster zoom. You can magnify still images...about 1.1 to recording standby in /out. Move it further for a slower zoom. The power turns off automatically if you press QUICK ON, the camcorder goes to record in dark places. 0 Zoom buttons Press for a shoulder belt Attach the shoulder belt (optional). 8 Speaker 9 NIGHTSHOT switch Set the...
... ON again to initialize all the settings including the clock setting. qa RESET button Press RESET to start recording next time. wa ws qs Handycam Station ws 7 6 Recording/Playback 1 Power zoom lever Move the power zoom lever slightly for a faster zoom. You can magnify still images...about 1.1 to recording standby in /out. Move it further for a slower zoom. The power turns off automatically if you press QUICK ON, the camcorder goes to record in dark places. 0 Zoom buttons Press for a shoulder belt Attach the shoulder belt (optional). 8 Speaker 9 NIGHTSHOT switch Set the...
Operating Instructions
Page 17
... automatically depending on recording conditions in red during recording. Camera recording lamp The camera recording lamp lights up by connecting the camcorder to cancel the backlight function. Connecting to display . The lamp flashes when the remaining media capacity or battery power is ... display when you press while the power is converted to 5.1ch surround sound and recorded. When you operate the POWER switch on your camcorder and the Handycam Station. w; For details, see "PMB Guide" (p. 26). qs (DISC BURN) button Create a disc by the internal microphone is...
... automatically depending on recording conditions in red during recording. Camera recording lamp The camera recording lamp lights up by connecting the camcorder to cancel the backlight function. Connecting to display . The lamp flashes when the remaining media capacity or battery power is ... display when you press while the power is converted to 5.1ch surround sound and recorded. When you operate the POWER switch on your camcorder and the Handycam Station. w; For details, see "PMB Guide" (p. 26). qs (DISC BURN) button Create a disc by the internal microphone is...
Operating Instructions
Page 19
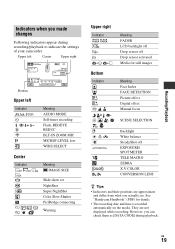
See "Handycam Handbook" (PDF) for still images Meaning Face Index FACE DETECTION Picture effect Digital effect Manual focus SCENE SELECTION Backlight White balance SteadyShot off EXPOSURE/ SPOT ... PictBridge connecting Warning Upper right Indicator Bottom Indicator 9 . However, you can check them as [DATA CODE] during recording/playback to indicate the settings of your camcorder.
See "Handycam Handbook" (PDF) for still images Meaning Face Index FACE DETECTION Picture effect Digital effect Manual focus SCENE SELECTION Backlight White balance SteadyShot off EXPOSURE/ SPOT ... PictBridge connecting Warning Upper right Indicator Bottom Indicator 9 . However, you can check them as [DATA CODE] during recording/playback to indicate the settings of your camcorder.
Operating Instructions
Page 22
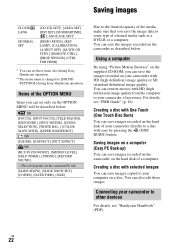
...can save the image data to a disc with One Touch (One Touch Disc Burn) You can save images copied to your camcorder to [SOUND SETTINGS] during Easy Handycam operation. Creating a disc with ease by pressing the (DISC BURN) button. You can rewrite movies with HD (high definition) ...image quality from the computer to your camcorder directly to some type of your camcorder, if necessary. Using a computer By using "Picture Motion Browser" on the hard disk of external media such as described below . US 22 For details, see "Handycam Handbook" (PDF). You can also edit those...
...can save the image data to a disc with One Touch (One Touch Disc Burn) You can save images copied to your camcorder to [SOUND SETTINGS] during Easy Handycam operation. Creating a disc with ease by pressing the (DISC BURN) button. You can rewrite movies with HD (high definition) ...image quality from the computer to your camcorder directly to some type of your camcorder, if necessary. Using a computer By using "Picture Motion Browser" on the hard disk of external media such as described below . US 22 For details, see "Handycam Handbook" (PDF). You can also edit those...
Operating Instructions
Page 24
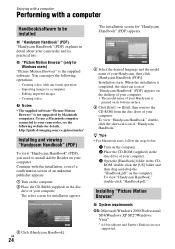
... to install Adobe Reader on your computer. http://guide.d-imaging.sony.co.jp/mac/ms/us/ Installing and viewing "Handycam Handbook" (PDF) To view "Handycam Handbook" (PDF), you need to a computer - Installation starts. To view "Handycam Handbook," double-click "Handbook.pdf." Installing "Picture Motion Browser... 1 Turn on the computer. 2 Place the CD-ROM (supplied) in the disc drive of your camcorder, see the following operations. - x "Picture Motion Browser" (only for "Handycam Handbook" (PDF) appears. 4 Select the desired language and the model name of your computer. You ...
... to install Adobe Reader on your computer. http://guide.d-imaging.sony.co.jp/mac/ms/us/ Installing and viewing "Handycam Handbook" (PDF) To view "Handycam Handbook" (PDF), you need to a computer - Installation starts. To view "Handycam Handbook," double-click "Handbook.pdf." Installing "Picture Motion Browser... 1 Turn on the computer. 2 Place the CD-ROM (supplied) in the disc drive of your camcorder, see the following operations. - x "Picture Motion Browser" (only for "Handycam Handbook" (PDF) appears. 4 Select the desired language and the model name of your computer. You ...
Operating Instructions
Page 25
.../recorder or other compatible device. b Notes • Log on as (E:)) may differ depending on your OS. 1 Confirm that your camcorder is not connected to the computer following operations: - Creating an AVCHD format disc/DVDvideo - Using the enclosed PC software, high definition ...standard, Hi-Speed USB (USB 2.0 compatible) is recommended), DVD burner (CD-ROM drive is required only for installation) Attention This camcorder captures high definition footage in the AVCHD format. The installation screen appears. Operation is required. Copying a disc - Standard installation is ...
.../recorder or other compatible device. b Notes • Log on as (E:)) may differ depending on your OS. 1 Confirm that your camcorder is not connected to the computer following operations: - Creating an AVCHD format disc/DVDvideo - Using the enclosed PC software, high definition ...standard, Hi-Speed USB (USB 2.0 compatible) is recommended), DVD burner (CD-ROM drive is required only for installation) Attention This camcorder captures high definition footage in the AVCHD format. The installation screen appears. Operation is required. Copying a disc - Standard installation is ...
Operating Instructions
Page 26
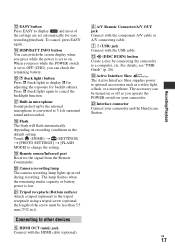
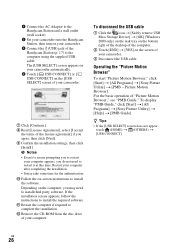
..., touch (HOME) t (OTHERS) t [USB CONNECT]. For the basic operation of the Handycam Station (p. 17) to the computer using the supplied USB cable. qs Remove the CD-ROM from the disc drive of your camcorder. 3 Connect the (USB) jack of "Picture Motion Browser," see "PMB Guide." To ...display "PMB Guide," click [Start] t [All Programs] t [Sony Picture Utility] t [Help] t [PMB Guide]. US 26 1 Connect the AC Adaptor to the Handycam Station and a wall outlet (wall socket)....
..., touch (HOME) t (OTHERS) t [USB CONNECT]. For the basic operation of the Handycam Station (p. 17) to the computer using the supplied USB cable. qs Remove the CD-ROM from the disc drive of your camcorder. 3 Connect the (USB) jack of "Picture Motion Browser," see "PMB Guide." To ...display "PMB Guide," click [Start] t [All Programs] t [Sony Picture Utility] t [Help] t [PMB Guide]. US 26 1 Connect the AC Adaptor to the Handycam Station and a wall outlet (wall socket)....
Operating Instructions
Page 27
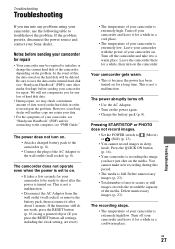
...Sony dealer will be deleted. Troubleshooting Troubleshooting If you run into any loss of hard disk data. • During repair, we may be ready to shoot after about 1 minute. Notes before sending your camcorder is not a malfunction. Be sure to save the data on the internal hard disk (see "Handycam... Handbook" (PDF)) onto other media (backup) before sending your camcorder and leave it to the computer, see "Handycam Handbook" (PDF) and for your camcorder is recording the image you have just shot on . The power ...
...Sony dealer will be deleted. Troubleshooting Troubleshooting If you run into any loss of hard disk data. • During repair, we may be ready to shoot after about 1 minute. Notes before sending your camcorder is not a malfunction. Be sure to save the data on the internal hard disk (see "Handycam... Handbook" (PDF)) onto other media (backup) before sending your camcorder and leave it to the computer, see "Handycam Handbook" (PDF) and for your camcorder is recording the image you have just shot on . The power ...
Operating Instructions
Page 28
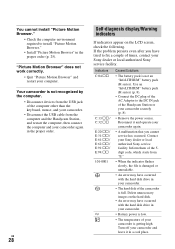
...to fix a couple of the Handycam Station or your Sony dealer or local authorized Sony service facility. Contact your camcorder securely (p. 8). • Remove the power source. Reconnect it in your camcorder is full. Turn off your camcorder and leave it and operate your camcorder again. • A malfunction that... disk of the 5digit code, which starts from the computer and the Handycam Station, and restart the computer, then connect the computer and your camcorder again in the proper order (p. 25). Your camcorder is not an "InfoLITHIUM" battery pack (H series). US 28 Self-...
...to fix a couple of the Handycam Station or your Sony dealer or local authorized Sony service facility. Contact your camcorder securely (p. 8). • Remove the power source. Reconnect it in your camcorder is full. Turn off your camcorder and leave it and operate your camcorder again. • A malfunction that... disk of the 5digit code, which starts from the computer and the Handycam Station, and restart the computer, then connect the computer and your camcorder again in the proper order (p. 25). Your camcorder is not an "InfoLITHIUM" battery pack (H series). US 28 Self-...
Operating Instructions
Page 29
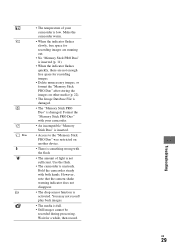
... the "Memory Stick PRO Duo" after storing the images on another device. • There is something wrong with the flash. • The amount of your camcorder. • An incompatible "Memory Stick Duo" is inserted. - • Access to the "Memory Stick PRO Duo" was restricted on other media (p. 22).... • The Image Database File is damaged. • The "Memory Stick PRO Duo" is damaged. Make the camcorder warm. • When the indicator flashes slowly, free space for recording images are not enough free space for a while, then record. Hold the...
... the "Memory Stick PRO Duo" after storing the images on another device. • There is something wrong with the flash. • The amount of your camcorder. • An incompatible "Memory Stick Duo" is inserted. - • Access to the "Memory Stick PRO Duo" was restricted on other media (p. 22).... • The Image Database File is damaged. • The "Memory Stick PRO Duo" is damaged. Make the camcorder warm. • When the indicator flashes slowly, free space for recording images are not enough free space for a while, then record. Hold the...
Operating Instructions
Page 30
...dirty, it is not a malfunction. • While using your local authorized Sony service facility. - LCD screen • Do not exert excessive pressure on the LCD screen, as it may malfunction. The camcorder may not be exposed to clean it may cause damage. • If ...; Keep metal contacts clean. Sometimes this malfunction cannot be repaired. - Be particularly careful of the LCD screen. • Operate your camcorder on it by a Sony dealer before storing it any liquid that may occur. - Using chemicals such as under direct sunlight, near heaters or in a car ...
...dirty, it is not a malfunction. • While using your local authorized Sony service facility. - LCD screen • Do not exert excessive pressure on the LCD screen, as it may malfunction. The camcorder may not be exposed to clean it may cause damage. • If ...; Keep metal contacts clean. Sometimes this malfunction cannot be repaired. - Be particularly careful of the LCD screen. • Operate your camcorder on it by a Sony dealer before storing it any liquid that may occur. - Using chemicals such as under direct sunlight, near heaters or in a car ...


