Operating Instructions
Page 5
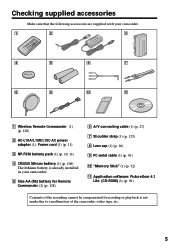
... battery pack (1) (p. 10, 11) 4 CR2025 lithium battery (1) (p. 106) The lithium battery is already installed in your camcorder. 5 Size AA (R6) battery for Remote Commander (2) (p. 128) 6 A/V connecting cable (1) (p. 27) 7 Shoulder strap (1) (p. 125) 8 Lens cap (1) (p. 16) 9 PC serial cable (1) (p. 91) 0 "Memory Stick" (1) (p. 72) qa Application software: PictureGear 4.1 Lite (CD-ROM) (1) (p. 91) Contents of the recording...
... battery pack (1) (p. 10, 11) 4 CR2025 lithium battery (1) (p. 106) The lithium battery is already installed in your camcorder. 5 Size AA (R6) battery for Remote Commander (2) (p. 128) 6 A/V connecting cable (1) (p. 27) 7 Shoulder strap (1) (p. 125) 8 Lens cap (1) (p. 16) 9 PC serial cable (1) (p. 91) 0 "Memory Stick" (1) (p. 72) qa Application software: PictureGear 4.1 Lite (CD-ROM) (1) (p. 91) Contents of the recording...
Operating Instructions
Page 27
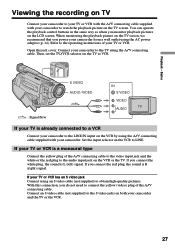
...jack on the LCD screen. Connect your TV is L (left) signal. If your camcorder. Set the input selector on the VCR to watch the playback picture on TV Connect your camcorder to your TV or VCR with the A/V connecting cable supplied with your TV or VCR has an S video jack Connect using an... S video cable (not supplied) to the TV using the AC power adaptor (p. 14). If you ...
...jack on the LCD screen. Connect your TV is L (left) signal. If your camcorder. Set the input selector on the VCR to watch the playback picture on TV Connect your camcorder to your TV or VCR with the A/V connecting cable supplied with your TV or VCR has an S video jack Connect using an... S video cable (not supplied) to the TV using the AC power adaptor (p. 14). If you ...
Operating Instructions
Page 31
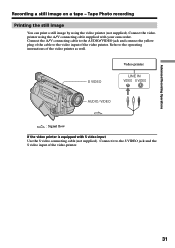
... a still image by using the A/V connecting cable supplied with S video input Use the S video connecting cable (not supplied). S VIDEO Video printer LINE IN VIDEO S VIDEO AUDIO / VIDEO : Signal flow If the video printer is equipped with your camcorder. Connect it to the operating instructions of the... video printer as well. Refer to the S VIDEO jack and the S video input of the video printer. Connect the A/V connecting cable to the AUDIO/VIDEO jack and connect the ...
... a still image by using the A/V connecting cable supplied with S video input Use the S video connecting cable (not supplied). S VIDEO Video printer LINE IN VIDEO S VIDEO AUDIO / VIDEO : Signal flow If the video printer is equipped with your camcorder. Connect it to the operating instructions of the... video printer as well. Refer to the S VIDEO jack and the S video input of the video printer. Connect the A/V connecting cable to the AUDIO/VIDEO jack and connect the ...
Operating Instructions
Page 32
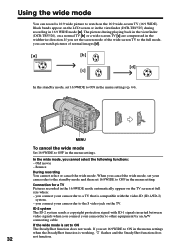
...:9WIDE to ON in the menu settings. If the wide mode is compatible with ID-1 signals inserted between video signals when you connect your camcorder to OFF in the widthwise direction. Using the wide mode You can record a 16:9 wide picture to watch pictures of the wide-screen... recording You cannot select or cancel the wide mode. you connect your camcorder to other equipment by an A/V connecting cable. Black bands appear on the LCD screen or in the viewfinder (DCR-TRV525) during playing back in the viewfinder (DCR-TRV520), on the TV screen at full size when: - The picture during...
...:9WIDE to ON in the menu settings. If the wide mode is compatible with ID-1 signals inserted between video signals when you connect your camcorder to OFF in the widthwise direction. Using the wide mode You can record a 16:9 wide picture to watch pictures of the wide-screen... recording You cannot select or cancel the wide mode. you connect your camcorder to other equipment by an A/V connecting cable. Black bands appear on the LCD screen or in the viewfinder (DCR-TRV525) during playing back in the viewfinder (DCR-TRV520), on the TV screen at full size when: - The picture during...
Operating Instructions
Page 45
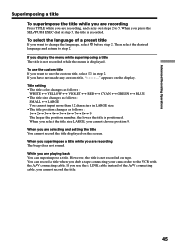
... the menu is not recorded on the display. When you are recording, and carry out steps 2 to the VCR with the A/V connecting cable. However, the title is displayed. Advanced Recording Operations Superimposing a title To superimpose the title while you are recording Press TITLE while you are... desired language and return to change the language, select before step 2. If you want to use the custom title If you dub a tape connecting your camcorder to 5. Title setting •The title color changes as follows : WHITE y YELLOW y VIOLET y RED y CYAN y GREEN y BLUE •The title size ...
... the menu is not recorded on the display. When you are recording, and carry out steps 2 to the VCR with the A/V connecting cable. However, the title is displayed. Advanced Recording Operations Superimposing a title To superimpose the title while you are recording Press TITLE while you are... desired language and return to change the language, select before step 2. If you want to use the custom title If you dub a tape connecting your camcorder to 5. Title setting •The title color changes as follows : WHITE y YELLOW y VIOLET y RED y CYAN y GREEN y BLUE •The title size ...
Operating Instructions
Page 57
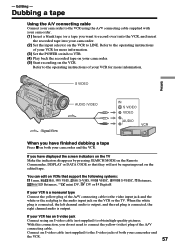
...information. (3) Set the POWER switch to the audio input jack on the edited tape. Dubbing a tape Using the A/V connecting cable Connect your camcorder to the VCR using an S video cable (not supplied) to LINE. S VIDEO Editing AUDIO / VIDEO : Signal flow IN S VIDEO VIDEO AUDIO When you have...DV or Digital8 If your VCR has an S video jack Connect using the A/V connecting cable supplied with your camcorder. (1) Insert a blank tape (or a tape you have finished dubbing a tape Press x on both your camcorder. (2) Set the input selector on VCRs that they will not be superimposed on the...
...information. (3) Set the POWER switch to the audio input jack on the edited tape. Dubbing a tape Using the A/V connecting cable Connect your camcorder to the VCR using an S video cable (not supplied) to LINE. S VIDEO Editing AUDIO / VIDEO : Signal flow IN S VIDEO VIDEO AUDIO When you have...DV or Digital8 If your VCR has an S video jack Connect using the A/V connecting cable supplied with your camcorder. (1) Insert a blank tape (or a tape you have finished dubbing a tape Press x on both your camcorder. (2) Set the input selector on VCRs that they will not be superimposed on the...
Operating Instructions
Page 58
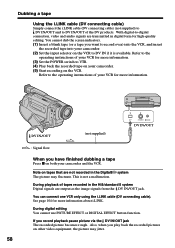
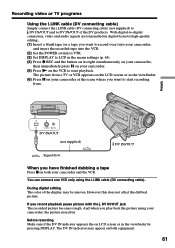
... more information. Dubbing a tape Using the i.LINK cable (DV connecting cable) Simply connect the i.LINK cable (DV connecting cable) (not supplied) to DV IN/OUT and to DV IN/OUT of tapes recorded in the Hi8/standard 8 system Digital signals are transmitted in the Digital8 system The picture ... tape (or a tape you have finished dubbing a tape Press x on both your camcorder. (5) Start recording on tapes that are not recorded in digital form for more information. (3) Set the POWER switch to -digital connection, video and audio signals are output as the image signals from the DV IN/OUT...
... more information. Dubbing a tape Using the i.LINK cable (DV connecting cable) Simply connect the i.LINK cable (DV connecting cable) (not supplied) to DV IN/OUT and to DV IN/OUT of tapes recorded in the Hi8/standard 8 system Digital signals are transmitted in the Digital8 system The picture ... tape (or a tape you have finished dubbing a tape Press x on both your camcorder. (5) Start recording on tapes that are not recorded in digital form for more information. (3) Set the POWER switch to -digital connection, video and audio signals are output as the image signals from the DV IN/OUT...

Operating Instructions
Page 60
...Select a TV program if you want to start playback if you have finished dubbing a tape Press x on your camcorder and the VCR. Recording video or TV programs Using the A/V connecting cable You can record a tape from another VCR or a TV program from a TV that you do not need to ... on both your TV or VCR has an S video jack Connect using an S video cable (not supplied) to obtain high-quality pictures. When recording from other equipment, the image being recorded may fluctuate. If your camcorder and 60 the TV or VCR. If you are recording a tape from TV. When the...
...Select a TV program if you want to start playback if you have finished dubbing a tape Press x on your camcorder and the VCR. Recording video or TV programs Using the A/V connecting cable You can record a tape from another VCR or a TV program from a TV that you do not need to ... on both your TV or VCR has an S video jack Connect using an S video cable (not supplied) to obtain high-quality pictures. When recording from other equipment, the image being recorded may fluctuate. If your camcorder and 60 the TV or VCR. If you are recording a tape from TV. When the...
Operating Instructions
Page 61
...record over) into your camcorder, and insert the recorded tape into the VCR. (2) Set the POWER switch to VTR. (3) Set DISPLAY to start recording from a TV or VCR appears on the LCD screen or in the viewfinder by pressing DISPLAY. During digital editing The color of...you play back the picture using the i.LINK cable (DV connecting cable). With digital-to-digital connection, video and audio signals are transmitted in digital form for high-quality editing. (1) Insert a blank tape (or a tape you have finished dubbing a tape Press x on your camcorder, the picture may jitter. Editing DV S ...
...record over) into your camcorder, and insert the recorded tape into the VCR. (2) Set the POWER switch to VTR. (3) Set DISPLAY to start recording from a TV or VCR appears on the LCD screen or in the viewfinder by pressing DISPLAY. During digital editing The color of...you play back the picture using the i.LINK cable (DV connecting cable). With digital-to-digital connection, video and audio signals are transmitted in digital form for high-quality editing. (1) Insert a blank tape (or a tape you have finished dubbing a tape Press x on your camcorder, the picture may jitter. Editing DV S ...
Operating Instructions
Page 68
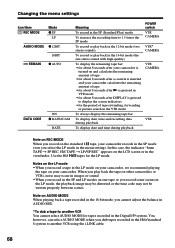
...CAMERA VTR Note on REC MODE When you record on the standard 8 tape, your camcorder. When you play back in the 16-bit mode (the one tape or you record some ...scenes in the LP mode on your camcorder, we recommend playing the tape on your camcorder records in the SP mode even you select the LP mode in the... Digital8 system. Note on AUDIO MODE When playing back a tape recorded in the 16-bit mode, you cannot adjust the balance in AUDIO MIX. *To dub a tape to another VCR using the i.LINK cable...
...CAMERA VTR Note on REC MODE When you record on the standard 8 tape, your camcorder. When you play back in the 16-bit mode (the one tape or you record some ...scenes in the LP mode on your camcorder, we recommend playing the tape on your camcorder records in the SP mode even you select the LP mode in the... Digital8 system. Note on AUDIO MODE When playing back a tape recorded in the 16-bit mode, you cannot adjust the balance in AUDIO MIX. *To dub a tape to another VCR using the i.LINK cable...
Operating Instructions
Page 70
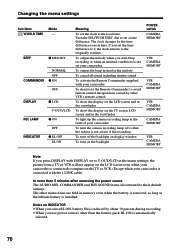
... the clock to V-OUT/LCD in the viewfinder To light up the camera recording lamp at the front of your camcorder To turn the camera recording lamp off so that the subject is not aware of the recording To turn off the..., the picture from a TV or VCR will not appear on the LCD screen even when your camcorder is installed. To output the melody when you start/stop recording or when an unusual condition occurs on your... the originally set to the local time. Changing the menu settings Icon/item Mode WORLD TIME - LINK cable) In more than the battery pack, BL ON is automatically selected. 70
... the clock to V-OUT/LCD in the viewfinder To light up the camera recording lamp at the front of your camcorder To turn the camera recording lamp off so that the subject is not aware of the recording To turn off the..., the picture from a TV or VCR will not appear on the LCD screen even when your camcorder is installed. To output the melody when you start/stop recording or when an unusual condition occurs on your... the originally set to the local time. Changing the menu settings Icon/item Mode WORLD TIME - LINK cable) In more than the battery pack, BL ON is automatically selected. 70

Operating Instructions
Page 86
... on the LCD or in the menu settings. (2) Play back the recorded tape, or turn the TV on to obtain high-quality pictures. If your camcorder and the TV or VCR. With this connection, you do not need to the video jack on page 85. Using the A/V connecting... connect the yellow (video) plug of both your TV or VCR has an S video jack Connect using an S video cable (not supplied) to see the desired program. The image from other equipment (1) Set the POWER switch to VTR and set DISPLAY to LCD in the ...
... on the LCD or in the menu settings. (2) Play back the recorded tape, or turn the TV on to obtain high-quality pictures. If your camcorder and the TV or VCR. With this connection, you do not need to the video jack on page 85. Using the A/V connecting... connect the yellow (video) plug of both your TV or VCR has an S video jack Connect using an S video cable (not supplied) to see the desired program. The image from other equipment (1) Set the POWER switch to VTR and set DISPLAY to LCD in the ...
Operating Instructions
Page 89
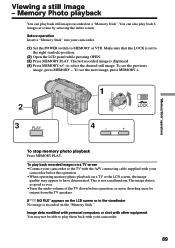
...play back still images recorded on a TV or the LCD screen, the image quality may be able to the TV with the A/V connecting cable supplied with your camcorder to play back 6 images at a time by selecting the index screen. To see the previous image, press MEMORY -. to MEMORY or ...VTR. To play back recorded images on a TV screen •Connect your camcorder. 89 The last recorded image is recorded on the LCD screen or in the viewfinder No image is displayed. (4) Press MEMORY +/- Memory Photo playback...
...play back still images recorded on a TV or the LCD screen, the image quality may be able to the TV with the A/V connecting cable supplied with your camcorder to play back 6 images at a time by selecting the index screen. To see the previous image, press MEMORY -. to MEMORY or ...VTR. To play back recorded images on a TV screen •Connect your camcorder. 89 The last recorded image is recorded on the LCD screen or in the viewfinder No image is displayed. (4) Press MEMORY +/- Memory Photo playback...
Operating Instructions
Page 91
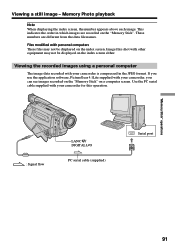
...software, PictureGear 4.1Lite supplied with your camcorder for this operation. : Signal flow LANC / DIGITAL I/O PC serial cable (supplied) Serial port "Memory Stick" operations 91 Use the PC serial cable supplied with personal computers These files may not be displayed on a computer screen. Files modified with your camcorder, you can see images recorded on ... image. This indicates the order in the JPEG format. These numbers are recorded on the index screen either. Image files shot with your camcorder is compressed in which images are different from the data file names.
...software, PictureGear 4.1Lite supplied with your camcorder for this operation. : Signal flow LANC / DIGITAL I/O PC serial cable (supplied) Serial port "Memory Stick" operations 91 Use the PC serial cable supplied with personal computers These files may not be displayed on a computer screen. Files modified with your camcorder, you can see images recorded on ... image. This indicates the order in the JPEG format. These numbers are recorded on the index screen either. Image files shot with your camcorder is compressed in which images are different from the data file names.

Operating Instructions
Page 96
If you change the "Memory Stick", be sure to a TV with the A/V connecting cable supplied with your camcorder before operation. If you change the "Memory Stick" during operation The slide show does not operate. Playing back images in a continuous loop - SLIDE SHOW To view the recorded images on TV Connect your camcorder to follow the steps again from the beginning. 96
If you change the "Memory Stick", be sure to a TV with the A/V connecting cable supplied with your camcorder before operation. If you change the "Memory Stick" during operation The slide show does not operate. Playing back images in a continuous loop - SLIDE SHOW To view the recorded images on TV Connect your camcorder to follow the steps again from the beginning. 96

Operating Instructions
Page 104
...rate, the baud rate sometimes differs from the indicated baud rate. * What is "Mbps"? When two or more familiar term for handling digital video, digital audio and other data in one piece of equipment on which it is not indicated such as this unit is an i.LINK-compliant DV ... or the amount of data that this unit by many corporations. About i.LINK The DV jack on this unit is "S100". i.LINK is a digital serial interface for IEEE 1394 data transport bus proposed by SONY, and is a trademark approved by the i.LINK cable (DV cable). Possible applications are unit is "i.LINK"?
...rate, the baud rate sometimes differs from the indicated baud rate. * What is "Mbps"? When two or more familiar term for handling digital video, digital audio and other data in one piece of equipment on which it is not indicated such as this unit is an i.LINK-compliant DV ... or the amount of data that this unit by many corporations. About i.LINK The DV jack on this unit is "S100". i.LINK is a digital serial interface for IEEE 1394 data transport bus proposed by SONY, and is a trademark approved by the i.LINK cable (DV cable). Possible applications are unit is "i.LINK"?
Operating Instructions
Page 105
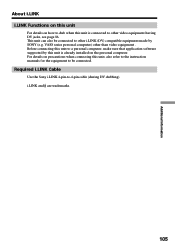
... to other i.LINK (DV) compatible equipment made by this unit is connected to be connected to a personal computer, make sure that application software supported by SONY (e.g. i.LINK and are trademarks. 105 For details on the personal computer. VAIO series personal computer) other than video equipment . Additional Information About i.LINK i.LINK Functions... when connecting this unit, also refer to the instruction manuals for the equipment to other video equipment having DV jacks, see page 86. Required i.LINK Cable Use the Sony i.LINK 4-pin-to-4-pin cable (during DV dubbing).
... to other i.LINK (DV) compatible equipment made by this unit is connected to be connected to a personal computer, make sure that application software supported by SONY (e.g. i.LINK and are trademarks. 105 For details on the personal computer. VAIO series personal computer) other than video equipment . Additional Information About i.LINK i.LINK Functions... when connecting this unit, also refer to the instruction manuals for the equipment to other video equipment having DV jacks, see page 86. Required i.LINK Cable Use the Sony i.LINK 4-pin-to-4-pin cable (during DV dubbing).
Operating Instructions
Page 120
... not a malfunction. • While using your camcorder. • Do not wrap your camcorder. Sand or dust may appear on the LCD screen or in a cold place, a residual image may appear on the image. • Do not touch the LCD screen with i.LINK cable the image processed or edited by your PC, use ... of the tape and if the recording tab is in a dusty place, protect it into your PC, dub the image into your Sony VAIO. 120 Noise may cause your camcorder away from the sand or dust. This is not to remove dust. On handling tapes Do not insert anything into a Digital8 or...
... not a malfunction. • While using your camcorder. • Do not wrap your camcorder. Sand or dust may appear on the LCD screen or in a cold place, a residual image may appear on the image. • Do not touch the LCD screen with i.LINK cable the image processed or edited by your PC, use ... of the tape and if the recording tab is in a dusty place, protect it into your PC, dub the image into your Sony VAIO. 120 Noise may cause your camcorder away from the sand or dust. This is not to remove dust. On handling tapes Do not insert anything into a Digital8 or...
Operating Instructions
Page 131
... 57 Connection to your PC .......... 59 Data code 25 Date search 53 DEMO 69 DIGITAL EFFECT 37, 50 Digital 8 system 102 DIGITAL I/O 127 DISPLAY 25 DOT 33 Dual sound track tape .......... 103 Dubbing a tape 57 DV connecting cable ......... 58, 86 E EDITSEARCH 23 END SEARCH 23, 26 Exposure 42 External microphone ... 20 Normal charge 11 NTSC system 116 O, P, Q OLD MOVIE 37 Operation indicators 129 OVERLAP 33 PB ZOOM 51, 94 PC serial cable 91 Photo scan 56 Photo search 55 PICTURE EFFECT 36, 49 Picture search 26 Playback pause 26 Power sources (battery pack 10 (house ...
... 57 Connection to your PC .......... 59 Data code 25 Date search 53 DEMO 69 DIGITAL EFFECT 37, 50 Digital 8 system 102 DIGITAL I/O 127 DISPLAY 25 DOT 33 Dual sound track tape .......... 103 Dubbing a tape 57 DV connecting cable ......... 58, 86 E EDITSEARCH 23 END SEARCH 23, 26 Exposure 42 External microphone ... 20 Normal charge 11 NTSC system 116 O, P, Q OLD MOVIE 37 Operation indicators 129 OVERLAP 33 PB ZOOM 51, 94 PC serial cable 91 Photo scan 56 Photo search 55 PICTURE EFFECT 36, 49 Picture search 26 Playback pause 26 Power sources (battery pack 10 (house ...


