Sony TRV50 - MiniDV Digital Camcorder Support and Manuals
Get Help and Manuals for this Sony item
Sony TRV50 Videos

Test Sony TRV50
Duration: 1:10
Total Views: 311
Duration: 1:10
Total Views: 311
Popular Sony TRV50 Manual Pages
Operating Instructions (primary manual) - Page 2
... returning your purchase of Conformity
Trade Name:
SONY
Model No.:
DCR-TRV50
Responsible Party: Sony Electronics Inc. Your Handycam is loaded with advanced features, but at the same time it is very easy to use of optical instruments with Part 15 of electric shock to the presence of rechargeable batteries, call : Sony Customer Information Center 1-800-222SONY (7669...
Operating Instructions (primary manual) - Page 12
... page 220. Getting Started - Before you start reading this manual, buttons and settings on your camcorder are for the two models listed in the text, for illustration purposes.
e.g.
Labeling a cassette (p. 115)
For details of cassette types, see this manual are shown in the illustrations. The DCR-TRV50 is indicated in capital letters.
Date search (p. 81) - Superimposing...
Operating Instructions (primary manual) - Page 97

...MENU] : END
97 The OUT point of the first program is set the program. Dubbing only desired scenes - When the program is set, then the bottom part of the first scene you want to insert using the video
operation ...Operation 1: Making a program
(1) Insert the tape for playback into your camcorder, and insert a tape for the beginning of the first program is set up to light blue.
Operating Instructions (primary manual) - Page 151
...selected scenes (programs) for the end of the first scene you want to 9, then set , then the bottom part of the program mark changes to light blue. (10) Repeat steps 6 to insert... select IMAGESIZE and select the desired
image size, then press the dial. (6) Search for recording into your
camcorder. (3) Press MENU and turn the SEL/PUSH EXEC dial to select VIDEO EDIT in maximum.
6,8
REW ...
Operating Instructions (primary manual) - Page 179
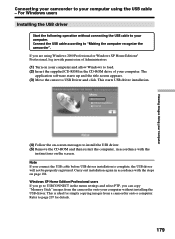
... copying images from a camcorder onto a computer. This starts USB driver installation.
(4) Follow the on-screen messages to load. (2) Insert the supplied CD-ROM in accordance with the
instructions on the screen. Carry out installation again in the menu settings and select PTP, you are using the USB cable - Windows XP Home Edition/Professional users If you connect the...
Operating Instructions (primary manual) - Page 181
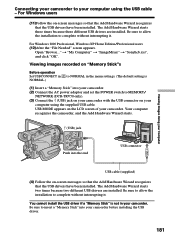
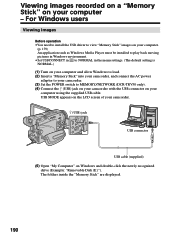
... it . For Windows 2000 Professional, Windows XP Home Edition/Professional users (12)After the "File Needed" screen appears. Viewing images recorded on "Memory Stick"s
Before operation Set USBCONNECT in NORMAL.)
to NORMAL in your computer using the supplied USB cable. Be sure to MEMORY/
NETWORK (DCR-TRV50 only). (3) Connect the (USB) jack on your camcorder with the...
Operating Instructions (primary manual) - Page 182

... tab, and click the "Device Manager" button. Connecting your camcorder to correctly install the USB driver. For Windows users
If you cannot install the USB driver
The USB driver has been registered incorrectly as your computer was connected to your camcorder before installation of the USB driver was completed.
Windows 98SE/Windows Me: Select "My Computer" t "Control Panel" t "System", and...
Operating Instructions (primary manual) - Page 184
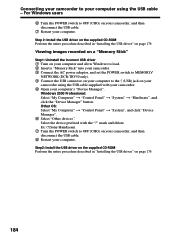
... adaptor, and set the POWER switch to MEMORY/
NETWORK (DCR-TRV50 only). 4 Connect the USB connector on your computer to OFF (CHG) on your camcorder, and then disconnect the USB cable. 8 Restart your computer. Windows 2000 Professional: Select "My Computer" t "Control Panel" t "System" t "Hardware", and click the "Device Manager" button. Step 2: Install the USB driver on the...
Operating Instructions (primary manual) - Page 185
For Windows users
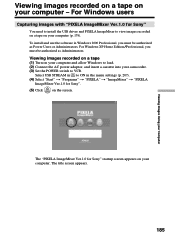
Capturing images with "PIXELA ImageMixer Ver.1.0 for Sony" startup screen appears on your computer (p. 179). Viewing Images Using your Computer
The "PIXELA ImageMixer Ver.1.0 for Sony"
You need to install the USB driver and PIXELA ImageMixer to view images recorded on a tape on your computer. To install and use the software in the menu settings (p. 207...
Operating Instructions (primary manual) - Page 190
... Windows Media Player must be installed to play back moving pictures in Windows environment. •Set USBCONNECT in to NORMAL in the menu settings. (The default setting is NORMAL.) (1) Turn on your computer and allow Windows to load. (2) Insert a "Memory Stick" into your camcorder, and connect the AC power
adaptor to your camcorder. (3) Set the POWER switch to MEMORY/NETWORK (DCR-TRV50...
Operating Instructions (primary manual) - Page 193
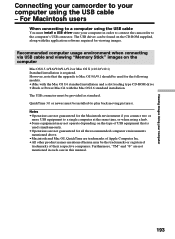
... your camcorder to your computer using the USB cable
You must install a USB driver onto your computer in this manual.
193 Furthermore, "TM" and "®" are not guaranteed for viewing images.
Recommended computer usage environment when connecting via USB cable and viewing "Memory Stick" images on the type of USB equipment that the upgrade to Mac...
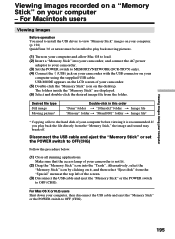
Operating Instructions (primary manual) - Page 195
... lit.
(2) Drag the "Memory Stick" icon into your camcorder, and connect the AC power
adaptor to your camcorder. (3) Set the POWER switch to MEMORY/NETWORK (DCR-TRV50 only). (4) Connect the (USB) jack on your camcorder with the USB connector on your computer. (p. 194) QuickTime 3.0 or newer must be installed to OFF (CHG). Make sure that the access...
Operating Instructions (primary manual) - Page 200
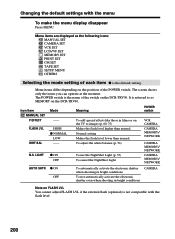
... to as the following icons:
MANUAL SET CAMERA SET VCR SET LCD/VF SET MEMORY SET PRINT SET CM SET TAPE SET SETUP MENU OTHERS
Selecting the mode setting of the switch on FLASH LVL...setting Makes the flash level lower than normal. Icon/item MANUAL SET P EFFECT
Mode -- LIGHT
z ON OFF
Meaning
POWER switch
To add special effects like those in bright conditions
CAMERA
Note on the DCR-TRV50...
Operating Instructions (primary manual) - Page 208
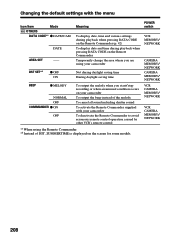
.... *2 Instead of DST, SUMMERTIME is displayed on your camcorder
To output the beep instead of the melody
To cancel all sound including shutter sound
To activate the Remote Commander supplied with the menu
Icon/item
Mode
OTHERS
DATA CODE*1 z DATE/CAM
DATE
AREA SET
-- DST SET*2 BEEP
z OFF ON
z MELODY
NORMAL OFF COMMANDER z ON...
Operating Instructions (primary manual) - Page 216
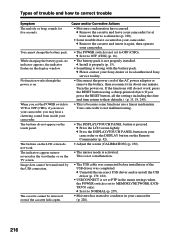
.... c Uninstall the incorrect USB driver and re-install the USB driver (p. 179, 182).
• USBCONNECT is set the POWER switch to VCR or OFF (CHG), if you move your camcorder.
c Press the LCD screen lightly. Cause and/or Corrective Actions
• Moisture condensation has occurred. c Please contact your Sony dealer or local authorized Sony service facility.
• Disconnect...
Sony TRV50 Reviews
We have not received any reviews for Sony yet.