Operating Instructions (primary manual)
Page 6
... tape 40 To display the screen indicators - Tape Photo recording 52 Recording still images on a tape 8 - MEMORY MIX 139 - Recording on Adjusting the white balance manually "Memory Stick"s 54 - Frame recording 74 Using this manual 12 Advanced Playback Checking supplied accessories 14 Step 1 Preparing the power supply ... 15 Installing the battery pack 15 Charging the battery pack 16 Connecting to a wall outlet 19 Step 2 Setting the date and time ........ 20 Step 3 Inserting a cassette 23 Step 4 Using the touch panel 24 Operations Playing back tapes with picture effect...
... tape 40 To display the screen indicators - Tape Photo recording 52 Recording still images on a tape 8 - MEMORY MIX 139 - Recording on Adjusting the white balance manually "Memory Stick"s 54 - Frame recording 74 Using this manual 12 Advanced Playback Checking supplied accessories 14 Step 1 Preparing the power supply ... 15 Installing the battery pack 15 Charging the battery pack 16 Connecting to a wall outlet 19 Step 2 Setting the date and time ........ 20 Step 3 Inserting a cassette 23 Step 4 Using the touch panel 24 Operations Playing back tapes with picture effect...
Operating Instructions (primary manual)
Page 12
..., "DCR-TRV50 only". Using this manual The instructions in this manual, buttons and settings on your camcorder. Any differences in operation are : - Set the POWER switch to indicate that are for the two models listed in the text, for illustration purposes. Date search (p. 81) - As you read through this manual are operated only with cassette memory. Photo search (p. 83) Functions you can operate only with your camcorder are shown in the introduction of cassette types...
..., "DCR-TRV50 only". Using this manual The instructions in this manual, buttons and settings on your camcorder. Any differences in operation are : - Set the POWER switch to indicate that are for the two models listed in the text, for illustration purposes. Date search (p. 81) - As you read through this manual are operated only with cassette memory. Photo search (p. 83) Functions you can operate only with your camcorder are shown in the introduction of cassette types...
Operating Instructions (primary manual)
Page 46
... VCR or the TV. If your camcorder. To turn the screen indicators off, press DISPLAY/TOUCH PANEL on your TV has an S video jack Pictures can operate the video control buttons in the menu settings (p. 209). Connect the S video cable (optional) to the audio input jack on the VCR by using the AC power adaptor (p. 19). When monitoring playback pictures on both your camcorder to LINE. If your TV or VCR is already connected to a VCR Connect your camcorder...
... VCR or the TV. If your camcorder. To turn the screen indicators off, press DISPLAY/TOUCH PANEL on your TV has an S video jack Pictures can operate the video control buttons in the menu settings (p. 209). Connect the S video cable (optional) to the audio input jack on the VCR by using the AC power adaptor (p. 19). When monitoring playback pictures on both your camcorder to LINE. If your TV or VCR is already connected to a VCR Connect your camcorder...
Operating Instructions (primary manual)
Page 52
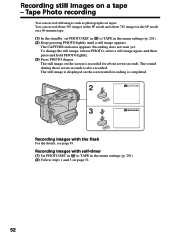
... displayed on tapes. The sound during those seven seconds is completed. 2 PHOTO 3 CAPTURE PHOTO Recording images with self-timer (1) Set PHOTO REC in to TAPE in the menu settings (p. 201). (2) Follow steps 1 and 3 on a 60-minute tape. (1) In the standby, set PHOTO REC in to TAPE in the menu settings (p. 201). (2) Keep pressing PHOTO lightly until recording is also recorded. Tape Photo recording You can record about 510 images in the SP mode and about seven seconds. Recording still images on the screen is recorded...
... displayed on tapes. The sound during those seven seconds is completed. 2 PHOTO 3 CAPTURE PHOTO Recording images with self-timer (1) Set PHOTO REC in to TAPE in the menu settings (p. 201). (2) Follow steps 1 and 3 on a 60-minute tape. (1) In the standby, set PHOTO REC in to TAPE in the menu settings (p. 201). (2) Keep pressing PHOTO lightly until recording is also recorded. Tape Photo recording You can record about 510 images in the SP mode and about seven seconds. Recording still images on the screen is recorded...
Operating Instructions (primary manual)
Page 90
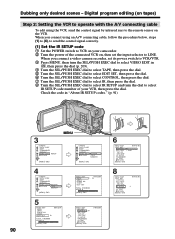
... connect a video camera recorder, set the input selector to select IR SETUP code number of your camcorder. 2 Turn the power of the connected VCR on the VCR. LINK "CUT-IN" "CUT-OUT" IR SETUP PAUSEMODE IR TEST RETURN [MENU] : END 8 VIDEO EDIT EDIT SET CONTROL ADJ TEST "CUT-IN" "CUT-OUT" IR SETUP PAUSEMODE IR TEST RETURN [MENU] : END 0:08:55:06 3 Digital program editing (on tapes) Step 2: Setting the VCR to operate with the A/V connecting cable To edit using...
... connect a video camera recorder, set the input selector to select IR SETUP code number of your camcorder. 2 Turn the power of the connected VCR on the VCR. LINK "CUT-IN" "CUT-OUT" IR SETUP PAUSEMODE IR TEST RETURN [MENU] : END 8 VIDEO EDIT EDIT SET CONTROL ADJ TEST "CUT-IN" "CUT-OUT" IR SETUP PAUSEMODE IR TEST RETURN [MENU] : END 0:08:55:06 3 Digital program editing (on tapes) Step 2: Setting the VCR to operate with the A/V connecting cable To edit using...

Operating Instructions (primary manual)
Page 130
... of (flash) changes the indicator as follows: t t t No indicator Auto red-eye reduction: The flash fires before recording to the appropriate brightness. The default setting is displayed when you press PHOTO. Recording still images on near objects. Recording images with the flash The flash automatically pops up to stop recording. Also, your camcorder prevents focusing on "Memory Stick"s - Checking images on the LCD screen. Forced flash: The flash fires regardless of still images during pressing PHOTO deeper. The flash is...
... of (flash) changes the indicator as follows: t t t No indicator Auto red-eye reduction: The flash fires before recording to the appropriate brightness. The default setting is displayed when you press PHOTO. Recording still images on near objects. Recording images with the flash The flash automatically pops up to stop recording. Also, your camcorder prevents focusing on "Memory Stick"s - Checking images on the LCD screen. Forced flash: The flash fires regardless of still images during pressing PHOTO deeper. The flash is...

Operating Instructions (primary manual)
Page 135
... operation •Insert a recorded tape into your camcorder. •Insert a "Memory Stick" into your camcorder. (1) Set the POWER switch to another image, release PHOTO once and press it lightly again. (4) Press PHOTO deeper. The image displayed on the screen will be recorded on the "Memory Stick" 640 SFN PB INDEX FN 135 To change from the image selected to VCR. (2) Press N. Moving pictures recorded on the tape are played back. (3) Press PHOTO lightly until picture you want to capture from the tape...
... operation •Insert a recorded tape into your camcorder. •Insert a "Memory Stick" into your camcorder. (1) Set the POWER switch to another image, release PHOTO once and press it lightly again. (4) Press PHOTO deeper. The image displayed on the screen will be recorded on the "Memory Stick" 640 SFN PB INDEX FN 135 To change from the image selected to VCR. (2) Press N. Moving pictures recorded on the tape are played back. (3) Press PHOTO lightly until picture you want to capture from the tape...
Operating Instructions (primary manual)
Page 145
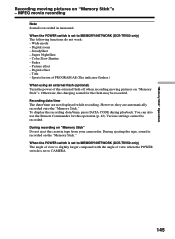
... flashes.) When using an external flash (optional) Turn the power of view when the POWER switch is set to CAMERA. 145 Recording date/time The date/time are automatically recorded onto the "Memory Stick." However, they are not displayed while recording. To display the recording date/time, press DATA CODE during playback. Various settings cannot be recorded. Otherwise, the charging sound for this operation (p. 42). When the POWER switch is set to MEMORY/NETWORK (DCR-TRV50 only) The angle of view is recorded in monaural. Wide mode - Digital zoom - SteadyShot - Digital...
... flashes.) When using an external flash (optional) Turn the power of view when the POWER switch is set to CAMERA. 145 Recording date/time The date/time are automatically recorded onto the "Memory Stick." However, they are not displayed while recording. To display the recording date/time, press DATA CODE during playback. Various settings cannot be recorded. Otherwise, the charging sound for this operation (p. 42). When the POWER switch is set to MEMORY/NETWORK (DCR-TRV50 only) The angle of view is recorded in monaural. Wide mode - Digital zoom - SteadyShot - Digital...
Operating Instructions (primary manual)
Page 179
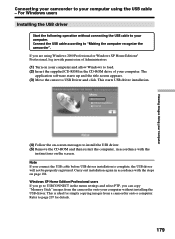
... users If you go to load. (2) Insert the supplied CD-ROM in the CD-ROM drive of Administrators. (1) Turn on page 182. Refer to your computer. Viewing Images Using your Computer Connecting your camcorder to install the USB driver. (5) Remove the CD-ROM and then restart the computer, in accordance with the instructions on the screen. Note If you can copy "Memory Stick" images from the camcorder onto your computer. This starts USB driver installation...
... users If you go to load. (2) Insert the supplied CD-ROM in the CD-ROM drive of Administrators. (1) Turn on page 182. Refer to your computer. Viewing Images Using your Computer Connecting your camcorder to install the USB driver. (5) Remove the CD-ROM and then restart the computer, in accordance with the instructions on the screen. Note If you can copy "Memory Stick" images from the camcorder onto your computer. This starts USB driver installation...
Operating Instructions (primary manual)
Page 181
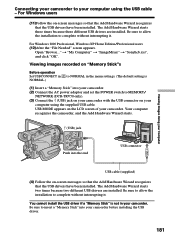
... power adaptor and set the POWER switch to MEMORY/ NETWORK (DCR-TRV50 only). (3) Connect the (USB) jack on your camcorder. Viewing images recorded on "Memory Stick"s Before operation Set USBCONNECT in NORMAL.) to NORMAL in the menu settings. (The default setting is not in your camcorder with the USB connector on -screen messages so that the Add Hardware Wizard recognizes that the USB drivers have been installed. Be sure to allow the installation to complete without interrupting it . Open...
... power adaptor and set the POWER switch to MEMORY/ NETWORK (DCR-TRV50 only). (3) Connect the (USB) jack on your camcorder. Viewing images recorded on "Memory Stick"s Before operation Set USBCONNECT in NORMAL.) to NORMAL in the menu settings. (The default setting is not in your camcorder with the USB connector on -screen messages so that the Add Hardware Wizard recognizes that the USB drivers have been installed. Be sure to allow the installation to complete without interrupting it . Open...

Operating Instructions (primary manual)
Page 182
... procedure to the (USB) jack on your camcorder using the USB cable - Windows 2000 Professional: Select "My Computer" t "Control Panel" t "System" t "Hardware" tab, and click the "Device Manager" button. Viewing images recorded on a tape Step 1: Uninstall the incorrect USB driver 1 Turn on your computer and allow Windows to load. 2 Connect the AC power adaptor, and set the POWER switch to VCR. 3 Connect the USB connector on your computer to correctly install the USB driver. Windows XP Home Edition/Professional...
... procedure to the (USB) jack on your camcorder using the USB cable - Windows 2000 Professional: Select "My Computer" t "Control Panel" t "System" t "Hardware" tab, and click the "Device Manager" button. Viewing images recorded on a tape Step 1: Uninstall the incorrect USB driver 1 Turn on your computer and allow Windows to load. 2 Connect the AC power adaptor, and set the POWER switch to VCR. 3 Connect the USB connector on your computer to correctly install the USB driver. Windows XP Home Edition/Professional...
Operating Instructions (primary manual)
Page 184
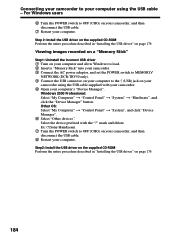
... and delete. Select the device prefixed with your camcorder. 5 Open your computer's "Device Manager". Ex: (?)Sony Handycam 7 Turn the POWER switch to OFF (CHG) on page 179. Connecting your camcorder to your computer using the USB cable supplied with the "?" Viewing images recorded on a "Memory Stick" Step1: Uninstall the incorrect USB driver 1 Turn on your computer and allow Windows to load. 2 Insert a "Memory Stick" into your camcorder. 3 Connect the AC power adaptor, and set the POWER switch to MEMORY/ NETWORK (DCR-TRV50 only). 4 Connect the USB connector...
... and delete. Select the device prefixed with your camcorder. 5 Open your computer's "Device Manager". Ex: (?)Sony Handycam 7 Turn the POWER switch to OFF (CHG) on page 179. Connecting your camcorder to your computer using the USB cable supplied with the "?" Viewing images recorded on a "Memory Stick" Step1: Uninstall the incorrect USB driver 1 Turn on your computer and allow Windows to load. 2 Insert a "Memory Stick" into your camcorder. 3 Connect the AC power adaptor, and set the POWER switch to MEMORY/ NETWORK (DCR-TRV50 only). 4 Connect the USB connector...
Operating Instructions (primary manual)
Page 185
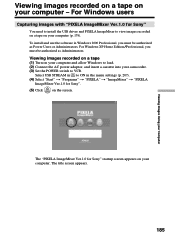
... Ver.1.0 for Sony" startup screen appears on your computer - For Windows users Capturing images with "PIXELA ImageMixer Ver.1.0 for Sony". (5) Click on the screen. To install and use the software in the menu settings (p. 207). (4) Select "Start" t "Programs" t "PIXELA" t "ImageMixer" t "PIXELA ImageMixer Ver.1.0 for Sony" You need to install the USB driver and PIXELA ImageMixer to view images recorded on a tape on your computer and allow Windows to load. (2) Connect the AC power adaptor, and...
... Ver.1.0 for Sony" startup screen appears on your computer - For Windows users Capturing images with "PIXELA ImageMixer Ver.1.0 for Sony". (5) Click on the screen. To install and use the software in the menu settings (p. 207). (4) Select "Start" t "Programs" t "PIXELA" t "ImageMixer" t "PIXELA ImageMixer Ver.1.0 for Sony" You need to install the USB driver and PIXELA ImageMixer to view images recorded on a tape on your computer and allow Windows to load. (2) Connect the AC power adaptor, and...
Operating Instructions (primary manual)
Page 190
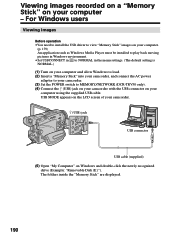
... "Memory Stick" are displayed. 190 Viewing images recorded on a "Memory Stick" on your computer using the supplied USB cable. For Windows users Viewing images Before operation •You need to install the USB driver to view "Memory Stick" images on your computer. (p. 179) An application such as Windows Media Player must be installed to play back moving pictures in Windows environment. •Set USBCONNECT in to NORMAL in the menu settings. (The default setting is NORMAL.) (1) Turn on your computer and allow Windows to load. (2) Insert a "Memory Stick...
... "Memory Stick" are displayed. 190 Viewing images recorded on a "Memory Stick" on your computer using the supplied USB cable. For Windows users Viewing images Before operation •You need to install the USB driver to view "Memory Stick" images on your computer. (p. 179) An application such as Windows Media Player must be installed to play back moving pictures in Windows environment. •Set USBCONNECT in to NORMAL in the menu settings. (The default setting is NORMAL.) (1) Turn on your computer and allow Windows to load. (2) Insert a "Memory Stick...
Operating Instructions (primary manual)
Page 195
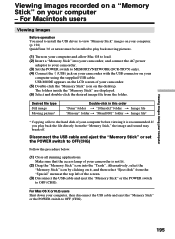
The folders inside the "Memory Stick" are displayed. (6) Select and double-click the desired image file from the "Special" menu at the top left of your camcorder is recommended. If you play back moving pictures. (1) Turn on your computer using the supplied USB cable. Disconnect the USB cable and eject the "Memory Stick" or set the POWER switch to OFF (CHG). 195 For Macintosh users Viewing images Before operation You need to install the USB driver to view "Memory Stick" images on your computer...
The folders inside the "Memory Stick" are displayed. (6) Select and double-click the desired image file from the "Special" menu at the top left of your camcorder is recommended. If you play back moving pictures. (1) Turn on your computer using the supplied USB cable. Disconnect the USB cable and eject the "Memory Stick" or set the POWER switch to OFF (CHG). 195 For Macintosh users Viewing images Before operation You need to install the USB driver to view "Memory Stick" images on your computer...
Operating Instructions (primary manual)
Page 208
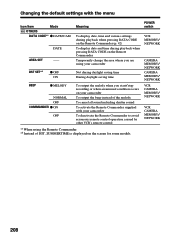
... all sound including shutter sound To activate the Remote Commander supplied with the menu Icon/item Mode OTHERS DATA CODE*1 z DATE/CAM DATE AREA SET -- Changing the default settings with your camcorder To deactivate the Remote Commander to avoid erroneous remote control operation caused by other VCR's remote control VCR CAMERA MEMORY/ NETWORK VCR CAMERA MEMORY/ NETWORK *1 When using your camcorder Not during daylight saving time During daylight saving time VCR MEMORY/ NETWORK CAMERA MEMORY/ NETWORK CAMERA MEMORY/ NETWORK To output the melody when you start/stop recording or...
... all sound including shutter sound To activate the Remote Commander supplied with the menu Icon/item Mode OTHERS DATA CODE*1 z DATE/CAM DATE AREA SET -- Changing the default settings with your camcorder To deactivate the Remote Commander to avoid erroneous remote control operation caused by other VCR's remote control VCR CAMERA MEMORY/ NETWORK VCR CAMERA MEMORY/ NETWORK *1 When using your camcorder Not during daylight saving time During daylight saving time VCR MEMORY/ NETWORK CAMERA MEMORY/ NETWORK CAMERA MEMORY/ NETWORK To output the melody when you start/stop recording or...
Operating Instructions (primary manual)
Page 216
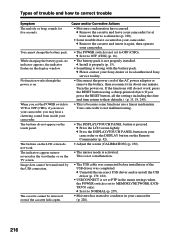
... cassette cannot be transferred by the USB connection. If the functions still do not work . c Uninstall the incorrect USB driver and re-install the USB driver (p. 179, 182). • USBCONNECT is set to PTP in the menu settings when the POWER switch is not set to OFF (CHG). You cannot charge the battery pack. c Remove the cassette and insert it again, then operate your camcorder, you press the RESET button, all the settings including the date and time...
... cassette cannot be transferred by the USB connection. If the functions still do not work . c Uninstall the incorrect USB driver and re-install the USB driver (p. 179, 182). • USBCONNECT is set to PTP in the menu settings when the POWER switch is not set to OFF (CHG). You cannot charge the battery pack. c Remove the cassette and insert it again, then operate your camcorder, you press the RESET button, all the settings including the date and time...

Operating Instructions (primary manual)
Page 219
... messages Troubleshooting Warning messages • CLOCK SET Set the date and time (p. 20). • FOR "InfoLITHIUM" BATTERY ONLY Use an "InfoLITHIUM" battery pack (p. 18). • CLEANING CASSETTE** The video heads are dirty (p. 229). • FULL The cassette memory is full.* • 16BIT AUDIO MODE is set to 16BIT (p. 206).* You cannot dub new audio. • REC MODE REC MODE is set to LOCK (p. 117).* • NO FILE No still image is recorded on the "Memory Stick" (p. 157).* • NO MEMORY STICK No "Memory Stick...
... messages Troubleshooting Warning messages • CLOCK SET Set the date and time (p. 20). • FOR "InfoLITHIUM" BATTERY ONLY Use an "InfoLITHIUM" battery pack (p. 18). • CLEANING CASSETTE** The video heads are dirty (p. 229). • FULL The cassette memory is full.* • 16BIT AUDIO MODE is set to 16BIT (p. 206).* You cannot dub new audio. • REC MODE REC MODE is set to LOCK (p. 117).* • NO FILE No still image is recorded on the "Memory Stick" (p. 157).* • NO MEMORY STICK No "Memory Stick...
Operating Instructions (primary manual)
Page 234
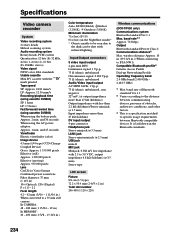
...) Video signal NTSC color, EIA standards Usable cassette Mini DV cassette with the mark printed Tape speed SP: Approx. 18.81 mm/s LP: Approx. 12.56 mm/s Recording/playback time (using cassette DVM60) SP: 1 hour LP: 1.5 hours Fastforward/rewind time (using cassette DVM60) When using the AC power adaptor: Approx. 1 min. and 30 seconds When using the battery pack: Approx. 2 min. and 45 seconds Viewfinder Electric viewfinder (color) Image device 4.5 mm (1/4 type) CCD (Charge Coupled Device) Gross...
...) Video signal NTSC color, EIA standards Usable cassette Mini DV cassette with the mark printed Tape speed SP: Approx. 18.81 mm/s LP: Approx. 12.56 mm/s Recording/playback time (using cassette DVM60) SP: 1 hour LP: 1.5 hours Fastforward/rewind time (using cassette DVM60) When using the AC power adaptor: Approx. 1 min. and 30 seconds When using the battery pack: Approx. 2 min. and 45 seconds Viewfinder Electric viewfinder (color) Image device 4.5 mm (1/4 type) CCD (Charge Coupled Device) Gross...
Operating Instructions (primary manual)
Page 245
... NTSC system 227 O, P, Q OLD MOVIE 61 Operation indicators 244 OVERLAP 57 Photo save 154 Photo scan 85 Photo search 83 Picture effect 60, 75 Picture search 44 Playback pause 44 Playing time 18 Power zoom 31 Print mark 171 PROGRAM AE 64 R Recording time 17 Rec Review 39 Remaining battery time indicator 33 Remaining tape indicator ...... 33 Remote Commander 242 Remote sensor 236 RESET 216 S Self-diagnosis display .......... 217 Self-timer recording 37, 51, 134 Signal convert function...
... NTSC system 227 O, P, Q OLD MOVIE 61 Operation indicators 244 OVERLAP 57 Photo save 154 Photo scan 85 Photo search 83 Picture effect 60, 75 Picture search 44 Playback pause 44 Playing time 18 Power zoom 31 Print mark 171 PROGRAM AE 64 R Recording time 17 Rec Review 39 Remaining battery time indicator 33 Remaining tape indicator ...... 33 Remote Commander 242 Remote sensor 236 RESET 216 S Self-diagnosis display .......... 217 Self-timer recording 37, 51, 134 Signal convert function...


