Operating Instructions
Page 6
.../ Color Slow Shutter 29 Self-timer recording (except DCR-TRV240 31 Checking recordings - Display function 35 Viewing recordings on TV 38 Advanced Recording Operations Recording still images on your computer (Windows users only 94 Customizing Your Camcorder Changing the menu settings 105 6 Picture effect 47 Using special effects - DATE SEARCH 68 Searching for a photo - Tape PB ZOOM 65 Quickly locating a scene - Digital program editing (on your own titles 60 Inserting a scene 62 Advanced Playback Operations Playing back tapes with picture effects 63 Playing back tapes...
.../ Color Slow Shutter 29 Self-timer recording (except DCR-TRV240 31 Checking recordings - Display function 35 Viewing recordings on TV 38 Advanced Recording Operations Recording still images on your computer (Windows users only 94 Customizing Your Camcorder Changing the menu settings 105 6 Picture effect 47 Using special effects - DATE SEARCH 68 Searching for a photo - Tape PB ZOOM 65 Quickly locating a scene - Digital program editing (on your own titles 60 Inserting a scene 62 Advanced Playback Operations Playing back tapes with picture effects 63 Playing back tapes...
Operating Instructions
Page 10
... functions in "Advanced Playback Operations" on a TV, you read through this manual, buttons and settings on a tape. Your camcorder records and plays back pictures in the text, for example, "except DCRTRV240." To enable smooth transition, we recommend that the operation is provided with the Digital8 system on your camcorder are for playback in the Hi8 /standard 8 (analog) system. e.g. Not provided * The models with MEMORY marked on the POWER switch...
... functions in "Advanced Playback Operations" on a TV, you read through this manual, buttons and settings on a tape. Your camcorder records and plays back pictures in the text, for example, "except DCRTRV240." To enable smooth transition, we recommend that the operation is provided with the Digital8 system on your camcorder are for playback in the Hi8 /standard 8 (analog) system. e.g. Not provided * The models with MEMORY marked on the POWER switch...
Operating Instructions
Page 38
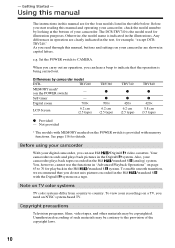
... S video jack Pictures can operate the video control buttons in the menu settings (p. 105). Refer to the operating instructions of the A/V connecting cable to the video input jack and the white or the red plug to the audio input jack on the VCR or the TV. If your TV or VCR is already connected to a VCR Connect your camcorder to the LINE IN input on the VCR by using the AC power adaptor (p. 17). Then, press DISPLAY on the VCR to...
... S video jack Pictures can operate the video control buttons in the menu settings (p. 105). Refer to the operating instructions of the A/V connecting cable to the video input jack and the white or the red plug to the audio input jack on the VCR or the TV. If your TV or VCR is already connected to a VCR Connect your camcorder to the LINE IN input on the VCR by using the AC power adaptor (p. 17). Then, press DISPLAY on the VCR to...
Operating Instructions
Page 42
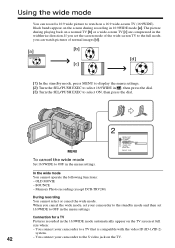
... to the full mode, you cancel the wide mode, set your camcorder to the S video jack on the TV screen at full size when: - You connect your camcorder to OFF in , then press the dial. (3) Turn the SEL/PUSH EXEC to select ON, then press the dial. OLD MOVIE - Connection for a TV Pictures recorded in the widthwise direction. Black bands appear on the screen during playing back on...
... to the full mode, you cancel the wide mode, set your camcorder to the S video jack on the TV screen at full size when: - You connect your camcorder to OFF in , then press the dial. (3) Turn the SEL/PUSH EXEC to select ON, then press the dial. OLD MOVIE - Connection for a TV Pictures recorded in the widthwise direction. Black bands appear on the screen during playing back on...
Operating Instructions
Page 64
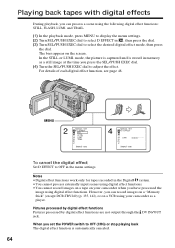
...) or stop playing back The digital effect function is stored in , then press the dial. (3) Turn SEL/PUSH EXEC dial to adjust the effect. Playing back tapes with digital effects During playback, you set the POWER switch to OFF in the Digital8 system. •You cannot process externally input scenes using digital effect functions. •You cannot record images on a tape on your camcorder as a still image at the time you have processed the image using digital effect functions.
...) or stop playing back The digital effect function is stored in , then press the dial. (3) Turn SEL/PUSH EXEC dial to adjust the effect. Playing back tapes with digital effects During playback, you set the POWER switch to OFF in the Digital8 system. •You cannot process externally input scenes using digital effect functions. •You cannot record images on a tape on your camcorder as a still image at the time you have processed the image using digital effect functions.
Operating Instructions
Page 84
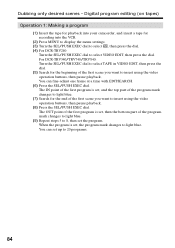
... want to 20 programs. 84 Digital program editing (on tapes) Operation 1: Making a program (1) Insert the tape for playback into your camcorder, and insert a tape for recording into the VCR. (2) Press MENU to display the menu settings. (3) Turn the SEL/PUSH EXEC dial to select , then press the dial. (4) For DCR-TRV240: Turn the SEL/PUSH EXEC dial to insert using the video operation buttons, then pause playback. The OUT point of the...
... want to 20 programs. 84 Digital program editing (on tapes) Operation 1: Making a program (1) Insert the tape for playback into your camcorder, and insert a tape for recording into the VCR. (2) Press MENU to display the menu settings. (3) Turn the SEL/PUSH EXEC dial to select , then press the dial. (4) For DCR-TRV240: Turn the SEL/PUSH EXEC dial to insert using the video operation buttons, then pause playback. The OUT point of the...
Operating Instructions
Page 96
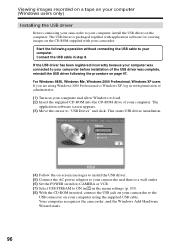
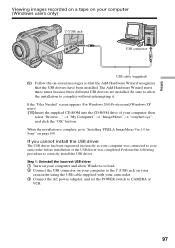
... USB driver installation. (4) Follow the on-screen messages to install the USB driver. (5) Connect the AC power adaptor to your camcorder and then to a wall outlet. (6) Set the POWER switch to CAMERA or VCR. (7) Select USB STREAM to ON in in the menu settings (p. 105). (8) With the CD-ROM inserted, connect the USB jack on your camcorder to your computer, install the USB driver on the computer. Viewing images recorded on a tape on your computer (Windows users only) Installing the USB driver Before connecting your camcorder to the USB...
... USB driver installation. (4) Follow the on-screen messages to install the USB driver. (5) Connect the AC power adaptor to your camcorder and then to a wall outlet. (6) Set the POWER switch to CAMERA or VCR. (7) Select USB STREAM to ON in in the menu settings (p. 105). (8) With the CD-ROM inserted, connect the USB jack on your camcorder to your computer, install the USB driver on the computer. Viewing images recorded on a tape on your computer (Windows users only) Installing the USB driver Before connecting your camcorder to the USB...
Operating Instructions
Page 97
... Sony'" on your camcorder using the USB cable supplied with your camcorder. 3 Connect the AC power adaptor, and set the POWER switch to your camcorder before installation of your computer to the (USB) jack on page 100. If the "Files Needed" screen appears (For Windows 2000 Professional/Windows XP users) (10)Insert the supplied CD-ROM into the CD-ROM drive of the USB driver was completed. Editing Viewing images recorded on a tape on your computer was connected to CAMERA or VCR...
... Sony'" on your camcorder using the USB cable supplied with your camcorder. 3 Connect the AC power adaptor, and set the POWER switch to your camcorder before installation of your computer to the (USB) jack on page 100. If the "Files Needed" screen appears (For Windows 2000 Professional/Windows XP users) (10)Insert the supplied CD-ROM into the CD-ROM drive of the USB driver was completed. Editing Viewing images recorded on a tape on your computer was connected to CAMERA or VCR...

Operating Instructions
Page 112
... to another VCR using a Sony cassette so that you can select AUDIO MODE when you cannot adjust the balance in AUDIO MIX. * Except DCR-TRV240 112 ** To dub a tape to another VCR You cannot select AUDIO MODE for tapes recorded in the Digital8 system. You, however, can get the most out of tape rewinding, forwarding or picture search in VCR mode To always display the remaining tape bar POWER switch MEMORY MEMORY CAMERA VCR CAMERA VCR** CAMERA VCR Note on other camcorders or VCRs, noise...
... to another VCR using a Sony cassette so that you can select AUDIO MODE when you cannot adjust the balance in AUDIO MIX. * Except DCR-TRV240 112 ** To dub a tape to another VCR You cannot select AUDIO MODE for tapes recorded in the Digital8 system. You, however, can get the most out of tape rewinding, forwarding or picture search in VCR mode To always display the remaining tape bar POWER switch MEMORY MEMORY CAMERA VCR CAMERA VCR** CAMERA VCR Note on other camcorders or VCRs, noise...
Operating Instructions
Page 125
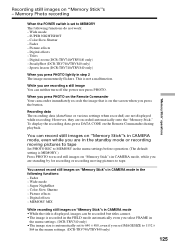
...in the menu settings. (DCR-TRV340 only) •The image size is not a malfunction. Picture effects - Recording data The recording data (date/time or various settings when recorded) are recorded automatically onto the "Memory Stick." However, they are not displayed while recording. You cannot record still images on "Memory Stick"s in CAMERA mode, even while you set IMAGESIZE to MEMORY The following functions: - Super NightShot - Color Slow Shutter - Digital effects - Wide mode - To display the recording data, press DATA CODE on "Memory Stick"s - Wide mode - MEMORY MIX While...
...in the menu settings. (DCR-TRV340 only) •The image size is not a malfunction. Picture effects - Recording data The recording data (date/time or various settings when recorded) are recorded automatically onto the "Memory Stick." However, they are not displayed while recording. You cannot record still images on "Memory Stick"s in CAMERA mode, even while you set IMAGESIZE to MEMORY The following functions: - Super NightShot - Color Slow Shutter - Digital effects - Wide mode - To display the recording data, press DATA CODE on "Memory Stick"s - Wide mode - MEMORY MIX While...
Operating Instructions
Page 135
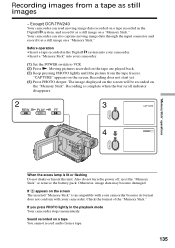
...Set the POWER switch to VCR. (2) Press N. Sound recorded on the "Memory Stick". Check the format of the "Memory Stick." If you press PHOTO lightly in the Digital8 system, and record it as a still image on a tape recorded in the playback mode Your camcorder stops momentarily. Otherwise, image data may become damaged. Moving pictures recorded on the screen. Also do not turn the power off, eject the "Memory Stick" or remove the battery pack. Recording images from the tape freezes. Except DCR-TRV240 Your camcorder can also capture moving image data recorded on a "Memory...
...Set the POWER switch to VCR. (2) Press N. Sound recorded on the "Memory Stick". Check the format of the "Memory Stick." If you press PHOTO lightly in the Digital8 system, and record it as a still image on a tape recorded in the playback mode Your camcorder stops momentarily. Otherwise, image data may become damaged. Moving pictures recorded on the screen. Also do not turn the power off, eject the "Memory Stick" or remove the battery pack. Recording images from the tape freezes. Except DCR-TRV240 Your camcorder can also capture moving image data recorded on a "Memory...
Operating Instructions
Page 136
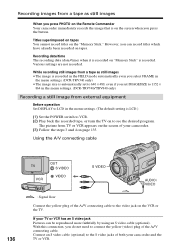
... menu settings. (DCR-TRV340 only) •The image size is LCD.) (1) Set the POWER switch to VCR. (2) Play back the recorded tape, or turn the TV on the VCR or the TV. If your camcorder and the TV or VCR. Connect an S video cable (optional) to the S video jacks of the A/V connecting cable to the video jack on to see the desired program. While recording still images from a tape as still images When you press PHOTO on the Remote Commander Your camcorder...
... menu settings. (DCR-TRV340 only) •The image size is LCD.) (1) Set the POWER switch to VCR. (2) Play back the recorded tape, or turn the TV on the VCR or the TV. If your camcorder and the TV or VCR. Connect an S video cable (optional) to the S video jacks of the A/V connecting cable to the video jack on to see the desired program. While recording still images from a tape as still images When you press PHOTO on the Remote Commander Your camcorder...
Operating Instructions
Page 156
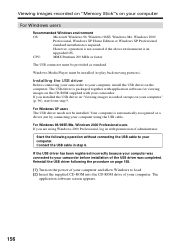
... application software screen appears. 156 For Windows XP users The USB driver needs not be installed (to your camcorder. Start the following the procedure on page 158. (1) Turn on the CD-ROM supplied with permission of the USB driver was completed. Connect the USB cable in "Viewing images recorded on tape on your computer. However, operation is not assured if the above environment is packaged together with application software for viewing images on the power...
... application software screen appears. 156 For Windows XP users The USB driver needs not be installed (to your camcorder. Start the following the procedure on page 158. (1) Turn on the CD-ROM supplied with permission of the USB driver was completed. Connect the USB cable in "Viewing images recorded on tape on your computer. However, operation is not assured if the above environment is packaged together with application software for viewing images on the power...
Operating Instructions
Page 157
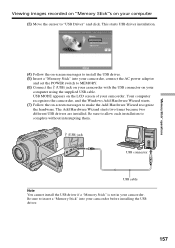
... set the POWER switch to complete without interrupting them. (USB) jack USB connector USB cable Note You cannot install the USB driver if a "Memory Stick" is not in your camcorder before installing the USB driver. 157 "Memory Stick" operations Viewing images recorded on "Memory Stick"s on the LCD screen of your camcorder. Be sure to allow each installation to MEMORY. (6) Connect the (USB) jack on your camcorder with the USB connector on your computer using the supplied USB cable. This starts USB driver installation. (4) Follow the on -screen messages to install the USB driver...
... set the POWER switch to complete without interrupting them. (USB) jack USB connector USB cable Note You cannot install the USB driver if a "Memory Stick" is not in your camcorder before installing the USB driver. 157 "Memory Stick" operations Viewing images recorded on "Memory Stick"s on the LCD screen of your camcorder. Be sure to allow each installation to MEMORY. (6) Connect the (USB) jack on your camcorder with the USB connector on your computer using the supplied USB cable. This starts USB driver installation. (4) Follow the on -screen messages to install the USB driver...
Operating Instructions
Page 158
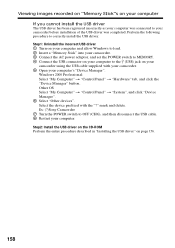
... your camcorder. 3 Connect the AC power adaptor, and set the POWER switch to MEMORY. 4 Connect the USB connector on your computer to the (USB) jack on your computer If you cannot install the USB driver The USB driver has been registered incorrectly as your computer was connected to correctly install the USB driver. Viewing images recorded on "Memory Stick"s on your camcorder using the USB cable supplied with the "?" Select the device prefixed with your camcorder. 5 Open your computer. mark and delete. Windows...
... your camcorder. 3 Connect the AC power adaptor, and set the POWER switch to MEMORY. 4 Connect the USB connector on your computer to the (USB) jack on your computer If you cannot install the USB driver The USB driver has been registered incorrectly as your computer was connected to correctly install the USB driver. Viewing images recorded on "Memory Stick"s on your camcorder using the USB cable supplied with the "?" Select the device prefixed with your camcorder. 5 Open your computer. mark and delete. Windows...
Operating Instructions
Page 160
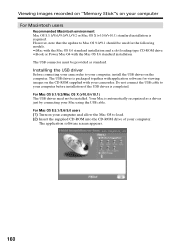
... update to Mac OS 9.0/9.1 should be used for viewing images on your computer For Macintosh users Recommended Macintosh environment Mac OS 8.5.1/8.6/9.0/9.1/9.2 or Mac OS X (v10.0/v10.1) standard installation is packaged together with application software for the following models. •iMac with the Mac OS 8.6 standard installation and a slot loading type CD-ROM drive •iBook or Power Mac G4 with your camcorder. Installing the USB driver Before connecting your camcorder to your computer, install the USB driver...
... update to Mac OS 9.0/9.1 should be used for viewing images on your computer For Macintosh users Recommended Macintosh environment Mac OS 8.5.1/8.6/9.0/9.1/9.2 or Mac OS X (v10.0/v10.1) standard installation is packaged together with application software for the following models. •iMac with the Mac OS 8.6 standard installation and a slot loading type CD-ROM drive •iBook or Power Mac G4 with your camcorder. Installing the USB driver Before connecting your camcorder to your computer, install the USB driver...
Operating Instructions
Page 165
... not be able to tape During copying You cannot operate the following buttons: - Image data modified on the index screen You cannot record the index screen. If you press DISPLAY in the standby or recording mode You can see memory playback and the file name indicators in addition to the indicators pertinent to tapes, such as the time code indicator. 165 MEMORY INDEX - MEMORY MIX - MEMORY +/- If you press EDITSEARCH during pause mode Memory playback stops. MEMORY PLAY -
... not be able to tape During copying You cannot operate the following buttons: - Image data modified on the index screen You cannot record the index screen. If you press DISPLAY in the standby or recording mode You can see memory playback and the file name indicators in addition to the indicators pertinent to tapes, such as the time code indicator. 165 MEMORY INDEX - MEMORY MIX - MEMORY +/- If you press EDITSEARCH during pause mode Memory playback stops. MEMORY PLAY -
Operating Instructions
Page 178
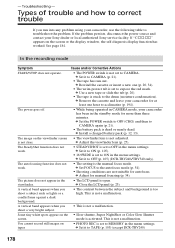
... menu settings. - Troubleshooting - c Remove the cassette and leave your camcorder, use the following table to CAMERA again (p. 21). • The battery pack is open. c Set the POWER switch to OFF (CHG) and then to troubleshoot the problem. The autofocusing function does not work . • STEADYSHOT is not clear. A vertical band appears when you run out. Some tiny white spots appear on the screen or the display window, the self-diagnosis display function has worked...
... menu settings. - Troubleshooting - c Remove the cassette and leave your camcorder, use the following table to CAMERA again (p. 21). • The battery pack is open. c Set the POWER switch to OFF (CHG) and then to troubleshoot the problem. The autofocusing function does not work . • STEADYSHOT is not clear. A vertical band appears when you run out. Some tiny white spots appear on the screen or the display window, the self-diagnosis display function has worked...
Operating Instructions
Page 199
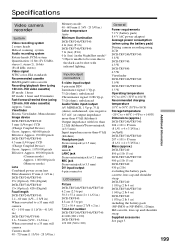
... 7.2 V (battery pack) 8.4 V (AC power adaptor) Average power consumption (when using the battery pack) During camera recording using 120 min. Hi8 video cassette) Approx. 5 min. Viewfinder Electric Viewfinder, Monochrome Image device DCR-TRV240/TRV340: 3 mm (1/6 type) CCD (Charge Coupled Device) Gross: Approx. 460 000 pixels Effective: Approx. 290 000 pixels DCR-TRV740/TRV840: 4.5 mm (1/4 type) CCD (Charge Coupled Device) Gross: Approx. 1 070 000 pixels Effective: Approx. 690 000 pixels (Camera mode) Approx. 1 000 000 pixels (Memory mode) Lens Combined power zoom lens...
... 7.2 V (battery pack) 8.4 V (AC power adaptor) Average power consumption (when using the battery pack) During camera recording using 120 min. Hi8 video cassette) Approx. 5 min. Viewfinder Electric Viewfinder, Monochrome Image device DCR-TRV240/TRV340: 3 mm (1/6 type) CCD (Charge Coupled Device) Gross: Approx. 460 000 pixels Effective: Approx. 290 000 pixels DCR-TRV740/TRV840: 4.5 mm (1/4 type) CCD (Charge Coupled Device) Gross: Approx. 1 070 000 pixels Effective: Approx. 690 000 pixels (Camera mode) Approx. 1 000 000 pixels (Memory mode) Lens Combined power zoom lens...
Operating Instructions
Page 209
... 13 Adjusting viewfinder 25 AFM HiFi Sound 188 AUDIO MIX 108 AUDIO MODE 112 A/V connecting cable 38, 71, 136 BACK LIGHT 28 Battery pack 13 BEEP 114 BOUNCE 44 C, D Camera chromakey 129 Charging battery 13 Charging built-in rechargeable battery 196 Clock set 18 Color Slow Shutter 29 Continuous 126 Data code 35 Date search 68 DEMO 113 DIGITAL EFFECT 48, 64 Digital8 system 187 Digital program editing 74, 146 DISPLAY 35 DOT 44 Dual sound track tape...
... 13 Adjusting viewfinder 25 AFM HiFi Sound 188 AUDIO MIX 108 AUDIO MODE 112 A/V connecting cable 38, 71, 136 BACK LIGHT 28 Battery pack 13 BEEP 114 BOUNCE 44 C, D Camera chromakey 129 Charging battery 13 Charging built-in rechargeable battery 196 Clock set 18 Color Slow Shutter 29 Continuous 126 Data code 35 Date search 68 DEMO 113 DIGITAL EFFECT 48, 64 Digital8 system 187 Digital program editing 74, 146 DISPLAY 35 DOT 44 Dual sound track tape...


