Operating Instructions
Page 4
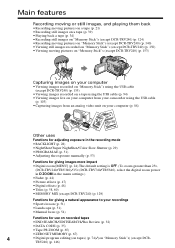
... •Viewing images recorded on "Memory Stick"s using the USB cable (except DCR-TRV240) (p. 155) •Viewing images recorded on a tape using the USB cable (p. 94) •Viewing images live on your computer from your camcorder using the USB cable (p. 103) •Capturing images from an analog video... for giving images more impact •Digital zoom [MENU] (p. 24) The default setting is OFF. (To zoom greater than 25×, (DCR-TRV240/TRV340)/15× (DCR-TRV740/TRV840), select the digital zoom power in D ZOOM in the menu settings.) •Fader (p. 44) •Picture effects (p. 47) ...
... •Viewing images recorded on "Memory Stick"s using the USB cable (except DCR-TRV240) (p. 155) •Viewing images recorded on a tape using the USB cable (p. 94) •Viewing images live on your computer from your camcorder using the USB cable (p. 103) •Capturing images from an analog video... for giving images more impact •Digital zoom [MENU] (p. 24) The default setting is OFF. (To zoom greater than 25×, (DCR-TRV240/TRV340)/15× (DCR-TRV740/TRV840), select the digital zoom power in D ZOOM in the menu settings.) •Fader (p. 44) •Picture effects (p. 47) ...
Operating Instructions
Page 5
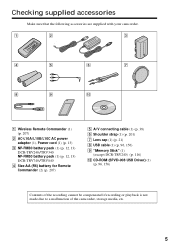
...supplied with your camcorder. 1 2 3 4 5 6 7 8 9 0 1 Wireless Remote Commander (1) (p. 207) 2 AC-L10A/L10B/L10C AC power adaptor (1), Power cord (1) (p. 13) 3 NP-FM30 battery pack (1) (p. 12, 13) DCR-TRV240/TRV340 NP-FM50 battery pack (1) (p. 12, 13) DCR-TRV740/TRV840 4... Size AA (R6) battery for Remote Commander (2) (p. 207) 5 A/V connecting cable (1) (p. 38) 6 Shoulder strap (1) (p. 201) 7 Lens cap (1) (p. 21) 8 USB cable (1) (p. 96, 156) 9 "Memory Stick" (1) (except DCR-TRV240) (p. 116) 0 CD-ROM (SPVD-008 USB...
...supplied with your camcorder. 1 2 3 4 5 6 7 8 9 0 1 Wireless Remote Commander (1) (p. 207) 2 AC-L10A/L10B/L10C AC power adaptor (1), Power cord (1) (p. 13) 3 NP-FM30 battery pack (1) (p. 12, 13) DCR-TRV240/TRV340 NP-FM50 battery pack (1) (p. 12, 13) DCR-TRV740/TRV840 4... Size AA (R6) battery for Remote Commander (2) (p. 207) 5 A/V connecting cable (1) (p. 38) 6 Shoulder strap (1) (p. 201) 7 Lens cap (1) (p. 21) 8 USB cable (1) (p. 96, 156) 9 "Memory Stick" (1) (except DCR-TRV240) (p. 116) 0 CD-ROM (SPVD-008 USB...
Operating Instructions
Page 6
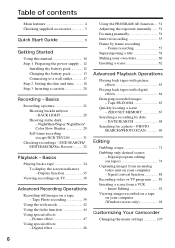
NightShot/Super NightShot/ Color Slow Shutter 29 Self-timer recording (except DCR-TRV240 31 Checking recordings - Basics Playing back a tape 34 To display the screen indicators - Digital effect 48 Using the PROGRAM AE function .... 51 Adjusting the ... Shooting backlit subjects - END SEARCH/ EDITSEARCH/Rec Review .......... 32 Playback - Frame recording 57 Superimposing a title 58 Making your computer (Windows users only 94 Customizing Your Camcorder Changing the menu settings 105 6
NightShot/Super NightShot/ Color Slow Shutter 29 Self-timer recording (except DCR-TRV240 31 Checking recordings - Basics Playing back a tape 34 To display the screen indicators - Digital effect 48 Using the PROGRAM AE function .... 51 Adjusting the ... Shooting backlit subjects - END SEARCH/ EDITSEARCH/Rec Review .......... 32 Playback - Frame recording 57 Superimposing a title 58 Making your computer (Windows users only 94 Customizing Your Camcorder Changing the menu settings 105 6
Operating Instructions
Page 7
...Stick"s - MPEG movie playback 153 Viewing images recorded on "Memory Stick"s on your camcorder abroad .......... 193 Maintenance information and precautions 194 Specifications 199 Quick Reference Identifying parts and ...Stick"s to correct trouble 178 Self-diagnosis display 184 Warning indicators and messages .... 185 Additional Information Digital8 system, recording and playback 187 About the "InfoLITHIUM" battery pack 189 About i.LINK 191 Using your... Types of contents "Memory Stick" operations (except DCR-TRV240) Using "Memory Stick" - Image protection 170 Deleting images -
...Stick"s - MPEG movie playback 153 Viewing images recorded on "Memory Stick"s on your camcorder abroad .......... 193 Maintenance information and precautions 194 Specifications 199 Quick Reference Identifying parts and ...Stick"s to correct trouble 178 Self-diagnosis display 184 Warning indicators and messages .... 185 Additional Information Digital8 system, recording and playback 187 About the "InfoLITHIUM" battery pack 189 About i.LINK 191 Using your... Types of contents "Memory Stick" operations (except DCR-TRV240) Using "Memory Stick" - Image protection 170 Deleting images -
Operating Instructions
Page 8
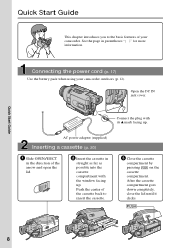
.... 3 Close the cassette compartment by pressing on the cassette compartment. See the page in the direction of your camcorder outdoors (p. 12). Connecting the power cord (p. 17) Use the battery pack when using your camcorder. Open the DC IN jack cover. AC power adaptor (supplied) Inserting a cassette (p. 20) 1 Slide OPEN/EJECT in parentheses...
.... 3 Close the cassette compartment by pressing on the cassette compartment. See the page in the direction of your camcorder outdoors (p. 12). Connecting the power cord (p. 17) Use the battery pack when using your camcorder. Open the DC IN jack cover. AC power adaptor (supplied) Inserting a cassette (p. 20) 1 Slide OPEN/EJECT in parentheses...
Operating Instructions
Page 9
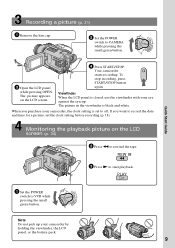
... in the viewfinder is closed, use the viewfinder with your eye against the eyecup. V POWER OFCFR(CHG) CAM M 3 Open the LCD panel while pressing OPEN. Your camcorder starts recording. Viewfinder When the LCD panel is black and white. When you want to record the date and time for a picture, set to VCR while..., press START/STOP button again. PLAY Quick Start Guide OFCFR(CHG) 1 Set the POWER switch to off. V POWER CAM M Note Do not pick up your camcorder, the clock setting is set the clock setting before recording (p. 18). Monitoring the playback picture on the...
... in the viewfinder is closed, use the viewfinder with your eye against the eyecup. V POWER OFCFR(CHG) CAM M 3 Open the LCD panel while pressing OPEN. Your camcorder starts recording. Viewfinder When the LCD panel is black and white. When you want to record the date and time for a picture, set to VCR while..., press START/STOP button again. PLAY Quick Start Guide OFCFR(CHG) 1 Set the POWER switch to off. V POWER CAM M Note Do not pick up your camcorder, the clock setting is set the clock setting before recording (p. 18). Monitoring the playback picture on the...
Operating Instructions
Page 10
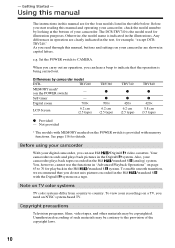
...the copyright laws. 10 Digital zoom 700× LCD Screen 6.2 cm (2.5 type) TRV340 z z 700× 6.2 cm (2.5 type) TRV740 z z 420× 6.2 cm (2.5 type) TRV840 z z 420× 8.8 cm (3.5 type) z Provided - See page 116 for illustration purposes. Also, your camcorder. To view your recordings on a TV, you.... Getting Started - To enable smooth transition, we recommend that the operation is indicated in the Digital8 system. The DCR-TRV740 is provided with the Digital8 system on TV color systems TV color systems differ from country to indicate that you can use the...
...the copyright laws. 10 Digital zoom 700× LCD Screen 6.2 cm (2.5 type) TRV340 z z 700× 6.2 cm (2.5 type) TRV740 z z 420× 6.2 cm (2.5 type) TRV840 z z 420× 8.8 cm (3.5 type) z Provided - See page 116 for illustration purposes. Also, your camcorder. To view your recordings on a TV, you.... Getting Started - To enable smooth transition, we recommend that the operation is indicated in the Digital8 system. The DCR-TRV740 is provided with the Digital8 system on TV color systems TV color systems differ from country to indicate that you can use the...
Operating Instructions
Page 11
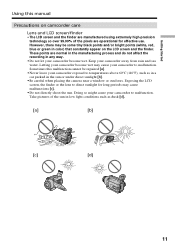
...malfunction. Sometimes this manual Precautions on camcorder care Lens and LCD screen/finder • The LCD screen and the finder are manufactured using extremely high-precision technology so over 99.99% of the sun in any way. •Do not let your camcorder to temperatures above 60°C (140... in low light conditions such as in a car parked in color) that constantly appear on the LCD screen and the finder. These points are operational for long periods may cause your camcorder become wet may cause malfunctions [c]. •Do not directly shoot the sun. Keep your...
...malfunction. Sometimes this manual Precautions on camcorder care Lens and LCD screen/finder • The LCD screen and the finder are manufactured using extremely high-precision technology so over 99.99% of the sun in any way. •Do not let your camcorder to temperatures above 60°C (140... in low light conditions such as in a car parked in color) that constantly appear on the LCD screen and the finder. These points are operational for long periods may cause your camcorder become wet may cause malfunctions [c]. •Do not directly shoot the sun. Keep your...
Operating Instructions
Page 12
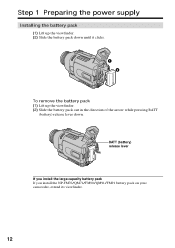
Step 1 Preparing the power supply Installing the battery pack (1) Lift up the viewfinder. (2) Slide the battery pack down until it clicks. 1 2 To remove the battery pack (1) Lift up the viewfinder. (2) Slide the battery pack out in the direction of the arrow while pressing BATT (battery) release lever down. BATT (battery) release lever If you install the large-capacity battery pack If you install the NP-FM70/QM71/FM90/QM91/FM91 battery pack on your camcorder, extend its viewfinder. 12
Step 1 Preparing the power supply Installing the battery pack (1) Lift up the viewfinder. (2) Slide the battery pack down until it clicks. 1 2 To remove the battery pack (1) Lift up the viewfinder. (2) Slide the battery pack out in the direction of the arrow while pressing BATT (battery) release lever down. BATT (battery) release lever If you install the large-capacity battery pack If you install the NP-FM70/QM71/FM90/QM91/FM91 battery pack on your camcorder, extend its viewfinder. 12
Operating Instructions
Page 13
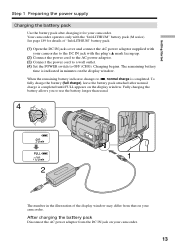
...(full charge), leave the battery pack attached after charging it for details of the display window may differ from the DC IN jack on your camcorder. Getting Started OFCFR(CHG) E ERMAORY CAM M Step 1 Preparing the power supply Charging the battery pack Use the battery pack after normal charge... cord to a wall outlet. (4) Set the POWER switch to use the battery longer than usual. 4 V POWER 1 2 The number in minutes on your camcorder. 13 The remaining battery time is indicated in the illustration of "InfoLITHIUM" battery pack. (1) Open the DC IN jack cover and connect the AC power...
...(full charge), leave the battery pack attached after charging it for details of the display window may differ from the DC IN jack on your camcorder. Getting Started OFCFR(CHG) E ERMAORY CAM M Step 1 Preparing the power supply Charging the battery pack Use the battery pack after normal charge... cord to a wall outlet. (4) Set the POWER switch to use the battery longer than usual. 4 V POWER 1 2 The number in minutes on your camcorder. 13 The remaining battery time is indicated in the illustration of "InfoLITHIUM" battery pack. (1) Open the DC IN jack cover and connect the AC power...
Operating Instructions
Page 14
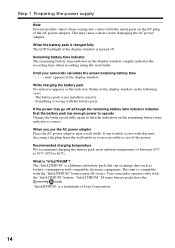
...recording time when recording using the viewfinder. Something is wrong with the "InfoLITHIUM" battery. Your camcorder operates only with the battery pack. TM SERIES "InfoLITHIUM" is a lithium ion battery pack ... of the display window is correct. When the battery pack is charged fully The LCD backlight of the AC power adaptor. While charging the battery pack No indicator appears ...or the indicator flashes in the display window in an ambient temperature of Sony Corporation. 14 If any trouble occurs with compatible electronic equipment. If the power may cause...
...recording time when recording using the viewfinder. Something is wrong with the "InfoLITHIUM" battery. Your camcorder operates only with the battery pack. TM SERIES "InfoLITHIUM" is a lithium ion battery pack ... of the display window is correct. When the battery pack is charged fully The LCD backlight of the AC power adaptor. While charging the battery pack No indicator appears ...or the indicator flashes in the display window in an ambient temperature of Sony Corporation. 14 If any trouble occurs with compatible electronic equipment. If the power may cause...
Operating Instructions
Page 16
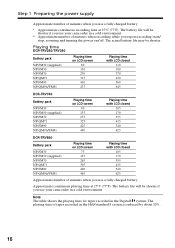
...LCD screen 75 125 265 305 400 465 Playing time with LCD...DCR-TRV240/TRV340 Battery pack NP-FM30 (supplied) NP-FM50 NP-FM70 NP-QM71 NP-FM90 NP-QM91/FM91 Playing time on LCD screen 80 130 270 315 410 475 Playing time with LCD closed 110 180 370 430 560 645 DCR...-TRV740 Battery pack NP-FM30 NP-FM50 (supplied) NP-FM70 NP-QM71 NP-FM90 NP-QM91/FM91 Playing time on LCD screen 80 135 275 325 425 490 Playing time with LCD... closed 105 170 355 415 540 625 DCR...if you use your camcorder in a cold environment...
...LCD screen 75 125 265 305 400 465 Playing time with LCD...DCR-TRV240/TRV340 Battery pack NP-FM30 (supplied) NP-FM50 NP-FM70 NP-QM71 NP-FM90 NP-QM91/FM91 Playing time on LCD screen 80 130 270 315 410 475 Playing time with LCD closed 110 180 370 430 560 645 DCR...-TRV740 Battery pack NP-FM30 NP-FM50 (supplied) NP-FM70 NP-QM71 NP-FM90 NP-QM91/FM91 Playing time on LCD screen 80 135 275 325 425 490 Playing time with LCD... closed 105 170 355 415 540 625 DCR...if you use your camcorder in a cold environment...
Operating Instructions
Page 17
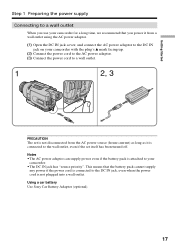
... your camcorder for a long time, we recommend that the battery pack cannot supply any power if the power cord is connected to the DC IN jack, even when the power cord is connected to the wall outlet, even if the set itself has been turned off. Using a car battery Use Sony Car... Battery Adaptor (optional). 17 Getting Started Step 1 Preparing the power supply Connecting to a wall outlet When you power it from a wall outlet using the AC power adaptor. (1) Open the DC IN jack cover, and connect the AC power adaptor to the DC IN jack on your camcorder with...
... your camcorder for a long time, we recommend that the battery pack cannot supply any power if the power cord is connected to the DC IN jack, even when the power cord is connected to the wall outlet, even if the set itself has been turned off. Using a car battery Use Sony Car... Battery Adaptor (optional). 17 Getting Started Step 1 Preparing the power supply Connecting to a wall outlet When you power it from a wall outlet using the AC power adaptor. (1) Open the DC IN jack cover, and connect the AC power adaptor to the DC IN jack on your camcorder with...
Operating Instructions
Page 18
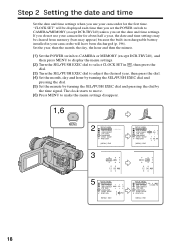
... (except DCR-TRV240) unless you use your camcorder for about half a year, the date and time settings may appear) because the built-in rechargeable battery installed in , then press the dial. (3) Turn the SEL/PUSH EXEC dial to make the menu settings disappear. 1,6 MENU 2 SETUP MENU CLOCK SET USB STREAM USBCONNECT LTR... JAN 1 LTR SIZE LANGUAGE DEMO MODE RETURN 12 00 AM [MENU] : END 2002 JAN 1 12 00 AM SETUP MENU CLOCK SET JUL 4 2002 USB STREAM 5:30:00 PM USBCONNECT LTR SIZE LANGUAGE DEMO MODE RETURN [MENU] : END 18 The clock starts to move. (6) Press MENU to adjust the desired ...
... (except DCR-TRV240) unless you use your camcorder for about half a year, the date and time settings may appear) because the built-in rechargeable battery installed in , then press the dial. (3) Turn the SEL/PUSH EXEC dial to make the menu settings disappear. 1,6 MENU 2 SETUP MENU CLOCK SET USB STREAM USBCONNECT LTR... JAN 1 LTR SIZE LANGUAGE DEMO MODE RETURN 12 00 AM [MENU] : END 2002 JAN 1 12 00 AM SETUP MENU CLOCK SET JUL 4 2002 USB STREAM 5:30:00 PM USBCONNECT LTR SIZE LANGUAGE DEMO MODE RETURN [MENU] : END 18 The clock starts to move. (6) Press MENU to adjust the desired ...
Operating Instructions
Page 19
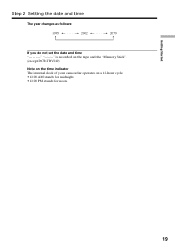
Getting Started Step 2 Setting the date and time The year changes as follows: 1995 T t 2002 T t 2079 If you do not set the date and time is recorded on the tape and the "Memory Stick". (except DCR-TRV240) Note on the time indicator The internal clock of your camcorder operates on a 12-hour cycle. •12:00 AM stands for midnight. •12:00 PM stands for noon. 19
Getting Started Step 2 Setting the date and time The year changes as follows: 1995 T t 2002 T t 2079 If you do not set the date and time is recorded on the tape and the "Memory Stick". (except DCR-TRV240) Note on the time indicator The internal clock of your camcorder operates on a 12-hour cycle. •12:00 AM stands for midnight. •12:00 PM stands for noon. 19

Operating Instructions
Page 20
... close the lid until it clicks. 2 3 4,5 4 5 To eject a cassette Follow the procedure above, and take out the cassette in the Digital8 system. • The recording time when you use standard 8 tape, be closed when you press any part of indicated time on Hi8 tape. &#...menu settings, 3/4 of the lid other DCR-TRV240/TRV340/TRV740/TRV840). •The cassette compartment may cause a malfunction. •Your camcorder records pictures in step 3. If you play back the tape on your camcorder is half of indicated time on other camcorders (including other than the mark. To ...
... close the lid until it clicks. 2 3 4,5 4 5 To eject a cassette Follow the procedure above, and take out the cassette in the Digital8 system. • The recording time when you use standard 8 tape, be closed when you press any part of indicated time on Hi8 tape. &#...menu settings, 3/4 of the lid other DCR-TRV240/TRV340/TRV740/TRV840). •The cassette compartment may cause a malfunction. •Your camcorder records pictures in step 3. If you play back the tape on your camcorder is half of indicated time on other camcorders (including other than the mark. To ...
Operating Instructions
Page 21
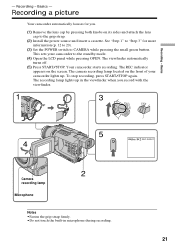
Basics - Basics - The REC indicator appears on the front of your camcorder to the standby mode. (4) Open the LCD panel while pressing OPEN. The recording lamp lights up . Recording - This sets your camcorder lights up in the viewfinder when you . (1) Remove the lens cap by pressing both knobs on its sides and attach the...
Basics - Basics - The REC indicator appears on the front of your camcorder to the standby mode. (4) Open the LCD panel while pressing OPEN. The recording lamp lights up . Recording - This sets your camcorder lights up in the viewfinder when you . (1) Remove the lens cap by pressing both knobs on its sides and attach the...
Operating Instructions
Page 22
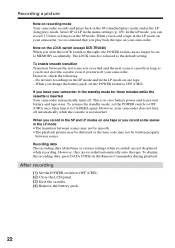
...in the SP mode. When you change the battery pack, set the POWER switch to OFF (CHG) once, then turn off . However, your camcorder. Recording data The recording data (date/time or various settings when recorded) are recorded automatically onto the tape. After recording (1) Set the POWER ...switch to OFF (CHG). (2) Close the LCD panel. (3) Eject the cassette. (4) Remove the battery pack. 22 Recording a picture Note on the LOCK switch (except DCR-TRV240) When you slide the LOCK switch to the right, the POWER switch can record 1.5 times...
...in the SP mode. When you change the battery pack, set the POWER switch to OFF (CHG) once, then turn off . However, your camcorder. Recording data The recording data (date/time or various settings when recorded) are recorded automatically onto the tape. After recording (1) Set the POWER ...switch to OFF (CHG). (2) Close the LCD panel. (3) Eject the cassette. (4) Remove the battery pack. 22 Recording a picture Note on the LOCK switch (except DCR-TRV240) When you slide the LOCK switch to the right, the POWER switch can record 1.5 times...
Operating Instructions
Page 23
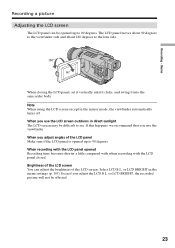
...the menu settings (p. 105). Even if you adjust angles of the LCD panel Make sure if the LCD panel is opened up to 90 degrees. Basics Recording a picture Adjusting the LCD screen The LCD panel can adjust the brightness of the LCD screen You can be opened Recording time becomes shorter a little compared... picture will not be difficult to the lens side. 180° 90° When closing the LCD panel, set it vertically until it clicks, and swing it into the camcorder body. The LCD panel moves about 90 degrees to the viewfinder side and about 180 degrees to see. Brightness of the...
...the menu settings (p. 105). Even if you adjust angles of the LCD panel Make sure if the LCD panel is opened up to 90 degrees. Basics Recording a picture Adjusting the LCD screen The LCD panel can adjust the brightness of the LCD screen You can be opened Recording time becomes shorter a little compared... picture will not be difficult to the lens side. 180° 90° When closing the LCD panel, set it vertically until it clicks, and swing it into the camcorder body. The LCD panel moves about 90 degrees to the viewfinder side and about 180 degrees to see. Brightness of the...

Operating Instructions
Page 30
... 3 m (10 feet). 30 While using the NightShot function, you cannot use the following functions: - Exposure - Memory Photo recording (except DCR-TRV240) While using the NightShot Light is automatically adjusted depending on the brightness. Recording a picture Notes •Do not use the following functions:... function in dark places where the illumination is set to MEMORY (except DCR-TRV240) You cannot use the NightShot mode in the daytime). Super NightShot - Exposure - Fader - This may cause your camcorder to malfunction. •When you keep NIGHTSHOT set to ON in normal...
... 3 m (10 feet). 30 While using the NightShot function, you cannot use the following functions: - Exposure - Memory Photo recording (except DCR-TRV240) While using the NightShot Light is automatically adjusted depending on the brightness. Recording a picture Notes •Do not use the following functions:... function in dark places where the illumination is set to MEMORY (except DCR-TRV240) You cannot use the NightShot mode in the daytime). Super NightShot - Exposure - Fader - This may cause your camcorder to malfunction. •When you keep NIGHTSHOT set to ON in normal...


