Operating Instructions
Page 2
With your purchase of this Sony Digital Handycam camcorder. For the customers in the U.S.A. DISPOSE OF PROPERLY. Note: In some areas the disposal of the FCC Rules. Never expose the battery pack to rain or moisture. WARNING To prevent fire or shock hazard, do not expose the unit to... may be of sufficient magnitude to constitute a risk of electric shock to the presence of Conformity Trade Name: SONY Model No.: DCR-TRV230, DCRTRV330, DCR-TRV530 Responsible Party: Sony Electronics lnc. For customers in the U.S.A. You will soon be producing home video that you may call 416-...
With your purchase of this Sony Digital Handycam camcorder. For the customers in the U.S.A. DISPOSE OF PROPERLY. Note: In some areas the disposal of the FCC Rules. Never expose the battery pack to rain or moisture. WARNING To prevent fire or shock hazard, do not expose the unit to... may be of sufficient magnitude to constitute a risk of electric shock to the presence of Conformity Trade Name: SONY Model No.: DCR-TRV230, DCRTRV330, DCR-TRV530 Responsible Party: Sony Electronics lnc. For customers in the U.S.A. You will soon be producing home video that you may call 416-...
Operating Instructions
Page 5
... 77 Customizing Your Camcorder Changing the menu settings 79 "Memory Stick" operations (DCR-TRV330/TRV530 only) Using "Memory Stick"-introduction .......... 88 Recording still images on a tape - Memory Photo recording 93 Superimposing a still image in the "Memory Stick" on "Memory Stick"s - Photo search/Photo scan 58 Digital8 system, recording and playback 133 About the "InfoLITHIUM" battery pack .. 135...
... 77 Customizing Your Camcorder Changing the menu settings 79 "Memory Stick" operations (DCR-TRV330/TRV530 only) Using "Memory Stick"-introduction .......... 88 Recording still images on a tape - Memory Photo recording 93 Superimposing a still image in the "Memory Stick" on "Memory Stick"s - Photo search/Photo scan 58 Digital8 system, recording and playback 133 About the "InfoLITHIUM" battery pack .. 135...
Operating Instructions
Page 6
... insert. 3 Close the cassette compartment by pressing the mark on the cassette compartment. Connecting the power cord (p. 16) Use the battery pack when using your camcorder. Open the DC IN jack cover. After the cassette compartment goes down completely, close the lid until it clicks. See the page... in the direction of the cassette to the basic features of your camcorder outdoors (p. 11). AC power adaptor (supplied) Inserting a cassette (p. 18) 1 Slide OPEN/EJECT in parentheses "( )" for more information. Quick Start ...
... insert. 3 Close the cassette compartment by pressing the mark on the cassette compartment. Connecting the power cord (p. 16) Use the battery pack when using your camcorder. Open the DC IN jack cover. After the cassette compartment goes down completely, close the lid until it clicks. See the page... in the direction of the cassette to the basic features of your camcorder outdoors (p. 11). AC power adaptor (supplied) Inserting a cassette (p. 18) 1 Slide OPEN/EJECT in parentheses "( )" for more information. Quick Start ...
Operating Instructions
Page 7
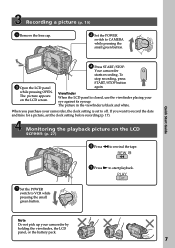
To stop recording, press START/STOP button again. If you purchase your camcorder, the clock setting is set the clock setting before recording (p. 17). Monitoring the playback picture on the LCD screen. 4 Press START/STOP. When you want ... cap. 2 Set the POWER switch to VCR while pressing the small green button. Your camcorder starts recording. The picture in the viewfinder is closed, use the viewfinder placing your camcorder by holding the viewfinder, the LCD panel, or the battery pack. 7 PLAY OFCFR(CHG) 1 Set the POWER switch to CAMERA while pressing the...
To stop recording, press START/STOP button again. If you purchase your camcorder, the clock setting is set the clock setting before recording (p. 17). Monitoring the playback picture on the LCD screen. 4 Press START/STOP. When you want ... cap. 2 Set the POWER switch to VCR while pressing the small green button. Your camcorder starts recording. The picture in the viewfinder is closed, use the viewfinder placing your camcorder by holding the viewfinder, the LCD panel, or the battery pack. 7 PLAY OFCFR(CHG) 1 Set the POWER switch to CAMERA while pressing the...
Operating Instructions
Page 10
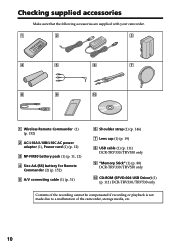
... are supplied with your camcorder. 1 2 3 4 5 6 7 8 9 0 1 Wireless Remote Commander (1) (p. 152) 2 AC-L10A/L10B/L10C AC power adaptor (1), Power cord (1) (p. 12) 3 NP-FM30 battery pack (1) (p. 11, 12) 4 Size AA (R6) battery for Remote Commander (2) (p. 152) 5 A/V connecting cable (1) (p. 31) 6 Shoulder strap (1) (p. 146) 7 Lens cap (1) (p. 19) 8 USB cable (1) (p. 111) DCR-TRV330/TRV530 only 9 "Memory Stick" (1) (p. 88) DCR-TRV330/TRV530 only 0 CD...
... are supplied with your camcorder. 1 2 3 4 5 6 7 8 9 0 1 Wireless Remote Commander (1) (p. 152) 2 AC-L10A/L10B/L10C AC power adaptor (1), Power cord (1) (p. 12) 3 NP-FM30 battery pack (1) (p. 11, 12) 4 Size AA (R6) battery for Remote Commander (2) (p. 152) 5 A/V connecting cable (1) (p. 31) 6 Shoulder strap (1) (p. 146) 7 Lens cap (1) (p. 19) 8 USB cable (1) (p. 111) DCR-TRV330/TRV530 only 9 "Memory Stick" (1) (p. 88) DCR-TRV330/TRV530 only 0 CD...
Operating Instructions
Page 11
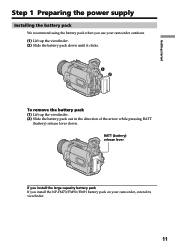
BATT (battery) release lever If you install the large capacity battery pack If you use your camcorder, extend its viewfinder. 11 Getting started Step 1 Preparing the power supply Installing the battery pack We recommend using the battery pack when you install the NP-FM70/FM90/FM91 battery pack on your camcorder outdoors. (1) Lift up the viewfinder. (2) Slide the battery pack down until it clicks. 1 2 To remove the battery pack (1) Lift up the viewfinder. (2) Slide the battery pack out in the direction of the arrow while pressing BATT (battery) release lever down.
BATT (battery) release lever If you install the large capacity battery pack If you use your camcorder, extend its viewfinder. 11 Getting started Step 1 Preparing the power supply Installing the battery pack We recommend using the battery pack when you install the NP-FM70/FM90/FM91 battery pack on your camcorder outdoors. (1) Lift up the viewfinder. (2) Slide the battery pack down until it clicks. 1 2 To remove the battery pack (1) Lift up the viewfinder. (2) Slide the battery pack out in the direction of the arrow while pressing BATT (battery) release lever down.
Operating Instructions
Page 12
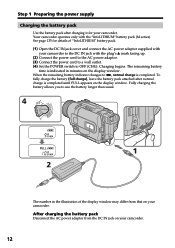
... adaptor from that on the display window. See page 135 for your camcorder. Charging begins. OFCFR(CHG) E ERMAORY CAM M Step 1 Preparing the power supply Charging the battery pack Use the battery pack after normal charge is completed until FULL appears on your camcorder to the DC IN jack with the plug's v mark facing up...
... adaptor from that on the display window. See page 135 for your camcorder. Charging begins. OFCFR(CHG) E ERMAORY CAM M Step 1 Preparing the power supply Charging the battery pack Use the battery pack after normal charge is completed until FULL appears on your camcorder to the DC IN jack with the plug's v mark facing up...

Operating Instructions
Page 13
...possible to cut off the power. Your camcorder operates only with this once a year. "InfoLITHIUM" M series battery packs have the mark. Until your camcorder calculates the actual remaining battery time "- - - - min" appears in the following cases: - While charging the battery pack, no indicator appears or the ... parts of the DC plug of Sony Corporation. This unit is correct. Getting started Step 1 Preparing the power supply Notes •Prevent metallic objects from the wall outlet as soon as battery consumption with the battery pack. The battery pack is a trademark of the AC...
...possible to cut off the power. Your camcorder operates only with this once a year. "InfoLITHIUM" M series battery packs have the mark. Until your camcorder calculates the actual remaining battery time "- - - - min" appears in the following cases: - While charging the battery pack, no indicator appears or the ... parts of the DC plug of Sony Corporation. This unit is correct. Getting started Step 1 Preparing the power supply Notes •Prevent metallic objects from the wall outlet as soon as battery consumption with the battery pack. The battery pack is a trademark of the AC...

Operating Instructions
Page 14
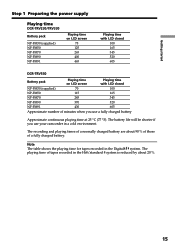
...) 145 (85) 150 (90) 240 (180) 330 (270) 360 (300) Approximate number of minutes to charge an empty battery pack at 25 °C (77 °F) Recording time DCR-TRV230/TRV330 Battery pack NP-FM30 (supplied) NP-FM50 NP-FM70 NP-FM90 NP-FM91 Recording with the viewfinder Continuous* Typical** 100 55 165...140 NP-FM90 520 335 370 210 NP-FM91 605 390 430 245 Approximate number of minutes when recording while you use your camcorder in a cold environment. ** Approximate number of minutes when you repeat recording start/ stop, zooming and turning the power on/off. The actual...
...) 145 (85) 150 (90) 240 (180) 330 (270) 360 (300) Approximate number of minutes to charge an empty battery pack at 25 °C (77 °F) Recording time DCR-TRV230/TRV330 Battery pack NP-FM30 (supplied) NP-FM50 NP-FM70 NP-FM90 NP-FM91 Recording with the viewfinder Continuous* Typical** 100 55 165...140 NP-FM90 520 335 370 210 NP-FM91 605 390 430 245 Approximate number of minutes when recording while you use your camcorder in a cold environment. ** Approximate number of minutes when you repeat recording start/ stop, zooming and turning the power on/off. The actual...
Operating Instructions
Page 15
...charged battery. The battery life will be shorter if you use your camcorder in a cold environment. The playing time of tapes recorded in the Digital8 system. The recording and playing times of a normally charged battery are about 20 %. 15 Getting started Step 1 Preparing the power supply Playing time DCR-TRV230/TRV330 Battery pack ...NP-FM30 (supplied) NP-FM50 NP-FM70 NP-FM90 NP-FM91 Playing time on LCD screen 75 125 265 400 465 Playing time with LCD closed 100 165 345 520 605 DCR-TRV530 Battery pack Playing time on LCD...
...charged battery. The battery life will be shorter if you use your camcorder in a cold environment. The playing time of tapes recorded in the Digital8 system. The recording and playing times of a normally charged battery are about 20 %. 15 Getting started Step 1 Preparing the power supply Playing time DCR-TRV230/TRV330 Battery pack ...NP-FM30 (supplied) NP-FM50 NP-FM70 NP-FM90 NP-FM91 Playing time on LCD screen 75 125 265 400 465 Playing time with LCD closed 100 165 345 520 605 DCR-TRV530 Battery pack Playing time on LCD...

Operating Instructions
Page 16
Using a car battery Use Sony DC Adaptor/Charger (optional). 16 This means that you power it from the AC power source (house current) as long as it is not plugged into a wall outlet. Notes • The AC power adaptor can supply power even if the battery pack is attached to the ...source priority". Step 1 Preparing the power supply Connecting to a wall outlet When you use your camcorder for a long time, we recommend that the battery pack cannot supply any power if the power cord is connected to your camcorder with the plug's v mark facing up. (2) Connect the power cord to the AC power...
Using a car battery Use Sony DC Adaptor/Charger (optional). 16 This means that you power it from the AC power source (house current) as long as it is not plugged into a wall outlet. Notes • The AC power adaptor can supply power even if the battery pack is attached to the ...source priority". Step 1 Preparing the power supply Connecting to a wall outlet When you use your camcorder for a long time, we recommend that the battery pack cannot supply any power if the power cord is connected to your camcorder with the plug's v mark facing up. (2) Connect the power cord to the AC power...
Operating Instructions
Page 17
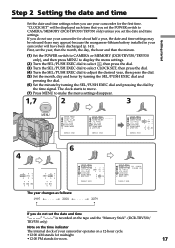
...DCR-TRV330/TRV530 only) unless you set the date and time settings. Getting started Step 2 Setting the date and time Set the date and time settings when you use your camcorder for about half a year, the date and time settings may be released (bars may appear) because the manganese-lithium battery installed in your camcorder... 4 2001 JAN 1 12 00 AM 2001 JAN 1 12 00 6 SETUP MENU CLOCK SET AUTO TV ON TV I NPUT 2001 JUL 4 LTR S I ZE L ANGUAGE DEMO MODE RETURN 5 30 PM [ MENU ] : END The year changes as follows: 1995 T t 2001 T t 2079 SETUP MENU CLOCK SET J UL 4 2001 AUTO TV ON 5:...
...DCR-TRV330/TRV530 only) unless you set the date and time settings. Getting started Step 2 Setting the date and time Set the date and time settings when you use your camcorder for about half a year, the date and time settings may be released (bars may appear) because the manganese-lithium battery installed in your camcorder... 4 2001 JAN 1 12 00 AM 2001 JAN 1 12 00 6 SETUP MENU CLOCK SET AUTO TV ON TV I NPUT 2001 JUL 4 LTR S I ZE L ANGUAGE DEMO MODE RETURN 5 30 PM [ MENU ] : END The year changes as follows: 1995 T t 2001 T t 2079 SETUP MENU CLOCK SET J UL 4 2001 AUTO TV ON 5:...
Operating Instructions
Page 20
... the SP and LP modes on LOCK (DCR-TRV330/TRV530 only) When you slide LOCK to prevent battery and tape wear. The LOCK is to save battery power and to the right, the POWER switch can make the transition between scenes. This is released as a default setting. If you leave your camcorder. Indicators in the standby...
... the SP and LP modes on LOCK (DCR-TRV330/TRV530 only) When you slide LOCK to prevent battery and tape wear. The LOCK is to save battery power and to the right, the POWER switch can make the transition between scenes. This is released as a default setting. If you leave your camcorder. Indicators in the standby...
Operating Instructions
Page 22
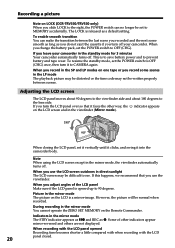
...panel and open it again, it takes about one minute for tapes recorded in the Digital8 system only) The time code indicates the recording or playback time, "0:00:00" (hours:minutes: seconds) in CAMERA mode and "0:00:00:00" (hours:minutes:seconds:frames) in the Hi8/standard 8 ...battery time indicator Format indicator Recording mode indicator STBY/REC indicator 40min SP REC 0:00:01 Time code/Tape counter indicator JUL 4 2001 12:05:56 AM Remaining tape indicator This appears after the POWER switch is displayed for a while. Date indicator This is set to CAMERA or MEMORY (DCR-TRV330...
...panel and open it again, it takes about one minute for tapes recorded in the Digital8 system only) The time code indicates the recording or playback time, "0:00:00" (hours:minutes: seconds) in CAMERA mode and "0:00:00:00" (hours:minutes:seconds:frames) in the Hi8/standard 8 ...battery time indicator Format indicator Recording mode indicator STBY/REC indicator 40min SP REC 0:00:01 Time code/Tape counter indicator JUL 4 2001 12:05:56 AM Remaining tape indicator This appears after the POWER switch is displayed for a while. Date indicator This is set to CAMERA or MEMORY (DCR-TRV330...
Operating Instructions
Page 29
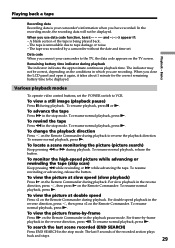
...on the conditions in the stop mode. The tape is your camcorder to reverse the playback direction. To rewind the tape Press m in which you close the LCD panel and open it again, it takes about 1 minute for the correct remaining battery time to be displayed. To... in the stop mode. For frame-by -frame Press C on the Remote Commander during playback. When you have recorded. To resume playback, press X or N. To resume normal playback, press N. To resume normal playback, press N. To resume normal playback, press N. To view a still image (playback pause...
...on the conditions in the stop mode. The tape is your camcorder to reverse the playback direction. To rewind the tape Press m in which you close the LCD panel and open it again, it takes about 1 minute for the correct remaining battery time to be displayed. To... in the stop mode. For frame-by -frame Press C on the Remote Commander during playback. When you have recorded. To resume playback, press X or N. To resume normal playback, press N. To resume normal playback, press N. To resume normal playback, press N. To view a still image (playback pause...
Operating Instructions
Page 82
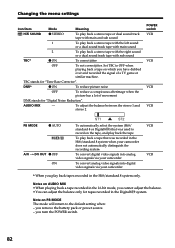
... To convert digital video signals into digital video siginals via your camcorder. To adjust the balance between the stereo 1 and stereo 2 POWER switch VCR VCR VCR VCR PB MODE z AUTO / A/V t DV OUT z OFF ON ST1 ST2 To automatically select the system (Hi8/ standard 8 or Digital8 ) that ...jitter OFF To not correct jitter. Note on which you remove the battery pack or power source. - TBC stands for "Digital Noise Reduction". To convert analog video signals into analog video signals via your camcorder. you cannot adjust the balance. •You can adjust the balance ...
... To convert digital video signals into digital video siginals via your camcorder. To adjust the balance between the stereo 1 and stereo 2 POWER switch VCR VCR VCR VCR PB MODE z AUTO / A/V t DV OUT z OFF ON ST1 ST2 To automatically select the system (Hi8/ standard 8 or Digital8 ) that ...jitter OFF To not correct jitter. Note on which you remove the battery pack or power source. - TBC stands for "Digital Noise Reduction". To convert analog video signals into analog video signals via your camcorder. you cannot adjust the balance. •You can adjust the balance ...
Operating Instructions
Page 83
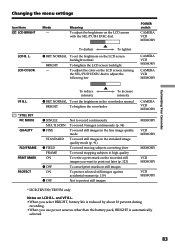
... (p. 123) To cancel print marks on still images To protect selected still images against accidental erasure (p. 119) Not to protect still images CAMERA VCR MEMORY MEMORY VCR MEMORY MEMORY VCR MEMORY VCR MEMORY * DCR-TRV330/TRV530 only Notes on the recorded still images you use power sources other than the battery pack, BRIGHT is automatically selected. 83...
... (p. 123) To cancel print marks on still images To protect selected still images against accidental erasure (p. 119) Not to protect still images CAMERA VCR MEMORY MEMORY VCR MEMORY MEMORY VCR MEMORY VCR MEMORY * DCR-TRV330/TRV530 only Notes on the recorded still images you use power sources other than the battery pack, BRIGHT is automatically selected. 83...

Operating Instructions
Page 87
... perform video editing (p. 63) To adjust and set the synchronicity of your camcorder and a VCR for dubbing in edit set mode (p. 63) To turn off the backlight on display window To turn on INDICATOR •When you select BL ON, battery life is reduced by the time difference you use power sources other... menu items are returned to outputs on the TV or VCR. (Except when your camcorder is removed...
... perform video editing (p. 63) To adjust and set the synchronicity of your camcorder and a VCR for dubbing in edit set mode (p. 63) To turn off the backlight on display window To turn on INDICATOR •When you select BL ON, battery life is reduced by the time difference you use power sources other... menu items are returned to outputs on the TV or VCR. (Except when your camcorder is removed...

Operating Instructions
Page 88
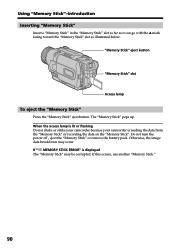
...not bend, drop or apply strong shock to corrosive gases •When you remove the "Memory Stick", turn the power off, or detach the battery for "Memory Stick" supplied with other equipment such as in a car parked in locations that are: - Under direct sunlight - - You can... static electricity or magnetic fields. •Prevent metallic objects or your camcorder. DCR-TRV330/TRV530 only You can easily play back still images on the model, the position and shape of your camcorder. On file format (JPEG) Your camcorder compresses image data in its label on the display of the switch ...
...not bend, drop or apply strong shock to corrosive gases •When you remove the "Memory Stick", turn the power off, or detach the battery for "Memory Stick" supplied with other equipment such as in a car parked in locations that are: - Under direct sunlight - - You can... static electricity or magnetic fields. •Prevent metallic objects or your camcorder. DCR-TRV330/TRV530 only You can easily play back still images on the model, the position and shape of your camcorder. On file format (JPEG) Your camcorder compresses image data in its label on the display of the switch ...
Operating Instructions
Page 90
..." slot as illustrated below. The "Memory Stick" pops up. When the access lamp is lit or flashing Do not shake or strike your camcorder because your camcorder is displayed The "Memory Stick" may occur. If this occurs, use another "Memory Stick." 90 "Memory Stick" eject button "Memory Stick"... slot Access lamp To eject the "Memory Stick" Press the "Memory Stick" eject button. Do not turn the power off , eject the "Memory Stick" or remove the battery...
..." slot as illustrated below. The "Memory Stick" pops up. When the access lamp is lit or flashing Do not shake or strike your camcorder because your camcorder is displayed The "Memory Stick" may occur. If this occurs, use another "Memory Stick." 90 "Memory Stick" eject button "Memory Stick"... slot Access lamp To eject the "Memory Stick" Press the "Memory Stick" eject button. Do not turn the power off , eject the "Memory Stick" or remove the battery...


