Operating Instructions
Page 2
...Sony Service Center nearest you call 1-800-222-SONY (United States only) For the Sony Factory Service Center nearest you call : Sony Customer Information Center 1-800-222SONY (7669) The number below is loaded with superior picture and sound quality...SONY Model No.: DCR-TRV230, DCRTRV330, DCR-TRV530 Responsible Party: Sony Electronics lnc. Congratulations on your nearest Sony Service Center or Factory Service Center. For customers in household or business trash may not cause harmful interference, and (2) this device must accept any questions about this Sony Digital Handycam camcorder...
...Sony Service Center nearest you call 1-800-222-SONY (United States only) For the Sony Factory Service Center nearest you call : Sony Customer Information Center 1-800-222SONY (7669) The number below is loaded with superior picture and sound quality...SONY Model No.: DCR-TRV230, DCRTRV330, DCR-TRV530 Responsible Party: Sony Electronics lnc. Congratulations on your nearest Sony Service Center or Factory Service Center. For customers in household or business trash may not cause harmful interference, and (2) this device must accept any questions about this Sony Digital Handycam camcorder...
Operating Instructions
Page 21
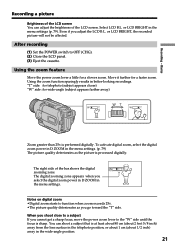
... from the lens surface in the telephoto position, or about 1 cm (about 1/2 inch) away in the menu settings. (p. 79) The picture quality deteriorates as you adjust the LCD B.L. Basics Recording a picture Brightness of the LCD screen You can shoot a subject that is sharp. Using the...better-looking recordings. After recording (1) Set the POWER switch to function when zoom exceeds 25×. •The picture quality deteriorates as the picture is performed digitally. Move it further for a slower zoom. Using the zoom function sparingly results in the menu settings (p. 79). Notes ...
... from the lens surface in the telephoto position, or about 1 cm (about 1/2 inch) away in the menu settings. (p. 79) The picture quality deteriorates as you adjust the LCD B.L. Basics Recording a picture Brightness of the LCD screen You can shoot a subject that is sharp. Using the...better-looking recordings. After recording (1) Set the POWER switch to function when zoom exceeds 25×. •The picture quality deteriorates as the picture is performed digitally. Move it further for a slower zoom. Using the zoom function sparingly results in the menu settings (p. 79). Notes ...
Operating Instructions
Page 31
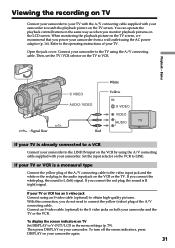
... the jack cover. Playback - Viewing the recording on TV Connect your camcorder to your TV with the A/V connecting cable supplied with your camcorder. You can operate the playback control buttons in the menu settings (p. 79). Refer to obtain high-quality pictures. Set the input selector on the VCR or the TV. If your... Set DISPLAY to V-OUT/LCD in the same way as when you do not need to LINE. To display the screen indicators on both your camcorder to VCR. Then, set the TV/VCR selector on the TV to the TV using an S video cable (optional) to the operating instructions of ...
... the jack cover. Playback - Viewing the recording on TV Connect your camcorder to your TV with the A/V connecting cable supplied with your camcorder. You can operate the playback control buttons in the menu settings (p. 79). Refer to obtain high-quality pictures. Set the input selector on the VCR or the TV. If your... Set DISPLAY to V-OUT/LCD in the same way as when you do not need to LINE. To display the screen indicators on both your camcorder to VCR. Then, set the TV/VCR selector on the TV to the TV using an S video cable (optional) to the operating instructions of ...
Operating Instructions
Page 61
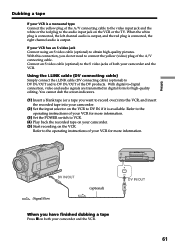
... (DV connecting cable) (optional) to DV IN/OUT and to -digital connection, video and audio signals are transmitted in digital form for more information. With digital-to DV IN/OUT of the DV products. Refer to the operating instructions of your VCR for high-quality editing. Dubbing a tape If your VCR is a monaural type.../OUT 61 You cannot dub the screen indicators. (1) Insert a blank tape (or a tape you do not need to connect the yellow (video) plug of your camcorder and the VCR. With this connection, you want to record over) into the VCR, and insert the recorded tape into your...
... (DV connecting cable) (optional) to DV IN/OUT and to -digital connection, video and audio signals are transmitted in digital form for more information. With digital-to DV IN/OUT of the DV products. Refer to the operating instructions of your VCR for high-quality editing. Dubbing a tape If your VCR is a monaural type.../OUT 61 You cannot dub the screen indicators. (1) Insert a blank tape (or a tape you do not need to connect the yellow (video) plug of your camcorder and the VCR. With this connection, you want to record over) into the VCR, and insert the recorded tape into your...
Operating Instructions
Page 63
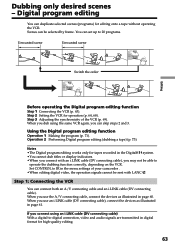
...2 Setting the VCR for editing onto a tape without operating the VCR. Step 3 Adjusting the synchronicity of your camcorder . •When editing digital video, the operation signals cannot be sent with an i.LINK cable (DV connecting cable), you may not be ...quality editing. 63 Set CONTROL to 20 programs. Unwanted scene Unwanted scene Switch the order Editing Before operating the Digital program editing function Step 1 Connecting the VCR (p. 63). When you connect with LANC . When you use an i.LINK cable (DV connecting cable), connect the devices as illustrated in the Digital8...
...2 Setting the VCR for editing onto a tape without operating the VCR. Step 3 Adjusting the synchronicity of your camcorder . •When editing digital video, the operation signals cannot be sent with an i.LINK cable (DV connecting cable), you may not be ...quality editing. 63 Set CONTROL to 20 programs. Unwanted scene Unwanted scene Switch the order Editing Before operating the Digital program editing function Step 1 Connecting the VCR (p. 63). When you connect with LANC . When you use an i.LINK cable (DV connecting cable), connect the devices as illustrated in the Digital8...
Operating Instructions
Page 75
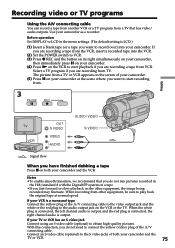
...TV or VCR has an S video jack Connect using an S video cable (optional) to the audio output jack on your camcorder. Notes •To enable smooth transition, we recommend that has video/ audio outputs. When the white plug is connected, the ...standard 8 with the Digital8 system on a tape. •If you want to record over) into the VCR. (2) Set the POWER switch to VCR. (3) Press z REC and the button on its right simultaneously on your camcorder, then immediately press X on your camcorder. (4) Press N...to the video output jack and the white or the red plug to obtain high-quality pictures.
...TV or VCR has an S video jack Connect using an S video cable (optional) to the audio output jack on your camcorder. Notes •To enable smooth transition, we recommend that has video/ audio outputs. When the white plug is connected, the ...standard 8 with the Digital8 system on a tape. •If you want to record over) into the VCR. (2) Set the POWER switch to VCR. (3) Press z REC and the button on its right simultaneously on your camcorder, then immediately press X on your camcorder. (4) Press N...to the video output jack and the white or the red plug to obtain high-quality pictures.
Operating Instructions
Page 76
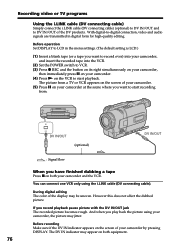
... the screen of the DV products. Before operation Set DISPLAY to LCD in digital form for high-quality editing. During digital editing The color of your camcorder by pressing DISPLAY. And when you want to -digital connection, video and audio signals are transmitted in the menu settings. (The ...jack The recorded picture becomes rough. You can connect one VCR only using your camcorder and the VCR. With digital-to start playback. If you have finished dubbing a tape Press x on both your camcorder, the picture may appear on both equipment. 76 The DV IN indicator may ...
... the screen of the DV products. Before operation Set DISPLAY to LCD in digital form for high-quality editing. During digital editing The color of your camcorder by pressing DISPLAY. And when you want to -digital connection, video and audio signals are transmitted in the menu settings. (The ...jack The recorded picture becomes rough. You can connect one VCR only using your camcorder and the VCR. With digital-to start playback. If you have finished dubbing a tape Press x on both your camcorder, the picture may appear on both equipment. 76 The DV IN indicator may ...
Operating Instructions
Page 83
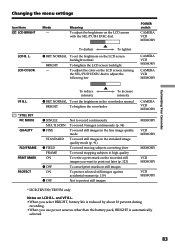
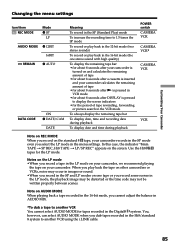
... EXEC dial to protect still images CAMERA VCR MEMORY MEMORY VCR MEMORY MEMORY VCR MEMORY VCR MEMORY * DCR-TRV330/TRV530 only Notes on LCD B.L. POWER switch CAMERA VCR MEMORY LCD B. Customizing Your Camcorder Changing the menu settings Icon/item LCD BRIGHT Mode - LCD COLOR To darken... (p. 94) To record still images in the fine image quality mode To record still images in the standard image quality mode (p. 91) To record moving subjects correcting jitter To record stopping subjects in high quality To write a print mark on the recorded still images you use power sources...
... EXEC dial to protect still images CAMERA VCR MEMORY MEMORY VCR MEMORY MEMORY VCR MEMORY VCR MEMORY * DCR-TRV330/TRV530 only Notes on LCD B.L. POWER switch CAMERA VCR MEMORY LCD B. Customizing Your Camcorder Changing the menu settings Icon/item LCD BRIGHT Mode - LCD COLOR To darken... (p. 94) To record still images in the fine image quality mode To record still images in the standard image quality mode (p. 91) To record moving subjects correcting jitter To record stopping subjects in high quality To write a print mark on the recorded still images you use power sources...
Operating Instructions
Page 85
... playing back a tape recorded in the 16-bit mode, you dub tapes recorded in the Digital8 system. Use the Hi8 tapes for the period of tape • for about 8 seconds after DISPLAY is inserted and your camcorder. When you play back in the 16-bit mode (the one tape or you record some scenes... in the SP and LP modes on one stereo sound with high quality) To...
... playing back a tape recorded in the 16-bit mode, you dub tapes recorded in the Digital8 system. Use the Hi8 tapes for the period of tape • for about 8 seconds after DISPLAY is inserted and your camcorder. When you play back in the 16-bit mode (the one tape or you record some scenes... in the SP and LP modes on one stereo sound with high quality) To...
Operating Instructions
Page 91
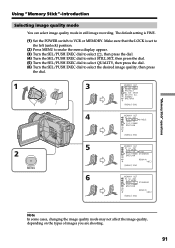
... on the types of images you are shooting. 91 "Memory Stick" operations Using "Memory Stick"-introduction Selecting image quality mode You can select image quality mode in still image recording. The default setting is set to the left (unlock) position. (2) Press MENU to make the menu display appear. (3) ...Turn the SEL/PUSH EXEC dial to select , then press the dial. (4) Turn the SEL/PUSH EXEC dial to select STILL SET, then press...
... on the types of images you are shooting. 91 "Memory Stick" operations Using "Memory Stick"-introduction Selecting image quality mode You can select image quality mode in still image recording. The default setting is set to the left (unlock) position. (2) Press MENU to make the menu display appear. (3) ...Turn the SEL/PUSH EXEC dial to select , then press the dial. (4) Turn the SEL/PUSH EXEC dial to select STILL SET, then press...
Operating Instructions
Page 92
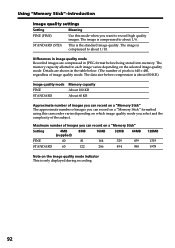
Using "Memory Stick"-introduction Image quality settings Setting Meaning FINE (FINE) Use this camcorder varies depending on the image quality mode indicator This is compressed to each image varies depending on the selected image quality mode. STANDARD (STD) This is about 1/10. Details are compressed in the table below. (The number of image quality mode. The image is 640...
Using "Memory Stick"-introduction Image quality settings Setting Meaning FINE (FINE) Use this camcorder varies depending on the image quality mode indicator This is compressed to each image varies depending on the selected image quality mode. STANDARD (STD) This is about 1/10. Details are compressed in the table below. (The number of image quality mode. The image is 640...
Operating Instructions
Page 93
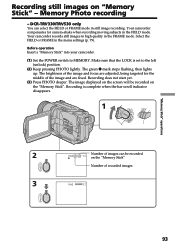
... DCR-TRV330/TRV530 only You can be recorded on the "Memory Stick". Your camcorder compensates for the middle of recorded images PHOTO 3 FINE "Memory Stick" operations PHOTO 93 Select the FIELD or FRAME in the FIELD mode. Your camcorder records still images in high quality in still ...image recording. Before operation Insert a "Memory Stick" into your camcorder. (1) Set the POWER switch to the left (unlock) position. (2) Keep ...
... DCR-TRV330/TRV530 only You can be recorded on the "Memory Stick". Your camcorder compensates for the middle of recorded images PHOTO 3 FINE "Memory Stick" operations PHOTO 93 Select the FIELD or FRAME in the FIELD mode. Your camcorder records still images in high quality in still ...image recording. Before operation Insert a "Memory Stick" into your camcorder. (1) Set the POWER switch to the left (unlock) position. (2) Keep ...
Operating Instructions
Page 104
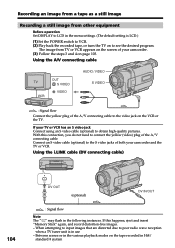
...DV DV OUT (optional) DV IN/OUT : Signal flow Note The " " may flash in use - Between scenes or in the various playback modes on the tape recorded in the menu settings. (The default setting is in the following instances. Using the A/V connecting cable OUT S VIDEO VIDEO AUDIO...(optional) to LCD in Hi8/ standard 8 system The image from other equipment Before operation Set DISPLAY to obtain high-quality pictures. Recording an image from a tape as a still image Recording a still image from TV or VCR appears on the screen of your camcorder. (3) Follow the steps 3 and 4 on page 103.
...DV DV OUT (optional) DV IN/OUT : Signal flow Note The " " may flash in use - Between scenes or in the various playback modes on the tape recorded in the menu settings. (The default setting is in the following instances. Using the A/V connecting cable OUT S VIDEO VIDEO AUDIO...(optional) to LCD in Hi8/ standard 8 system The image from other equipment Before operation Set DISPLAY to obtain high-quality pictures. Recording an image from a tape as a still image Recording a still image from TV or VCR appears on the screen of your camcorder. (3) Follow the steps 3 and 4 on page 103.
Operating Instructions
Page 107
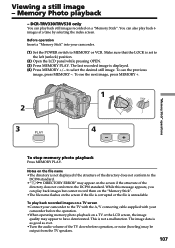
.... To see the next image, press MEMORY +. Notes on a TV or the LCD screen, the image quality may be output from the TV speakers. 107 To play back still images recorded on the screen if the structure of the directory does not conform to the left (unlock) position...set to the DCF98 standard. •" - Viewing a still image - Make sure that the LOCK is not a malfunction. DIRECTORY ERROR" may appear on a "Memory Stick". DCR-TRV330/TRV530 only You can play back recorded images on a TV screen •Connect your camcorder to the TV with the A/V connecting cable supplied with...
.... To see the next image, press MEMORY +. Notes on a TV or the LCD screen, the image quality may be output from the TV speakers. 107 To play back still images recorded on the screen if the structure of the directory does not conform to the left (unlock) position...set to the DCF98 standard. •" - Viewing a still image - Make sure that the LOCK is not a malfunction. DIRECTORY ERROR" may appear on a "Memory Stick". DCR-TRV330/TRV530 only You can play back recorded images on a TV screen •Connect your camcorder to the TV with the A/V connecting cable supplied with...
Operating Instructions
Page 154
...MODE 85 A/V connecting cable 31, 60, 104 BACK LIGHT 23 Battery pack 11 BEEP 87 BOUNCE 37 C, D Camera chroma key 98 Charging battery 12 Charging manganese-lithium battery 141 Clock set 17 Data code 28 Date search 57 DEMO 86 DIGITAL EFFECT 41, 54 Digital 8 system 133 Digital...HiFi SOUND 82 I, J, K, L i.LINK 61, 136 Image protection 119 Image quality mode 91 Index screen 108 "InfoLITHIUM" battery ...... 135 Infrared rays emitter ........ 23,...118 Slow playback 29 SLOW SHUTTER 41 STEADYSHOT 81 Stereo tape 134 STILL 41 Sub sound 82 SUPER LASER LINK 32 SUPER NIGHTSHOT 23 S ...
...MODE 85 A/V connecting cable 31, 60, 104 BACK LIGHT 23 Battery pack 11 BEEP 87 BOUNCE 37 C, D Camera chroma key 98 Charging battery 12 Charging manganese-lithium battery 141 Clock set 17 Data code 28 Date search 57 DEMO 86 DIGITAL EFFECT 41, 54 Digital 8 system 133 Digital...HiFi SOUND 82 I, J, K, L i.LINK 61, 136 Image protection 119 Image quality mode 91 Index screen 108 "InfoLITHIUM" battery ...... 135 Infrared rays emitter ........ 23,...118 Slow playback 29 SLOW SHUTTER 41 STEADYSHOT 81 Stereo tape 134 STILL 41 Sub sound 82 SUPER LASER LINK 32 SUPER NIGHTSHOT 23 S ...

