Operating Instructions
Page 1
Serial No. DCR-TRV530 TM SERIES DCR-TRV230/TRV330/TRV530 ©2001 Sony Corporation Model No. Serial No. DCR-TRV Model No. Record the serial number in the space provided below. 3-065-262-13 (1) Digital Video Camera Recorder Operating Instructions Before operating the unit, please read this product. Refer to these numbers whenever you call upon your Sony dealer regarding this manual thoroughly, and retain it for future reference. Owner's Record The model and serial numbers are located on the bottom. AC-
Serial No. DCR-TRV530 TM SERIES DCR-TRV230/TRV330/TRV530 ©2001 Sony Corporation Model No. Serial No. DCR-TRV Model No. Record the serial number in the space provided below. 3-065-262-13 (1) Digital Video Camera Recorder Operating Instructions Before operating the unit, please read this product. Refer to these numbers whenever you call upon your Sony dealer regarding this manual thoroughly, and retain it for future reference. Owner's Record The model and serial numbers are located on the bottom. AC-
Operating Instructions
Page 2
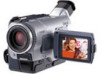
... Center. You will soon be producing home video that you call 416-499-SONY (Canada only) This symbol is intended to... "dangerous voltage" within the product's enclosure that may not cause harmful interference, and (2) this Sony Digital Handycam camcorder. You can enjoy for the FCC related matters only. Regulatory Information Declaration of the FCC Rules.... superior picture and sound quality. Your Digital Handycam is loaded with Part15 of Conformity Trade Name: SONY Model No.: DCR-TRV230, DCRTRV330, DCR-TRV530 Responsible Party: Sony Electronics lnc. and CANADA DISPOSAL OF LITHIUM...
... Center. You will soon be producing home video that you call 416-499-SONY (Canada only) This symbol is intended to... "dangerous voltage" within the product's enclosure that may not cause harmful interference, and (2) this Sony Digital Handycam camcorder. You can enjoy for the FCC related matters only. Regulatory Information Declaration of the FCC Rules.... superior picture and sound quality. Your Digital Handycam is loaded with Part15 of Conformity Trade Name: SONY Model No.: DCR-TRV230, DCRTRV330, DCR-TRV530 Responsible Party: Sony Electronics lnc. and CANADA DISPOSAL OF LITHIUM...
Operating Instructions
Page 4
..." (p. 93) (DCR-TRV330/TRV530 only) • Viewing a still image recorded on "Memory Stick" (p. 107) (DCR-TRV330/TRV530 only) b Capturing images on your computer • Using with analog video unit and your computer (p. 74) • Viewing images recorded on "Memory Stick" using USB cable (p. 110) (DCR-TRV330/TRV530 only) Other uses Functions to adjust exposure in the recording mode •...
..." (p. 93) (DCR-TRV330/TRV530 only) • Viewing a still image recorded on "Memory Stick" (p. 107) (DCR-TRV330/TRV530 only) b Capturing images on your computer • Using with analog video unit and your computer (p. 74) • Viewing images recorded on "Memory Stick" using USB cable (p. 110) (DCR-TRV330/TRV530 only) Other uses Functions to adjust exposure in the recording mode •...
Operating Instructions
Page 5
...still image on an image - Tape Photo recording 33 Using the wide mode...still images recorded on "Memory Stick" - Photo search/Photo scan 58 Digital8...Camcorder Changing the menu settings 79 "Memory Stick" operations (DCR-TRV330/TRV530 only) Using "Memory Stick"-introduction .......... 88 Recording still... Playing back a tape with analog video unit and your computer ...... 110 ...still image - Date search 57 Searching for a photo - Digital effect 41 Using the PROGRAM AE function 44 Adjusting the exposure manually 46 Focusing manually 47 Superimposing a title 48 Making your camcorder...
...still image on an image - Tape Photo recording 33 Using the wide mode...still images recorded on "Memory Stick" - Photo search/Photo scan 58 Digital8...Camcorder Changing the menu settings 79 "Memory Stick" operations (DCR-TRV330/TRV530 only) Using "Memory Stick"-introduction .......... 88 Recording still... Playing back a tape with analog video unit and your computer ...... 110 ...still image - Date search 57 Searching for a photo - Digital effect 41 Using the PROGRAM AE function 44 Adjusting the exposure manually 46 Focusing manually 47 Superimposing a title 48 Making your camcorder...
Operating Instructions
Page 8
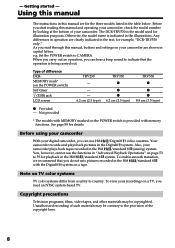
...Digital8 video cassettes. Copyright precautions Television programs, films, video tapes, and other materials may be copyrighted. Before you can hear a beep sound to CAMERA. Otherwise, the model name is the model used for details. Before using your camcorder With your digital camcorder... "DCR-TRV530 only." Also, your camcorder are clearly indicated in capital letters. - Any differences in operation are shown in the text, for playback in the Hi8 /standard 8 with the Digital8 system on the POWER switch) Self-timer (USB) jack LCD screen TRV230 - - - 6.2 cm (2.5 type) TRV330 z...
...Digital8 video cassettes. Copyright precautions Television programs, films, video tapes, and other materials may be copyrighted. Before you can hear a beep sound to CAMERA. Otherwise, the model name is the model used for details. Before using your camcorder With your digital camcorder... "DCR-TRV530 only." Also, your camcorder are clearly indicated in capital letters. - Any differences in operation are shown in the text, for playback in the Hi8 /standard 8 with the Digital8 system on the POWER switch) Self-timer (USB) jack LCD screen TRV230 - - - 6.2 cm (2.5 type) TRV330 z...
Operating Instructions
Page 18
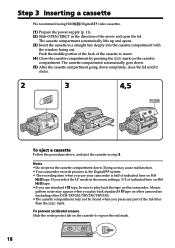
...We recommend using Hi8 /Digital8 video cassettes. (1) Prepare the power supply (p. 11). (2) Slide OPEN/EJECT in the direction of indicated time on Hi8 tape. •If you use your camcorder is half of the cassette to expose the red mark. 18 If you select the LP mode in step 3. Notes... deeply into the cassette compartment with the window facing out. To prevent accidental erasure Slide the write-protect tab on other camcorders (including other DCR-TRV230/TRV330/TRV530). •The cassette compartment may appear when you press any part of the lid other than the mark. The ...
...We recommend using Hi8 /Digital8 video cassettes. (1) Prepare the power supply (p. 11). (2) Slide OPEN/EJECT in the direction of indicated time on Hi8 tape. •If you use your camcorder is half of the cassette to expose the red mark. 18 If you select the LP mode in step 3. Notes... deeply into the cassette compartment with the window facing out. To prevent accidental erasure Slide the write-protect tab on other camcorders (including other DCR-TRV230/TRV330/TRV530). •The cassette compartment may appear when you press any part of the lid other than the mark. The ...
Operating Instructions
Page 29
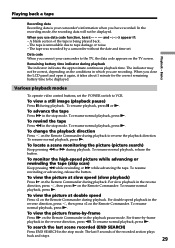
... the Remote Commander. For frame-by a camcorder without the date and time set the POWER switch to be displayed. In the recording mode, the recording data will not be correct,... rewinding or M while advancing the tape. For slow playback in the stop mode. To resume normal playback, press N. To view a still image (playback pause) Press X during playback to tape damage or noise. ...at slow speed (slow playback) Press y on the Remote Commander during playback. Various playback modes To operate video control buttons, set . The last 5 seconds of the tape is unreadable due to reverse ...
... the Remote Commander. For frame-by a camcorder without the date and time set the POWER switch to be displayed. In the recording mode, the recording data will not be correct,... rewinding or M while advancing the tape. For slow playback in the stop mode. To resume normal playback, press N. To view a still image (playback pause) Press X during playback to tape damage or noise. ...at slow speed (slow playback) Press y on the Remote Commander during playback. Various playback modes To operate video control buttons, set . The last 5 seconds of the tape is unreadable due to reverse ...
Operating Instructions
Page 31
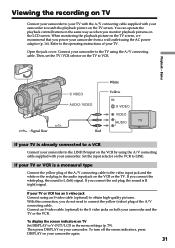
... DISPLAY on the VCR to LINE. Set the input selector on your camcorder again. 31 Connect an S video cable (optional) to the S video jacks on the TV to VCR. Then, set the TV/VCR selector on both your camcorder and the TV or the VCR. Then press DISPLAY on TV Set ... operate the playback control buttons in the menu settings (p. 79). Basics : Signal flow S VIDEO AUDIO / VIDEO Red White Yellow IN S VIDEO VIDEO AUDIO If your camcorder to connect the yellow (video) plug of the A/V connecting cable to the video input jack and the white or the red plug to the audio input jack on the...
... DISPLAY on the VCR to LINE. Set the input selector on your camcorder again. 31 Connect an S video cable (optional) to the S video jacks on the TV to VCR. Then, set the TV/VCR selector on both your camcorder and the TV or the VCR. Then press DISPLAY on TV Set ... operate the playback control buttons in the menu settings (p. 79). Basics : Signal flow S VIDEO AUDIO / VIDEO Red White Yellow IN S VIDEO VIDEO AUDIO If your camcorder to connect the yellow (video) plug of the A/V connecting cable to the video input jack and the white or the red plug to the audio input jack on the...
Operating Instructions
Page 32
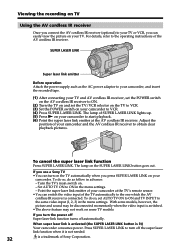
...super laser link function when it is not needed. 32 is lit) Your camcorder consumes power. Adjust the position of Sony Corporation. If you turn off automatically. If you use a Sony TV • You can switch the video input of the AV cordless IR receiver. Press SUPER LASER LINK to the... one which the AV cordless IR receiver is switched. • The above feature may not work on your camcorder at the AV cordless IR receiver...
...super laser link function when it is not needed. 32 is lit) Your camcorder consumes power. Adjust the position of Sony Corporation. If you turn off automatically. If you use a Sony TV • You can switch the video input of the AV cordless IR receiver. Press SUPER LASER LINK to the... one which the AV cordless IR receiver is switched. • The above feature may not work on your camcorder at the AV cordless IR receiver...
Operating Instructions
Page 33
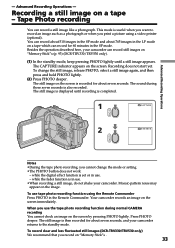
... displayed until a still image appears. while the digital effect function is then recorded for about seven seconds, and your camcorder can record a still image like a photograph. Mosaic-pattern noise may appear on a tape - Press PHOTO deeper. The still image is set or in the SP mode. To record clear and less fluctuated still images (DCR-TRV330/TRV530 only) We...
... displayed until a still image appears. while the digital effect function is then recorded for about seven seconds, and your camcorder can record a still image like a photograph. Mosaic-pattern noise may appear on a tape - Press PHOTO deeper. The still image is set or in the SP mode. To record clear and less fluctuated still images (DCR-TRV330/TRV530 only) We...

Operating Instructions
Page 35
... the operating instructions of the video printer as well. Connect the video printer using the video printer (optional). S VIDEO AUDIO / VIDEO Video printer LINE IN VIDEO S VIDEO : Signal flow If the video printer is equipped with your camcorder. Refer to the video input of the video printer. 35 Tape Photo recording Printing the still image You can print a still image by using the A/V connecting...
... the operating instructions of the video printer as well. Connect the video printer using the video printer (optional). S VIDEO AUDIO / VIDEO Video printer LINE IN VIDEO S VIDEO : Signal flow If the video printer is equipped with your camcorder. Refer to the video input of the video printer. 35 Tape Photo recording Printing the still image You can print a still image by using the A/V connecting...
Operating Instructions
Page 36
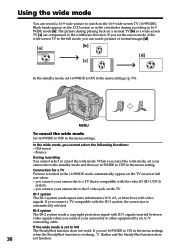
...If you connect a TV compatible with video signals. Bounce During recording You cannot select or cancel the wide mode. Black bands appear on a normal TV [b] or a wide-screen TV [c] are compressed in the menu settings (p. 79). In the wide mode, you connect your camcorder to other equipment by an A/V connecting... ON in the widthwise direction. If you set the screen mode of the wide-screen TV to the full mode, you connect your camcorder to a TV that is automatically selected. you can record a 16:9 wide picture to the S video jack on the TV. ID-2 system The ID-2 system ...
...If you connect a TV compatible with video signals. Bounce During recording You cannot select or cancel the wide mode. Black bands appear on a normal TV [b] or a wide-screen TV [c] are compressed in the menu settings (p. 79). In the wide mode, you connect your camcorder to other equipment by an A/V connecting... ON in the widthwise direction. If you set the screen mode of the wide-screen TV to the full mode, you connect your camcorder to a TV that is automatically selected. you can record a 16:9 wide picture to the S video jack on the TV. ID-2 system The ID-2 system ...
Operating Instructions
Page 60
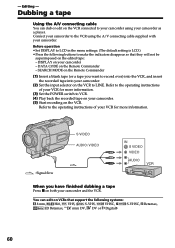
... tape Using the A/V connecting cable You can edit on VCRs that they will not be superimposed on both your camcorder. (2) Set the input selector on the Remote Commander - SEARCH MODE on the Remote Commander (1) Insert a blank tape (or a tape you have finished dubbing a tape Press ... or Digital8 60 Before operation • Set DISPLAY to the VCR using your camcorder as a player. Refer to record over) into the VCR, and insert the recorded tape into your camcorder and the VCR. - You can dub or edit on your camcorder. Editing - S VIDEO AUDIO / VIDEO IN S VIDEO VIDEO AUDIO...
... tape Using the A/V connecting cable You can edit on VCRs that they will not be superimposed on both your camcorder. (2) Set the input selector on the Remote Commander - SEARCH MODE on the Remote Commander (1) Insert a blank tape (or a tape you have finished dubbing a tape Press ... or Digital8 60 Before operation • Set DISPLAY to the VCR using your camcorder as a player. Refer to record over) into the VCR, and insert the recorded tape into your camcorder and the VCR. - You can dub or edit on your camcorder. Editing - S VIDEO AUDIO / VIDEO IN S VIDEO VIDEO AUDIO...
Operating Instructions
Page 61
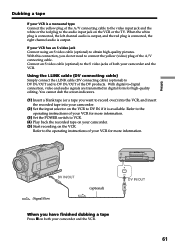
... recorded tape on your camcorder. (5) Start recording on the VCR or the TV. Using the i.LINK cable (DV connecting cable) Simply connect the i.LINK cable (DV connecting cable) (optional) to DV IN/OUT and to -digital connection, video and audio signals are transmitted in digital form for more information....quality editing. With digital-to DV IN/OUT of the DV products. With this connection, you want to record over) into the VCR, and insert the recorded tape into your camcorder. (2) Set the input selector on both your VCR has an S video jack Connect using an S video cable (optional)...
... recorded tape on your camcorder. (5) Start recording on the VCR or the TV. Using the i.LINK cable (DV connecting cable) Simply connect the i.LINK cable (DV connecting cable) (optional) to DV IN/OUT and to -digital connection, video and audio signals are transmitted in digital form for more information....quality editing. With digital-to DV IN/OUT of the DV products. With this connection, you want to record over) into the VCR, and insert the recorded tape into your camcorder. (2) Set the input selector on both your VCR has an S video jack Connect using an S video cable (optional)...
Operating Instructions
Page 62
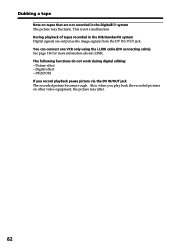
Dubbing a tape Note on other video equipment, the picture may fluctuate. Picture effect - See page 136 for more infomation about i.LINK. PB ZOOM If you play back the recorded pictures on tapes that are not recorded in the Hi8/standard 8 system Digital signals are output as the image signals from the... picture becomes rough. You can connect one VCR only using the i.LINK cable (DV connecting cable). The following functions do not work during digital editing: - This is not a malfunction. During playback of tapes recorded in the Digital8 system The picture may jitter. 62
Dubbing a tape Note on other video equipment, the picture may fluctuate. Picture effect - See page 136 for more infomation about i.LINK. PB ZOOM If you play back the recorded pictures on tapes that are not recorded in the Hi8/standard 8 system Digital signals are output as the image signals from the... picture becomes rough. You can connect one VCR only using the i.LINK cable (DV connecting cable). The following functions do not work during digital editing: - This is not a malfunction. During playback of tapes recorded in the Digital8 system The picture may jitter. 62
Operating Instructions
Page 63
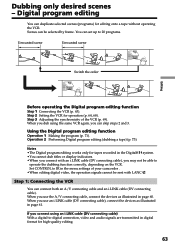
...use the A/V connecting cable, connect the devices as illustrated in digital format for tapes recorded in page 60. If you connect with LANC . Step 3 Adjusting the synchronicity of your camcorder . •When editing digital video, the operation signals cannot be selected by frame. When you... use an i.LINK cable (DV connecting cable), connect the devices as illustrated in the Digital8 system. •You cannot dub titles or ...
...use the A/V connecting cable, connect the devices as illustrated in digital format for tapes recorded in page 60. If you connect with LANC . Step 3 Adjusting the synchronicity of your camcorder . •When editing digital video, the operation signals cannot be selected by frame. When you... use an i.LINK cable (DV connecting cable), connect the devices as illustrated in the Digital8 system. •You cannot dub titles or ...
Operating Instructions
Page 64
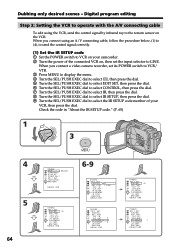
...I R TEST RETURN [ MENU ] : END IR i . When you connect a video camera recorder, set its POWER switch to VCR/ VTR. 3 Press MENU to display ...OUT " I R SETUP 3 P AUS EMODE I R TEST RETURN [ MENU ] : END OTHERS ED I T SET CONTROL I R ADJ TEST " CUT- Digital program editing Step 2: Setting the VCR to operate with the A/V connecting cable To edit using an A/V connecting cable, follow the procedure below, (1) to (4), to ...(1) Set the IR SETUP code 1 Set the POWER switch to the remote sensor on your camcorder. 2 Turn the power of your VCR, then press the dial. When you connect using the...
...I R TEST RETURN [ MENU ] : END IR i . When you connect a video camera recorder, set its POWER switch to VCR/ VTR. 3 Press MENU to display ...OUT " I R SETUP 3 P AUS EMODE I R TEST RETURN [ MENU ] : END OTHERS ED I T SET CONTROL I R ADJ TEST " CUT- Digital program editing Step 2: Setting the VCR to operate with the A/V connecting cable To edit using an A/V connecting cable, follow the procedure below, (1) to (4), to ...(1) Set the IR SETUP code 1 Set the POWER switch to the remote sensor on your camcorder. 2 Turn the power of your VCR, then press the dial. When you connect using the...
Operating Instructions
Page 68
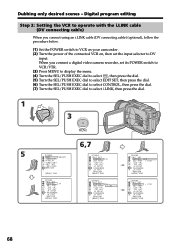
... ] : END OTHERS ED I T SET CONTROL ADJ TEST " CUT- Dubbing only desired scenes - Digital program editing Step 2: Setting the VCR to operate with the i.LINK cable (DV connecting cable) When you connect a digital video camera recorder, set the input selector to select i.LINK, then press the dial. 1 5 OFCFR(CHG... When you connect using an i.LINK cable (DV connecting cable) (optional), follow the procedure below. (1) Set the POWER switch to VCR on your camcorder . (2) Turn the power of the connected VCR on, then set its POWER switch to VCR/VTR. (3) Press MENU to display the menu. (4) ...
... ] : END OTHERS ED I T SET CONTROL ADJ TEST " CUT- Dubbing only desired scenes - Digital program editing Step 2: Setting the VCR to operate with the i.LINK cable (DV connecting cable) When you connect a digital video camera recorder, set the input selector to select i.LINK, then press the dial. 1 5 OFCFR(CHG... When you connect using an i.LINK cable (DV connecting cable) (optional), follow the procedure below. (1) Set the POWER switch to VCR on your camcorder . (2) Turn the power of the connected VCR on, then set its POWER switch to VCR/VTR. (3) Press MENU to display the menu. (4) ...
Operating Instructions
Page 70
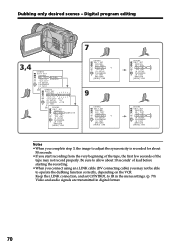
... " 0 I R SETUP P AUS EMODE I R TEST RETURN [ MENU ] : END OTHERS ED I T SET CONTROL ADJ TEST " CUT- I N " " CUT-OUT " 0 I R SETUP P AUS EMODE I T SET CONTROL ADJ TEST RETURN " CUT- Digital program editing 7 3,4 OTHERS ED I R TEST RETURN [ MENU ] : END Notes • When you complete step 3, the image to IR in the menu settings. (p. 79...
... " 0 I R SETUP P AUS EMODE I R TEST RETURN [ MENU ] : END OTHERS ED I T SET CONTROL ADJ TEST " CUT- I N " " CUT-OUT " 0 I R SETUP P AUS EMODE I T SET CONTROL ADJ TEST RETURN " CUT- Digital program editing 7 3,4 OTHERS ED I R TEST RETURN [ MENU ] : END Notes • When you complete step 3, the image to IR in the menu settings. (p. 79...
Operating Instructions
Page 71
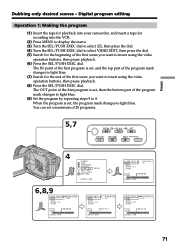
... ED I T MARK UNDO ERASE AL L START 0:10:01:23 4 IN TOTAL SCENE 0:00:47:12 3 [ MENU ] : END 71 Digital program editing Operation 1: Making the program (1) Insert the tape for playback into your camcorder, and insert a tape for recording into the VCR. (2) Press MENU to display the menu. (3) Turn the SEL/PUSH EXEC..., then press the dial. (5) Search for the end of the first scene you want to insert using the video operation buttons, then pause playback. (6) Press the SEL/PUSH EXEC dial. You can set , and the top part of the program mark changes to light ...
... ED I T MARK UNDO ERASE AL L START 0:10:01:23 4 IN TOTAL SCENE 0:00:47:12 3 [ MENU ] : END 71 Digital program editing Operation 1: Making the program (1) Insert the tape for playback into your camcorder, and insert a tape for recording into the VCR. (2) Press MENU to display the menu. (3) Turn the SEL/PUSH EXEC..., then press the dial. (5) Search for the end of the first scene you want to insert using the video operation buttons, then pause playback. (6) Press the SEL/PUSH EXEC dial. You can set , and the top part of the program mark changes to light ...


