Operating Instructions
Page 2
... and (2) this Sony Digital Handycam camcorder. For customers in the U.S.A. This symbol is very easy to temperatures above 60°C (140°F) such as in a car parked in the literature accompanying the appliance. Welcome! and CANADA DISPOSAL OF LITHIUM ION BATTERY. Address: 680 ...presence of Conformity Trade Name: SONY Model No.: DCR-TRV230, DCRTRV330, DCR-TRV530 Responsible Party: Sony Electronics lnc. If you can return your purchase of electric shock to the following two conditions: (1) This device may call 416-499-SONY (Canada only) This symbol is...
... and (2) this Sony Digital Handycam camcorder. For customers in the U.S.A. This symbol is very easy to temperatures above 60°C (140°F) such as in a car parked in the literature accompanying the appliance. Welcome! and CANADA DISPOSAL OF LITHIUM ION BATTERY. Address: 680 ...presence of Conformity Trade Name: SONY Model No.: DCR-TRV230, DCRTRV330, DCR-TRV530 Responsible Party: Sony Electronics lnc. If you can return your purchase of electric shock to the following two conditions: (1) This device may call 416-499-SONY (Canada only) This symbol is...
Operating Instructions
Page 5
... Shooting in a continuous loop - Insert Editing 77 Customizing Your Camcorder Changing the menu settings 79 "Memory Stick" operations (DCR-TRV330/TRV530 only) Using "Memory Stick"-introduction .......... 88 Recording still images on "Memory Stick"s - Photo save 105 Viewing a still image - NightShot/Super NightShot ...... 23 Self-timer recording (DCR-TRV330/TRV530 only) ....... 25 Checking the recording - Picture effect 40...
... Shooting in a continuous loop - Insert Editing 77 Customizing Your Camcorder Changing the menu settings 79 "Memory Stick" operations (DCR-TRV330/TRV530 only) Using "Memory Stick"-introduction .......... 88 Recording still images on "Memory Stick"s - Photo save 105 Viewing a still image - NightShot/Super NightShot ...... 23 Self-timer recording (DCR-TRV330/TRV530 only) ....... 25 Checking the recording - Picture effect 40...
Operating Instructions
Page 6
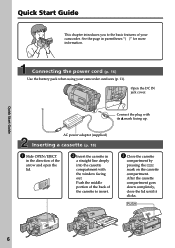
... introduces you to insert. 3 Close the cassette compartment by pressing the mark on the cassette compartment. Connecting the power cord (p. 16) Use the battery pack when using your camcorder. After the cassette compartment goes down completely, close the lid until it clicks. Open the DC IN jack cover. See the page in...
... introduces you to insert. 3 Close the cassette compartment by pressing the mark on the cassette compartment. Connecting the power cord (p. 16) Use the battery pack when using your camcorder. After the cassette compartment goes down completely, close the lid until it clicks. Open the DC IN jack cover. See the page in...
Operating Instructions
Page 7
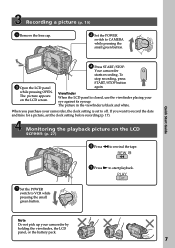
... the clock setting before recording (p. 17). Recording a picture (p. 19) 1 Remove the lens cap. 2 Set the POWER switch to start playback. Your camcorder starts recording. REW 3 Press N to CAMERA while pressing the small green button. PLAY OFCFR(CHG) 1 Set the POWER switch to off. To stop ...3 Open the LCD panel while pressing OPEN. The picture in the viewfinder is closed, use the viewfinder placing your camcorder by holding the viewfinder, the LCD panel, or the battery pack. 7 V POWER CAM M Note Do not pick up your eye against its eyecup. Monitoring the playback picture...
... the clock setting before recording (p. 17). Recording a picture (p. 19) 1 Remove the lens cap. 2 Set the POWER switch to start playback. Your camcorder starts recording. REW 3 Press N to CAMERA while pressing the small green button. PLAY OFCFR(CHG) 1 Set the POWER switch to off. To stop ...3 Open the LCD panel while pressing OPEN. The picture in the viewfinder is closed, use the viewfinder placing your camcorder by holding the viewfinder, the LCD panel, or the battery pack. 7 V POWER CAM M Note Do not pick up your eye against its eyecup. Monitoring the playback picture...
Operating Instructions
Page 10
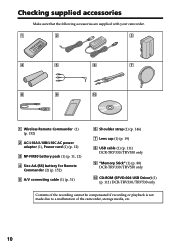
... are supplied with your camcorder. 1 2 3 4 5 6 7 8 9 0 1 Wireless Remote Commander (1) (p. 152) 2 AC-L10A/L10B/L10C AC power adaptor (1), Power cord (1) (p. 12) 3 NP-FM30 battery pack (1) (p. 11, 12) 4 Size AA (R6) battery for Remote Commander (2) (p. 152) 5 A/V connecting cable (1) (p. 31) 6 Shoulder strap (1) (p. 146) 7 Lens cap (1) (p. 19) 8 USB cable (1) (p. 111) DCR-TRV330/TRV530 only 9 "Memory Stick" (1) (p. 88) DCR-TRV330/TRV530 only 0 CD...
... are supplied with your camcorder. 1 2 3 4 5 6 7 8 9 0 1 Wireless Remote Commander (1) (p. 152) 2 AC-L10A/L10B/L10C AC power adaptor (1), Power cord (1) (p. 12) 3 NP-FM30 battery pack (1) (p. 11, 12) 4 Size AA (R6) battery for Remote Commander (2) (p. 152) 5 A/V connecting cable (1) (p. 31) 6 Shoulder strap (1) (p. 146) 7 Lens cap (1) (p. 19) 8 USB cable (1) (p. 111) DCR-TRV330/TRV530 only 9 "Memory Stick" (1) (p. 88) DCR-TRV330/TRV530 only 0 CD...
Operating Instructions
Page 11
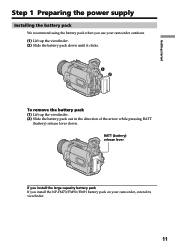
Getting started Step 1 Preparing the power supply Installing the battery pack We recommend using the battery pack when you install the NP-FM70/FM90/FM91 battery pack on your camcorder outdoors. (1) Lift up the viewfinder. (2) Slide the battery pack down until it clicks. 1 2 To remove the battery pack (1) Lift up the viewfinder. (2) Slide the battery pack out in the direction of the arrow while pressing BATT (battery) release lever down. BATT (battery) release lever If you install the large capacity battery pack If you use your camcorder, extend its viewfinder. 11
Getting started Step 1 Preparing the power supply Installing the battery pack We recommend using the battery pack when you install the NP-FM70/FM90/FM91 battery pack on your camcorder outdoors. (1) Lift up the viewfinder. (2) Slide the battery pack down until it clicks. 1 2 To remove the battery pack (1) Lift up the viewfinder. (2) Slide the battery pack out in the direction of the arrow while pressing BATT (battery) release lever down. BATT (battery) release lever If you install the large capacity battery pack If you use your camcorder, extend its viewfinder. 11
Operating Instructions
Page 12
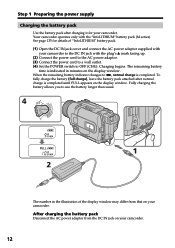
... DC IN jack cover and connect the AC power adaptor supplied with your camcorder to the DC IN jack with the "InfoLITHIUM" battery pack (M series). To fully charge the battery (full charge), leave the battery pack attached after charging it for details of the display window may differ from.... OFCFR(CHG) E ERMAORY CAM M Step 1 Preparing the power supply Charging the battery pack Use the battery pack after normal charge is completed until FULL appears on your camcorder. 12 After charging the battery pack Disconnect the AC power adaptor from that on the display window. Fully charging the...
... DC IN jack cover and connect the AC power adaptor supplied with your camcorder to the DC IN jack with the "InfoLITHIUM" battery pack (M series). To fully charge the battery (full charge), leave the battery pack attached after charging it for details of the display window may differ from.... OFCFR(CHG) E ERMAORY CAM M Step 1 Preparing the power supply Charging the battery pack Use the battery pack after normal charge is completed until FULL appears on your camcorder. 12 After charging the battery pack Disconnect the AC power adaptor from that on the display window. Fully charging the...

Operating Instructions
Page 13
...is "InfoLITHIUM"? If any trouble occurs with the battery pack. TM SERIES 13 Until your camcorder calculates the actual remaining battery time "- - - - While charging the battery pack, no indicator appears or the indicator flashes ...in the display window in the display window roughly indicates the recording time with the "InfoLITHIUM" battery. This unit is charged fully The LCD backlight of Sony Corporation. "InfoLITHIUM" M series battery...
...is "InfoLITHIUM"? If any trouble occurs with the battery pack. TM SERIES 13 Until your camcorder calculates the actual remaining battery time "- - - - While charging the battery pack, no indicator appears or the indicator flashes ...in the display window in the display window roughly indicates the recording time with the "InfoLITHIUM" battery. This unit is charged fully The LCD backlight of Sony Corporation. "InfoLITHIUM" M series battery...

Operating Instructions
Page 14
... will be shorter. 14 The actual battery life may be shorter if you use your camcorder in a cold environment. ** Approximate number of minutes when recording while you use a fully charged battery * Approximate continuous recording time at 25 °C (77 °F) Recording time DCR-TRV230/TRV330 Battery pack NP-FM30 (supplied) NP-FM50 NP-FM70 NP-FM90...
... will be shorter. 14 The actual battery life may be shorter if you use your camcorder in a cold environment. ** Approximate number of minutes when recording while you use a fully charged battery * Approximate continuous recording time at 25 °C (77 °F) Recording time DCR-TRV230/TRV330 Battery pack NP-FM30 (supplied) NP-FM50 NP-FM70 NP-FM90...
Operating Instructions
Page 15
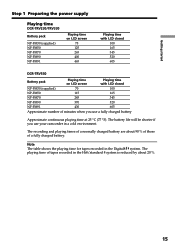
...camcorder in the Digital8 system. Note The table shows the playing time for tapes recorded in a cold environment. The playing time of tapes recorded in the Hi8/standard 8 system is reduced by about 90 % of those of a fully charged battery. Getting started Step 1 Preparing the power supply Playing time DCR-TRV230/TRV330 Battery... pack NP-FM30 (supplied) NP-FM50 NP-FM70 NP-FM90 NP-FM91 Playing time on LCD screen 75 125 265 400 465 Playing time with LCD closed 100 165 345 520 605 DCR-TRV530 Battery pack Playing time on LCD ...
...camcorder in the Digital8 system. Note The table shows the playing time for tapes recorded in a cold environment. The playing time of tapes recorded in the Hi8/standard 8 system is reduced by about 90 % of those of a fully charged battery. Getting started Step 1 Preparing the power supply Playing time DCR-TRV230/TRV330 Battery... pack NP-FM30 (supplied) NP-FM50 NP-FM70 NP-FM90 NP-FM91 Playing time on LCD screen 75 125 265 400 465 Playing time with LCD closed 100 165 345 520 605 DCR-TRV530 Battery pack Playing time on LCD ...

Operating Instructions
Page 16
... is attached to your camcorder with the plug's v mark facing up. (2) Connect the power cord to the AC power adaptor. (3) Connect the power cord to a wall outlet. 1 2, 3 PRECAUTION The set itself has been turned off. Using a car battery Use Sony DC Adaptor/Charger (optional). 16 Step 1 Preparing the power supply Connecting to a wall...
... is attached to your camcorder with the plug's v mark facing up. (2) Connect the power cord to the AC power adaptor. (3) Connect the power cord to a wall outlet. 1 2, 3 PRECAUTION The set itself has been turned off. Using a car battery Use Sony DC Adaptor/Charger (optional). 16 Step 1 Preparing the power supply Connecting to a wall...
Operating Instructions
Page 17
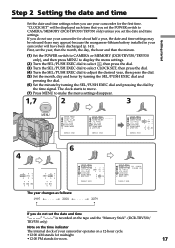
...signal. If you do not set the date and time is recorded on the tape and the "Memory Stick". (DCR-TRV330/ TRV530 only) Note on the time indicator The internal clock of your camcorder will be released (bars may be displayed each time that you set the POWER switch to CAMERA/MEMORY...TV ON 5:30:00 PM TV I NPUT LTR S I ZE L ANGUAGE DEMO MODE RETURN [ MENU ] : END If you use your camcorder for about half a year, the date and time settings may appear) because the manganese-lithium battery installed in your camcorder operates on a 12-hour cycle. •12:00 AM stands for midnight. &#...
...signal. If you do not set the date and time is recorded on the tape and the "Memory Stick". (DCR-TRV330/ TRV530 only) Note on the time indicator The internal clock of your camcorder will be released (bars may be displayed each time that you set the POWER switch to CAMERA/MEMORY...TV ON 5:30:00 PM TV I NPUT LTR S I ZE L ANGUAGE DEMO MODE RETURN [ MENU ] : END If you use your camcorder for about half a year, the date and time settings may appear) because the manganese-lithium battery installed in your camcorder operates on a 12-hour cycle. •12:00 AM stands for midnight. &#...
Operating Instructions
Page 20
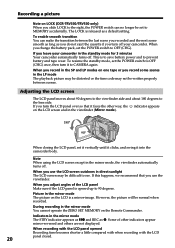
... Some of the LCD panel Make sure if the LCD panel is to save battery power and to prevent battery and tape wear. If this happens, we recommend that it to see. Recording a picture Note on LOCK (DCR-TRV330/TRV530 only) When you slide LOCK to the right, the POWER switch can make... the transition between scenes. To enable smooth transition You can no longer be written properly between the last scene you turn off your camcorder in the mirror mode The STBY indicator appears as...
... Some of the LCD panel Make sure if the LCD panel is to save battery power and to prevent battery and tape wear. If this happens, we recommend that it to see. Recording a picture Note on LOCK (DCR-TRV330/TRV530 only) When you slide LOCK to the right, the POWER switch can make... the transition between scenes. To enable smooth transition You can no longer be written properly between the last scene you turn off your camcorder in the mirror mode The STBY indicator appears as...
Operating Instructions
Page 22
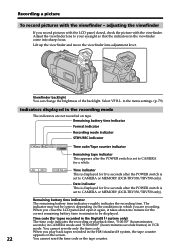
... Recording mode indicator STBY/REC indicator 40min SP REC 0:00:01 Time code/Tape counter indicator JUL 4 2001 12:05:56 AM Remaining tape indicator This appears after the POWER switch is set to CAMERA or MEMORY (DCR-TRV330/TRV530 only). Remaining battery time indicator The remaining battery time ... in minutes to CAMERA or MEMORY (DCR-TRV330/TRV530 only). in the menu settings. (p. 79) Indicators displayed in VCR mode. Date indicator This is set to CAMERA for five seconds after the POWER switch is displayed for tapes recorded in the Digital8 system only) The time code indicates ...
... Recording mode indicator STBY/REC indicator 40min SP REC 0:00:01 Time code/Tape counter indicator JUL 4 2001 12:05:56 AM Remaining tape indicator This appears after the POWER switch is set to CAMERA or MEMORY (DCR-TRV330/TRV530 only). Remaining battery time indicator The remaining battery time ... in minutes to CAMERA or MEMORY (DCR-TRV330/TRV530 only). in the menu settings. (p. 79) Indicators displayed in VCR mode. Date indicator This is set to CAMERA for five seconds after the POWER switch is displayed for tapes recorded in the Digital8 system only) The time code indicates ...
Operating Instructions
Page 29
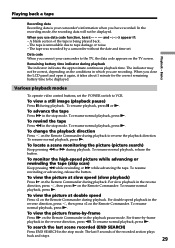
... tape was recorded by a camcorder without the date and time set the POWER switch to be displayed. When you have recorded. To resume normal playback, press N. To view a still image (playback pause) Press X during playback. To resume playback, press X or N. To resume normal ... during playback The indicator indicates the approximate continuous playback time. To view the picture frame-by -frame playback in the stop mode. Remaining battery time indicator during playback to tape damage or noise. - Playback - Basics Playing back a tape Recording data Recording data is...
... tape was recorded by a camcorder without the date and time set the POWER switch to be displayed. When you have recorded. To resume normal playback, press N. To view a still image (playback pause) Press X during playback. To resume playback, press X or N. To resume normal ... during playback The indicator indicates the approximate continuous playback time. To view the picture frame-by -frame playback in the stop mode. Remaining battery time indicator during playback to tape damage or noise. - Playback - Basics Playing back a tape Recording data Recording data is...
Operating Instructions
Page 82
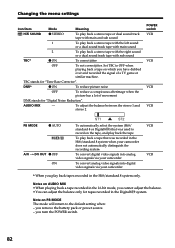
... VCR VCR VCR VCR PB MODE z AUTO / A/V t DV OUT z OFF ON ST1 ST2 To automatically select the system (Hi8/ standard 8 or Digital8 ) that was recorded in the Hi8/standard 8 system when your camcorder does not automatically distinguish the recording system To convert digital video signals into digital video siginals via your camcorder. TBC stands for tapes...
... VCR VCR VCR VCR PB MODE z AUTO / A/V t DV OUT z OFF ON ST1 ST2 To automatically select the system (Hi8/ standard 8 or Digital8 ) that was recorded in the Hi8/standard 8 system when your camcorder does not automatically distinguish the recording system To convert digital video signals into digital video siginals via your camcorder. TBC stands for tapes...
Operating Instructions
Page 83
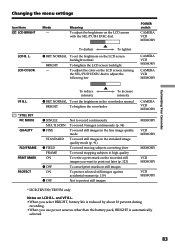
Customizing Your Camcorder Changing the menu settings Icon/item LCD BRIGHT Mode - To adjust the color on the LCD screen, turning the SEL/PUSH EXEC dial to adjust the following bar CAMERA VCR MEMORY CAMERA VCR MEMORY VF B.L. * STILL SET PIC MODE QUALITY FLD/FRAME PRINT MARK PROTECT To ... FIELD FRAME ON z OFF ON z OFF Not to protect still images CAMERA VCR MEMORY MEMORY VCR MEMORY MEMORY VCR MEMORY VCR MEMORY * DCR-TRV330/TRV530 only Notes on the recorded still images you use power sources other than the battery pack, BRIGHT is automatically selected. 83 Meaning To adjust the ...
Customizing Your Camcorder Changing the menu settings Icon/item LCD BRIGHT Mode - To adjust the color on the LCD screen, turning the SEL/PUSH EXEC dial to adjust the following bar CAMERA VCR MEMORY CAMERA VCR MEMORY VF B.L. * STILL SET PIC MODE QUALITY FLD/FRAME PRINT MARK PROTECT To ... FIELD FRAME ON z OFF ON z OFF Not to protect still images CAMERA VCR MEMORY MEMORY VCR MEMORY MEMORY VCR MEMORY VCR MEMORY * DCR-TRV330/TRV530 only Notes on the recorded still images you use power sources other than the battery pack, BRIGHT is automatically selected. 83 Meaning To adjust the ...

Operating Instructions
Page 87
.... •When you set a time difference. Notes on the TV or VCR. (Except when your camcorder is connected to outputs on INDICATOR •When you select BL ON, battery life is reduced by the time difference you use power sources other menu items are returned to set here.... LINK cable) In more than the battery pack, BL ON is automatically selected. 87 Changing the menu settings Customizing Your Camcorder Icon/item Mode WORLD TIME -
.... •When you set a time difference. Notes on the TV or VCR. (Except when your camcorder is connected to outputs on INDICATOR •When you select BL ON, battery life is reduced by the time difference you use power sources other menu items are returned to set here.... LINK cable) In more than the battery pack, BL ON is automatically selected. 87 Changing the menu settings Customizing Your Camcorder Icon/item Mode WORLD TIME -

Operating Instructions
Page 88
...", turn the power off, or detach the battery for "Memory Stick" supplied with your computer. On file format (JPEG) Your camcorder compresses image data in its label on the "Memory Stick" is flashing - DCR-TRV330/TRV530 only You can easily play back still images on the screen of your camcorder. If you carry or store a "Memory...
...", turn the power off, or detach the battery for "Memory Stick" supplied with your computer. On file format (JPEG) Your camcorder compresses image data in its label on the "Memory Stick" is flashing - DCR-TRV330/TRV530 only You can easily play back still images on the screen of your camcorder. If you carry or store a "Memory...
Operating Instructions
Page 90
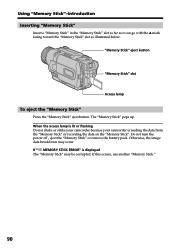
Otherwise, the image data breakdown may be corrupted. Do not turn the power off , eject the "Memory Stick" or remove the battery pack. If " MEMORY STICK ERROR" is reading the data from the "Memory Stick" or recording the data on the "Memory Stick". Using "Memory Stick"-... illustrated below. If this occurs, use another "Memory Stick." 90 When the access lamp is lit or flashing Do not shake or strike your camcorder because your camcorder is displayed The "Memory Stick" may occur. The "Memory Stick" pops up. "Memory Stick" eject button "Memory Stick" slot Access lamp To eject ...
Otherwise, the image data breakdown may be corrupted. Do not turn the power off , eject the "Memory Stick" or remove the battery pack. If " MEMORY STICK ERROR" is reading the data from the "Memory Stick" or recording the data on the "Memory Stick". Using "Memory Stick"-... illustrated below. If this occurs, use another "Memory Stick." 90 When the access lamp is lit or flashing Do not shake or strike your camcorder because your camcorder is displayed The "Memory Stick" may occur. The "Memory Stick" pops up. "Memory Stick" eject button "Memory Stick" slot Access lamp To eject ...


