Operating Instructions
Page 2
...can help preserve our environment by returning your used in this Sony Handycam. For more information regarding recycling of important operating and maintenance (servicing) instructions in the U.S.A. RECYCLING LITHIUM-ION BATTERIES Lithium-Ion batteries are restricted. Operation is harmful to eyes, do not expose...Do not handle damaged or leaking Lithium-Ion batteries. This Class B digital apparatus complies with advanced features, but at the same time it is intended to alert the user to use network functions are recyclable. DCR-IP220 only Countries and areas where you can ...
...can help preserve our environment by returning your used in this Sony Handycam. For more information regarding recycling of important operating and maintenance (servicing) instructions in the U.S.A. RECYCLING LITHIUM-ION BATTERIES Lithium-Ion batteries are restricted. Operation is harmful to eyes, do not expose...Do not handle damaged or leaking Lithium-Ion batteries. This Class B digital apparatus complies with advanced features, but at the same time it is intended to alert the user to use network functions are recyclable. DCR-IP220 only Countries and areas where you can ...
Operating Instructions
Page 6
...a still image in the dark - Picture effect 58 - Basics Playing back a tape with picture effects 70 Playing back a tape with digital effects 71 Enlarging images recorded on a Playing back a tape 42 "Memory Stick" To display the screen indicators - MPEG MOVIE playback ... Operations Getting Started Using this manual 14 Checking supplied accessories 16 Step 1 Preparing the power supply .... 17 Inserting the battery pack 17 Charging the battery pack 18 Connecting to a tape 141 6 MULTI-PICTURE SEARCH ...... 74 Searching the boundaries of contents Main Features 4 ...
...a still image in the dark - Picture effect 58 - Basics Playing back a tape with picture effects 70 Playing back a tape with digital effects 71 Enlarging images recorded on a Playing back a tape 42 "Memory Stick" To display the screen indicators - MPEG MOVIE playback ... Operations Getting Started Using this manual 14 Checking supplied accessories 16 Step 1 Preparing the power supply .... 17 Inserting the battery pack 17 Charging the battery pack 18 Connecting to a tape 141 6 MULTI-PICTURE SEARCH ...... 74 Searching the boundaries of contents Main Features 4 ...
Operating Instructions
Page 7
...-diagnosis display 192 Warning indicators and messages .... 193 Additional Information Usable cassettes 195 About the "InfoLITHIUM" battery pack 196 About i.LINK 198 Using your camcorder abroad .......... 200 Maintenance information and precautions 201 Specifications 208 Quick Reference Identifying the parts and controls .... ... Network function (DCR-IP220 only) Accessing the network 175 For the details, refer to your computer using the USB cable (For Windows users 154 Viewing images recorded on a tape on your computer (For Windows users 169 Connecting your camcorder to the Network...
...-diagnosis display 192 Warning indicators and messages .... 193 Additional Information Usable cassettes 195 About the "InfoLITHIUM" battery pack 196 About i.LINK 198 Using your camcorder abroad .......... 200 Maintenance information and precautions 201 Specifications 208 Quick Reference Identifying the parts and controls .... ... Network function (DCR-IP220 only) Accessing the network 175 For the details, refer to your computer using the USB cable (For Windows users 154 Viewing images recorded on a tape on your computer (For Windows users 169 Connecting your camcorder to the Network...
Operating Instructions
Page 10
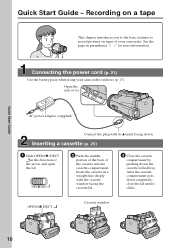
After the cassette compartment goes down . Connecting the power cord (p. 21) Use the battery pack when using your camcorder. OPEN/ Z EJECT 2 Push the middle portion of the back of your camcorder outdoors (p. 17). OPEN/Z EJECT Cassette window 10 Recording on a tape This chapter introduces you to the basic features to record pictures on tapes...
After the cassette compartment goes down . Connecting the power cord (p. 21) Use the battery pack when using your camcorder. OPEN/ Z EJECT 2 Push the middle portion of the back of your camcorder outdoors (p. 17). OPEN/Z EJECT Cassette window 10 Recording on a tape This chapter introduces you to the basic features to record pictures on tapes...
Operating Instructions
Page 12
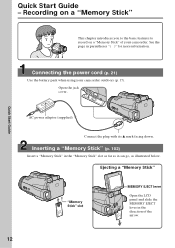
Connecting the power cord (p. 21) Use the battery pack when using your camcorder. Quick Start Guide AC power adaptor (supplied) Connect the plug with its v mark facing down. Recording on a "Memory Stick" This chapter introduces you to the ... slide the MEMORY EJECT lever in parentheses "( )" for more information. Quick Start Guide - Open the jack cover. See the page in the direction of your camcorder outdoors (p. 17). Inserting a "Memory Stick" (p. 102) Insert a "Memory Stick" in the "Memory Stick" slot as far as it can go, as illustrated below...
Connecting the power cord (p. 21) Use the battery pack when using your camcorder. Quick Start Guide AC power adaptor (supplied) Connect the plug with its v mark facing down. Recording on a "Memory Stick" This chapter introduces you to the ... slide the MEMORY EJECT lever in parentheses "( )" for more information. Quick Start Guide - Open the jack cover. See the page in the direction of your camcorder outdoors (p. 17). Inserting a "Memory Stick" (p. 102) Insert a "Memory Stick" in the "Memory Stick" slot as far as it can go, as illustrated below...
Operating Instructions
Page 16
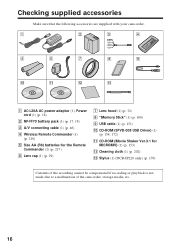
... that the following accessories are supplied with your camcorder. 1 2 3 4 5 6 7 8 9 0 qa qs qd 1 AC-L20A AC power adaptor (1), Power cord (1) (p. 18) 2 NP-FF70 battery pack (1) (p. 17, 18) 3 A/V connecting cable (1) (p. 46) 4 Wireless Remote Commander (1) (p. 216) 5 Size AA (R6) batteries for MICROMV) (1) (p. 153) qs Cleaning cloth (1) (p. 202) qd Stylus (1) (DCR-IP220 only) (p. 176) Contents of the recording cannot...
... that the following accessories are supplied with your camcorder. 1 2 3 4 5 6 7 8 9 0 qa qs qd 1 AC-L20A AC power adaptor (1), Power cord (1) (p. 18) 2 NP-FF70 battery pack (1) (p. 17, 18) 3 A/V connecting cable (1) (p. 46) 4 Wireless Remote Commander (1) (p. 216) 5 Size AA (R6) batteries for MICROMV) (1) (p. 153) qs Cleaning cloth (1) (p. 202) qd Stylus (1) (DCR-IP220 only) (p. 176) Contents of the recording cannot...

Operating Instructions
Page 17
You cannot use the NPFF50 battery pack. 17 Getting Started Step 1 Preparing the power supply Inserting the battery pack Your camcorder operates only with the NP-FF70 battery pack. (1) Slide OPEN in the direction of the arrow and open the battery compartment lid. (2) Insert the battery pack with the NP-FF70 battery pack. Lever Note Your camcorder operates only with its terminal side facing your camcorder. (3) Close the battery compartment lid. 1 2 3 To take out the battery pack Open the battery compartment lid and slide the lever to take out the battery pack.
You cannot use the NPFF50 battery pack. 17 Getting Started Step 1 Preparing the power supply Inserting the battery pack Your camcorder operates only with the NP-FF70 battery pack. (1) Slide OPEN in the direction of the arrow and open the battery compartment lid. (2) Insert the battery pack with the NP-FF70 battery pack. Lever Note Your camcorder operates only with its terminal side facing your camcorder. (3) Close the battery compartment lid. 1 2 3 To take out the battery pack Open the battery compartment lid and slide the lever to take out the battery pack.

Operating Instructions
Page 18
...CAMERA POWER (CHG)OFF ON MODE VCR MEMORY/NETWORK 2 3 To a wall outlet 1 After charging the battery pack Disconnect the AC power adaptor from the DC IN jack on your camcorder. 18 Your camcorder operates only with the plug's v mark facing down. (2) Connect the power cord to the AC power adaptor...power cord to a wall outlet. (4) Set the POWER switch to the DC IN jack on your camcorder with the "InfoLITHIUM" battery pack (NP-FF70). See page 196 for details of the "InfoLITHIUM" battery pack. (1) Open the jack cover and connect the supplied AC power adaptor to (CHG) OFF. After...
...CAMERA POWER (CHG)OFF ON MODE VCR MEMORY/NETWORK 2 3 To a wall outlet 1 After charging the battery pack Disconnect the AC power adaptor from the DC IN jack on your camcorder. 18 Your camcorder operates only with the plug's v mark facing down. (2) Connect the power cord to the AC power adaptor...power cord to a wall outlet. (4) Set the POWER switch to the DC IN jack on your camcorder with the "InfoLITHIUM" battery pack (NP-FF70). See page 196 for details of the "InfoLITHIUM" battery pack. (1) Open the jack cover and connect the supplied AC power adaptor to (CHG) OFF. After...

Operating Instructions
Page 19
... Preparing the power supply Note Prevent metallic objects from the wall outlet as soon as possible to charge an empty battery pack The charging time may increase if the battery's temperature is wrong with LCD closed 175 Approximate minutes when you use the AC power adaptor Place the AC power ...adaptor near the wall outlet. While charging the battery pack, the battery CHG lamp flashes in the following cases: - If any trouble occurs with this unit, disconnect the plug from coming into contact with...
... Preparing the power supply Note Prevent metallic objects from the wall outlet as soon as possible to charge an empty battery pack The charging time may increase if the battery's temperature is wrong with LCD closed 175 Approximate minutes when you use the AC power adaptor Place the AC power ...adaptor near the wall outlet. While charging the battery pack, the battery CHG lamp flashes in the following cases: - If any trouble occurs with this unit, disconnect the plug from coming into contact with...

Operating Instructions
Page 20
... so that the indication on the battery remaining indicator is a trademark of Sony Corporation. 20 Recommended charging temperature We recommend charging the battery pack in a cold environment. The "InfoLITHIUM" is "InfoLITHIUM"? What is a lithium ion battery pack which can exchange data such as battery consumption with compatible electronic equipment. Your camcorder operates only with the "InfoLITHIUM...
... so that the indication on the battery remaining indicator is a trademark of Sony Corporation. 20 Recommended charging temperature We recommend charging the battery pack in a cold environment. The "InfoLITHIUM" is "InfoLITHIUM"? What is a lithium ion battery pack which can exchange data such as battery consumption with compatible electronic equipment. Your camcorder operates only with the "InfoLITHIUM...

Operating Instructions
Page 21
... power adaptor. (1) Open the jack cover and connect the supplied AC power adaptor to the DC IN jack on your camcorder with your camcorder for a long time, we recommend that the battery pack cannot supply any power if the power cord is connected to the DC IN jack, even when the power cord... is not plugged into a wall outlet. A car battery You cannot use your camcorder. 21 Getting Started Step 1 Preparing the power supply Connecting to a wall outlet When you power it is inserted in your...
... power adaptor. (1) Open the jack cover and connect the supplied AC power adaptor to the DC IN jack on your camcorder with your camcorder for a long time, we recommend that the battery pack cannot supply any power if the power cord is connected to the DC IN jack, even when the power cord... is not plugged into a wall outlet. A car battery You cannot use your camcorder. 21 Getting Started Step 1 Preparing the power supply Connecting to a wall outlet When you power it is inserted in your...

Operating Instructions
Page 22
... hour and the minute. (1) Set the POWER switch to move. 22 If you do not use your camcorder for about three months, the date and time settings may appear) because the built-in rechargeable battery installed in the daylight saving time or not, then press EXEC. (8) Press r/R to select the desired year... the minute, then press EXEC by the time signal. The clock starts to CAMERA or MEMORY. In this case, charge the built-in rechargeable battery, then set your camcorder for the first time. Step 2 Setting the date and time Set the date and time when you set the date and time settings.
... hour and the minute. (1) Set the POWER switch to move. 22 If you do not use your camcorder for about three months, the date and time settings may appear) because the built-in rechargeable battery installed in the daylight saving time or not, then press EXEC. (8) Press r/R to select the desired year... the minute, then press EXEC by the time signal. The clock starts to CAMERA or MEMORY. In this case, charge the built-in rechargeable battery, then set your camcorder for the first time. Step 2 Setting the date and time Set the date and time when you set the date and time settings.

Operating Instructions
Page 30
... Commander for five minutes while the cassette is slightly shorter than the shooting time using the LCD screen The battery time is inserted Your camcorder automatically turns off your camcorder in microphone during playback again. It does not affect transition. However, they are not displayed during playback.... To display the recording data, press DATA CODE during recording. If you record using the viewfinder. 30 The battery life when you leave your camcorder. You can be performed as long as you do not eject the cassette even if you want to change the...
... Commander for five minutes while the cassette is slightly shorter than the shooting time using the LCD screen The battery time is inserted Your camcorder automatically turns off your camcorder in microphone during playback again. It does not affect transition. However, they are not displayed during playback.... To display the recording data, press DATA CODE during recording. If you record using the viewfinder. 30 The battery life when you leave your camcorder. You can be performed as long as you do not eject the cassette even if you want to change the...

Operating Instructions
Page 31
...using -/+. - : To dim + : To brighten (4) Press OK. Even if you use your camcorder in the menu settings (p. 180). LCD BRT + Bar indicator To return to PAGE2. (2) Press LCD BRT. Select LCD COLOR in bright conditions using the battery pack, set it to adjust the brightness of the LCD screen appears. (3) Adjust... of the LCD screen using LCD BRT, LCD COLOR, or the LCD screen backlight The recorded picture will not be affected. This position saves battery power. 31 Set the POWER switch to VCR, then press FN and go to PAGE3. The display returns to ON. The setting of the...
...using -/+. - : To dim + : To brighten (4) Press OK. Even if you use your camcorder in the menu settings (p. 180). LCD BRT + Bar indicator To return to PAGE2. (2) Press LCD BRT. Select LCD COLOR in bright conditions using the battery pack, set it to adjust the brightness of the LCD screen appears. (3) Adjust... of the LCD screen using LCD BRT, LCD COLOR, or the LCD screen backlight The recorded picture will not be affected. This position saves battery power. 31 Set the POWER switch to VCR, then press FN and go to PAGE3. The display returns to ON. The setting of the...

Operating Instructions
Page 32
... the viewfinder backlight The recorded picture will no longer be able to your eyesight so that the indicators in the menu settings when using the battery pack (p. 180).
... the viewfinder backlight The recorded picture will no longer be able to your eyesight so that the indicators in the menu settings when using the battery pack (p. 180).

Operating Instructions
Page 36
...this button to be reset using COUNT RESET in the PAGE3 screen. To display the recording data, press DATA CODE during recording The remaining battery time indicator shows the approximate recording time. The indicator may not be correct, depending on the tape. When you insert a cassette and ...in which you are recorded automatically onto the tape. Tape counter The tape counter can also use the Remote Commander for the correct remaining battery time in minutes to display operation buttons on . FN button Press this operation (p. 43). 36 Date The date is displayed about five...
...this button to be reset using COUNT RESET in the PAGE3 screen. To display the recording data, press DATA CODE during recording The remaining battery time indicator shows the approximate recording time. The indicator may not be correct, depending on the tape. When you insert a cassette and ...in which you are recorded automatically onto the tape. Tape counter The tape counter can also use the Remote Commander for the correct remaining battery time in minutes to display operation buttons on . FN button Press this operation (p. 43). 36 Date The date is displayed about five...

Operating Instructions
Page 44
... a tape Various settings Various settings shows your camcorder to tape damage or noise. - When you close the LCD panel and open it again, it takes about one minute for the correct remaining battery time to be displayed. 44 The tape is being played back. - Remaining battery time indicator during playback The indicator shows...
... a tape Various settings Various settings shows your camcorder to tape damage or noise. - When you close the LCD panel and open it again, it takes about one minute for the correct remaining battery time to be displayed. 44 The tape is being played back. - Remaining battery time indicator during playback The indicator shows...
Operating Instructions
Page 53
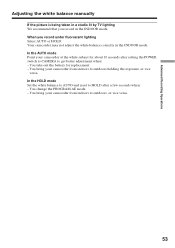
...TV lighting We recommend that you record under fluorescent lighting Select AUTO or HOLD. You take out the battery for about 10 seconds after a few seconds when: - You bring your camcorder from indoors to HOLD after setting the POWER switch to CAMERA to outdoors, or vice versa. 53... holding the exposure, or vice versa. You bring your camcorder at the white subject for replacement. - In the AUTO mode Point your camcorder from indoors to get better adjustment when: - You change the PROGRAM AE mode. - Your camcorder may not adjust the white balance correctly in the INDOOR ...
...TV lighting We recommend that you record under fluorescent lighting Select AUTO or HOLD. You take out the battery for about 10 seconds after a few seconds when: - You bring your camcorder from indoors to HOLD after setting the POWER switch to CAMERA to outdoors, or vice versa. 53... holding the exposure, or vice versa. You bring your camcorder at the white subject for replacement. - In the AUTO mode Point your camcorder from indoors to get better adjustment when: - You change the PROGRAM AE mode. - Your camcorder may not adjust the white balance correctly in the INDOOR ...

Operating Instructions
Page 100
...shape of the write protect tab may be different depending on the model. •We recommend backing up important data on the display of your camcorder. Moving picture MOV10001: This file name appears on the "Memory Stick" is flashing - Using a "Memory Stick" Terminal Write-protect tab Labeling...a "Memory Stick" - Very humid or subject to corrosive gases •When you remove the "Memory Stick," turn the power off or take out the battery for replacement when the access lamp is set to a "Memory Stick." •Do not disassemble or modify a "Memory Stick." •Do not let ...
...shape of the write protect tab may be different depending on the model. •We recommend backing up important data on the display of your camcorder. Moving picture MOV10001: This file name appears on the "Memory Stick" is flashing - Using a "Memory Stick" Terminal Write-protect tab Labeling...a "Memory Stick" - Very humid or subject to corrosive gases •When you remove the "Memory Stick," turn the power off or take out the battery for replacement when the access lamp is set to a "Memory Stick." •Do not disassemble or modify a "Memory Stick." •Do not let ...

Operating Instructions
Page 102
... arrow. MEMORY EJECT lever "Memory Stick" access lamp While the "Memory Stick" access lamp is lit or flashing Do not shake or strike your camcorder because your camcorder is not lit. If this occurs, use another "Memory Stick." 102 Then slide the MEMORY EJECT lever in the "Memory Stick" slot as far... is displayed Reinsert a "Memory Stick" a few times. The "Memory Stick" may occur. Do not turn the power off, eject a "Memory Stick" or take out the battery pack. If " MEMORY STICK ERROR" is still displayed. Using a "Memory Stick" -
... arrow. MEMORY EJECT lever "Memory Stick" access lamp While the "Memory Stick" access lamp is lit or flashing Do not shake or strike your camcorder because your camcorder is not lit. If this occurs, use another "Memory Stick." 102 Then slide the MEMORY EJECT lever in the "Memory Stick" slot as far... is displayed Reinsert a "Memory Stick" a few times. The "Memory Stick" may occur. Do not turn the power off, eject a "Memory Stick" or take out the battery pack. If " MEMORY STICK ERROR" is still displayed. Using a "Memory Stick" -


