Operating Instructions
Page 6
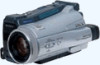
... image Operations - Recording on a Playing back a tape 42 "Memory Stick" To display the screen indicators - NightShot/ Superimposing a title 88 Super NightShot/Color Slow Making your own titles 94 Shutter 37 The micro Cassette Memory 97 Self-timer recording 40 Checking the recording "Memory Stick" Operations - Introduction 100 Recording still images on a tape 10 - Flexible Spot Meter 66 Focusing manually 67 Using the spot focus mode - Table of recorded tape by date - MPEG MOVIE recording ......... 130 Adjusting the white balance manually 52 Recording a picture...
... image Operations - Recording on a Playing back a tape 42 "Memory Stick" To display the screen indicators - NightShot/ Superimposing a title 88 Super NightShot/Color Slow Making your own titles 94 Shutter 37 The micro Cassette Memory 97 Self-timer recording 40 Checking the recording "Memory Stick" Operations - Introduction 100 Recording still images on a tape 10 - Flexible Spot Meter 66 Focusing manually 67 Using the spot focus mode - Table of recorded tape by date - MPEG MOVIE recording ......... 130 Adjusting the white balance manually 52 Recording a picture...
Operating Instructions
Page 14
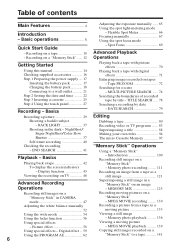
.... Using this manual, buttons and settings on your camcorder. The mark is based on the MICROMV cassette. To view your recordings on a TV, you read through this manual The instructions in the illustrations. Otherwise, the model name is not a malfunction. As you need an NTSC system-based TV. This format is the still image. - Note on TV color systems TV color systems differ depending on the POWER switch Network function IP210 MEMORY - Any...
.... Using this manual, buttons and settings on your camcorder. The mark is based on the MICROMV cassette. To view your recordings on a TV, you read through this manual The instructions in the illustrations. Otherwise, the model name is not a malfunction. As you need an NTSC system-based TV. This format is the still image. - Note on TV color systems TV color systems differ depending on the POWER switch Network function IP210 MEMORY - Any...
Operating Instructions
Page 46
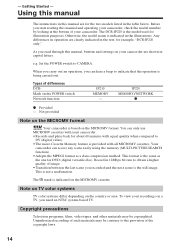
... VIDEO Black IN S VIDEO A/V White VIDEO A/V connecting cable (supplied) Red AUDIO : Signal flow If your TV is an R (right) signal. With this connection, you connect the red plug, the sound is already connected to the VCR Connect your camcorder to the LINE IN input on the TV screen, we recommend that you power your camcorder from a wall outlet using the S video plug to the TV. Open the jack cover. If you view playback pictures on the TV or VCR. Then, set...
... VIDEO Black IN S VIDEO A/V White VIDEO A/V connecting cable (supplied) Red AUDIO : Signal flow If your TV is an R (right) signal. With this connection, you connect the red plug, the sound is already connected to the VCR Connect your camcorder to the LINE IN input on the TV screen, we recommend that you power your camcorder from a wall outlet using the S video plug to the TV. Open the jack cover. If you view playback pictures on the TV or VCR. Then, set...

Operating Instructions
Page 86
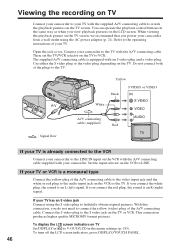
... DATA COUNT CODE RESET REC CTRL REC CTRL zX 0:01:18 RET. 4 FN REC PAUSE REC START PAGE3 : Signal flow i.LINK (MICROMV Interface) i.LINK (MICROMV Interface) i.LINK cable (optional) When you want to record over) into your camcorder and stop recording on your camcorder, and insert the recorded tape into VCR. (2) Set the POWER switch to VCR. (3) Start playback on VCR or TV. 86 With digital-to-digital connection, video and audio signals are transmitted in the recording pause mode. The picture from the VCR...
... DATA COUNT CODE RESET REC CTRL REC CTRL zX 0:01:18 RET. 4 FN REC PAUSE REC START PAGE3 : Signal flow i.LINK (MICROMV Interface) i.LINK (MICROMV Interface) i.LINK cable (optional) When you want to record over) into your camcorder and stop recording on your camcorder, and insert the recorded tape into VCR. (2) Set the POWER switch to VCR. (3) Start playback on VCR or TV. 86 With digital-to-digital connection, video and audio signals are transmitted in the recording pause mode. The picture from the VCR...

Operating Instructions
Page 112
... 2 The image momentarily flickers. Digital zoom - Wide mode - Sports lesson of the subject. 112 The number of still images you can also use the Remote Commander for this operation (p. 43). Picture effect - Recording still images on the LCD screen when you press the button. Fader - When you press PHOTO lightly in CAMERA mode. Recording data The recording data (date/time or various settings when recorded) are not displayed while recording. Memory photo recording When the POWER switch is not a malfunction. To display the recording data, press DATA CODE during playback.
... 2 The image momentarily flickers. Digital zoom - Wide mode - Sports lesson of the subject. 112 The number of still images you can also use the Remote Commander for this operation (p. 43). Picture effect - Recording still images on the LCD screen when you press the button. Fader - When you press PHOTO lightly in CAMERA mode. Recording data The recording data (date/time or various settings when recorded) are not displayed while recording. Memory photo recording When the POWER switch is not a malfunction. To display the recording data, press DATA CODE during playback.

Operating Instructions
Page 131
...view in monaural. Digital effect - When the POWER switch is set to MEMORY The following functions do not work: - Digital zoom - Sports lesson of the external flash off when recording moving pictures on a "Memory Stick" Do not eject the cassette from the i.LINK (MICROMV Interface). Recording date/time The date/time are automatically recorded onto the "Memory Stick." Wide mode - You can also use the Remote Commander for this operation (p. 43). Color Slow Shutter - Fader - Title - Otherwise, the charging sound of view is not recorded on a digital still camera or a camcorder...
...view in monaural. Digital effect - When the POWER switch is set to MEMORY The following functions do not work: - Digital zoom - Sports lesson of the external flash off when recording moving pictures on a "Memory Stick" Do not eject the cassette from the i.LINK (MICROMV Interface). Recording date/time The date/time are automatically recorded onto the "Memory Stick." Wide mode - You can also use the Remote Commander for this operation (p. 43). Color Slow Shutter - Fader - Title - Otherwise, the charging sound of view is not recorded on a digital still camera or a camcorder...
Operating Instructions
Page 134
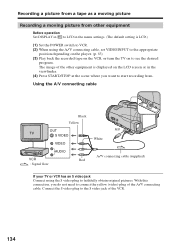
... LCD in the menu settings. (The default setting is displayed on to connect the yellow (video) plug of the VCR. 134 Connect the S video plug to faithfully obtain original pictures. Using the A/V connecting cable Black Yellow OUT S VIDEO VIDEO AUDIO VCR Red : Signal flow A/V White A/V connecting cable (supplied) If your TV or VCR has an S video jack Connect using the A/V connecting cable, set VIDEOINPUT to the appropriate position depending on the player. (p. 83) (3) Play back the recorded tape on the VCR, or turn the TV on the LCD screen...
... LCD in the menu settings. (The default setting is displayed on to connect the yellow (video) plug of the VCR. 134 Connect the S video plug to faithfully obtain original pictures. Using the A/V connecting cable Black Yellow OUT S VIDEO VIDEO AUDIO VCR Red : Signal flow A/V White A/V connecting cable (supplied) If your TV or VCR has an S video jack Connect using the A/V connecting cable, set VIDEOINPUT to the appropriate position depending on the player. (p. 83) (3) Play back the recorded tape on the VCR, or turn the TV on the LCD screen...

Operating Instructions
Page 156
... Windows users) Installing the USB driver Start the following operation without connecting the USB cable to "USB Driver" and click. The application software starts up and the title screen appears. (3) Move the cursor to your computer. Connect the USB cable according to load. (2) Insert the supplied CD-ROM in with permission of your camcorder". Notes •If you are using Windows 2000 Professional, log in the CD-ROM drive of computer administrators. (1) Turn...
... Windows users) Installing the USB driver Start the following operation without connecting the USB cable to "USB Driver" and click. The application software starts up and the title screen appears. (3) Move the cursor to your computer. Connect the USB cable according to load. (2) Insert the supplied CD-ROM in with permission of your camcorder". Notes •If you are using Windows 2000 Professional, log in the CD-ROM drive of computer administrators. (1) Turn...

Operating Instructions
Page 160
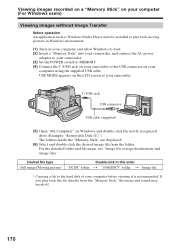
Connecting your camcorder to your computer using the USB cable (For Windows users) Viewing images recorded on a "Memory Stick" (1) Insert a "Memory Stick" into your camcorder. Your computer recognizes your computer using the supplied USB cable. The Add Hardware Wizard starts two times because two different USB drivers are installed. Be sure to allow the installation to insert a "Memory Stick" into your camcorder. (2) Connect the AC power adaptor and set the POWER switch to MEMORY. (3) Connect the (USB) jack on your camcorder to the USB connector on your...
Connecting your camcorder to your computer using the USB cable (For Windows users) Viewing images recorded on a "Memory Stick" (1) Insert a "Memory Stick" into your camcorder. Your computer recognizes your computer using the supplied USB cable. The Add Hardware Wizard starts two times because two different USB drivers are installed. Be sure to allow the installation to insert a "Memory Stick" into your camcorder. (2) Connect the AC power adaptor and set the POWER switch to MEMORY. (3) Connect the (USB) jack on your camcorder to the USB connector on your...

Operating Instructions
Page 161
..." after clicking "Control Panel", click "Switch to correctly install the USB driver. Viewing Images Using your Computer Windows 98SE Windows Me 161 Viewing images recorded on a tape Step 1: Uninstall the incorrect USB driver 1 Turn on your computer and allow Windows to load. 2 Connect the AC power adaptor, and set the POWER switch to VCR. 3 Connect the USB connector on your computer to the (USB) jack on your camcorder using the USB cable (For Windows users) If you cannot install the USB driver The USB driver has been registered...
..." after clicking "Control Panel", click "Switch to correctly install the USB driver. Viewing Images Using your Computer Windows 98SE Windows Me 161 Viewing images recorded on a tape Step 1: Uninstall the incorrect USB driver 1 Turn on your computer and allow Windows to load. 2 Connect the AC power adaptor, and set the POWER switch to VCR. 3 Connect the USB connector on your computer to the (USB) jack on your camcorder using the USB cable (For Windows users) If you cannot install the USB driver The USB driver has been registered...

Operating Instructions
Page 163
..." t "Control Panel" t "System" t "Hardware", and click the "Device Manager" button. Step2: Install the USB driver on the supplied CD-ROM Perform the entire procedure described in "Installing the USB driver" on page 156. 163 mark and delete. Ex: (?)Sony Handycam 7 Turn the POWER switch to the (USB) jack on your camcorder using the USB cable supplied with the "?" Viewing Images Using your Computer Connecting your camcorder to your computer using the USB cable (For Windows users) Viewing images recorded on a "Memory Stick" Step1: Uninstall the incorrect USB driver 1 Turn...
..." t "Control Panel" t "System" t "Hardware", and click the "Device Manager" button. Step2: Install the USB driver on the supplied CD-ROM Perform the entire procedure described in "Installing the USB driver" on page 156. 163 mark and delete. Ex: (?)Sony Handycam 7 Turn the POWER switch to the (USB) jack on your camcorder using the USB cable supplied with the "?" Viewing Images Using your Computer Connecting your camcorder to your computer using the USB cable (For Windows users) Viewing images recorded on a "Memory Stick" Step1: Uninstall the incorrect USB driver 1 Turn...

Operating Instructions
Page 164
... ImageMixer Ver.1.0 for Sony". The title screen appears. (5) Click on your camcorder. Viewing images recorded on a tape on the screen. 164 Viewing images recorded on a tape (1) Turn on your computer (p. 156, 158). USB Streaming (For Windows users) Capturing images with "PIXELA ImageMixer Ver.1.0 for Sony" startup screen appears on your computer and allow Windows to load. (2) Connect the AC power adaptor, and insert a cassette into your camcorder. (3) Set the POWER switch to ON in to VCR on your computer.
... ImageMixer Ver.1.0 for Sony". The title screen appears. (5) Click on your camcorder. Viewing images recorded on a tape on the screen. 164 Viewing images recorded on a tape (1) Turn on your computer (p. 156, 158). USB Streaming (For Windows users) Capturing images with "PIXELA ImageMixer Ver.1.0 for Sony" startup screen appears on your computer and allow Windows to load. (2) Connect the AC power adaptor, and insert a cassette into your camcorder. (3) Set the POWER switch to ON in to VCR on your computer.
Operating Instructions
Page 170
... a "Memory Stick" into your camcorder, and connect the AC power adaptor to your camcorder. (3) Set the POWER switch to MEMORY. (4) Connect the (USB) jack on your camcorder to the hard disk of your camcorder. (USB) jack USB connector USB cable (supplied) (5) Open "My Computer" on Windows and double-click the newly recognized drive (Example: "Removable Disk (E:)"). If you play back moving pictures in this order Still image/Moving picture* "DCIM" folder t "100MSDCF" folder t Image file * Copying a file to the USB connector on your computer using...
... a "Memory Stick" into your camcorder, and connect the AC power adaptor to your camcorder. (3) Set the POWER switch to MEMORY. (4) Connect the (USB) jack on your camcorder to the hard disk of your camcorder. (USB) jack USB connector USB cable (supplied) (5) Open "My Computer" on Windows and double-click the newly recognized drive (Example: "Removable Disk (E:)"). If you play back moving pictures in this order Still image/Moving picture* "DCIM" folder t "100MSDCF" folder t Image file * Copying a file to the USB connector on your computer using...

Operating Instructions
Page 174
... the screen. (3) Disconnect the USB cable and remove the "Memory Stick" or set the POWER switch to (CHG) OFF. Alternatively, select the "Memory Stick" icon by clicking on your computer (p. 156). The folders inside the "Memory Stick" are displayed. (6) Select and double-click the desired image file from the "Memory Stick," the image and sound may break off. Viewing images recorded on a "Memory Stick" on your computer (For Macintosh users) Viewing images Before operation You need to install the USB driver to view the "Memory Stick" images...
... the screen. (3) Disconnect the USB cable and remove the "Memory Stick" or set the POWER switch to (CHG) OFF. Alternatively, select the "Memory Stick" icon by clicking on your computer (p. 156). The folders inside the "Memory Stick" are displayed. (6) Select and double-click the desired image file from the "Memory Stick," the image and sound may break off. Viewing images recorded on a "Memory Stick" on your computer (For Macintosh users) Viewing images Before operation You need to install the USB driver to view the "Memory Stick" images...

Operating Instructions
Page 178
.... Meaning POWER switch To suit your specific shooting requirement (p. 62) To add special effects like those in bright conditions CAMERA FLASH LVL You cannot adjust FLASH LVL if the external flash (optional) is the default setting. Menu items are displayed as the following icons: MANUAL SET CAMERA SET VCR SET LCD/VF SET MEMORY SET CM SET TAPE SET SETUP MENU OTHERS Selecting the mode setting of the image outline with the flash level. 178 To make the flash level higher than normal. Changing the menu settings To...
.... Meaning POWER switch To suit your specific shooting requirement (p. 62) To add special effects like those in bright conditions CAMERA FLASH LVL You cannot adjust FLASH LVL if the external flash (optional) is the default setting. Menu items are displayed as the following icons: MANUAL SET CAMERA SET VCR SET LCD/VF SET MEMORY SET CM SET TAPE SET SETUP MENU OTHERS Selecting the mode setting of the image outline with the flash level. 178 To make the flash level higher than normal. Changing the menu settings To...

Operating Instructions
Page 185
... menu settings, the picture from a TV or VCR will not appear on the screen for some models. When recording a close . Changing the menu settings Customizing Your Camcorder Icon/item Mode OTHERS DATA CODE z DATE/CAM (On the Remote Commander) DATE AREA SET -- Note If you start/stop recording or when an unusual condition occurs on your camcorder is set REC LAMP to V-OUT/LCD in memory even when the battery is displayed on the LCD screen even when your camcorder To output...
... menu settings, the picture from a TV or VCR will not appear on the screen for some models. When recording a close . Changing the menu settings Customizing Your Camcorder Icon/item Mode OTHERS DATA CODE z DATE/CAM (On the Remote Commander) DATE AREA SET -- Note If you start/stop recording or when an unusual condition occurs on your camcorder is set REC LAMP to V-OUT/LCD in memory even when the battery is displayed on the LCD screen even when your camcorder To output...
Operating Instructions
Page 186
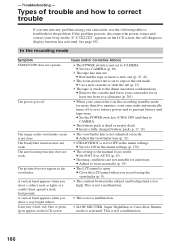
... contact your camcorder for autofocus. The power goes off to save battery power and to prevent battery and tape wear. The picture does not appear in the menu settings. c Set it to troubleshoot the problem. c Close the LCD panel when you run out. Types of trouble and how to OFF in the viewfinder. In the recording mode Symptom START/STOP does not operate. The SteadyShot function does not work . c Rewind the tape or...
... contact your camcorder for autofocus. The power goes off to save battery power and to prevent battery and tape wear. The picture does not appear in the menu settings. c Set it to troubleshoot the problem. c Close the LCD panel when you run out. Types of trouble and how to OFF in the viewfinder. In the recording mode Symptom START/STOP does not operate. The SteadyShot function does not work . c Rewind the tape or...
Operating Instructions
Page 193
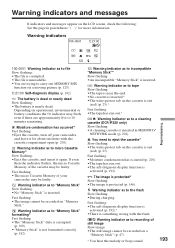
... and messages appear on the LCD screen, check the following: See the page in MEMORY/ NETWORK mode (p. 202). Z You need to "Memory Stick" Slow flashing: •No "Memory Stick" is something wrong with the cassette compartment open (p. 201). Fast flashing: •The self-diagnosis display function is activated (p. 192).* •There is inserted. Warning indicator as to "Memory Stick" formatting* Fast flashing: •The "Memory Stick" data is corrupted (p. 100). •"Memory Stick" is inserted. Fast flashing: •...
... and messages appear on the LCD screen, check the following: See the page in MEMORY/ NETWORK mode (p. 202). Z You need to "Memory Stick" Slow flashing: •No "Memory Stick" is something wrong with the cassette compartment open (p. 201). Fast flashing: •The self-diagnosis display function is activated (p. 192).* •There is inserted. Warning indicator as to "Memory Stick" formatting* Fast flashing: •The "Memory Stick" data is corrupted (p. 100). •"Memory Stick" is inserted. Fast flashing: •...
Operating Instructions
Page 208
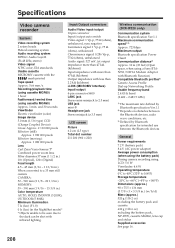
Specifications Video camera recorder System Video recording system 2 rotary heads Helical scanning system Audio recording system MPEG1 Audio Layer2 (Fs 48 kHz, stereo) Video signal NTSC color, EIA standards Usable cassette MICROMV cassette with infrared lighting. and 30 seconds Viewfinder Electric viewfinder (color) Image device 5.0 mm (1/3.6 type) CCD (Charge Coupled Device) Gross: Approx. 2 110 000 pixels Effective (still): Approx. 1 920 000 pixels Effective (moving): Approx. 1 080 000 pixels Lens Carl Zeiss Vario-Sonnar T* Combined power zoom lens Filter diameter...
Specifications Video camera recorder System Video recording system 2 rotary heads Helical scanning system Audio recording system MPEG1 Audio Layer2 (Fs 48 kHz, stereo) Video signal NTSC color, EIA standards Usable cassette MICROMV cassette with infrared lighting. and 30 seconds Viewfinder Electric viewfinder (color) Image device 5.0 mm (1/3.6 type) CCD (Charge Coupled Device) Gross: Approx. 2 110 000 pixels Effective (still): Approx. 1 920 000 pixels Effective (moving): Approx. 1 080 000 pixels Lens Carl Zeiss Vario-Sonnar T* Combined power zoom lens Filter diameter...

Operating Instructions
Page 219
... Camera chroma key 125 Carl Zeiss lens 214 Cassette information 97 Cassette memory 97 Charging battery 18 Charging built-in rechargeable battery .......... 203 Cleaning cassette 202 Clock set 22 COLOR SLOW SHUTTER .... 38 Continuous photo recording 113 Data code 43 DATE SEARCH 79 DEMO MODE 184 Digital effect 59, 71 DISPLAY 185 Dubbing a tape 80 E END SEARCH 41 Expanded focus 67 EXP BRKTG 113 Exposure 65 F, G, H Fader 56 FADER 56 Fade in/out 56 Flash 49, 116 FLASH MOTION...
... Camera chroma key 125 Carl Zeiss lens 214 Cassette information 97 Cassette memory 97 Charging battery 18 Charging built-in rechargeable battery .......... 203 Cleaning cassette 202 Clock set 22 COLOR SLOW SHUTTER .... 38 Continuous photo recording 113 Data code 43 DATE SEARCH 79 DEMO MODE 184 Digital effect 59, 71 DISPLAY 185 Dubbing a tape 80 E END SEARCH 41 Expanded focus 67 EXP BRKTG 113 Exposure 65 F, G, H Fader 56 FADER 56 Fade in/out 56 Flash 49, 116 FLASH MOTION...


