
Computer Applications Guide
Page 2
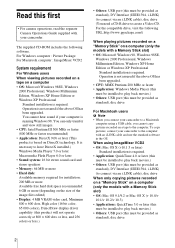
...must be provided as standard), DV Interface (IEEE1394, i.LINK) (to connect via an i.LINK cable), disc drive (You need a CD-R drive to create a Video CD. You cannot hear sound if your camcorder. For Windows computer : Picture Package For Macintosh computer : ImageMixer VCD2 System requirement For Windows users...less.) • Others: USB port (this must be provided as standard), disc drive For Macintosh users b Note • When you connect your camcorder to a Macintosh computer using ImageMixer VCD2 • OS: Mac OS X (v10.1.5 or later) Standard installation is not assured if the above ...
...must be provided as standard), DV Interface (IEEE1394, i.LINK) (to connect via an i.LINK cable), disc drive (You need a CD-R drive to create a Video CD. You cannot hear sound if your camcorder. For Windows computer : Picture Package For Macintosh computer : ImageMixer VCD2 System requirement For Windows users...less.) • Others: USB port (this must be provided as standard), disc drive For Macintosh users b Note • When you connect your camcorder to a Macintosh computer using ImageMixer VCD2 • OS: Mac OS X (v10.1.5 or later) Standard installation is not assured if the above ...
Computer Applications Guide
Page 4
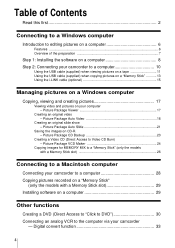
Digital convert function 33 4 Picture Package Auto Slide 21 Saving the images on CD-R - Picture Package VCD Maker 24 Copying images for MEMORY MIX to a "Memory Stick" (only the models with a Memory Stick slot 26 Connecting to a Macintosh computer Connecting your camcorder to a ... software on a computer 8 Step 2: Connecting your camcorder to a computer 10 Using the USB cable (supplied) when viewing pictures on a tape 11 Using the USB cable (supplied) when copying pictures on a "Memory Stick 13 Using the i.LINK cable (optional 15 Managing pictures on a Windows computer Copying...
Digital convert function 33 4 Picture Package Auto Slide 21 Saving the images on CD-R - Picture Package VCD Maker 24 Copying images for MEMORY MIX to a "Memory Stick" (only the models with a Memory Stick slot 26 Connecting to a Macintosh computer Connecting your camcorder to a ... software on a computer 8 Step 2: Connecting your camcorder to a computer 10 Using the USB cable (supplied) when viewing pictures on a tape 11 Using the USB cable (supplied) when copying pictures on a "Memory Stick 13 Using the i.LINK cable (optional 15 Managing pictures on a Windows computer Copying...

Computer Applications Guide
Page 7
Connecting to complete the preparation. Overview of models with an i.LINK cable (optional) See "Step 2: Connecting your camcorder to a computer. • Connecting with a USB cable (supplied) • Connecting with a Handycam Station. For models with a Handycam Station, place your camcorder to a computer. You cannot directly connect your camcorder on a computer CD-ROM (supplied) Connecting to a Windows computer On your...
Connecting to complete the preparation. Overview of models with an i.LINK cable (optional) See "Step 2: Connecting your camcorder to a computer. • Connecting with a USB cable (supplied) • Connecting with a Handycam Station. For models with a Handycam Station, place your camcorder to a computer. You cannot directly connect your camcorder on a computer CD-ROM (supplied) Connecting to a Windows computer On your...
Computer Applications Guide
Page 8
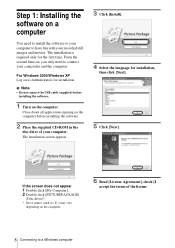
b Note • Do not connect the USB cable (supplied) before installing the software. 1 Turn on as (E:)) may vary depending on the computer before installing the software. 2 Place the supplied CD-ROM in the ... your computer. The installation is required only for installation, then click [Next]. 5 Click [Next]. From the second time on a computer You need to connect your camcorder and the computer. Step 1: Installing the software on , you only need to install the software to your computer to have fun with your recorded still...
b Note • Do not connect the USB cable (supplied) before installing the software. 1 Turn on as (E:)) may vary depending on the computer before installing the software. 2 Place the supplied CD-ROM in the ... your computer. The installation is required only for installation, then click [Next]. 5 Click [Next]. From the second time on a computer You need to connect your camcorder and the computer. Step 1: Installing the software on , you only need to install the software to your computer to have fun with your recorded still...
Computer Applications Guide
Page 10
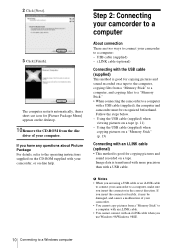
...Memory Stick." • When connecting the camcorder to a computer with a USB cable (supplied), the computer and camcorder must be damaged, and causes a malfunction of your camcorder. • You cannot copy pictures from the disc drive of your camcorder to the operating instructions supplied on the ... your computer. If you insert the connector in the correct direction. USB cable (supplied) - Step 2: Connecting your camcorder to a computer About connection There are using a USB cable or an i.LINK cable to connect your camcorder, or on a tape. 2 Click [Next]. 3 Click [Finish]. ...
...Memory Stick." • When connecting the camcorder to a computer with a USB cable (supplied), the computer and camcorder must be damaged, and causes a malfunction of your camcorder. • You cannot copy pictures from the disc drive of your camcorder to the operating instructions supplied on the ... your computer. If you insert the connector in the correct direction. USB cable (supplied) - Step 2: Connecting your camcorder to a computer About connection There are using a USB cable or an i.LINK cable to connect your camcorder, or on a tape. 2 Click [Next]. 3 Click [Finish]. ...
Computer Applications Guide
Page 11
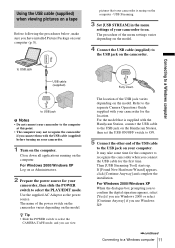
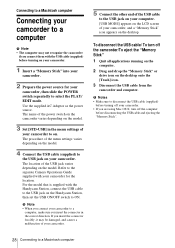
... the model. For the model that your camcorder for your camcorder. 1 Turn on the computer. It may not recognize the camcorder if you connect them with your camcorder is supplied with the Handycam Station, connect the USB cable to the USB jack on the Handycam Station, then set the USB ON/OFF ...dialogue box prompting you to confirm the digital signature appears, select [Yes] if you use Windows 2000 or select [Continue Anyway] if you have installed Picture Package on your computer. USB Streaming. 3 Set [USB STREAM] in the menu settings of the USB cable to the USB jack on your ...
... the model. For the model that your camcorder for your camcorder. 1 Turn on the computer. It may not recognize the camcorder if you connect them with your camcorder is supplied with the Handycam Station, connect the USB cable to the USB jack on the Handycam Station, then set the USB ON/OFF ...dialogue box prompting you to confirm the digital signature appears, select [Yes] if you use Windows 2000 or select [Continue Anyway] if you have installed Picture Package on your computer. USB Streaming. 3 Set [USB STREAM] in the menu settings of the USB cable to the USB jack on your ...
Computer Applications Guide
Page 13
...image quality and brightness when connecting your computer. [USB MODE] appears on the camcorder. Refer to the separate Camera Operations Guide supplied with the Handycam Station, connect the USB cable to the USB jack on the Handycam Station, then set the USB ON/OFF switch to ON. 6 Connect the ...other end of your camcorder and the computer, [Picture Package Menu] starts up after the second ...
...image quality and brightness when connecting your computer. [USB MODE] appears on the camcorder. Refer to the separate Camera Operations Guide supplied with the Handycam Station, connect the USB cable to the USB jack on the Handycam Station, then set the USB ON/OFF switch to ON. 6 Connect the ...other end of your camcorder and the computer, [Picture Package Menu] starts up after the second ...
Computer Applications Guide
Page 14
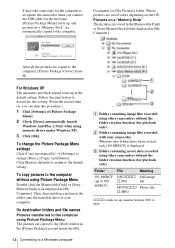
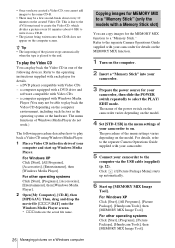
...pictures are stored in the [Removable Disk] or [Sony MemoryStick] folder displayed in the [Picture Package] created inside the [My 14 Connecting to a Windows computer A B C A Folder containing image files recorded using other camcorders without the folder creation function (for playback only) Folder...The automatic playback wizard starts up , and pictures in a "Memory Stick" are saved varies depending on , you connect the USB cable for playback only) B Folder containing image files recorded with your computer. Where pictures are automatically copied to 9999. Then, drag and ...
...pictures are stored in the [Removable Disk] or [Sony MemoryStick] folder displayed in the [Picture Package] created inside the [My 14 Connecting to a Windows computer A B C A Folder containing image files recorded using other camcorders without the folder creation function (for playback only) Folder...The automatic playback wizard starts up , and pictures in a "Memory Stick" are saved varies depending on , you connect the USB cable for playback only) B Folder containing image files recorded with your computer. Where pictures are automatically copied to 9999. Then, drag and ...

Computer Applications Guide
Page 15
...off your computer has a USB keyboard and a USB mouse as shown in the following illustrations to operate the camcorder correctly. • Connect the camcorder to a computer via the USB cable (supplied). Click here. 3 Click [OK] in Windows 2000/Windows Me). If [USB MODE] does ... environments. Click this icon. • If your camcorder. b Notes • Do not disconnect the USB cable while the access lamp is not guaranteed on the task tray. Connecting to a Windows computer task tray 2 Click [Safely remove Sony Camcorder] ([Unplug or eject hardware] in Windows 2000/Windows...
...off your computer has a USB keyboard and a USB mouse as shown in the following illustrations to operate the camcorder correctly. • Connect the camcorder to a computer via the USB cable (supplied). Click here. 3 Click [OK] in Windows 2000/Windows Me). If [USB MODE] does ... environments. Click this icon. • If your camcorder. b Notes • Do not disconnect the USB cable while the access lamp is not guaranteed on the task tray. Connecting to a Windows computer task tray 2 Click [Safely remove Sony Camcorder] ([Unplug or eject hardware] in Windows 2000/Windows...
Computer Applications Guide
Page 16
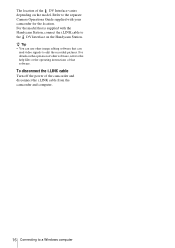
The location of the camcorder and disconnect the i.LINK cable from the camcorder and computer. 16 Connecting to a Windows computer To disconnect the i.LINK cable Turn off the power of the DV Interface varies depending on the model. For details on the Handycam Station. Refer to the separate Camera Operations Guide supplied with the Handycam Station, connect...
The location of the camcorder and disconnect the i.LINK cable from the camcorder and computer. 16 Connecting to a Windows computer To disconnect the i.LINK cable Turn off the power of the DV Interface varies depending on the model. For details on the Handycam Station. Refer to the separate Camera Operations Guide supplied with the Handycam Station, connect...
Computer Applications Guide
Page 18
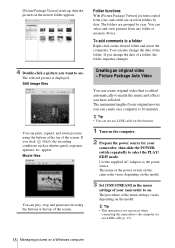
...or memory device. You can play, stop, and pause movies using the buttons at the top of your camcorder, then slide the POWER switch repeatedly to the computer via an i.LINK cable (p. 15). 18 Managing pictures on a Windows computer Use the supplied AC Adaptor as shutter speed, exposure,...menu settings varies depending on a computer is displayed. Picture Package Auto Video You can create original video that is not necessary when connecting the camcorder to select the PLAY/ EDIT mode. [Picture Package Viewer] starts up, then the pictures in the newest folder appears. 4 Double-click a...
...or memory device. You can play, stop, and pause movies using the buttons at the top of your camcorder, then slide the POWER switch repeatedly to the computer via an i.LINK cable (p. 15). 18 Managing pictures on a Windows computer Use the supplied AC Adaptor as shutter speed, exposure,...menu settings varies depending on a computer is displayed. Picture Package Auto Video You can create original video that is not necessary when connecting the camcorder to select the PLAY/ EDIT mode. [Picture Package Viewer] starts up, then the pictures in the newest folder appears. 4 Double-click a...

Computer Applications Guide
Page 19
... than sample ,continued Managing pictures on a Windows computer 19 music on the tape where you want to start copying. 5 Connect your camcorder to the computer using a USB cable (supplied) or i.LINK cable (optional) (p. 11, 15). [Picture Package Menu] starts up automatically. 6 Click [Automatic Video Producer]. [Picture Package Auto Video] starts up. . You can...
... than sample ,continued Managing pictures on a Windows computer 19 music on the tape where you want to start copying. 5 Connect your camcorder to the computer using a USB cable (supplied) or i.LINK cable (optional) (p. 11, 15). [Picture Package Menu] starts up automatically. 6 Click [Automatic Video Producer]. [Picture Package Auto Video] starts up. . You can...
Computer Applications Guide
Page 24
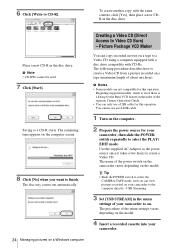
... copy recorded movies on the computer screen. . 8 Click [No] when you can only use an i.LINK cable. 1 Turn on the computer. 2 Prepare the power source for your camcorder. Regarding supported models, check to the computer directly - USB Streaming. 3 Set [USB STREAM] in the disc... view pictures recorded on . The procedure of the menu settings varies depending on a tape (maximum length of the power switch on the camcorder varies depending on a Windows computer Creating a Video CD (Direct Access to finish. Saving to CD-R]. . The following procedure describes how ...
... copy recorded movies on the computer screen. . 8 Click [No] when you can only use an i.LINK cable. 1 Turn on the computer. 2 Prepare the power source for your camcorder. Regarding supported models, check to the computer directly - USB Streaming. 3 Set [USB STREAM] in the disc... view pictures recorded on . The procedure of the menu settings varies depending on a tape (maximum length of the power switch on the camcorder varies depending on a Windows computer Creating a Video CD (Direct Access to finish. Saving to CD-R]. . The following procedure describes how ...
Computer Applications Guide
Page 25
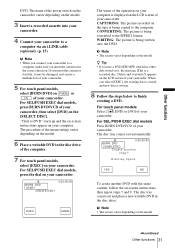
...Video CD. b Note • CD-RWs cannot be damaged, and causes a malfunction of your camcorder. CAPTURING: The picture recorded on the LCD screen of your camcorder. 9 Follow the steps below to a computer via a USB cable (supplied) (p. 11). [Picture Package Menu] starts up . For touch panel models Select [ ...END] or [NO] of your camcorder. YES NO To create another copy? For SEL/...
...Video CD. b Note • CD-RWs cannot be damaged, and causes a malfunction of your camcorder. CAPTURING: The picture recorded on the LCD screen of your camcorder. 9 Follow the steps below to a computer via a USB cable (supplied) (p. 11). [Picture Package Menu] starts up . For touch panel models Select [ ...END] or [NO] of your camcorder. YES NO To create another copy? For SEL/...
Computer Applications Guide
Page 26
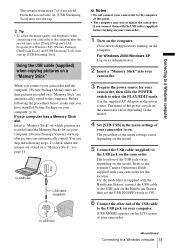
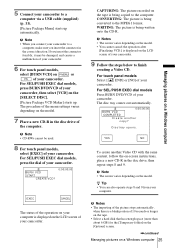
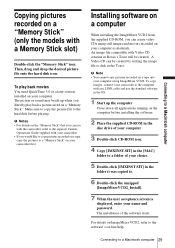
...For other operating systems Click [Start], [Programs], [Picture Package], [Handycam Tools], then [MEMORY MIX Image Tool]. For details, refer to the separate Camera Operations Guide supplied with your camcorder. 5 Connect your camcorder, then slide the POWER switch repeatedly to select the PLAY/ EDIT mode... • The importing of your camcorder to on the computer. 2 Insert a "Memory Stick" into your camcorder. 3 Prepare the power source for your camcorder to the computer via the USB cable (supplied) (p. 12). The name of the power switch on the camcorder varies depending on the model. 4...
...For other operating systems Click [Start], [Programs], [Picture Package], [Handycam Tools], then [MEMORY MIX Image Tool]. For details, refer to the separate Camera Operations Guide supplied with your camcorder. 5 Connect your camcorder, then slide the POWER switch repeatedly to select the PLAY/ EDIT mode... • The importing of your camcorder to on the computer. 2 Insert a "Memory Stick" into your camcorder. 3 Prepare the power source for your camcorder to the computer via the USB cable (supplied) (p. 12). The name of the power switch on the camcorder varies depending on the model. 4...
Computer Applications Guide
Page 28
...AC Adaptor as the power source. b Notes • Make sure to disconnect the USB cable (supplied) before turning off the computer before turning on your camcorder. 1 Insert a "Memory Stick" into your camcorder. 2 Prepare the power source for the location. If you insert the connector in the menu... camcorder if you connect them with the USB cable (supplied) before disconnecting the USB cable and ejecting the "Memory Stick". 28 Connecting to the USB jack on the model. 3 Set [STD-USB] in the correct direction. Refer to the separate Camera Operations Guide supplied with the Handycam ...
...AC Adaptor as the power source. b Notes • Make sure to disconnect the USB cable (supplied) before turning off the computer before turning on your camcorder. 1 Insert a "Memory Stick" into your camcorder. 2 Prepare the power source for the location. If you insert the connector in the menu... camcorder if you connect them with the USB cable (supplied) before disconnecting the USB cable and ejecting the "Memory Stick". 28 Connecting to the USB jack on the model. 3 Set [STD-USB] in the correct direction. Refer to the separate Camera Operations Guide supplied with the Handycam ...
Computer Applications Guide
Page 29
... 3.0 or a later version installed on your computer using still images and movies recorded on the computer before playing. An image file compatible with your camcorder. • If you would like to copy pictures recorded on a tape, copy the pictures to disk in the OS. 1 Start up when ...computer 29 Then, drag and drop the desired picture file onto the hard disk icon. Connecting to the computer with an i.LINK cable and use with the camcorder, refer to the separate Camera Operations Guide supplied with Video CD creation in Roxio's Toast will be created by writing the image ...
... 3.0 or a later version installed on your computer using still images and movies recorded on the computer before playing. An image file compatible with your camcorder. • If you would like to copy pictures recorded on a tape, copy the pictures to disk in the OS. 1 Start up when ...computer 29 Then, drag and drop the desired picture file onto the hard disk icon. Connecting to the computer with an i.LINK cable and use with the camcorder, refer to the separate Camera Operations Guide supplied with Video CD creation in Roxio's Toast will be created by writing the image ...

Computer Applications Guide
Page 30
...Guide. • You can only use a USB cable. Taiwan http://vaio-online.sony.com/tw/vaio/ - For system and operation requirements, visit the following procedures describe how to create a DVD from a picture recorded on a tape to a DVD easily if your camcorder is a listing for this operation. You also need...power source since it starts up for the first time The Direct Access to "Click to DVD" function enables you turn on your camcorder to a Sony VAIO series computer* that can create DVDs when you need the computer with a DVD drive that supports "Click to write DVDs. ...
...Guide. • You can only use a USB cable. Taiwan http://vaio-online.sony.com/tw/vaio/ - For system and operation requirements, visit the following procedures describe how to create a DVD from a picture recorded on a tape to a DVD easily if your camcorder is a listing for this operation. You also need...power source since it starts up for the first time The Direct Access to "Click to DVD" function enables you turn on your camcorder to a Sony VAIO series computer* that can create DVDs when you need the computer with a DVD drive that supports "Click to write DVDs. ...
Computer Applications Guide
Page 31
... EXEC dial models Press BURN DVD/VCD of the power switch on the camcorder varies depending on the model. 3 Insert a recorded cassette into your camcorder. 4 Connect your camcorder to a computer via an i.LINK cable (optional). (p. 15) b Note • When you connect your camcorder to DVD" starts up and the on-screen instructions appear on the...
... EXEC dial models Press BURN DVD/VCD of the power switch on the camcorder varies depending on the model. 3 Insert a recorded cassette into your camcorder. 4 Connect your camcorder to a computer via an i.LINK cable (optional). (p. 15) b Note • When you connect your camcorder to DVD" starts up and the on-screen instructions appear on the...
Computer Applications Guide
Page 32
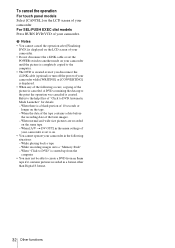
... to DVD" is started up to the computer. • The DVD is created even if you disconnect the i.LINK cable (optional) or turn off the power of your camcorder until the picture is completely copied to the point the operation was canceled is displayed. • When any of the ... a format other than Digital 8 format. 32 Other functions For SEL/PUSH EXEC dial models Press BURN DVD/VCD of your camcorder. b Notes • You cannot cancel the operation after [Finalizing DVD.] is displayed on the LCD screen of your camcorder. • Do not disconnect the i.LINK cable or set to create ...
... to DVD" is started up to the computer. • The DVD is created even if you disconnect the i.LINK cable (optional) or turn off the power of your camcorder until the picture is completely copied to the point the operation was canceled is displayed. • When any of the ... a format other than Digital 8 format. 32 Other functions For SEL/PUSH EXEC dial models Press BURN DVD/VCD of your camcorder. b Notes • You cannot cancel the operation after [Finalizing DVD.] is displayed on the LCD screen of your camcorder. • Do not disconnect the i.LINK cable or set to create ...


