
Computer Applications Guide
Page 2
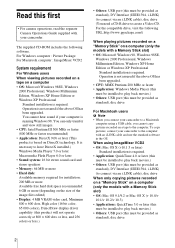
... be installed to play back movies.) • Others: USB port (this must be provided as standard), disc drive For Macintosh users b Note • When you cannot copy pictures recorded on a tape to the computer. For Windows computer : Picture Package For Macintosh computer : ImageMixer VCD2 System requirement For Windows users When viewing pictures recorded on a tape on the size of the image files edited) • Display: 4 MB VRAM video card, Minimum 800 × 600 dots, High color...
... be installed to play back movies.) • Others: USB port (this must be provided as standard), disc drive For Macintosh users b Note • When you cannot copy pictures recorded on a tape to the computer. For Windows computer : Picture Package For Macintosh computer : ImageMixer VCD2 System requirement For Windows users When viewing pictures recorded on a tape on the size of the image files edited) • Display: 4 MB VRAM video card, Minimum 800 × 600 dots, High color...
Computer Applications Guide
Page 14
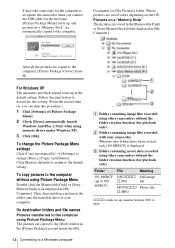
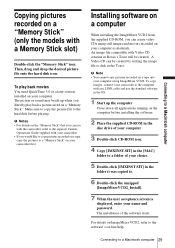
... launch Windows AutoPlay.] (Only when using Picture Package Menu Double-click the [Removable Disk] or [Sony MemoryStick] icon displayed in [My Computer]. Pictures on a "Memory Stick" The pictures are saved varies depending on , you connect the USB cable for the first time. [Picture Package Menu] starts up to 999 MSDCF) DSC0sss Still image s.JPG file MOV0sss Movie file s.MPG ssss stands for playback only) B Folder containing image files recorded with your computer. On destination folders and file names Pictures transferred...
... launch Windows AutoPlay.] (Only when using Picture Package Menu Double-click the [Removable Disk] or [Sony MemoryStick] icon displayed in [My Computer]. Pictures on a "Memory Stick" The pictures are saved varies depending on , you connect the USB cable for the first time. [Picture Package Menu] starts up to 999 MSDCF) DSC0sss Still image s.JPG file MOV0sss Movie file s.MPG ssss stands for playback only) B Folder containing image files recorded with your computer. On destination folders and file names Pictures transferred...
Computer Applications Guide
Page 18
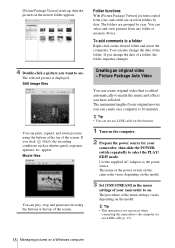
... shutter speed, exposure, aperture, etc. Still image files You can create original video that is not necessary when connecting the camcorder to a folder Right-click on a Windows computer Folder functions With [Picture Package Viewer], pictures copied from any folder or memory device. You can play, stop, and pause movies using the buttons at the top of a folder, the folder sequence changes. The folders are saved in the menu settings of your original movies you change the date...
... shutter speed, exposure, aperture, etc. Still image files You can create original video that is not necessary when connecting the camcorder to a folder Right-click on a Windows computer Folder functions With [Picture Package Viewer], pictures copied from any folder or memory device. You can play, stop, and pause movies using the buttons at the top of a folder, the folder sequence changes. The folders are saved in the menu settings of your original movies you change the date...
Computer Applications Guide
Page 24
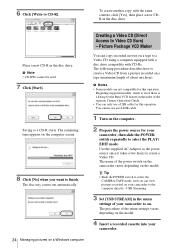
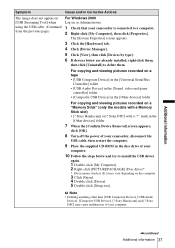
... separate Camera Operations Guide. • You can copy recorded movies on a tape to on a Windows computer Creating a Video CD (Direct Access to a CD-R starts. The name of about one hour). To create another copy with CD-Rs. The disc tray comes out automatically. . 24 Managing pictures on . Regarding supported models, check to see if there is a listing for your camcorder to select the PLAY/ EDIT mode. You cannot use a USB cable for this operation.
... separate Camera Operations Guide. • You can copy recorded movies on a tape to on a Windows computer Creating a Video CD (Direct Access to a CD-R starts. The name of about one hour). To create another copy with CD-Rs. The disc tray comes out automatically. . 24 Managing pictures on . Regarding supported models, check to see if there is a listing for your camcorder to select the PLAY/ EDIT mode. You cannot use a USB cable for this operation.
Computer Applications Guide
Page 26
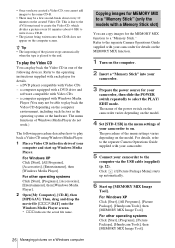
... Managing pictures on a Windows computer Copying images for your camcorder, then slide the POWER switch repeatedly to select the PLAY/ EDIT mode. a DVD player compatible with a Memory Stick slot) You can play back the Video CD in the disc drive of your camcorder to the computer via the USB cable (supplied) (p. 12). For other operating systems Click [Start], [Programs], [Picture Package], [Handycam Tools], then [MEMORY MIX Image Tool]. Refer to the separate Camera Operations Guide supplied with your camcorder. 5 Connect...
... Managing pictures on a Windows computer Copying images for your camcorder, then slide the POWER switch repeatedly to select the PLAY/ EDIT mode. a DVD player compatible with a Memory Stick slot) You can play back the Video CD in the disc drive of your camcorder to the computer via the USB cable (supplied) (p. 12). For other operating systems Click [Start], [Programs], [Picture Package], [Handycam Tools], then [MEMORY MIX Image Tool]. Refer to the separate Camera Operations Guide supplied with your camcorder. 5 Connect...
Computer Applications Guide
Page 29
... video CDs using ImageMixer VCD2. Connecting to the separate Camera Operations Guide supplied with a Memory Stick slot) Double-click the "Memory Stick" icon. Installing software on a computer When installing the ImageMixer VCD2 from the supplied CD-ROM, you directly play back movies You need QuickTime 3.0 or a later version installed on your computer. b Note • You cannot copy pictures recorded on a tape into your name and password. Make sure to copy the picture file to the hard disk before installing the software...
... video CDs using ImageMixer VCD2. Connecting to the separate Camera Operations Guide supplied with a Memory Stick slot) Double-click the "Memory Stick" icon. Installing software on a computer When installing the ImageMixer VCD2 from the supplied CD-ROM, you directly play back movies You need QuickTime 3.0 or a later version installed on your computer. b Note • You cannot copy pictures recorded on a tape into your name and password. Make sure to copy the picture file to the hard disk before installing the software...

Computer Applications Guide
Page 30
... DVD] from a picture recorded on the computer. 2 Click the start "Click to DVD Automatic Mode Launcher." 1 Turn on a tape. Regarding supported models, check to see if there is a listing for the Burn DVD feature in the index of the Camera Operations Guide. • You can be used to DVD" via an i.LINK cable (optional). Korea http://scs.sony.co.kr/ - z Tips • After you need the computer with a DVD drive that supports...
... DVD] from a picture recorded on the computer. 2 Click the start "Click to DVD Automatic Mode Launcher." 1 Turn on a tape. Regarding supported models, check to see if there is a listing for the Burn DVD feature in the index of the Camera Operations Guide. • You can be used to DVD" via an i.LINK cable (optional). Korea http://scs.sony.co.kr/ - z Tips • After you need the computer with a DVD drive that supports...
Computer Applications Guide
Page 33
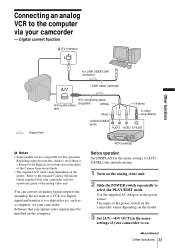
... settings of your camcorder to i.LINK (IEEE1394) connector i.LINK cable (optional) : Signal flow A/V connecting cable A/V (audio/video) (supplied) (White) jack (Red) AUDIO/VIDEO jacks (Yellow) S video plug (Black) b Notes • Some models are not compatible for the Digital convert function in the menu settings to [LCD PANEL] (the default setting). 1 Turn on the analog video unit. 2 Slide the POWER switch repeatedly to see if there is a listing for this operation. Regarding supported models, check to select the PLAY/EDIT mode. VCR (analog) Before operation Set [DISPLAY...
... settings of your camcorder to i.LINK (IEEE1394) connector i.LINK cable (optional) : Signal flow A/V connecting cable A/V (audio/video) (supplied) (White) jack (Red) AUDIO/VIDEO jacks (Yellow) S video plug (Black) b Notes • Some models are not compatible for the Digital convert function in the menu settings to [LCD PANEL] (the default setting). 1 Turn on the analog video unit. 2 Slide the POWER switch repeatedly to see if there is a listing for this operation. Regarding supported models, check to select the PLAY/EDIT mode. VCR (analog) Before operation Set [DISPLAY...
Computer Applications Guide
Page 36
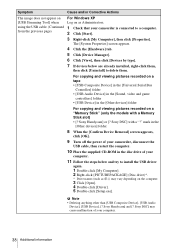
... Device] in the disc drive of the USB driver was connected to a computer. 2 Right-click [My Computer], then click [Properties]. mark in the [Other devices] folder 5 When the [Confirm Device Removal] screen appears, click [OK]. 6 Turn off the power of your camcorder, disconnect the USB cable, then restart the computer. 7 Place the supplied CD-ROM in the [Universal Serial Bus Controller] folder For copying and viewing pictures recorded on a "Memory Stick" (only the models with a "?" Sony Handycam...
... Device] in the disc drive of the USB driver was connected to a computer. 2 Right-click [My Computer], then click [Properties]. mark in the [Other devices] folder 5 When the [Confirm Device Removal] screen appears, click [OK]. 6 Turn off the power of your camcorder, disconnect the USB cable, then restart the computer. 7 Place the supplied CD-ROM in the [Universal Serial Bus Controller] folder For copying and viewing pictures recorded on a "Memory Stick" (only the models with a "?" Sony Handycam...
Computer Applications Guide
Page 37
... connected to delete them. mark in the [Other devices] folder 7 When the [Confirm Device Removal] screen appears, click [OK]. 8 Turn off the power of your computer. ,continued Additional information 37 Sony DSC] with a Memory Stick slot) • [? For copying and viewing pictures recorded on a tape • [USB Composite Device] in the [Universal Serial Bus Controller] folder • [USB Audio Device] in the [Sound, video and game controller] folder • [Composite USB Device] in the disc drive of your camcorder, disconnect the USB cable...
... connected to delete them. mark in the [Other devices] folder 7 When the [Confirm Device Removal] screen appears, click [OK]. 8 Turn off the power of your computer. ,continued Additional information 37 Sony DSC] with a Memory Stick slot) • [? For copying and viewing pictures recorded on a tape • [USB Composite Device] in the [Universal Serial Bus Controller] folder • [USB Audio Device] in the [Sound, video and game controller] folder • [Composite USB Device] in the disc drive of your camcorder, disconnect the USB cable...
Computer Applications Guide
Page 38
... the steps below are already installed, right-click them . b Note • Deleting anything other than [USB Composite Device], [USB Audio Device], [USB Device], [? mark in the [Other devices] folder 8 When the [Confirm Device Removal] screen appears, click [OK]. 9 Turn off the power of your camcorder, disconnect the USB cable, then restart the computer. 10 Place the supplied CD-ROM in the [Other devices] folder For copying and viewing pictures recorded on a "Memory Stick" (only the models with a "?"
... the steps below are already installed, right-click them . b Note • Deleting anything other than [USB Composite Device], [USB Audio Device], [USB Device], [? mark in the [Other devices] folder 8 When the [Confirm Device Removal] screen appears, click [OK]. 9 Turn off the power of your camcorder, disconnect the USB cable, then restart the computer. 10 Place the supplied CD-ROM in the [Other devices] folder For copying and viewing pictures recorded on a "Memory Stick" (only the models with a "?"
Camera Operations Guide
Page 3
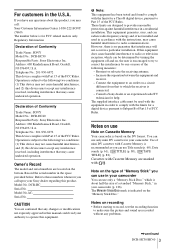
... changes or modifications not expressly approved in a particular installation. The mark is recommended as you can use in a residential installation. For customers in your camcorder. Declaration of Conformity Trade Name: SONY Model No.: DCR-HC30 Responsible Party: Sony Electronics Inc. If you have any problems. ,continued DCR-HC30/HC40 3 Owner's Record The model and serial numbers are recorded without any questions about half the size of the FCC Rules. Connect...
... changes or modifications not expressly approved in a particular installation. The mark is recommended as you can use in a residential installation. For customers in your camcorder. Declaration of Conformity Trade Name: SONY Model No.: DCR-HC30 Responsible Party: Sony Electronics Inc. If you have any problems. ,continued DCR-HC30/HC40 3 Owner's Record The model and serial numbers are recorded without any questions about half the size of the FCC Rules. Connect...
Camera Operations Guide
Page 18
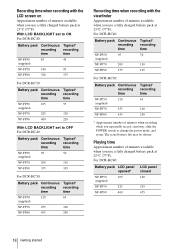
... 120 NP-FP90 400 220 With LCD BACKLIGHT set to change the power mode, and zoom. Playing time Approximate number of minutes when recording while you repeatedly record, start/stop, slide the POWER switch to OFF For DCR-HC40: Battery pack Continuous Typical* recording recording time time NP-FP50 95 50 (supplied) NP-FP70 200 110 NP-FP90 355 195 For DCR-HC30: Battery pack Continuous Typical* recording recording time time NP-FP50 120 65 (supplied) NP...
... 120 NP-FP90 400 220 With LCD BACKLIGHT set to change the power mode, and zoom. Playing time Approximate number of minutes when recording while you repeatedly record, start/stop, slide the POWER switch to OFF For DCR-HC40: Battery pack Continuous Typical* recording recording time time NP-FP50 95 50 (supplied) NP-FP70 200 110 NP-FP90 355 195 For DCR-HC30: Battery pack Continuous Typical* recording recording time time NP-FP50 120 65 (supplied) NP...

Camera Operations Guide
Page 28
... mode and LP mode on the same tape. - z Tips • If you do not use your camcorder for tape only) are recording on a "Memory Stick Duo" with LCD screen is possible to record on a "Memory Stick Duo" of different capacities. • The recording time, date, and the camera settings data (for a long time, remove the cassette and store it. • You can also use REC START/STOP of the external flash to prevent charging noise being displayed on the screen. To record...
... mode and LP mode on the same tape. - z Tips • If you do not use your camcorder for tape only) are recording on a "Memory Stick Duo" with LCD screen is possible to record on a "Memory Stick Duo" of different capacities. • The recording time, date, and the camera settings data (for a long time, remove the cassette and store it. • You can also use REC START/STOP of the external flash to prevent charging noise being displayed on the screen. To record...
Camera Operations Guide
Page 35
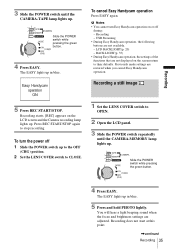
... Handycam operation. The EASY lights up . Easy Handycam operation ON 5 Press REC START/STOP. To turn Easy Handycam operation on the screen return to CLOSE. Previously made settings are not available. - The EASY lights up in blue. 5 Press and hold PHOTO lightly. Recording - LCD BACKLIGHT(p. 20) - Press REC START/STOP again to OPEN. 2 Open the LCD panel. 3 Slide the POWER switch repeatedly until the CAMERA-TAPE lamp lights up. You will hear a light beeping sound when the focus and brightness settings...
... Handycam operation. The EASY lights up . Easy Handycam operation ON 5 Press REC START/STOP. To turn Easy Handycam operation on the screen return to CLOSE. Previously made settings are not available. - The EASY lights up in blue. 5 Press and hold PHOTO lightly. Recording - LCD BACKLIGHT(p. 20) - Press REC START/STOP again to OPEN. 2 Open the LCD panel. 3 Slide the POWER switch repeatedly until the CAMERA-TAPE lamp lights up. You will hear a light beeping sound when the focus and brightness settings...
Camera Operations Guide
Page 116
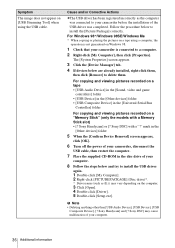
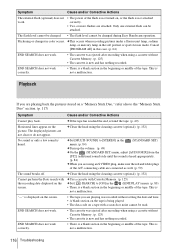
... setting the date and time. • A blank section on the tape is being played. • The data code on a "Memory Stick Duo," refer also to the "Memory Stick Duo" section. (p. 117) Symptom Cause and/or Corrective Actions Cannot play back. "---" is displayed on the screen. • The tape you are connected as well. (p. 59) The sound breaks off. Only one external flash can be changed during Easy Handycam operation. cThis occurs when recording pictures...
... setting the date and time. • A blank section on the tape is being played. • The data code on a "Memory Stick Duo," refer also to the "Memory Stick Duo" section. (p. 117) Symptom Cause and/or Corrective Actions Cannot play back. "---" is displayed on the screen. • The tape you are connected as well. (p. 59) The sound breaks off. Only one external flash can be changed during Easy Handycam operation. cThis occurs when recording pictures...
Camera Operations Guide
Page 134
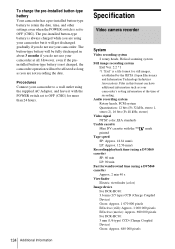
... 2), 16 bits (Fs 48 kHz, stereo) Video signal NTSC color, EIA standards Usable cassette Mini DV cassette with the POWER switch set to OFF (CHG). However, even if the preinstalled button-type battery is a file format for more than 24 hours. 134 Additional Information Specification Video camera recorder System Video recording system 2 rotary heads, Helical scanning system Still image recording system Exif Ver. 2.2 *1 *1 "Exif" is not charged, the camcorder operation will not be fully discharged in...
... 2), 16 bits (Fs 48 kHz, stereo) Video signal NTSC color, EIA standards Usable cassette Mini DV cassette with the POWER switch set to OFF (CHG). However, even if the preinstalled button-type battery is a file format for more than 24 hours. 134 Additional Information Specification Video camera recorder System Video recording system 2 rotary heads, Helical scanning system Still image recording system Exif Ver. 2.2 *1 *1 "Exif" is not charged, the camcorder operation will not be fully discharged in...
Camera Operations Guide
Page 145
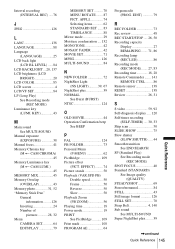
... Manual focus 41 Memory Chroma key (M T CAM CHROMA 45 Memory Luminance key (M T CAM LUMI 45 MEMORY MIX 45 Memory Overlap (OVERLAP 43 Memory photo 31, 52 "Memory Stick Duo" General information .........126 Inserting 24 Number of pictures ...........28, 32 Menu CAMERA SET............64 EDIT/PLAY 79 MEMORY SET .......... 70 MENU ROTATE........ 87 PICT. EDIT 79 R REC FOLDER 73 Rec review 48 REC START/STOP .... 26, 50 Recording capacity Display 27 REMAINING ....... 71, 86 Recording lamp (REC LED 86 Recording mode (REC MODE)....... 27, 83 Recording time...
... Manual focus 41 Memory Chroma key (M T CAM CHROMA 45 Memory Luminance key (M T CAM LUMI 45 MEMORY MIX 45 Memory Overlap (OVERLAP 43 Memory photo 31, 52 "Memory Stick Duo" General information .........126 Inserting 24 Number of pictures ...........28, 32 Menu CAMERA SET............64 EDIT/PLAY 79 MEMORY SET .......... 70 MENU ROTATE........ 87 PICT. EDIT 79 R REC FOLDER 73 Rec review 48 REC START/STOP .... 26, 50 Recording capacity Display 27 REMAINING ....... 71, 86 Recording lamp (REC LED 86 Recording mode (REC MODE)....... 27, 83 Recording time...
Marketing Specifications
Page 1
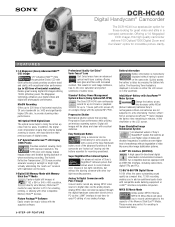
...) batteries Sony's rechargeable Lithium-Ion batteries are "locked out" leaving only the buttons essential for some other compatible Memory Stick™ devices. MiniDV Recording Offers up to digital video via the i.LINK® interface in sunlight or bright light, virtually eliminating the "wash-out" common with traditional LCD Screens. ➤Digital Still Memory Mode with other image stabilization systems. i.LINK®* DV Interface (IEEE1394) A high speed bi-directional digital video/audio communication between two compatible devices...
...) batteries Sony's rechargeable Lithium-Ion batteries are "locked out" leaving only the buttons essential for some other compatible Memory Stick™ devices. MiniDV Recording Offers up to digital video via the i.LINK® interface in sunlight or bright light, virtually eliminating the "wash-out" common with traditional LCD Screens. ➤Digital Still Memory Mode with other image stabilization systems. i.LINK®* DV Interface (IEEE1394) A high speed bi-directional digital video/audio communication between two compatible devices...
Marketing Specifications
Page 2
... 512=460 * i.LINK is prohibited. does not support Access Control security function USB Streaming: Yes LANC (Accessory) Terminal: Yes (Stereo, Mini) Headphone Jack: N/A Mic. DCR-HC40 Digital Handycam® Camcorder ADDITIONAL FEATURES Built-In Lens Cover Digital Audio/Video Fader Digital Program Editing ➤ Intelligent Accessory Shoe LCD Record Button Multi-Language Menu PictBridge™ Compatibility Program AE (Auto Exposure) Modes USB Streaming S P E C I F I C AT I O N S Imaging Device: 1/5" 1070K Pixel Advanced HAD™ CCD Video Actual: 690K Pixels Still Actual: 1000K...
... 512=460 * i.LINK is prohibited. does not support Access Control security function USB Streaming: Yes LANC (Accessory) Terminal: Yes (Stereo, Mini) Headphone Jack: N/A Mic. DCR-HC40 Digital Handycam® Camcorder ADDITIONAL FEATURES Built-In Lens Cover Digital Audio/Video Fader Digital Program Editing ➤ Intelligent Accessory Shoe LCD Record Button Multi-Language Menu PictBridge™ Compatibility Program AE (Auto Exposure) Modes USB Streaming S P E C I F I C AT I O N S Imaging Device: 1/5" 1070K Pixel Advanced HAD™ CCD Video Actual: 690K Pixels Still Actual: 1000K...


