
Operating Instructions
Page 4
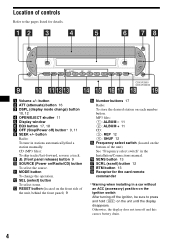
...CDX-R3300 CDX-R3300S a Volume +/- button Radio: To tune in the Installation/Connections manual. CD (MP3 files): To skip tracks/fast-forward, reverse a track. Location of the unit) See "Frequency select switch" in stations automatically/find a station manually. Otherwise, the display does not turn off ) button* 9, 11 h SEEK +/- button b ATT (attenuate) button... select switch (located on each number button. l SEL (select) button To select items. m RESET button (located on the front side of the unit, behind the front panel) 9 n Number buttons 17 Radio: To store the desired ...
...CDX-R3300 CDX-R3300S a Volume +/- button Radio: To tune in the Installation/Connections manual. CD (MP3 files): To skip tracks/fast-forward, reverse a track. Location of the unit) See "Frequency select switch" in stations automatically/find a station manually. Otherwise, the display does not turn off ) button* 9, 11 h SEEK +/- button b ATT (attenuate) button... select switch (located on each number button. l SEL (select) button To select items. m RESET button (located on the front side of the unit, behind the front panel) 9 n Number buttons 17 Radio: To store the desired ...

Operating Instructions
Page 5
... cannot be operated with the card remote commander Album can be skipped using the DISC (ALBUM) (+/-) buttons on the unit is pressed, or a disc is played. a DSPL button b MENU button*1 c SOURCE button d SEEK (-/+) buttons e SOUND button f OFF button g VOL (+/-) buttons h MODE button i LIST button*1 j DISC*1 (ALBUM)/PRESET (+/-) buttons k ENTER button*1 l ATT button *1 Not available for each album] - PRESET - + VOL - Card remote commander RM-X114 (optional) DSPL...
... cannot be operated with the card remote commander Album can be skipped using the DISC (ALBUM) (+/-) buttons on the unit is pressed, or a disc is played. a DSPL button b MENU button*1 c SOURCE button d SEEK (-/+) buttons e SOUND button f OFF button g VOL (+/-) buttons h MODE button i LIST button*1 j DISC*1 (ALBUM)/PRESET (+/-) buttons k ENTER button*1 l ATT button *1 Not available for each album] - PRESET - + VOL - Card remote commander RM-X114 (optional) DSPL...
Operating Instructions
Page 9
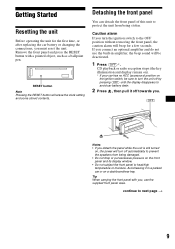
... a dashboard/rear tray. Getting Started Resetting the unit Before operating the unit for a few seconds. Remove the front panel and press the RESET button with you connect an optional amplifier and do not use the supplied front panel case. Detaching the front panel You can detach the front panel... as a ballpoint pen. If you , use the built-in a parked car or on the ignition switch, be deactivated. 1 Press (OFF)*. RESET button Note Pressing the RESET button will be sure to turn the unit off towards you. (OFF) OPEN/EJECT Notes • If you must reset the unit. continue to...
... a dashboard/rear tray. Getting Started Resetting the unit Before operating the unit for a few seconds. Remove the front panel and press the RESET button with you connect an optional amplifier and do not use the supplied front panel case. Detaching the front panel You can detach the front panel... as a ballpoint pen. If you , use the built-in a parked car or on the ignition switch, be deactivated. 1 Press (OFF)*. RESET button Note Pressing the RESET button will be sure to turn the unit off towards you. (OFF) OPEN/EJECT Notes • If you must reset the unit. continue to...
Operating Instructions
Page 10
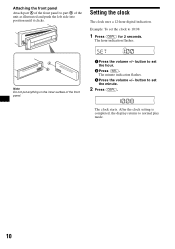
... indication flashes. After the clock setting is completed, the display returns to 10:08 1 Press (DSPL) for 2 seconds. button to set the minute. 2 Press (DSPL). The minute indication flashes. 3 Press the volume +/- button to set the hour. 2 Press (SEL). The clock starts. OPEN/EJECT Setting the clock The clock uses a 12-hour...
... indication flashes. After the clock setting is completed, the display returns to 10:08 1 Press (DSPL) for 2 seconds. button to set the minute. 2 Press (DSPL). The minute indication flashes. 3 Press the volume +/- button to set the hour. 2 Press (SEL). The clock starts. OPEN/EJECT Setting the clock The clock uses a 12-hour...
Operating Instructions
Page 13
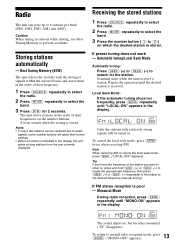
... cancel the local seek mode, press (SENS) twice when receiving FM. Best Tuning Memory (BTM) The unit selects the stations with relatively strong signals will be received due to weak signals, some number buttons will retain their frequencies on which the desired station is stored....Receiving the stored stations 1 Press (SOURCE) repeatedly to select the radio. 2 Press (MODE) repeatedly to select the band. 3 Press the number button ((1) to the desired frequency (manual tuning). Repeat the operation until "LOCAL-ON" appears in stations while driving, use Best Tuning Memory to search for...
... cancel the local seek mode, press (SENS) twice when receiving FM. Best Tuning Memory (BTM) The unit selects the stations with relatively strong signals will be received due to weak signals, some number buttons will retain their frequencies on which the desired station is stored....Receiving the stored stations 1 Press (SOURCE) repeatedly to select the radio. 2 Press (MODE) repeatedly to select the band. 3 Press the number button ((1) to the desired frequency (manual tuning). Repeat the operation until "LOCAL-ON" appears in stations while driving, use Best Tuning Memory to search for...
Operating Instructions
Page 14
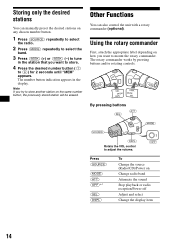
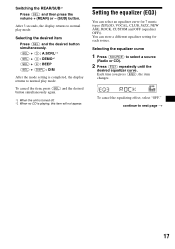
...control to adjust the volume. (OFF) Press (SOURCE) (MODE) (ATT) (OFF)*1 (SEL) (DSPL) To Change the source (Radio/CD)/Power on any chosen number button. 1 Press (SOURCE) repeatedly to select the radio. 2 Press (MODE) repeatedly to select the band. 3 Press (SEEK) (+) or (SEEK) (-) to mount the ...sound Stop playback or radio reception/Power off Adjust and select Change the display item 14 The number button indication appears in the station that you want to store. 4 Press the desired number button ((1) to (6)) for 2 seconds until "MEM" appears. Storing only the desired stations You can...
...control to adjust the volume. (OFF) Press (SOURCE) (MODE) (ATT) (OFF)*1 (SEL) (DSPL) To Change the source (Radio/CD)/Power on any chosen number button. 1 Press (SOURCE) repeatedly to select the radio. 2 Press (MODE) repeatedly to select the band. 3 Press (SEEK) (+) or (SEEK) (-) to mount the ...sound Stop playback or radio reception/Power off Adjust and select Change the display item 14 The number button indication appears in the station that you want to store. 4 Press the desired number button ((1) to (6)) for 2 seconds until "MEM" appears. Storing only the desired stations You can...

Operating Instructions
Page 16
button to a subwoofer. • A.SCRL (Auto Scroll)*2 (page 12) • DEMO*1 - Menu The following items can adjust the balance, fader, low pass filter and subwoofer volume. 1 ...
button to a subwoofer. • A.SCRL (Auto Scroll)*2 (page 12) • DEMO*1 - Menu The following items can adjust the balance, fader, low pass filter and subwoofer volume. 1 ...
Operating Instructions
Page 17
... time you press (EQ3), the item changes. Switching the REAR/SUB*1 Press (SEL) and then press the volume + (REAR) or - (SUB) button. Selecting the desired item Press (SEL) and the desired button simultaneously. (SEL) + (3): A.SCRL*2 (SEL) + (4): DEMO*1 (SEL) + (6): BEEP (SEL) + (DSPL): DIM After the mode setting ...for each source. Selecting the equalizer curve 1 Press (SOURCE) to next page t 17 To cancel the item, press (SEL) and the desired button simultaneously again. *1 When the unit is turned off. *2 When no CD is completed, the display returns to normal play mode. To cancel the...
... time you press (EQ3), the item changes. Switching the REAR/SUB*1 Press (SEL) and then press the volume + (REAR) or - (SUB) button. Selecting the desired item Press (SEL) and the desired button simultaneously. (SEL) + (3): A.SCRL*2 (SEL) + (4): DEMO*1 (SEL) + (6): BEEP (SEL) + (DSPL): DIM After the mode setting ...for each source. Selecting the equalizer curve 1 Press (SOURCE) to next page t 17 To cancel the item, press (SEL) and the desired button simultaneously again. *1 When the unit is turned off. *2 When no CD is completed, the display returns to normal play mode. To cancel the...

Operating Instructions
Page 18
...desired tone range. Note When EQ3 is adjustable by 1 dB steps from the ignition switch. 18 • Never touch the connectors directly with your nearest Sony dealer. In order to +10 dB. The volume level is set equalizer curve, press (SEL) for different tone ranges. 1 Press (SOURCE) to ... the one matching the amperage rating stated on the original fuse. Warning Never use one supplied with a cotton swab dipped in alcohol. button repeatedly to adjust to adjust the equalizer curve. If the fuse blows again after replacement, there may not function properly if the connectors ...
...desired tone range. Note When EQ3 is adjustable by 1 dB steps from the ignition switch. 18 • Never touch the connectors directly with your nearest Sony dealer. In order to +10 dB. The volume level is set equalizer curve, press (SEL) for different tone ranges. 1 Press (SOURCE) to ... the one matching the amperage rating stated on the original fuse. Warning Never use one supplied with a cotton swab dipped in alcohol. button repeatedly to adjust to adjust the equalizer curve. If the fuse blows again after replacement, there may not function properly if the connectors ...
Operating Instructions
Page 22
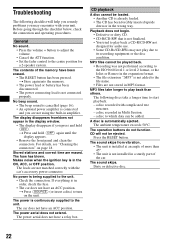
... supplied to the unit. t Press and hold (OFF). The power is not connected properly. The car does not have been erased. • The RESET button has been pressed. a disc to which data can be ejected. Stored stations and correct time are not stored in the ON, ACC, or OFF position. CD playback...
... supplied to the unit. t Press and hold (OFF). The power is not connected properly. The car does not have been erased. • The RESET button has been pressed. a disc to which data can be ejected. Stored stations and correct time are not stored in the ON, ACC, or OFF position. CD playback...
Operating Instructions
Page 23
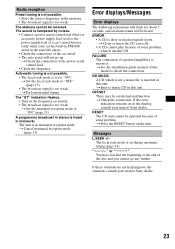
... is incorrect. t Clean or insert the CD correctly. • A CD cannot play because of the disc and you cannot go up. FAILURE The connection of this unit. t See the installation guide manual of speakers... cannot be operated because of a car's aerial booster (only when your car has built-in FM/AM aerial in this unit. The sound is inserted in the rear/side glass). • ...go any further. t Press the RESET button on in this model to "ON" (page 13). If these solutions do not help improve the situation, consult your nearest Sony dealer. Radio reception Preset tuning is not...
... is incorrect. t Clean or insert the CD correctly. • A CD cannot play because of the disc and you cannot go up. FAILURE The connection of this unit. t See the installation guide manual of speakers... cannot be operated because of a car's aerial booster (only when your car has built-in FM/AM aerial in this unit. The sound is inserted in the rear/side glass). • ...go any further. t Press the RESET button on in this model to "ON" (page 13). If these solutions do not help improve the situation, consult your nearest Sony dealer. Radio reception Preset tuning is not...


