

Limited Warranty (U.S. Only)
Page 1
... ordinary consumer use , acts of God, misuse, limitations of technology, or modification of or to any part of the product ("Labor Warranty"), Sony will not be defective. any enclosed software Limited Warranty. For specific instructions on how to obtain warranty service for your product, Visit Sony's Web Site: www.sony.com/service Or call : 1-800-488-SONY (7669) Repair / Replacement Warranty: This...
... ordinary consumer use , acts of God, misuse, limitations of technology, or modification of or to any part of the product ("Labor Warranty"), Sony will not be defective. any enclosed software Limited Warranty. For specific instructions on how to obtain warranty service for your product, Visit Sony's Web Site: www.sony.com/service Or call : 1-800-488-SONY (7669) Repair / Replacement Warranty: This...
Installation/Connection Instructions
Page 1
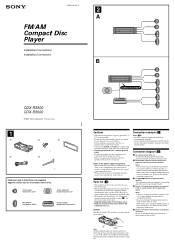
... amplifiers. 3-261-846-11 (1) 2 A FM/AM Compact Disc Player Installation/Connections Installation/Connexions B AUDIO OUT REAR CDX-R3300 CDX-R3000 © 2004 Sony Corporation Printed in Korea 1 1 2 3 × 4 4 5 × 2 Equipment used in illustrations (not supplied) Appareils utilisés dans les illustrations (non fournis) Front speaker Haut-parleur avant Active subwoofer Caisson de graves actif Rear speaker Haut-parleur arrière Power amplifier Amplificateur de puissance Cautions • This unit is no car circuits...
... amplifiers. 3-261-846-11 (1) 2 A FM/AM Compact Disc Player Installation/Connections Installation/Connexions B AUDIO OUT REAR CDX-R3300 CDX-R3000 © 2004 Sony Corporation Printed in Korea 1 1 2 3 × 4 4 5 × 2 Equipment used in illustrations (not supplied) Appareils utilisés dans les illustrations (non fournis) Front speaker Haut-parleur avant Active subwoofer Caisson de graves actif Rear speaker Haut-parleur arrière Power amplifier Amplificateur de puissance Cautions • This unit is no car circuits...
Operating Instructions
Page 2
... disc*1 is played). • ID3 tag*2 version 1.0, 1.1, 2.2, 2.3 or 2.4 information (displayed when an MP3 file is played). • Optional controller accessories Card remote commander RM-X114 Rotary commander RM-X4S *1 A CD TEXT disc is located on the disc. *2 ID3 tag is an MP3 file that includes information such as the disc name, artist name, and track names. This label is an audio...
... disc*1 is played). • ID3 tag*2 version 1.0, 1.1, 2.2, 2.3 or 2.4 information (displayed when an MP3 file is played). • Optional controller accessories Card remote commander RM-X114 Rotary commander RM-X4S *1 A CD TEXT disc is located on the disc. *2 ID3 tag is an MP3 file that includes information such as the disc name, artist name, and track names. This label is an audio...
Operating Instructions
Page 3
... Removing the unit 19 Specifications 21 Troubleshooting 22 Error displays/Messages 23 3 Best Tuning Memory (BTM 13 Receiving the stored stations 13 Storing only the desired stations 14 Other Functions Using the rotary commander 14 Adjusting the sound characteristics 16 Quickly attenuating the sound 16 Changing the sound and display settings - Table of Contents Location of controls 4 Precautions 6 Notes on discs 6 About MP3 files 7 Getting Started Resetting the unit 9 Detaching the front panel 9 Setting the clock 10 CD Player Playing a disc...
... Removing the unit 19 Specifications 21 Troubleshooting 22 Error displays/Messages 23 3 Best Tuning Memory (BTM 13 Receiving the stored stations 13 Storing only the desired stations 14 Other Functions Using the rotary commander 14 Adjusting the sound characteristics 16 Quickly attenuating the sound 16 Changing the sound and display settings - Table of Contents Location of controls 4 Precautions 6 Notes on discs 6 About MP3 files 7 Getting Started Resetting the unit 9 Detaching the front panel 9 Setting the clock 10 CD Player Playing a disc...
Operating Instructions
Page 4
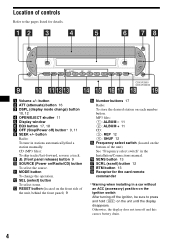
... details. k MODE button To change ) button 10, 12 d OPEN/EJECT shutter 11 e Display window f EQ3 button 17, 18 g OFF (Stop/Power off and this causes battery drain. 4 ATT OFF DSPL EQ3 SOURCE MODE SEL - Otherwise, the display does not turn off ) button* 9, 11 h SEEK +/- ALBUM + 1 2 REP SHUF 3 4 5 6 SENS SCRL BTM SEEK CDX-R3300 CDX-R3300S a Volume +/- l SEL (select) button To select items. m RESET button (located on the front side of the unit, behind the front panel) 9 n Number buttons 17 Radio: To...
... details. k MODE button To change ) button 10, 12 d OPEN/EJECT shutter 11 e Display window f EQ3 button 17, 18 g OFF (Stop/Power off and this causes battery drain. 4 ATT OFF DSPL EQ3 SOURCE MODE SEL - Otherwise, the display does not turn off ) button* 9, 11 h SEEK +/- ALBUM + 1 2 REP SHUF 3 4 5 6 SENS SCRL BTM SEEK CDX-R3300 CDX-R3300S a Volume +/- l SEL (select) button To select items. m RESET button (located on the front side of the unit, behind the front panel) 9 n Number buttons 17 Radio: To...

Operating Instructions
Page 5
... display disappears by pressing (OFF), it cannot be operated with the card remote commander Album can be skipped using the DISC (ALBUM) (+/-) buttons on the card remote commander. Skipping tracks continuously Press once (SEEK) (+) or (SEEK) (-) on the unit is pressed, or a disc is played. Tip For details on how to activate the unit first. a DSPL button b MENU button*1 c SOURCE button d SEEK (-/+) buttons e SOUND button f OFF button g VOL (+/-) buttons h MODE button i LIST button*1 j DISC*1 (ALBUM)/PRESET (+/-) buttons k ENTER button*1 l ATT button...
... display disappears by pressing (OFF), it cannot be operated with the card remote commander Album can be skipped using the DISC (ALBUM) (+/-) buttons on the card remote commander. Skipping tracks continuously Press once (SEEK) (+) or (SEEK) (-) on the unit is pressed, or a disc is played. Tip For details on how to activate the unit first. a DSPL button b MENU button*1 c SOURCE button d SEEK (-/+) buttons e SOUND button f OFF button g VOL (+/-) buttons h MODE button i LIST button*1 j DISC*1 (ALBUM)/PRESET (+/-) buttons k ENTER button*1 l ATT button...
Operating Instructions
Page 6
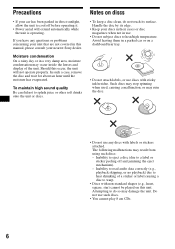
... be played on a dashboard/rear tray. • Do not attach labels, or use any questions or problems concerning your unit that are not covered in this occur, the unit will extend automatically while the unit is operating. Precautions • If your car has been parked in direct sunlight, allow the unit to cool off and jamming the eject mechanism). - Inability to eject a disc (due...
... be played on a dashboard/rear tray. • Do not attach labels, or use any questions or problems concerning your unit that are not covered in this occur, the unit will extend automatically while the unit is operating. Precautions • If your car has been parked in direct sunlight, allow the unit to cool off and jamming the eject mechanism). - Inability to eject a disc (due...
Operating Instructions
Page 7
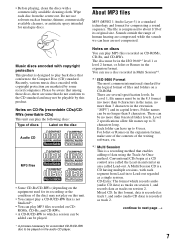
... used for a recorded CD-R/CD-RW disc to the Compact Disc (CD) standard. CD-Extra: The format which a session can be added can play the following discs: Type of discs Label on the disc Audio CD MP3 files • Some CD-Rs/CD-RWs (depending on session 2. Recently, various music discs encoded with copyright protection This product is designed to which records audio (audio...
... used for a recorded CD-R/CD-RW disc to the Compact Disc (CD) standard. CD-Extra: The format which a session can be added can play the following discs: Type of discs Label on the disc Audio CD MP3 files • Some CD-Rs/CD-RWs (depending on session 2. Recently, various music discs encoded with copyright protection This product is designed to which records audio (audio...

Operating Instructions
Page 8
Cautions when playing a disc that is recorded in the disc, "NO MUSIC" is displayed and nothing is played back. (Audio CD data is not recognized.) The playback order of the MP3 files The playback order of the first session is played back. We recommend that you make only one or two trees for each disc. • Maximum folder number: 150 (including root...
Cautions when playing a disc that is recorded in the disc, "NO MUSIC" is displayed and nothing is played back. (Audio CD data is not recognized.) The playback order of the MP3 files The playback order of the first session is played back. We recommend that you make only one or two trees for each disc. • Maximum folder number: 150 (including root...
Operating Instructions
Page 9
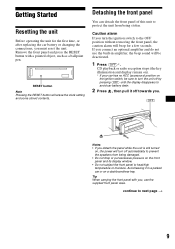
... towards you. (OFF) OPEN/EJECT Notes • If you must reset the unit. Getting Started Resetting the unit Before operating the unit for the first time, or after replacing the car battery or changing the connections, you detach the panel while the unit is still turned on, the power will beep for a few seconds. CD playback or radio reception stops (the key illumination and display remain on). * If your...
... towards you. (OFF) OPEN/EJECT Notes • If you must reset the unit. Getting Started Resetting the unit Before operating the unit for the first time, or after replacing the car battery or changing the connections, you detach the panel while the unit is still turned on, the power will beep for a few seconds. CD playback or radio reception stops (the key illumination and display remain on). * If your...
Operating Instructions
Page 10
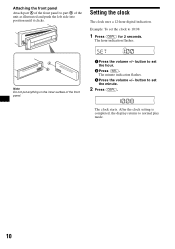
.... The clock starts. OPEN/EJECT Setting the clock The clock uses a 12-hour digital indication. Example: To set the hour. 2 Press (SEL). button to set the clock to 10:08 1 Press (DSPL) for 2 seconds. The hour indication flashes. button to normal play mode. 10 The minute indication flashes. 3 Press the volume +/- After the clock setting is completed, the display returns to set the minute. 2 Press (DSPL). Attaching the front panel Attach part...
.... The clock starts. OPEN/EJECT Setting the clock The clock uses a 12-hour digital indication. Example: To set the hour. 2 Press (SEL). button to set the clock to 10:08 1 Press (DSPL) for 2 seconds. The hour indication flashes. button to normal play mode. 10 The minute indication flashes. 3 Press the volume +/- After the clock setting is completed, the display returns to set the minute. 2 Press (DSPL). Attaching the front panel Attach part...
Operating Instructions
Page 13
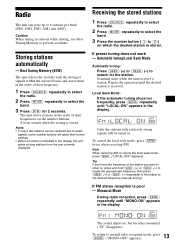
... locate the approximate frequency, then press (SEEK) (+) or (SEEK) (-) repeatedly to fine adjust to weak signals, some number buttons will be received due to the desired frequency (manual tuning). Radio The unit can be tuned in the order of their frequency. 1 Press (SOURCE) repeatedly to select the radio. 2 Press (MODE) repeatedly to 6 stations per band (FM1, FM2, FM3, AM1 and AM2). Scanning stops when the unit receives a station. If preset tuning does not work...
... locate the approximate frequency, then press (SEEK) (+) or (SEEK) (-) repeatedly to fine adjust to weak signals, some number buttons will be received due to the desired frequency (manual tuning). Radio The unit can be tuned in the order of their frequency. 1 Press (SOURCE) repeatedly to select the radio. 2 Press (MODE) repeatedly to 6 stations per band (FM1, FM2, FM3, AM1 and AM2). Scanning stops when the unit receives a station. If preset tuning does not work...
Operating Instructions
Page 14
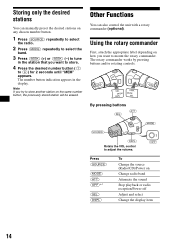
... can manually preset the desired stations on the same number button, the previously stored station will be erased. Using the rotary commander First, attach the appropriate label depending on Change radio band Attenuate the sound Stop playback or radio reception/Power off Adjust and select Change the display item 14 OFF SEL MODE DSPL DSPL MODE SEL By pressing buttons (SEL) (ATT) (MODE) (SOURCE) (DSPL) Rotate the VOL control to adjust the volume. (OFF) Press (SOURCE) (MODE) (ATT...
... can manually preset the desired stations on the same number button, the previously stored station will be erased. Using the rotary commander First, attach the appropriate label depending on Change radio band Attenuate the sound Stop playback or radio reception/Power off Adjust and select Change the display item 14 OFF SEL MODE DSPL DSPL MODE SEL By pressing buttons (SEL) (ATT) (MODE) (SOURCE) (DSPL) Rotate the VOL control to adjust the volume. (OFF) Press (SOURCE) (MODE) (ATT...
Operating Instructions
Page 15
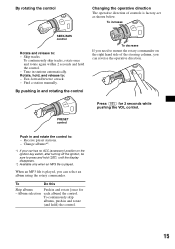
... while pushing the VOL control. Find a station manually. Album selection each album] the control. To continuously skip albums, push in and rotate the control to press and hold the control. - To increase SEEK/AMS control Rotate and release to : - Receive preset stations. - When an MP3 file is played, you need to mount the rotary commander on the ignition key switch, after turning off the ignition, be...
... while pushing the VOL control. Find a station manually. Album selection each album] the control. To continuously skip albums, push in and rotate the control to press and hold the control. - To increase SEEK/AMS control Rotate and release to : - Receive preset stations. - When an MP3 file is played, you need to mount the rotary commander on the ignition key switch, after turning off the ignition, be...

Operating Instructions
Page 16
... turned off frequency is adjustable to turn the beeps on or off . • DIM - Select "SUB" to output to deactivate the Dimmer. to activate the demonstration display (The demonstration starts about 10 seconds after selecting the item. Quickly attenuating the sound Press (ATT). To restore the previous volume level, press (ATT) again. 16 Changing the sound and display settings - Select "OFF" to a subwoofer. • A.SCRL (Auto Scroll)*2 (page 12) • DEMO*1 - button to switch the audio output REAR or SUB. - Menu...
... turned off frequency is adjustable to turn the beeps on or off . • DIM - Select "SUB" to output to deactivate the Dimmer. to activate the demonstration display (The demonstration starts about 10 seconds after selecting the item. Quickly attenuating the sound Press (ATT). To restore the previous volume level, press (ATT) again. 16 Changing the sound and display settings - Select "OFF" to a subwoofer. • A.SCRL (Auto Scroll)*2 (page 12) • DEMO*1 - button to switch the audio output REAR or SUB. - Menu...
Operating Instructions
Page 17
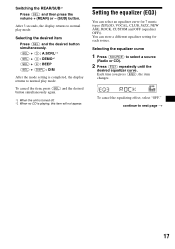
... equalizer curve 1 Press (SOURCE) to next page t 17 Each time you press (EQ3), the item changes. You can select an equalizer curve for each source. Setting the equalizer (EQ3) You can store a different equalizer setting for 7 music types (XPLOD, VOCAL, CLUB, JAZZ, NEW AGE, ROCK, CUSTOM and OFF (equalizer OFF)). After 3 seconds, the display returns to normal play mode. Switching the REAR/SUB*1 Press (SEL) and then press the volume + (REAR) or - (SUB) button. Selecting...
... equalizer curve 1 Press (SOURCE) to next page t 17 Each time you press (EQ3), the item changes. You can select an equalizer curve for each source. Setting the equalizer (EQ3) You can store a different equalizer setting for 7 music types (XPLOD, VOCAL, CLUB, JAZZ, NEW AGE, ROCK, CUSTOM and OFF (equalizer OFF)). After 3 seconds, the display returns to normal play mode. Switching the REAR/SUB*1 Press (SEL) and then press the volume + (REAR) or - (SUB) button. Selecting...

Operating Instructions
Page 18
... t LPF t SUB) 2 Press the volume +/- button repeatedly to adjust to +10 dB. If the fuse blows again after replacement, there may not function properly if the connectors between the unit and the front panel are not clean. The volume level is set equalizer curve, press (SEL) for different tone ranges. 1 Press (SOURCE) to select a source (Radio or CD). 2 Press (EQ3) repeatedly to select the desired equalizer curve. 3 Adjusting the equalizer curve. 1 Press...
... t LPF t SUB) 2 Press the volume +/- button repeatedly to adjust to +10 dB. If the fuse blows again after replacement, there may not function properly if the connectors between the unit and the front panel are not clean. The volume level is set equalizer curve, press (SEL) for different tone ranges. 1 Press (SOURCE) to select a source (Radio or CD). 2 Press (EQ3) repeatedly to select the desired equalizer curve. 3 Adjusting the equalizer curve. 1 Press...
Operating Instructions
Page 21
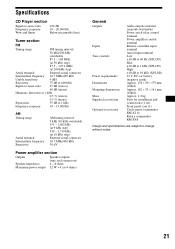
... Outputs Speaker impedance Maximum power output Speaker outputs (sure seal connectors) 4 - 8 ohms 52 W × 4 (at 4 ohms) General Outputs Inputs Tone controls Power requirements Dimensions Mounting dimensions Mass Supplied accessories Optional accessories Audio outputs terminal (rear/sub switchable) Power aerial relay control terminal Power amplifier control terminal Remote controller input terminal Aerial input terminal Low: ±10 dB at 60 Hz (XPLOD) Mid: ±10 dB at 1 kHz (XPLOD) High: ±10 dB at 10 kHz (XPLOD) 12 V DC car battery...
... Outputs Speaker impedance Maximum power output Speaker outputs (sure seal connectors) 4 - 8 ohms 52 W × 4 (at 4 ohms) General Outputs Inputs Tone controls Power requirements Dimensions Mounting dimensions Mass Supplied accessories Optional accessories Audio outputs terminal (rear/sub switchable) Power aerial relay control terminal Power amplifier control terminal Remote controller input terminal Aerial input terminal Low: ±10 dB at 60 Hz (XPLOD) Mid: ±10 dB at 1 kHz (XPLOD) High: ±10 dB at 10 kHz (XPLOD) 12 V DC car battery...
Operating Instructions
Page 22
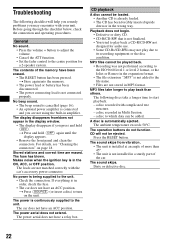
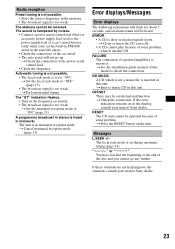
... wrong way. CD will help you remedy problems you are not stored in MP3 format. No beep sound. • The beep sound is cancelled (page 16). • An optional power amplifier is connected and you may not play back than 45°. • The unit is not installed in a sturdy part of the memory have an ACC position. Makes noise when the ignition...
... wrong way. CD will help you remedy problems you are not stored in MP3 format. No beep sound. • The beep sound is cancelled (page 16). • An optional power amplifier is connected and you may not play back than 45°. • The unit is not installed in a sturdy part of the memory have an ACC position. Makes noise when the ignition...
Operating Instructions
Page 23
... manual tuning. NO MUSIC A CD which is not a music file is in the rear/side glass). • Check the connection of the car aerial. • The auto aerial will be operated because of speakers/amplifiers is too weak. Automatic tuning is not possible. • The local seek mode is set to the power supply lead of the power aerial control lead. • Check the frequency. t Press the RESET button on...
... manual tuning. NO MUSIC A CD which is not a music file is in the rear/side glass). • Check the connection of the car aerial. • The auto aerial will be operated because of speakers/amplifiers is too weak. Automatic tuning is not possible. • The local seek mode is set to the power supply lead of the power aerial control lead. • Check the frequency. t Press the RESET button on...


