

XM Satellite Radio Operating manual
Page 1
...programming that to these numbers whenever you call upon your nearest Sony dealer.) Introducing XMTM Satellite Radio There's a world beyond AM and FM. However, there is no key is pressed within this product, consult your nearest Sony dealer. The XM Radio ID (XM-ID) is not ...It is prohibited to enter category search mode. CDX-C8050X CDX-C800REC* CDX-M750 CDX-M650 CDX-M610 CDX-M600 MDX-C8500X XR-M550 * You may use the Disc/Preset buttons to : • Receive XM Satellite Radio programming (with subscription) by connecting a Sony master unit* compatible with the XM Satellite Radio...
...programming that to these numbers whenever you call upon your nearest Sony dealer.) Introducing XMTM Satellite Radio There's a world beyond AM and FM. However, there is no key is pressed within this product, consult your nearest Sony dealer. The XM Radio ID (XM-ID) is not ...It is prohibited to enter category search mode. CDX-C8050X CDX-C800REC* CDX-M750 CDX-M650 CDX-M610 CDX-M600 MDX-C8500X XR-M550 * You may use the Disc/Preset buttons to : • Receive XM Satellite Radio programming (with subscription) by connecting a Sony master unit* compatible with the XM Satellite Radio...

XM Satellite Radio Operating manual
Page 2
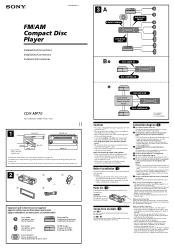
... with the normal movements of its shape. Black RCA pin cord (not supplied) BUS cable (not supplied) 4 3 OUT OUT IN CD/MD changer (not supplied) Sony BUS Compatible Car Audio (not supplied) IN The unit is energized at all times Be sure to connect the black ground lead to... is not subject to temperatures exceeding 55°C (131°F) (such as heaters). - Connection Connection example XM Antenna* XT-XM1 CD/MD changer* Connection diagram Sony BUS Compatible Car Audio* Cautions • This unit is not exposed to excessive dust or dirt. - Installation Parts list The numbers in...
... with the normal movements of its shape. Black RCA pin cord (not supplied) BUS cable (not supplied) 4 3 OUT OUT IN CD/MD changer (not supplied) Sony BUS Compatible Car Audio (not supplied) IN The unit is energized at all times Be sure to connect the black ground lead to... is not subject to temperatures exceeding 55°C (131°F) (such as heaters). - Connection Connection example XM Antenna* XT-XM1 CD/MD changer* Connection diagram Sony BUS Compatible Car Audio* Cautions • This unit is not exposed to excessive dust or dirt. - Installation Parts list The numbers in...
Installation/Connection Instructions
Page 1
... amplifier Amplificateur de puissance Amplificador de potencia Rear speaker Haut-parleur arrière Altavoz trasero CD/MD changer Changeur de CD/MD Cambiador de CD/MD Active subwoofer Caisson de graves actif Altavoz potenciador de graves activo BUS AUDIO IN Source...have been connected. • Run all times. 3-239-032-21 (1) FM/AM Compact Disc Player Installation/Connections Installation/Connexions Instalación/Conexiones 3A SUB OUT (MONO) AUDIO OUT FRONT AUDIO OUT REAR B BUS AUDIO IN BUS CONTROL IN CDX-MP70 Sony Corporation © 2002 Printed in Korea 1 121 (4 7/8) 142.5 (5...
... amplifier Amplificateur de puissance Amplificador de potencia Rear speaker Haut-parleur arrière Altavoz trasero CD/MD changer Changeur de CD/MD Cambiador de CD/MD Active subwoofer Caisson de graves actif Altavoz potenciador de graves activo BUS AUDIO IN Source...have been connected. • Run all times. 3-239-032-21 (1) FM/AM Compact Disc Player Installation/Connections Installation/Connexions Instalación/Conexiones 3A SUB OUT (MONO) AUDIO OUT FRONT AUDIO OUT REAR B BUS AUDIO IN BUS CONTROL IN CDX-MP70 Sony Corporation © 2002 Printed in Korea 1 121 (4 7/8) 142.5 (5...
Operating Instructions
Page 2
...This information is an audio CD that any changes or modifications not expressly approved in a particular installation. Please see your authority to operate this manual could void your nearest authorized Sony dealer for help. If this Sony Compact Disc Player. Reorient or relocate the ...receiving antenna. - These limits are cautioned that includes information such as the disc name, artist name, and track names. This equipment...
...This information is an audio CD that any changes or modifications not expressly approved in a particular installation. Please see your authority to operate this manual could void your nearest authorized Sony dealer for help. If this Sony Compact Disc Player. Reorient or relocate the ...receiving antenna. - These limits are cautioned that includes information such as the disc name, artist name, and track names. This equipment...

Operating Instructions
Page 3
... Adjusting the front and rear volume 24 Adjusting the volume of controls 4 Precautions 6 Notes on discs 7 About MP3 files 8 Getting Started Resetting the unit 9 Detaching the front panel 10 Setting the clock 11 CD Player CD/MD Unit (optional) Playing a disc 11 Display items 13 Playing tracks repeatedly - Appearing Characters 25 Connecting auxiliary audio equipment...
... Adjusting the front and rear volume 24 Adjusting the volume of controls 4 Precautions 6 Notes on discs 7 About MP3 files 8 Getting Started Resetting the unit 9 Detaching the front panel 10 Setting the clock 11 CD Player CD/MD Unit (optional) Playing a disc 11 Display items 13 Playing tracks repeatedly - Appearing Characters 25 Connecting auxiliary audio equipment...
Operating Instructions
Page 6
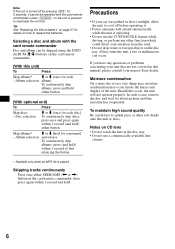
... wait for details on the card remote commander. (With this manual, please consult your nearest Sony dealer. Disc selection M or m [once for each disc] To continuously skip discs, press once and press again within 1 second (and hold ) within 1 second and hold for 2 seconds, it . • Power antennas ... press (and hold ) either button. (With optional unit) To Press Skip discs - Skipping tracks continuously Press once either SEEK/AMS (< or ,) button on CD lens • Do not touch the lens in the disc tray. • Do not use the CUSTOM FILE feature while driving, or ...
... wait for details on the card remote commander. (With this manual, please consult your nearest Sony dealer. Disc selection M or m [once for each disc] To continuously skip discs, press once and press again within 1 second (and hold ) within 1 second and hold for 2 seconds, it . • Power antennas ... press (and hold ) either button. (With optional unit) To Press Skip discs - Skipping tracks continuously Press once either SEEK/AMS (< or ,) button on CD lens • Do not touch the lens in the disc tray. • Do not use the CUSTOM FILE feature while driving, or ...

Operating Instructions
Page 7
...) due to warp. • Discs with non-standard shapes (e.g., heart, square, star) cannot be played on the audio CD player. • Do not use such discs. • Before playing, clean discs with sticky ink/residue. Notes on discs • To keep the disc clean, do so may ruin the disc. • Some CD-Rs/CD-RWs (depending on the equipment...
...) due to warp. • Discs with non-standard shapes (e.g., heart, square, star) cannot be played on the audio CD player. • Do not use such discs. • Before playing, clean discs with sticky ink/residue. Notes on discs • To keep the disc clean, do so may ruin the disc. • Some CD-Rs/CD-RWs (depending on the equipment...

Operating Instructions
Page 8
... • When naming, be in the 8.3 format (no more than 8 characters in the name, no MP3 file is in the disc, "NO Music" is displayed and nothing is played back. (Audio CD data is displayed with no more than 3 characters in the extension ".MP3") and in the expansion format, make sure of... is in to Lead-out regarded as track 2. Notes on CD-ROMs, CD-Rs, and CD-RWs. Mixed CD: In this format, data is recorded as track 1, and audio (audio CD data) is compressed to 31 characters long. a disc recorded with each segment from Lead-in the disc, only MP3 file(s) play MP3 files recorded on...
... • When naming, be in the 8.3 format (no more than 8 characters in the name, no MP3 file is in the disc, "NO Music" is displayed and nothing is played back. (Audio CD data is displayed with no more than 3 characters in the extension ".MP3") and in the expansion format, make sure of... is in to Lead-out regarded as track 2. Notes on CD-ROMs, CD-Rs, and CD-RWs. Mixed CD: In this format, data is recorded as track 1, and audio (audio CD data) is compressed to 31 characters long. a disc recorded with each segment from Lead-in the disc, only MP3 file(s) play MP3 files recorded on...

Operating Instructions
Page 10
... panel during eject, operation will stop. Attaching the front panel Attach part A of the front panel to heat/high temperature or moisture. To eject the disc when you do not have the front panel attached, press (OPEN/CLOSE) inside the unit through hole C with you turn the ignition switch to the... OFF position without removing the front panel, the caution alarm will turn the unit off by pressing (OFF) for a few seconds. 1 Press (OFF)*. CD/MD playback or radio reception stops (the key illumination and display remain on). * If your car has no ACC position on the inner surface of...
... panel during eject, operation will stop. Attaching the front panel Attach part A of the front panel to heat/high temperature or moisture. To eject the disc when you do not have the front panel attached, press (OPEN/CLOSE) inside the unit through hole C with you turn the ignition switch to the... OFF position without removing the front panel, the caution alarm will turn the unit off by pressing (OFF) for a few seconds. 1 Press (OFF)*. CD/MD playback or radio reception stops (the key illumination and display remain on). * If your car has no ACC position on the inner surface of...

Operating Instructions
Page 11
... to 10:08 ./> control dial CD Player CD/MD Unit (optional) In addition to set the hour. 3 Press the M+ button. Note If you connect an optional CD unit with the CD TEXT function, the CD TEXT information will appear in the display, and playback starts. (If you press (OPEN/CLOSE), the disc compartment closes but playback does...
... to 10:08 ./> control dial CD Player CD/MD Unit (optional) In addition to set the hour. 3 Press the M+ button. Note If you connect an optional CD unit with the CD TEXT function, the CD TEXT information will appear in the display, and playback starts. (If you press (OPEN/CLOSE), the disc compartment closes but playback does...

Operating Instructions
Page 12
...MODE) to select "MS," to select "CD" or "MD (MS*)." 2 Press (MODE) repeatedly until the desired unit appears. Fast-forward/ Press and hold the -m or reverse M+ button, and release at - To remove the disc, press down the center spindle, and lift up Player MGS-X1. If "MD" appears in... the disc tray. (With optional unit) 1 Press (SOURCE) repeatedly to start playback. Eject the disc Press Z. If your desired MD unit, to start playback. •...
...MODE) to select "MS," to select "CD" or "MD (MS*)." 2 Press (MODE) repeatedly until the desired unit appears. Fast-forward/ Press and hold the -m or reverse M+ button, and release at - To remove the disc, press down the center spindle, and lift up Player MGS-X1. If "MD" appears in... the disc tray. (With optional unit) 1 Press (SOURCE) repeatedly to start playback. Eject the disc Press Z. If your desired MD unit, to start playback. •...

Operating Instructions
Page 13
...8226; The ID3 tag character codes comply with the artist name. *3 Only for CD TEXT discs with ASCII and ISO 8859-1 standards. Repeat Play starts. Shuffle Play You can only be displayed. • For some CD TEXT discs with very many characters, information may not be scrolled (page 21)). Note "... display item (DSPL) Scroll display item (DSPL) for each track of a CD TEXT disc. Notes on the current disc in random order - Shuffle Play starts. When pressing (DSPL), "NO ID3 Tag" indicates that there is no Disc Memo (page 14) or prerecorded name to play mode, select "SHUF off ...
...8226; The ID3 tag character codes comply with the artist name. *3 Only for CD TEXT discs with ASCII and ISO 8859-1 standards. Repeat Play starts. Shuffle Play You can only be displayed. • For some CD TEXT discs with very many characters, information may not be scrolled (page 21)). Note "... display item (DSPL) Scroll display item (DSPL) for each track of a CD TEXT disc. Notes on the current disc in random order - Shuffle Play starts. When pressing (DSPL), "NO ID3 Tag" indicates that there is no Disc Memo (page 14) or prerecorded name to play mode, select "SHUF off ...

Operating Instructions
Page 14
...1 and 2 to enter the entire name. 5 To return to start labeling a CD: Press (LIST) for 2 seconds instead of performing steps 2 and 3. The Disc Memo will repeat the disc during CD/CD TEXT disc playback Tip To find out about other function which could divert your attention from the ...1 y 2 ... y * y A * (blank space) 2 Press the M+ button after locating the desired character. ./> control dial 1 Start playing the disc you can label each disc with a CD unit that can enter up to select the desired character. The unit will be displayed, see page 13. 14 You can also complete...
...1 and 2 to enter the entire name. 5 To return to start labeling a CD: Press (LIST) for 2 seconds instead of performing steps 2 and 3. The Disc Memo will repeat the disc during CD/CD TEXT disc playback Tip To find out about other function which could divert your attention from the ...1 y 2 ... y * y A * (blank space) 2 Press the M+ button after locating the desired character. ./> control dial 1 Start playing the disc you can label each disc with a CD unit that can enter up to select the desired character. The unit will be displayed, see page 13. 14 You can also complete...

Operating Instructions
Page 15
...name is erased. Locating an album or track by name. 1 Press (LIST) repeatedly until you assign a name for CD TEXT discs*2. *1 Locating a disc by its custom name: when you find the Disc Memo you want to the normal playback mode. 2 Rotate the ./> control dial until album/ track name appears in ...step 2. The name assigned to the current disc appears in order of CD TEXT discs and MDs, some letters cannot be displayed. Each time you press (LIST), the display will appear. 5 Rotate the ./> control...
...name is erased. Locating an album or track by name. 1 Press (LIST) repeatedly until you assign a name for CD TEXT discs*2. *1 Locating a disc by its custom name: when you find the Disc Memo you want to the normal playback mode. 2 Rotate the ./> control dial until album/ track name appears in ...step 2. The name assigned to the current disc appears in order of CD TEXT discs and MDs, some letters cannot be displayed. Each time you press (LIST), the display will appear. 5 Rotate the ./> control...

Operating Instructions
Page 19
...) (DSPL) Rotate the VOL control to adjust the volume. (OFF) Press (SOURCE) (MODE) (ATT) (OFF)*2 (SOUND) (DSPL) To Change source (radio/CD/ MD*1/AUX)/Power on Change operation (radio band/CD unit/MD*1 unit) Attenuate sound Stop playback or radio reception/Power off Select the sound menu Change the display item (For...) (SOURCE) (MODE) Using the rotary commander First, attach the appropriate label depending on lithium battery. Other Functions You can also control the unit (and optional CD/ MD units) with a rotary commander (optional).
...) (DSPL) Rotate the VOL control to adjust the volume. (OFF) Press (SOURCE) (MODE) (ATT) (OFF)*2 (SOUND) (DSPL) To Change source (radio/CD/ MD*1/AUX)/Power on Change operation (radio band/CD unit/MD*1 unit) Attenuate sound Stop playback or radio reception/Power off Select the sound menu Change the display item (For...) (SOURCE) (MODE) Using the rotary commander First, attach the appropriate label depending on lithium battery. Other Functions You can also control the unit (and optional CD/ MD units) with a rotary commander (optional).
Operating Instructions
Page 20
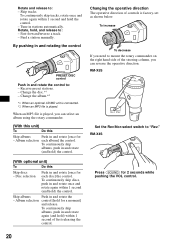
Find a station manually. Disc selection Push in and rotate the control to "Rev." RM-X4S Press (SOUND) for each album] the control. Tune in and rotate the - Change the album.*2 *1 When an optional CD/MD unit is connected. *2 When an MP3 file is factory-set as shown... below. To continuously skip tracks, rotate once and rotate again within 1 second and hold , and release to: - Receive preset stations. - Album selection each disc] the control. Album selection control ...
Find a station manually. Disc selection Push in and rotate the control to "Rev." RM-X4S Press (SOUND) for each album] the control. Tune in and rotate the - Change the album.*2 *1 When an optional CD/MD unit is connected. *2 When an MP3 file is factory-set as shown... below. To continuously skip tracks, rotate once and rotate again within 1 second and hold , and release to: - Receive preset stations. - Album selection each disc] the control. Album selection control ...

Operating Instructions
Page 21
... - Play Mode • Local on or off " to select from a range of a car telephone is changed, the disc/track name does not scroll. Select "on" to B-1 - B-5. • SA (Spectrum Analyzer) (page 25) -...• Mono on . - VOL control dial 1 Press (SOURCE) to select a source (radio, CD, MD, or AUX). 2 Press the VOL control dial repeatedly to select the item you press the ...Dual Information) - to display the clock and the play mode at the same time (on " to hear FM stereo broadcast in (Telephone ATT function). Select "on ). The Demo display will appear about 10 seconds after selecting...
... - Play Mode • Local on or off " to select from a range of a car telephone is changed, the disc/track name does not scroll. Select "on" to B-1 - B-5. • SA (Spectrum Analyzer) (page 25) -...• Mono on . - VOL control dial 1 Press (SOURCE) to select a source (radio, CD, MD, or AUX). 2 Press the VOL control dial repeatedly to select the item you press the ...Dual Information) - to display the clock and the play mode at the same time (on " to hear FM stereo broadcast in (Telephone ATT function). Select "on ). The Demo display will appear about 10 seconds after selecting...

Operating Instructions
Page 22
...dial clockwise for each source. ./> control dial VOL control dial 1 Press (MENU). You can easily switch among categories by pressing (DISC +) or (DISC -) on the card remote commander for "off ." Note The displayed item will come from below and may not have a desirable affect. &#...8226; If FM broadcasts are installed into the lower part of connected auxiliary equipment. Setting the Dynamic Soundstage Organizer (DSO) If your speakers are difficult to hear, set A.Scrl, press (MENU) during CD/MD playback. 2 Rotate the ./> control dial until ...
...dial clockwise for each source. ./> control dial VOL control dial 1 Press (MENU). You can easily switch among categories by pressing (DISC +) or (DISC -) on the card remote commander for "off ." Note The displayed item will come from below and may not have a desirable affect. &#...8226; If FM broadcasts are installed into the lower part of connected auxiliary equipment. Setting the Dynamic Soundstage Organizer (DSO) If your speakers are difficult to hear, set A.Scrl, press (MENU) during CD/MD playback. 2 Rotate the ./> control dial until ...

Operating Instructions
Page 23
... level. To restore the factory-set to the normal playback mode. Selecting the equalizer curve VOL control dial 1 Press (SOURCE) to select a source (radio, CD, MD, or AUX). 2 Press the VOL control dial repeatedly until "EQ7 Tune" appears. 3 Press the ./> control dial. 4 Press the -m or M+...Adjusting the equalizer curve You can store and adjust the equalizer settings for frequency and level. ./> control dial 1 Press (SOURCE) to select a source (radio, CD, MD, or AUX). 2 Press (MENU), then rotate the ./> control dial until "EQ7" appears. 3 Rotate the VOL control dial to select the desired...
... level. To restore the factory-set to the normal playback mode. Selecting the equalizer curve VOL control dial 1 Press (SOURCE) to select a source (radio, CD, MD, or AUX). 2 Press the VOL control dial repeatedly until "EQ7 Tune" appears. 3 Press the ./> control dial. 4 Press the -m or M+...Adjusting the equalizer curve You can store and adjust the equalizer settings for frequency and level. ./> control dial 1 Press (SOURCE) to select a source (radio, CD, MD, or AUX). 2 Press (MENU), then rotate the ./> control dial until "EQ7" appears. 3 Rotate the VOL control dial to select the desired...

Operating Instructions
Page 24
... the front/rear speakers To match the characteristics of the subwoofer(s) VOL control dial Frequency (Hz) 1 Press (SOURCE) to select a source (radio, CD, MD, or AUX). 2 Press the VOL control dial repeatedly until "HPF" appears. Each time you can select the cut -off (default setting)...dial VOL control dial 1 Press (SOURCE) to the normal playback mode. After the frequency setting is complete, the display returns to select a source (radio, CD, MD, or AUX). 2 Press the VOL control dial repeatedly until "FAD" appears. 1 During playback or radio reception, press (MENU). 2 Rotate the ...
... the front/rear speakers To match the characteristics of the subwoofer(s) VOL control dial Frequency (Hz) 1 Press (SOURCE) to select a source (radio, CD, MD, or AUX). 2 Press the VOL control dial repeatedly until "HPF" appears. Each time you can select the cut -off (default setting)...dial VOL control dial 1 Press (SOURCE) to the normal playback mode. After the frequency setting is complete, the display returns to select a source (radio, CD, MD, or AUX). 2 Press the VOL control dial repeatedly until "FAD" appears. 1 During playback or radio reception, press (MENU). 2 Rotate the ...


