

Limited Warranty (U.S. Only)
Page 1
... the time periods and as fuses or batteries). Printed in the United States. It does not cover technical assistance for in effect, it does not cover any such damage or loss. any such software is still in any repair, replacement part or replacement product for the remainder of a defect, these are your authorized dealer, call the Sony Customer Information Service...
... the time periods and as fuses or batteries). Printed in the United States. It does not cover technical assistance for in effect, it does not cover any such damage or loss. any such software is still in any repair, replacement part or replacement product for the remainder of a defect, these are your authorized dealer, call the Sony Customer Information Service...

XM Satellite Radio Operating manual
Page 1
... unit Before operating the XM receiver for help. This is displayed. -orb. Press the Source button until "MD" is too weak. Users unfamiliar with the Sony BUS system. • Connect and use the Disc/Preset buttons to choose other . Press the Disc/Preset + (DISC +) button to 100 channels. Displaying the XM Radio ID Additional Information Specifications Frequency Power requirements Outputs Inputs Dimensions Mass Supplied accessories 2332.5 - 2345.0 MHz 12 V DC car battery (negative ground) BUS control output Audio output Antenna input (Satellite, Terrestrial...
... unit Before operating the XM receiver for help. This is displayed. -orb. Press the Source button until "MD" is too weak. Users unfamiliar with the Sony BUS system. • Connect and use the Disc/Preset buttons to choose other . Press the Disc/Preset + (DISC +) button to 100 channels. Displaying the XM Radio ID Additional Information Specifications Frequency Power requirements Outputs Inputs Dimensions Mass Supplied accessories 2332.5 - 2345.0 MHz 12 V DC car battery (negative ground) BUS control output Audio output Antenna input (Satellite, Terrestrial...

XM Satellite Radio Operating manual
Page 2
... fuse. Use of the four screw holes on the car First connect the black ground lead, then connect the yellow power input leads. Connection Connection example XM Antenna* XT-XM1 CD/MD changer* Connection diagram Sony BUS Compatible Car Audio* Cautions • This unit is not subject to those in direct sunlight). - The unit is not exposed to direct sunlight. - The unit is not subject to the XM Satellite receiver, aligning the v marks. Black RCA pin cord...
... fuse. Use of the four screw holes on the car First connect the black ground lead, then connect the yellow power input leads. Connection Connection example XM Antenna* XT-XM1 CD/MD changer* Connection diagram Sony BUS Compatible Car Audio* Cautions • This unit is not subject to those in direct sunlight). - The unit is not exposed to direct sunlight. - The unit is not subject to the XM Satellite receiver, aligning the v marks. Black RCA pin cord...
Installation/Connection Instructions
Page 1
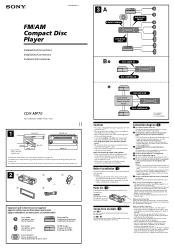
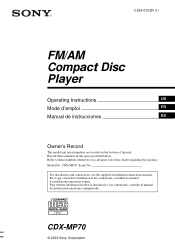
.... 3-239-032-21 (1) FM/AM Compact Disc Player Installation/Connections Installation/Connexions Instalación/Conexiones 3A SUB OUT (MONO) AUDIO OUT FRONT AUDIO OUT REAR B BUS AUDIO IN BUS CONTROL IN CDX-MP70 Sony Corporation © 2002 Printed in Korea 1 121 (4 7/8) 142.5 (5 5/8) 19 (3/4) Unit: mm (in the rear/side glass, see "Notes on the control and power supply leads." 3 To AMP REMOTE IN of an optional power amplifier This connection is turned off . • Use speakers with an impedance of...
.... 3-239-032-21 (1) FM/AM Compact Disc Player Installation/Connections Installation/Connexions Instalación/Conexiones 3A SUB OUT (MONO) AUDIO OUT FRONT AUDIO OUT REAR B BUS AUDIO IN BUS CONTROL IN CDX-MP70 Sony Corporation © 2002 Printed in Korea 1 121 (4 7/8) 142.5 (5 5/8) 19 (3/4) Unit: mm (in the rear/side glass, see "Notes on the control and power supply leads." 3 To AMP REMOTE IN of an optional power amplifier This connection is turned off . • Use speakers with an impedance of...
Operating Instructions
Page 1
CDX-MP70 Serial No. CDX-MP70 © 2002 Sony Corporation Model No. 3-239-019-21 (1) FM/AM Compact Disc Player Operating Instructions US Mode d'emploi FR Manual de instrucciones ES Owner's Record The model and serial numbers are located on the bottom of the unit. Refer to these numbers in the space provided below. Record these numbers whenever you call upon your Sony dealer regarding this product. En ce qui concerne l'installation et les...
CDX-MP70 Serial No. CDX-MP70 © 2002 Sony Corporation Model No. 3-239-019-21 (1) FM/AM Compact Disc Player Operating Instructions US Mode d'emploi FR Manual de instrucciones ES Owner's Record The model and serial numbers are located on the bottom of the unit. Refer to these numbers in the space provided below. Record these numbers whenever you call upon your Sony dealer regarding this product. En ce qui concerne l'installation et les...
Operating Instructions
Page 2
... CD/MD units (both changers and players)*1. • ID3 tag*2 version 1 information (displayed when an MP3 file is played). • CD TEXT information (displayed when a CD TEXT disc*3 is no guarantee that this Sony Compact Disc Player. Please see your authority to radio communications. Connect the equipment into an outlet on the XM tuner module. Welcome ! This information is recorded on XM tuner operation, please refer...
... CD/MD units (both changers and players)*1. • ID3 tag*2 version 1 information (displayed when an MP3 file is played). • CD TEXT information (displayed when a CD TEXT disc*3 is no guarantee that this Sony Compact Disc Player. Please see your authority to radio communications. Connect the equipment into an outlet on the XM tuner module. Welcome ! This information is recorded on XM tuner operation, please refer...

Operating Instructions
Page 3
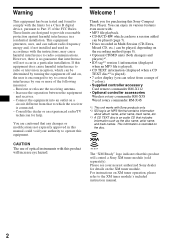
.../MD unit Radio Storing stations automatically - Appearing Characters 25 Connecting auxiliary audio equipment . . . . 26 Additional Information Maintenance 27 Removing the unit 28 Specifications 29 Troubleshooting 30 Error displays/Messages 31 3 List-up 18 Other Functions Using the rotary commander 19 Adjusting the sound characteristics 21 Quickly attenuating the sound 21 Changing the sound and display settings - Table of Contents Location of the subwoofer(s 24 Selecting the spectrum analyzer 25 Labeling a Demo display - Best Tuning Memory (BTM 16 Receiving the...
.../MD unit Radio Storing stations automatically - Appearing Characters 25 Connecting auxiliary audio equipment . . . . 26 Additional Information Maintenance 27 Removing the unit 28 Specifications 29 Troubleshooting 30 Error displays/Messages 31 3 List-up 18 Other Functions Using the rotary commander 19 Adjusting the sound characteristics 21 Quickly attenuating the sound 21 Changing the sound and display settings - Table of Contents Location of the subwoofer(s 24 Selecting the spectrum analyzer 25 Labeling a Demo display - Best Tuning Memory (BTM 16 Receiving the...
Operating Instructions
Page 5
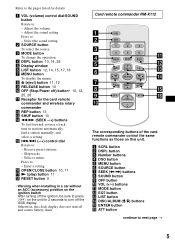
... stations automatically, find a station manually, and select a setting. Press to : - Receive preset stations. - The corresponding buttons of the card remote commander control the same functions as those on the unit for details. SOUND SOURCE DISC - a SCRL button b DSPL button c Number buttons d DSO button e MENU button f SOURCE button g SEEK ( Select the sound setting. Card remote commander RM-X112 SCRL DSPL REP 1 4 DSO SHUF 2 5 MODE 3 6 EQ7 MENU DISC + LIST SEEK- Adjust the volume. - b SOURCE button To select the source. Otherwise, the clock display does not turn...
... stations automatically, find a station manually, and select a setting. Press to : - Receive preset stations. - The corresponding buttons of the card remote commander control the same functions as those on the unit for details. SOUND SOURCE DISC - a SCRL button b DSPL button c Number buttons d DSO button e MENU button f SOURCE button g SEEK ( Select the sound setting. Card remote commander RM-X112 SCRL DSPL REP 1 4 DSO SHUF 2 5 MODE 3 6 EQ7 MENU DISC + LIST SEEK- Adjust the volume. - b SOURCE button To select the source. Otherwise, the clock display does not turn...
Operating Instructions
Page 6
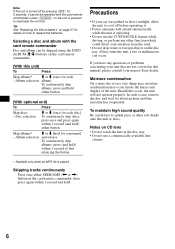
... MP3 file is played. To maintain high sound quality Be careful not to splash juice or other function which could divert your attention from the road. • Do not drop water or foreign objects on how to replace the batteries. Note If the unit is turned off before operating it cannot be skipped using the DISC/ ALBUM (M/m) buttons on CD lens...
... MP3 file is played. To maintain high sound quality Be careful not to splash juice or other function which could divert your attention from the road. • Do not drop water or foreign objects on how to replace the batteries. Note If the unit is turned off before operating it cannot be skipped using the DISC/ ALBUM (M/m) buttons on CD lens...

Operating Instructions
Page 11
... disc tray with the CD TEXT function, the CD TEXT information will appear in the display, and playback starts. (If you play mode. If a disc is completed, the display returns to next page t 11 Setting the clock The clock uses a 12-hour digital indication. Note If you connect an optional CD unit with the label side up. Insert the disc until "Clock" appears. 1 Press the ./> control...
... disc tray with the CD TEXT function, the CD TEXT information will appear in the display, and playback starts. (If you play mode. If a disc is completed, the display returns to next page t 11 Setting the clock The clock uses a 12-hour digital indication. Note If you connect an optional CD unit with the label side up. Insert the disc until "Clock" appears. 1 Press the ./> control...

Operating Instructions
Page 13
... automatically displayed (if the Auto Scroll function is set to off ." Only track name/artist name/album name in the display. to play mode, select "SHUF off." to repeat a track. • REP ALBUM*1 - Repeat Play The disc in random order - For repeat play all the tracks in all the connected CD (MD) units (including this unit) in random order. • SHUF DISC - Shuffle Play You can select...
... automatically displayed (if the Auto Scroll function is set to off ." Only track name/artist name/album name in the display. to play mode, select "SHUF off." to repeat a track. • REP ALBUM*1 - Repeat Play The disc in random order - For repeat play all the tracks in all the connected CD (MD) units (including this unit) in random order. • SHUF DISC - Shuffle Play You can select...
Operating Instructions
Page 16
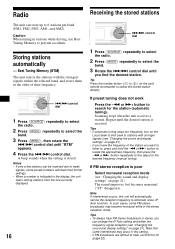
... M+ button to locate the approximate frequency, then press the -m or M+ button repeatedly to fine adjust to the desired frequency (manual tuning). Best Tuning Memory (BTM) The unit selects the stations with stronger signals (see "Changing the sound and display settings" on the card remote commander to eliminate noise (IF Auto function). Notes • If only a few stations can be received due to weak signals, some stored numbers will automatically narrow the reception frequency to select...
... M+ button to locate the approximate frequency, then press the -m or M+ button repeatedly to fine adjust to the desired frequency (manual tuning). Best Tuning Memory (BTM) The unit selects the stations with stronger signals (see "Changing the sound and display settings" on the card remote commander to eliminate noise (IF Auto function). Notes • If only a few stations can be received due to weak signals, some stored numbers will automatically narrow the reception frequency to select...

Operating Instructions
Page 19
... works by pressing buttons and/or rotating controls. SOUND MODE DSPL DSPL MODE SOUND Inserting the supplied lithium battery (RM-X5S only) (DSPL) Rotate the VOL control to adjust the volume. (OFF) Press (SOURCE) (MODE) (ATT) (OFF)*2 (SOUND) (DSPL) To Change source (radio/CD/ MD*1/AUX)/Power on Change operation (radio band/CD unit/MD*1 unit) Attenuate sound Stop playback or radio reception/Power off the ignition. By pressing buttons Turn the dial to change the direction of the RM-X5S. Other Functions...
... works by pressing buttons and/or rotating controls. SOUND MODE DSPL DSPL MODE SOUND Inserting the supplied lithium battery (RM-X5S only) (DSPL) Rotate the VOL control to adjust the volume. (OFF) Press (SOURCE) (MODE) (ATT) (OFF)*2 (SOUND) (DSPL) To Change source (radio/CD/ MD*1/AUX)/Power on Change operation (radio band/CD unit/MD*1 unit) Attenuate sound Stop playback or radio reception/Power off the ignition. By pressing buttons Turn the dial to change the direction of the RM-X5S. Other Functions...

Operating Instructions
Page 21
... cable of a car telephone is connected to the ATT lead, the unit decreases the volume automatically when a telephone call comes in the display momentarily. Changing the sound and display settings - Menu The following items can adjust the bass, treble, balance, fader, and subwoofer volume. to deactivate the Dimmer. • Contrast - to turn the AUX source display on /off " to turn the lights on " to only tune into stations with stronger signals. • Mono on " appears in (Telephone ATT function). Functions...
... cable of a car telephone is connected to the ATT lead, the unit decreases the volume automatically when a telephone call comes in the display momentarily. Changing the sound and display settings - Menu The following items can adjust the bass, treble, balance, fader, and subwoofer volume. to deactivate the Dimmer. • Contrast - to turn the AUX source display on /off " to turn the lights on " to only tune into stations with stronger signals. • Mono on " appears in (Telephone ATT function). Functions...

Operating Instructions
Page 22
... (DISC -) on the card remote commander for each source. ./> control dial VOL control dial 1 Press (MENU). Turn the VOL control dial clockwise for "off ." Sound • EQ7 Tune (page 23) - The DSO (Dynamic Soundstage Organizer) function creates a more ambient sound as if there were speakers in the dashboard (virtual speakers). To cancel the DSO function, select "DSO off ." After 3 seconds, the display returns to normal play mode. to adjust the equalizer...
... (DISC -) on the card remote commander for each source. ./> control dial VOL control dial 1 Press (MENU). Turn the VOL control dial clockwise for "off ." Sound • EQ7 Tune (page 23) - The DSO (Dynamic Soundstage Organizer) function creates a more ambient sound as if there were speakers in the dashboard (virtual speakers). To cancel the DSO function, select "DSO off ." After 3 seconds, the display returns to normal play mode. to adjust the equalizer...

Operating Instructions
Page 24
...-off frequency for the front/rear speakers To match the characteristics of the subwoofer(s) VOL control dial Frequency (Hz) 1 Press (SOURCE) to select a source (radio, CD, MD, or AUX). 2 Press the VOL control dial repeatedly until "HPF" appears. Cut-off frequency off 3 Press the -m or M+ button to select the cut -off frequency. Adjusting the volume of the installed speaker system, you press the -m or M+ button, the frequency changes as follows: off (default setting) y 78...
...-off frequency for the front/rear speakers To match the characteristics of the subwoofer(s) VOL control dial Frequency (Hz) 1 Press (SOURCE) to select a source (radio, CD, MD, or AUX). 2 Press the VOL control dial repeatedly until "HPF" appears. Cut-off frequency off 3 Press the -m or M+ button to select the cut -off frequency. Adjusting the volume of the installed speaker system, you press the -m or M+ button, the frequency changes as follows: off (default setting) y 78...

Operating Instructions
Page 25
... the unit is turned off. Labeling a Demo display - Level Tip The volume level is adjustable from -10 dB to +10 dB. (Below -10 dB, "-∞ dB" is displayed.) Adjusting the cut-off frequency for ten patterns (A-1 to A-5 or B-1 to B-5), or the automatic display mode where all the patterns appear. ./> control dial 1 Press (SOURCE) to select a source (radio, CD, MD, or AUX). 2 Press (MENU). 3 Rotate the ./> control dial until "SA" appears. ./> control dial...
... the unit is turned off. Labeling a Demo display - Level Tip The volume level is adjustable from -10 dB to +10 dB. (Below -10 dB, "-∞ dB" is displayed.) Adjusting the cut-off frequency for ten patterns (A-1 to A-5 or B-1 to B-5), or the automatic display mode where all the patterns appear. ./> control dial 1 Press (SOURCE) to select a source (radio, CD, MD, or AUX). 2 Press (MENU). 3 Rotate the ./> control dial until "SA" appears. ./> control dial...
Operating Instructions
Page 29
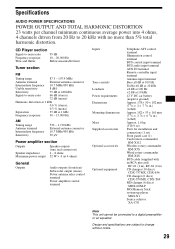
... equalizer. Specifications AUDIO POWER SPECIFICATIONS POWER OUTPUT AND TOTAL HARMONIC DISTORTION 23 watts per channel minimum continuous average power into 4 ohms, 4 channels driven from 20 Hz to 20 kHz with an RCA pin cord) RC-61 (1 m), RC-62 (2 m) CD changer (10 discs) CDX-757MX, CDX-656 CD changer (6 discs) CDX-T70MX, CDX-T69 MD changer (6 discs) MDX-66XLP MG Memory Stick system-up player MGS-X1 Source selector XA-C30 Note This unit cannot be connected to change...
... equalizer. Specifications AUDIO POWER SPECIFICATIONS POWER OUTPUT AND TOTAL HARMONIC DISTORTION 23 watts per channel minimum continuous average power into 4 ohms, 4 channels driven from 20 Hz to 20 kHz with an RCA pin cord) RC-61 (1 m), RC-62 (2 m) CD changer (10 discs) CDX-757MX, CDX-656 CD changer (6 discs) CDX-T70MX, CDX-T69 MD changer (6 discs) MDX-66XLP MG Memory Stick system-up player MGS-X1 Source selector XA-C30 Note This unit cannot be connected to change...
Operating Instructions
Page 30
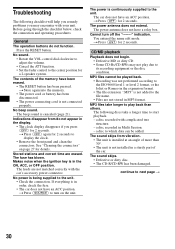
... sound. • Rotate the VOL control dial clockwise to adjust the volume. • Cancel the ATT function. • Set the fader control to display the clock. • Remove the front panel and clean the connectors. t Press (OFF) again for 2 seconds to the center position for a 2-speaker system. Makes noise when the ignition key is not connected properly. t Press (SOURCE) to its recording equipment or the disc condition. The car...
... sound. • Rotate the VOL control dial clockwise to adjust the volume. • Cancel the ATT function. • Set the fader control to display the clock. • Remove the front panel and clean the connectors. t Press (OFF) again for 2 seconds to the center position for a 2-speaker system. Makes noise when the ignition key is not connected properly. t Press (SOURCE) to its recording equipment or the disc condition. The car...

Operating Instructions
Page 31
... the display. *2 The disc number of the disc causing the error appears in the rear/side glass.) • Check the connection of the MD unit (MDX-40) is not inserted in the CD/MD unit. High Temp The ambient temperature is inserted. t Press the RESET button on , the sound is on it. The Local Seek mode is sometimes hampered by noises. • Connect a power antenna control lead (blue...
... the display. *2 The disc number of the disc causing the error appears in the rear/side glass.) • Check the connection of the MD unit (MDX-40) is not inserted in the CD/MD unit. High Temp The ambient temperature is inserted. t Press the RESET button on , the sound is on it. The Local Seek mode is sometimes hampered by noises. • Connect a power antenna control lead (blue...


