
Operating Instructions
Page 4
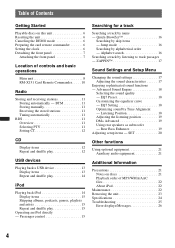
... 11 Storing manually 11 Receiving the stored stations 11 Tuning automatically 11 RDS 11 Overview 11 Selecting PTY 11 Setting CT 12 CD Display items 12 Repeat and shuffle play 12 USB devices Playing back a USB device 13 Display items 13 Repeat and shuffle...Sound Settings and Setup Menu Changing the sound settings 17 Adjusting the sound characteristics 17 Enjoying sophisticated sound functions - Table of Contents Getting Started Playable discs on discs 21 Playback order of controls and basic operations Main unit 8 RM-X151 Card Remote Commander . . . . . 10 Radio Storing and ...
... 11 Storing manually 11 Receiving the stored stations 11 Tuning automatically 11 RDS 11 Overview 11 Selecting PTY 11 Setting CT 12 CD Display items 12 Repeat and shuffle play 12 USB devices Playing back a USB device 13 Display items 13 Repeat and shuffle...Sound Settings and Setup Menu Changing the sound settings 17 Adjusting the sound characteristics 17 Enjoying sophisticated sound functions - Table of Contents Getting Started Playable discs on discs 21 Playback order of controls and basic operations Main unit 8 RM-X151 Card Remote Commander . . . . . 10 Radio Storing and ...

Operating Instructions
Page 6
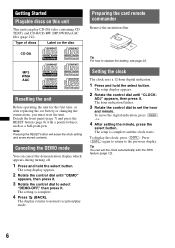
...you must reset the unit. The display returns to the previous display. Press (DSPL) again to return to normal reception/play CD-DA (also containing CD TEXT) and CD-R/CD-RW (MP3/WMA/AAC files (page 21)). Note Pressing the RESET button will erase the clock setting and some stored contents. ...The hour indication flashes. 3 Rotate the control dial to set the clock automatically with a pointed object, such as a ball-point pen. Type of discs Label...
...you must reset the unit. The display returns to the previous display. Press (DSPL) again to return to normal reception/play CD-DA (also containing CD TEXT) and CD-R/CD-RW (MP3/WMA/AAC files (page 21)). Note Pressing the RESET button will erase the clock setting and some stored contents. ...The hour indication flashes. 3 Rotate the control dial to set the clock automatically with a pointed object, such as a ball-point pen. Type of discs Label...

Operating Instructions
Page 8
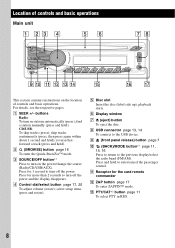
... Insert the disc (label side up), playback starts. H USB connector page 13, 14 To connect to the previous display/select the radio band (FM/AM). M PTY/CAT*2 button page 11 To select PTY in stations automatically (press); select setup items (press and rotate). reverse/...location of controls and basic operations. F Display window G Z (eject) button To eject the disc. Location of controls and basic operations Main unit This section contains instructions on the power/change the source (Radio/CD/USB/AUX). I (front panel release) button page 7 J (BACK)/MODE button*1 page ...
... Insert the disc (label side up), playback starts. H USB connector page 13, 14 To connect to the previous display/select the radio band (FM/AM). M PTY/CAT*2 button page 11 To select PTY in stations automatically (press); select setup items (press and rotate). reverse/...location of controls and basic operations. F Display window G Z (eject) button To eject the disc. Location of controls and basic operations Main unit This section contains instructions on the power/change the source (Radio/CD/USB/AUX). I (front panel release) button page 7 J (BACK)/MODE button*1 page ...

Operating Instructions
Page 9
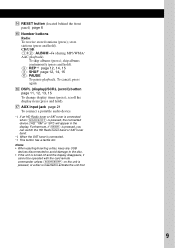
...Radio tuner band or SAT tuner band. *2 When the SAT tuner is pressed, the connected device ("HD," "XM" or "SR") will appear in the display. CD/USB: (1)/(2): ALBUM -/+ (during MP3/WMA/ AAC playback) To skip albums (press); To cancel, press again. store stations (press and hold ). Q AUX input... is turned off and the display disappears, it cannot be operated with the card remote commander unless (SOURCE/OFF) on the unit is pressed, or a disc is inserted to activate the unit first. 9 scroll the display item (press and hold ). skip albums continuously (press and hold). (3): REP*3 page 12...
...Radio tuner band or SAT tuner band. *2 When the SAT tuner is pressed, the connected device ("HD," "XM" or "SR") will appear in the display. CD/USB: (1)/(2): ALBUM -/+ (during MP3/WMA/ AAC playback) To skip albums (press); To cancel, press again. store stations (press and hold ). Q AUX input... is turned off and the display disappears, it cannot be operated with the card remote commander unless (SOURCE/OFF) on the unit is pressed, or a disc is inserted to activate the unit first. 9 scroll the display item (press and hold ). skip albums continuously (press and hold). (3): REP*3 page 12...

Operating Instructions
Page 10
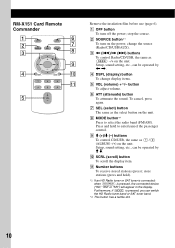
change display items. E VOL (volume) +*2/- C buttons To control Radio/CD/USB, the same as (1)/(2) (ALBUM -/+) on the unit. F ATT...connected device ("HD," "XM" or "SR") will appear in the display. Remove the insulation film before use (page 6). I M (+)/m (-) buttons To control CD/USB, the same as (SEEK) -/+ on the unit. J SCRL (scroll) button To scroll the display item. DSPL SCRL 6 7 8 9 q; 1 ... A OFF button To turn on the unit. D DSPL (display) button To change the source (Radio/CD/USB/AUX). button To adjust volume. Press and hold ). *1 If an HD Radio tuner or SAT tuner...
change display items. E VOL (volume) +*2/- C buttons To control Radio/CD/USB, the same as (1)/(2) (ALBUM -/+) on the unit. F ATT...connected device ("HD," "XM" or "SR") will appear in the display. Remove the insulation film before use (page 6). I M (+)/m (-) buttons To control CD/USB, the same as (SEEK) -/+ on the unit. J SCRL (scroll) button To scroll the display item. DSPL SCRL 6 7 8 9 q; 1 ... A OFF button To turn on the unit. D DSPL (display) button To change the source (Radio/CD/USB/AUX). button To adjust volume. Press and hold ). *1 If an HD Radio tuner or SAT tuner...

Operating Instructions
Page 12
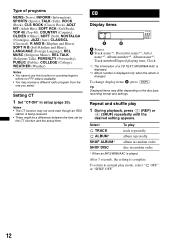
To change display items B, press (DSPL). Select TRACK ALBUM* SHUF ALBUM* SHUF DISC To play 1 During playback, press (3) (REP) or (4) (SHUF) repeatedly until the desired setting appears. Type of a CD TEXT, MP3/WMA/AAC is displayed. *2 Album number is displayed only when the album is...and shuffle play track repeatedly. After 3 seconds, the setting is changed. disc in setup (page 20). To return to normal play mode, select " OFF" or "SHUF OFF." 12 CD Display items A Source B Track name*1, Disc/artist name*1, Artist name*1, Album number*2, Album name*1, Track number/Elapsed playing...
To change display items B, press (DSPL). Select TRACK ALBUM* SHUF ALBUM* SHUF DISC To play 1 During playback, press (3) (REP) or (4) (SHUF) repeatedly until the desired setting appears. Type of a CD TEXT, MP3/WMA/AAC is displayed. *2 Album number is displayed only when the album is...and shuffle play track repeatedly. After 3 seconds, the setting is changed. disc in setup (page 20). To return to normal play mode, select " OFF" or "SHUF OFF." 12 CD Display items A Source B Track name*1, Disc/artist name*1, Artist name*1, Album number*2, Album name*1, Track number/Elapsed playing...
Operating Instructions
Page 16
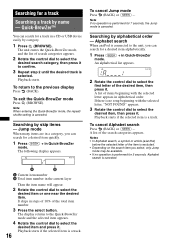
...) before the selected letter of the item is excluded. • Depending on the search item you can search for a desired item quickly. 1 Press (SEEK) + in a CD or USB device easily by alphabetical order - Searching by name - To cancel Jump mode Press (BACK) or (SEEK) -. An alphabetical list appears. 2 Rotate the control...
...) before the selected letter of the item is excluded. • Depending on the search item you can search for a desired item quickly. 1 Press (SEEK) + in a CD or USB device easily by alphabetical order - Searching by name - To cancel Jump mode Press (BACK) or (SEEK) -. An alphabetical list appears. 2 Rotate the control...
Operating Instructions
Page 17
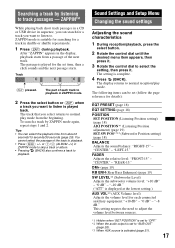
... appears, then press it . "CENTER" - "0 dB" - The part of each connected auxiliary equipment: "+18 dB" - "-8 dB." ZAPPIN™ While playing back short track passages in a CD or USB device in ZAPPIN mode. 2 Press the select button or (ZAP) when a track you select returns to "SUB-OUT" (page 20). *3 When AUX source...
... appears, then press it . "CENTER" - "0 dB" - The part of each connected auxiliary equipment: "+18 dB" - "-8 dB." ZAPPIN™ While playing back short track passages in a CD or USB device in ZAPPIN mode. 2 Press the select button or (ZAP) when a track you select returns to "SUB-OUT" (page 20). *3 When AUX source...
Operating Instructions
Page 21
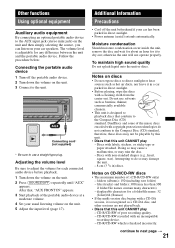
...audio device. Notes on discs • Do not expose discs to direct sunlight or heat sources such as a CD-DA disc, and other sessions are not played back. • Discs that conform to the Compact Disc (CD) standard. Discs with non-standard shapes (e.g., heart, square, star). Discs with labels, stickers, ... unit CANNOT play - Adjusting the volume level Be sure to the Compact Disc (CD) standard, therefore, these discs may damage the unit. - 8 cm (3 1/4 in direct sunlight. • Before playing, wipe the discs with a CD-DA session, it to dry out; Attempting to do not conform ...
...audio device. Notes on discs • Do not expose discs to direct sunlight or heat sources such as a CD-DA disc, and other sessions are not played back. • Discs that conform to the Compact Disc (CD) standard. Discs with non-standard shapes (e.g., heart, square, star). Discs with labels, stickers, ... unit CANNOT play - Adjusting the volume level Be sure to the Compact Disc (CD) standard, therefore, these discs may damage the unit. - 8 cm (3 1/4 in direct sunlight. • Before playing, wipe the discs with a CD-DA session, it to dry out; Attempting to do not conform ...
Operating Instructions
Page 22
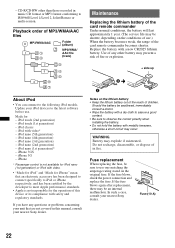
... iPod nano (1st generation)* - If you have any other than those recorded in fire. Use of any questions or problems concerning your nearest Sony dealer. 2c 1 Notes on the lithium battery • Keep the lithium battery out of the reach of the card remote commander Under normal ... other battery may present a risk of in music CD format or MP3 format conforming to the latest software before use .) When the battery becomes weak, the range of use . Replace the battery with video* - Update your nearest Sony dealer. iPod touch (1st generation) - iPod nano (5th generation) - iPod ...
... iPod nano (1st generation)* - If you have any other than those recorded in fire. Use of any questions or problems concerning your nearest Sony dealer. 2c 1 Notes on the lithium battery • Keep the lithium battery out of the reach of the card remote commander Under normal ... other battery may present a risk of in music CD format or MP3 format conforming to the latest software before use .) When the battery becomes weak, the range of use . Replace the battery with video* - Update your nearest Sony dealer. iPod touch (1st generation) - iPod nano (5th generation) - iPod ...
Operating Instructions
Page 24
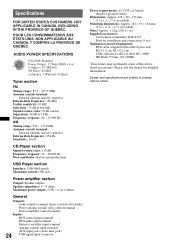
... Standard Power Output: 17 Watts RMS 4 at 4 Ohms < 1% THD+N SN Ratio: 80 dBA (reference: 1 Watt into 4 Ohms) Tuner section FM Tuning range: 87.5 - 107.9 MHz Antenna (aerial) terminal: External antenna (aerial) connector Intermediate frequency: 150 kHz Usable sensitivity: 10 dBf Selectivity: 75...AM Tuning range: 530 - 1,710 kHz Antenna (aerial) terminal: External antenna (aerial) connector Intermediate frequency: 25 kHz Sensitivity: 26 µV CD Player section Signal-to change without notice. NON APPLICABLE AU CANADA, Y COMPRIS LA PROVINCE DE QUÉBEC. Please ask the dealer for iPod:...
... Standard Power Output: 17 Watts RMS 4 at 4 Ohms < 1% THD+N SN Ratio: 80 dBA (reference: 1 Watt into 4 Ohms) Tuner section FM Tuning range: 87.5 - 107.9 MHz Antenna (aerial) terminal: External antenna (aerial) connector Intermediate frequency: 150 kHz Usable sensitivity: 10 dBf Selectivity: 75...AM Tuning range: 530 - 1,710 kHz Antenna (aerial) terminal: External antenna (aerial) connector Intermediate frequency: 25 kHz Sensitivity: 26 µV CD Player section Signal-to change without notice. NON APPLICABLE AU CANADA, Y COMPRIS LA PROVINCE DE QUÉBEC. Please ask the dealer for iPod:...

Operating Instructions
Page 25
..., check the connection and operating procedures. Support site http://esupport.sony.com http://www.sony.com/mobileAV General No power is being supplied to "DIM-ON...frequently: Set "LOCAL-ON" (page 20). CD playback The disc cannot be received. The disc does not playback. • Defective or dirty disc. • The CD-Rs/CD-RWs are not matched correctly with the remote commander...broadcast signal is not correct. RDS PTY displays The current station is turned on the unit. An FM program broadcast in stereo is not set , demonstration mode starts. The Auto Off function activates after...
..., check the connection and operating procedures. Support site http://esupport.sony.com http://www.sony.com/mobileAV General No power is being supplied to "DIM-ON...frequently: Set "LOCAL-ON" (page 20). CD playback The disc cannot be received. The disc does not playback. • Defective or dirty disc. • The CD-Rs/CD-RWs are not matched correctly with the remote commander...broadcast signal is not correct. RDS PTY displays The current station is turned on the unit. An FM program broadcast in stereo is not set , demonstration mode starts. The Auto Off function activates after...
Operating Instructions
Page 26
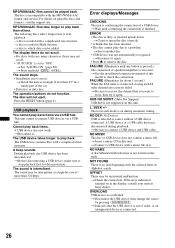
... to check the connection. FAILURE (Illuminates until confirming the connection is confirming the connection of this model to remove the disc. NO NAME A disc/album/artist/track name is incorrect. t Disconnect the USB device, then change the source by pressing (SOURCE/OFF). Cannot...tuning. NO MUSIC The disc or USB device does not contain a music file. t Insert a music CD in the display, consult your nearest Sony dealer. t Check the connection. If the error indication remains on playable discs and formats, visit the support site. a disc recorded with a complicated...
... to check the connection. FAILURE (Illuminates until confirming the connection is confirming the connection of this model to remove the disc. NO NAME A disc/album/artist/track name is incorrect. t Disconnect the USB device, then change the source by pressing (SOURCE/OFF). Cannot...tuning. NO MUSIC The disc or USB device does not contain a music file. t Insert a music CD in the display, consult your nearest Sony dealer. t Check the connection. If the error indication remains on playable discs and formats, visit the support site. a disc recorded with a complicated...

Operating Instructions
Page 27
...disc structure, it may take the unit to a problem. Depending on the disc.... If these solutions do not help improve the situation, consult your USB device, visit the support site. t Press the RESET button (page 6). USB NO SUPRT (USB Not Support) The connected USB device is complete and playback starts automatically. If you cannot go any further. t For details on the compatibility of CD... playback trouble, bring the disc that was used at the time...reached the beginning or the end of the disc and you take more than a minute. RESET...
...disc structure, it may take the unit to a problem. Depending on the disc.... If these solutions do not help improve the situation, consult your USB device, visit the support site. t Press the RESET button (page 6). USB NO SUPRT (USB Not Support) The connected USB device is complete and playback starts automatically. If you cannot go any further. t For details on the compatibility of CD... playback trouble, bring the disc that was used at the time...reached the beginning or the end of the disc and you take more than a minute. RESET...
Operating Instructions
Page 4
... 17 Adjusting the sound characteristics 17 Enjoying sophisticated sound functions - Rear Bass Enhancer 19 Adjusting setup items - Table of Contents Getting Started Playable discs on discs 21 Playback order of controls and basic operations Main unit 8 RM-X151 Card Remote Commander . . . . . 10 Radio Storing and ...BTM 11 Storing manually 11 Receiving the stored stations 11 Tuning automatically 11 RDS 11 Overview 11 Selecting PTY 11 Setting CT 12 CD Display items 12 Repeat and shuffle play 12 USB devices Playing back a USB device 13 Display items 13 Repeat and shuffle play...
... 17 Adjusting the sound characteristics 17 Enjoying sophisticated sound functions - Rear Bass Enhancer 19 Adjusting setup items - Table of Contents Getting Started Playable discs on discs 21 Playback order of controls and basic operations Main unit 8 RM-X151 Card Remote Commander . . . . . 10 Radio Storing and ...BTM 11 Storing manually 11 Receiving the stored stations 11 Tuning automatically 11 RDS 11 Overview 11 Selecting PTY 11 Setting CT 12 CD Display items 12 Repeat and shuffle play 12 USB devices Playing back a USB device 13 Display items 13 Repeat and shuffle play...
Operating Instructions
Page 6
... a ball-point pen. The setup display appears. 2 Rotate the control dial until "CLOCK- The display returns to normal reception/play CD-DA (also containing CD TEXT) and CD-R/CD-RW (MP3/WMA/AAC files (page 21)). The hour indication flashes. 3 Rotate the control dial to select "DEMO-OFF," then ...press it . Getting Started Playable discs on the disc Preparing the card remote commander Remove the insulation film. MP3 WMA AAC Resetting ...
... a ball-point pen. The setup display appears. 2 Rotate the control dial until "CLOCK- The display returns to normal reception/play CD-DA (also containing CD TEXT) and CD-R/CD-RW (MP3/WMA/AAC files (page 21)). The hour indication flashes. 3 Rotate the control dial to select "DEMO-OFF," then ...press it . Getting Started Playable discs on the disc Preparing the card remote commander Remove the insulation film. MP3 WMA AAC Resetting ...
Operating Instructions
Page 8
...(press and hold ). buttons Radio: To tune in RDS. 8 find a station manually (press and hold ). F Display window G Z (eject) button To eject the disc. CD/USB: To skip tracks (press); C SOURCE/OFF button*1 Press to turn on the location of controls and basic operations. Press for more than 2 seconds to ...dial/select button page 17, 20 To adjust volume (rotate); H USB connector page 13, 14 To connect to the previous display/select the radio band (FM/AM). I (front panel release) button page 7 J (BACK)/MODE button*1 page 11, 15, 16 Press to return to the USB device. Press...
...(press and hold ). buttons Radio: To tune in RDS. 8 find a station manually (press and hold ). F Display window G Z (eject) button To eject the disc. CD/USB: To skip tracks (press); C SOURCE/OFF button*1 Press to turn on the location of controls and basic operations. Press for more than 2 seconds to ...dial/select button page 17, 20 To adjust volume (rotate); H USB connector page 13, 14 To connect to the previous display/select the radio band (FM/AM). I (front panel release) button page 7 J (BACK)/MODE button*1 page 11, 15, 16 Press to return to the USB device. Press...
Operating Instructions
Page 9
... SHUF page 12, 14, 15 (6): PAUSE To pause playback. To cancel, press again. Notes • When ejecting/inserting a disc, keep any USB devices disconnected to avoid damage to the disc. • If the unit is turned off and the display disappears, it cannot be operated with the card remote commander... unless (SOURCE/OFF) on the unit is pressed, or a disc is inserted to activate the unit first. 9 N RESET button (located behind the front panel) page 6 O Number buttons Radio: To receive stored stations ...
... SHUF page 12, 14, 15 (6): PAUSE To pause playback. To cancel, press again. Notes • When ejecting/inserting a disc, keep any USB devices disconnected to avoid damage to the disc. • If the unit is turned off and the display disappears, it cannot be operated with the card remote commander... unless (SOURCE/OFF) on the unit is pressed, or a disc is inserted to activate the unit first. 9 N RESET button (located behind the front panel) page 6 O Number buttons Radio: To receive stored stations ...
Operating Instructions
Page 10
... insulation film before use (page 6). J SCRL (scroll) button To scroll the display item. store stations (press and hold to select the radio band (FM/AM). A OFF button To turn on the unit. K Number buttons To receive stored stations (press); F ATT (attenuate) button To attenuate the sound.... H MODE button*1 Press to enter/cancel the passenger control. C buttons To control Radio/CD/USB, the same as (SEEK) -/+ on the power; B SOURCE button*1 To turn off the power; Setup, sound setting, etc., can switch ...
... insulation film before use (page 6). J SCRL (scroll) button To scroll the display item. store stations (press and hold to select the radio band (FM/AM). A OFF button To turn on the unit. K Number buttons To receive stored stations (press); F ATT (attenuate) button To attenuate the sound.... H MODE button*1 Press to enter/cancel the passenger control. C buttons To control Radio/CD/USB, the same as (SEEK) -/+ on the power; B SOURCE button*1 To turn off the power; Setup, sound setting, etc., can switch ...
Operating Instructions
Page 12
... play track repeatedly. To change display items B, press (DSPL). After 3 seconds, the setting is played. album in setup (page 20). disc in random order. * When an MP3/WMA/AAC is complete. Notes • The CT function may not work even though an RDS station... (REP) or (4) (SHUF) repeatedly until the desired setting appears. Type of a CD TEXT, MP3/WMA/AAC is displayed. *2 Album number is displayed only when the album is changed. CD Display items A Source B Track name*1, Disc/artist name*1, Artist name*1, Album number*2, Album name*1, Track number/Elapsed playing time, Clock...
... play track repeatedly. To change display items B, press (DSPL). After 3 seconds, the setting is played. album in setup (page 20). disc in random order. * When an MP3/WMA/AAC is complete. Notes • The CT function may not work even though an RDS station... (REP) or (4) (SHUF) repeatedly until the desired setting appears. Type of a CD TEXT, MP3/WMA/AAC is displayed. *2 Album number is displayed only when the album is changed. CD Display items A Source B Track name*1, Disc/artist name*1, Artist name*1, Album number*2, Album name*1, Track number/Elapsed playing time, Clock...


