
AL-1655CS Operation Manual
Page 20
... is no paper in the bypass tray. *1 The number of sheets of paper that have metal clasps, plastic snappers, strings, windows, linings, self-adhesive strips, patches or synthetic materials. to 21 lbs. (56 g/m2 to 80 g/m2) 250 sheets *1...loaded varies depending on the tray) 50 sheets *1 Thick paper Transparency film/Labels Envelopes *2 Monarch (3-7/8" x 7-1/2") Commercial 9 (3-7/8" x 8-7/8") Commercial 10 (4-1/8" x 9-1/2") 14 lbs. Load one (52 g/m2 to 34.5 lbs. 2 Chapter 2 LOADING PAPER The tray location indicator will damage the machine. *3 When loading paper larger than ...
... is no paper in the bypass tray. *1 The number of sheets of paper that have metal clasps, plastic snappers, strings, windows, linings, self-adhesive strips, patches or synthetic materials. to 21 lbs. (56 g/m2 to 80 g/m2) 250 sheets *1...loaded varies depending on the tray) 50 sheets *1 Thick paper Transparency film/Labels Envelopes *2 Monarch (3-7/8" x 7-1/2") Commercial 9 (3-7/8" x 8-7/8") Commercial 10 (4-1/8" x 9-1/2") 14 lbs. Load one (52 g/m2 to 34.5 lbs. 2 Chapter 2 LOADING PAPER The tray location indicator will damage the machine. *3 When loading paper larger than ...
AL-1655CS Operation Manual
Page 46
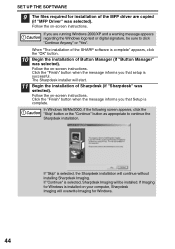
... when the message informs you that Setup is complete" appears, click the "OK" button. 10 Begin the installation of Button Manager (if "Button Manager" was selected). If Imaging for Windows is successful. Follow the on -screen instructions. If "Skip" is selected, Sharpdesk Imaging will... overwrite Imaging for Windows. 44 When "The installation of the SHARP software is complete. If "Continue" is selected, the Sharpdesk installation will start. 11 Begin the installation of Sharpdesk ...
... when the message informs you that Setup is complete" appears, click the "OK" button. 10 Begin the installation of Button Manager (if "Button Manager" was selected). If Imaging for Windows is successful. Follow the on -screen instructions. If "Skip" is selected, Sharpdesk Imaging will... overwrite Imaging for Windows. 44 When "The installation of the SHARP software is complete. If "Continue" is selected, the Sharpdesk installation will start. 11 Begin the installation of Sharpdesk ...
AL-1655CS Operation Manual
Page 51
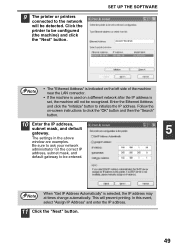
...; If the machine is used on -screen instructions to click the "OK" button and then the "Search" button. 10 Enter the IP address, subnet mask, and default gateway. 5 The settings in the above window are examples. 9 The printer or printers connected to the network will be configured (the machine) and click the...
...; If the machine is used on -screen instructions to click the "OK" button and then the "Search" button. 10 Enter the IP address, subnet mask, and default gateway. 5 The settings in the above window are examples. 9 The printer or printers connected to the network will be configured (the machine) and click the...

AL-1655CS Operation Manual
Page 52
LPR (TCP/IP) direct printing After step 1-7 on page 48. 9 Read the message in first and go to step 11 on page 51. SET UP THE SOFTWARE 12 Click the "Yes" button. If you have not set the IP Address, click the "Set the IP Address" button in the "Welcome" window and then click the "Next" button. 10 Select "LPR (TCP/IP) direct printing" and click the "Next" button. 50 Go to step 8 on page 47-48 8 Click the "Printer Driver" button.
LPR (TCP/IP) direct printing After step 1-7 on page 48. 9 Read the message in first and go to step 11 on page 51. SET UP THE SOFTWARE 12 Click the "Yes" button. If you have not set the IP Address, click the "Set the IP Address" button in the "Welcome" window and then click the "Next" button. 10 Select "LPR (TCP/IP) direct printing" and click the "Next" button. 50 Go to step 8 on page 47-48 8 Click the "Printer Driver" button.

AL-1655CS Operation Manual
Page 56
... the model name of your machine and click the "Next" button. This completes the installation of your machine, see the operation panel on the machine. 10 Follow the on-screen instructions. 11 When the "Finish" screen appears, click the "Close" button. SET UP THE SOFTWARE 8 For the port to ...be shared (the machine) by browsing the network in the printer server. 9 When the model selection window appears, select model name of the software. 54 In this case, click the "Yes" button to restart your computer. Note If the shared printer does...
... the model name of your machine and click the "Next" button. This completes the installation of your machine, see the operation panel on the machine. 10 Follow the on-screen instructions. 11 When the "Finish" screen appears, click the "Close" button. SET UP THE SOFTWARE 8 For the port to ...be shared (the machine) by browsing the network in the printer server. 9 When the model selection window appears, select model name of the software. 54 In this case, click the "Yes" button to restart your computer. Note If the shared printer does...
AL-1655CS Operation Manual
Page 100
... VARY FROM JURISDICTION TO JURISDICTION. 7. SHOULD THE SOFTWARE PROVE DEFECTIVE, YOU (AND NOT SHARP OR A SHARP AUTHORIZED REPRESENTATIVE) ASSUME THE ENTIRE COST OF ALL NECESSARY SERVICING, REPAIR OR CORRECTION, SOME... 6. This License constitutes the entire agreement between the parties with Apple Macintosh and Microsoft Windows, this License will be free from defects in accordance with a copy of the Software...portion of this license shall be binding unless in full force and effect. 10. No amendment to or modification of the Software related with respect to replace a disk damaged...
... VARY FROM JURISDICTION TO JURISDICTION. 7. SHOULD THE SOFTWARE PROVE DEFECTIVE, YOU (AND NOT SHARP OR A SHARP AUTHORIZED REPRESENTATIVE) ASSUME THE ENTIRE COST OF ALL NECESSARY SERVICING, REPAIR OR CORRECTION, SOME... 6. This License constitutes the entire agreement between the parties with Apple Macintosh and Microsoft Windows, this License will be free from defects in accordance with a copy of the Software...portion of this license shall be binding unless in full force and effect. 10. No amendment to or modification of the Software related with respect to replace a disk damaged...
AL-1655CS Operation Manual
Page 121
... 79 Reversing tray 9, 83 Roller 83 Roller rotating knob 82 ROPM 59 RSPF 9, 25, 32, 34, 37, 83, 89 RSPF indicator 10, 25, 80 RSPF roller 89 RSPF scanning window 89 S Scan head lamp 17 Scan head locking switch 13 Scanner driver 40 Scanning from the operation panel .. 61 Scanning from your... 69 Selecting the tray 27 Set the IP address 48 Set up the software 40 Setting the number of copies 27 Setting up button manager - Windows XP 55 Sharing the printer 52 Sharpdesk 40 Short edge 30, 38 Side cover 9 Side cover open button 9 Sort copy 33 Special papers 19 Specifications...
... 79 Reversing tray 9, 83 Roller 83 Roller rotating knob 82 ROPM 59 RSPF 9, 25, 32, 34, 37, 83, 89 RSPF indicator 10, 25, 80 RSPF roller 89 RSPF scanning window 89 S Scan head lamp 17 Scan head locking switch 13 Scanner driver 40 Scanning from the operation panel .. 61 Scanning from your... 69 Selecting the tray 27 Set the IP address 48 Set up the software 40 Setting the number of copies 27 Setting up button manager - Windows XP 55 Sharing the printer 52 Sharpdesk 40 Short edge 30, 38 Side cover 9 Side cover open button 9 Sort copy 33 Special papers 19 Specifications...


