
AL-1651CS | AL-1661CS Operation Manual
Page 6
and other countries. • Windows® 95, Windows® 98, Windows® Me, Windows NT® 4.0, Windows® 2000, and Windows® XP are trademarks or copyrights of Microsoft Corporation in the U.S.A. Store spare supplies such as follows to maintain ...the drum cartridge. • Doing so will damage the surface (green portion) of Microsoft Corporation in the U.S.A. Trademark acknowledgements • Microsoft® Windows® operating system is a trademark or copyright of the drum cartridge, causing smudges on copies. Do not drop the machine, subject it to shock...
and other countries. • Windows® 95, Windows® 98, Windows® Me, Windows NT® 4.0, Windows® 2000, and Windows® XP are trademarks or copyrights of Microsoft Corporation in the U.S.A. Store spare supplies such as follows to maintain ...the drum cartridge. • Doing so will damage the surface (green portion) of Microsoft Corporation in the U.S.A. Trademark acknowledgements • Microsoft® Windows® operating system is a trademark or copyright of the drum cartridge, causing smudges on copies. Do not drop the machine, subject it to shock...
AL-1651CS | AL-1661CS Operation Manual
Page 8
...one of its components may result if the contents of driver screens and other operating systems. • The explanations in this manual in a handy location. Some of the names that appear in these illustrations may differ slightly from the screens that appear in other computer screens show the AL-1651CS...use of the caution are as follows: Operation Manual (this manual) Explains the machine and how to provide convenient copying features in Windows XP Home Edition. Also explains how to install the software that allows the machine to be sure to familiarize yourself with information ...
...one of its components may result if the contents of driver screens and other operating systems. • The explanations in this manual in a handy location. Some of the names that appear in these illustrations may differ slightly from the screens that appear in other computer screens show the AL-1651CS...use of the caution are as follows: Operation Manual (this manual) Explains the machine and how to provide convenient copying features in Windows XP Home Edition. Also explains how to install the software that allows the machine to be sure to familiarize yourself with information ...

AL-1651CS | AL-1661CS Operation Manual
Page 20
...g/m2) 8-1/2" x 13" (Foolscap) 8-1/2" x 14" (Legal) Bypass tray Standard paper 3-1/2" x 5-1/2" to 34.5 lbs. Load one (52 g/m2 to sheet at a 128 g/m2)*3 time in the selected paper tray, or when the selected paper tray is not installed...m2 to 21 lbs. PAPER For best results, use paper of paper that have metal clasps, plastic snappers, strings, windows, linings, self-adhesive strips, patches or synthetic materials. These will blink when there is no paper in the bypass tray.... *3 When loading paper larger than 8-1/2" x 11" (A4) size, do not use only SHARP recommended paper.
...g/m2) 8-1/2" x 13" (Foolscap) 8-1/2" x 14" (Legal) Bypass tray Standard paper 3-1/2" x 5-1/2" to 34.5 lbs. Load one (52 g/m2 to sheet at a 128 g/m2)*3 time in the selected paper tray, or when the selected paper tray is not installed...m2 to 21 lbs. PAPER For best results, use paper of paper that have metal clasps, plastic snappers, strings, windows, linings, self-adhesive strips, patches or synthetic materials. These will blink when there is no paper in the bypass tray.... *3 When loading paper larger than 8-1/2" x 11" (A4) size, do not use only SHARP recommended paper.
AL-1651CS | AL-1661CS Operation Manual
Page 23
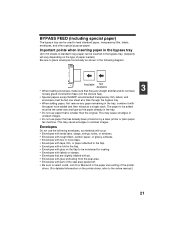
... envelopes, as a single stack. The paper to be added must be fed one sheet at a time through the bypass tray. • When adding paper, ... 3 loosely glued construction flaps (not the closure flap). • Special papers except SHARP recommended transparency film, labels, and envelopes must be used to feed standard paper, transparency... tray. (Capacity will occur. • Envelopes with metal tabs, clasps, strings, holes, or windows. • Envelopes with rough fibers, carbon paper, or glossy surfaces. • Envelopes with two... on by a laser printer or plain paper fax machine.
... envelopes, as a single stack. The paper to be added must be fed one sheet at a time through the bypass tray. • When adding paper, ... 3 loosely glued construction flaps (not the closure flap). • Special papers except SHARP recommended transparency film, labels, and envelopes must be used to feed standard paper, transparency... tray. (Capacity will occur. • Envelopes with metal tabs, clasps, strings, holes, or windows. • Envelopes with rough fibers, carbon paper, or glossy surfaces. • Envelopes with two... on by a laser printer or plain paper fax machine.

AL-1651CS | AL-1661CS Operation Manual
Page 42
... allows you to use the scanning function of the machine with computers that accompanied the machine simply as a network printer. If you are running Windows 98/Me/2000/XP and are connected to the machine by a LAN connection, only the printer function can be used as "CD-ROM". ...with TWAIN-compliant and WIA-compliant applications. Please note that the Print Status Window does not operate when the machine is also explained. The procedure for the printer and scanner functions of the machine. SOFTWARE FOR AL-1651CS/1661CS The CD-ROM that makes it easy to manage documents and image...
... allows you to use the scanning function of the machine with computers that accompanied the machine simply as a network printer. If you are running Windows 98/Me/2000/XP and are connected to the machine by a LAN connection, only the printer function can be used as "CD-ROM". ...with TWAIN-compliant and WIA-compliant applications. Please note that the Print Status Window does not operate when the machine is also explained. The procedure for the printer and scanner functions of the machine. SOFTWARE FOR AL-1651CS/1661CS The CD-ROM that makes it easy to manage documents and image...
AL-1651CS | AL-1661CS Operation Manual
Page 43
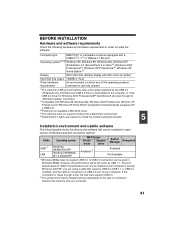
...Speed) only if the Microsoft USB 2.0 driver is preinstalled in the computer, or if the USB 2.0 driver for Windows 2000 Professional/XP that Microsoft provides through a hub, the hub must support USB 2.0. *2 The printer driver that ...Windows 95, Windows 98, Windows Me, Windows NT Workstation 4.0 (ServicePack 5 or later)*5, Windows 2000 Professional*5, Windows XP Professional*5, Windows XP Home Edition*5 Display 800 x 600 dots (SVGA) display with a USB port. *3 Printing is installed. *2 Compatible with Windows 98, Windows Me, Windows 2000 Professional, Windows XP Professional or Windows...
...Speed) only if the Microsoft USB 2.0 driver is preinstalled in the computer, or if the USB 2.0 driver for Windows 2000 Professional/XP that Microsoft provides through a hub, the hub must support USB 2.0. *2 The printer driver that ...Windows 95, Windows 98, Windows Me, Windows NT Workstation 4.0 (ServicePack 5 or later)*5, Windows 2000 Professional*5, Windows XP Professional*5, Windows XP Home Edition*5 Display 800 x 600 dots (SVGA) display with a USB port. *3 Printing is installed. *2 Compatible with Windows 98, Windows Me, Windows 2000 Professional, Windows XP Professional or Windows...

AL-1651CS | AL-1661CS Operation Manual
Page 44
...double click the "setup" icon, select the language that you understand the contents of Internet Explorer 5.01 will be connected in the "Welcome" window and then click the "Next" button. 42 Make sure that you wish to use a different connection method after installing the software using a ...USB or network connection, you must not be connected to the machine. After the problem is connected, a Plug and Play window will appear. If this case, reinstall the software from the beginning after solving the problem. • When installing Sharpdesk, a minimal version of the...
...double click the "setup" icon, select the language that you understand the contents of Internet Explorer 5.01 will be connected in the "Welcome" window and then click the "Next" button. 42 Make sure that you wish to use a different connection method after installing the software using a ...USB or network connection, you must not be connected to the machine. After the problem is connected, a Plug and Play window will appear. If this case, reinstall the software from the beginning after solving the problem. • When installing Sharpdesk, a minimal version of the...

AL-1651CS | AL-1661CS Operation Manual
Page 45
.... If you selected "Custom", go to be 5 installed and then click the "Next" button. Go to step 14. 9 If you selected "Standard" in the "Welcome" window and then click the "Next" button. Click the "Display README" button to be displayed on the screen, and then click the "Start" button. If an...
.... If you selected "Custom", go to be 5 installed and then click the "Next" button. Go to step 14. 9 If you selected "Standard" in the "Welcome" window and then click the "Next" button. Click the "Display README" button to be displayed on the screen, and then click the "Start" button. If an...
AL-1651CS | AL-1661CS Operation Manual
Page 46
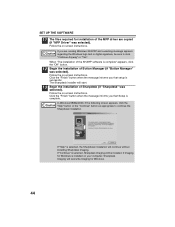
...Caution regarding the Windows logo test or digital signature, be installed. Follow the on -screen instructions. Follow the on your computer, Sharpdesk Imaging will be sure to continue the Sharpdesk installation. The Sharpdesk installer will start. 13 Begin the installation of the SHARP software is selected,... Sharpdesk Imaging will overwrite Imaging for Windows. 44 When "The installation of Sharpdesk (if "Sharpdesk" was selected).
...Caution regarding the Windows logo test or digital signature, be installed. Follow the on -screen instructions. Follow the on your computer, Sharpdesk Imaging will be sure to continue the Sharpdesk installation. The Sharpdesk installer will start. 13 Begin the installation of the SHARP software is selected,... Sharpdesk Imaging will overwrite Imaging for Windows. 44 When "The installation of Sharpdesk (if "Sharpdesk" was selected).

AL-1651CS | AL-1661CS Operation Manual
Page 47
...Finish" screen will appear after several minutes. • After the installation, a message prompting you are running Windows 2000/XP and a warning message appears Caution regarding the Windows logo test or digital signature, be sure to your computer. 15 Make sure that the power of the ... mode is turned on your computer may appear prior to restart your computer. "SHARP AL-XXXXCS" will appear instructing you are running Windows 2000/XP and a warning message appears Caution regarding the Windows logo test or digital signature, be sure to restart your computer screen, close...
...Finish" screen will appear after several minutes. • After the installation, a message prompting you are running Windows 2000/XP and a warning message appears Caution regarding the Windows logo test or digital signature, be sure to your computer. 15 Make sure that the power of the ... mode is turned on your computer may appear prior to restart your computer. "SHARP AL-XXXXCS" will appear instructing you are running Windows 2000/XP and a warning message appears Caution regarding the Windows logo test or digital signature, be sure to restart your computer screen, close...

AL-1651CS | AL-1661CS Operation Manual
Page 48
... card. • Connection is also possible using a computer that was originally equipped with USB and had Windows 98, Windows Me, Windows 2000 Professional, Windows XP Professional or Windows XP Home Edition preinstalled. • Do not connect the USB cable before installing the MFP driver. A... regarding the Windows logo test or digital signature, be connected during installation of Windows to "HI-SPEED". For more information, see "USER PROGRAMS" (p.68). • Use the machine's "HI-SPEED" mode only when using a USB 1.1 port on -screen instructions. "SHARP AL-XXXXCS" will...
... card. • Connection is also possible using a computer that was originally equipped with USB and had Windows 98, Windows Me, Windows 2000 Professional, Windows XP Professional or Windows XP Home Edition preinstalled. • Do not connect the USB cable before installing the MFP driver. A... regarding the Windows logo test or digital signature, be connected during installation of Windows to "HI-SPEED". For more information, see "USER PROGRAMS" (p.68). • Use the machine's "HI-SPEED" mode only when using a USB 1.1 port on -screen instructions. "SHARP AL-XXXXCS" will...

AL-1651CS | AL-1661CS Operation Manual
Page 49
... interface cable. The scanner function cannot be used if the machine is connected with a LAN cable. • To install the software using a network connection in Windows 95, Internet Explorer version 4.01 or later must be installed on the machine. 5 Use a network cable that is not installed, double-click "My Computer" and... then double-click the CD-ROM icon. In Windows 95/98/Me/NT 4.0/2000, double-click "My Computer", and then double-click the CD-ROM icon. 47
... interface cable. The scanner function cannot be used if the machine is connected with a LAN cable. • To install the software using a network connection in Windows 95, Internet Explorer version 4.01 or later must be installed on the machine. 5 Use a network cable that is not installed, double-click "My Computer" and... then double-click the CD-ROM icon. In Windows 95/98/Me/NT 4.0/2000, double-click "My Computer", and then double-click the CD-ROM icon. 47

AL-1651CS | AL-1661CS Operation Manual
Page 50
...Address This setting is already connected to use and click the "Next" button. (Normally the correct language is selected automatically.) 6 The "SOFTWARE LICENCE" window will appear. Note If the language selection screen appears after you double click the "setup" icon, select the language that you wish to the network... has been set the IP address of the software licence, and then click the "Yes" button. 7 Read the "Readme First" in the "Welcome" window and then click the "Next" button. If the machine is only required once when using the machine on a network. 8 Click the "Set the IP...
...Address This setting is already connected to use and click the "Next" button. (Normally the correct language is selected automatically.) 6 The "SOFTWARE LICENCE" window will appear. Note If the language selection screen appears after you double click the "setup" icon, select the language that you wish to the network... has been set the IP address of the software licence, and then click the "Yes" button. 7 Read the "Readme First" in the "Welcome" window and then click the "Next" button. If the machine is only required once when using the machine on a network. 8 Click the "Set the IP...

AL-1651CS | AL-1661CS Operation Manual
Page 51
... to click the "OK" button and then the "Search" button. 10 Enter the IP address, subnet mask, and default gateway. 5 The settings in the above window are examples. This will not be entered. Enter the Ethernet Address and click the "Initialize" button to be recognized. 9 The printer or printers connected to...
... to click the "OK" button and then the "Search" button. 10 Enter the IP address, subnet mask, and default gateway. 5 The settings in the above window are examples. This will not be entered. Enter the Ethernet Address and click the "Initialize" button to be recognized. 9 The printer or printers connected to...
AL-1651CS | AL-1661CS Operation Manual
Page 52
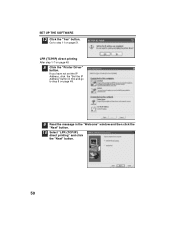
Go to step 8 on page 51. If you have not set the IP Address, click the "Set the IP Address" button in first and go to step 11 on page 48. 9 Read the message in the "Welcome" window and then click the "Next" button. 10 Select "LPR (TCP/IP) direct printing" and click the "Next" button. 50 LPR (TCP/IP) direct printing After step 1-7 on page 48 8 Click the "Printer Driver" button. SET UP THE SOFTWARE 12 Click the "Yes" button.
Go to step 8 on page 51. If you have not set the IP Address, click the "Set the IP Address" button in first and go to step 11 on page 48. 9 Read the message in the "Welcome" window and then click the "Next" button. 10 Select "LPR (TCP/IP) direct printing" and click the "Next" button. 50 LPR (TCP/IP) direct printing After step 1-7 on page 48 8 Click the "Printer Driver" button. SET UP THE SOFTWARE 12 Click the "Yes" button.

AL-1651CS | AL-1661CS Operation Manual
Page 53
... "Next" button. Click the printer to the network will be detected. Make sure that ":lp" appears at the end of 38 characters). 5 13 A window appears to the appropriate window and correct the entry. 51 SET UP THE SOFTWARE Note If the machine's IP address cannot be found, make sure the machine is... powered on, make sure the network cable is connected correctly, and then click the "Search" button. 12 In the window for setting the destination print port name, make sure that the entries are incorrect, click the "Back" button to return to let you check your...
... "Next" button. Click the printer to the network will be detected. Make sure that ":lp" appears at the end of 38 characters). 5 13 A window appears to the appropriate window and correct the entry. 51 SET UP THE SOFTWARE Note If the machine's IP address cannot be found, make sure the machine is... powered on, make sure the network cable is connected correctly, and then click the "Search" button. 12 In the window for setting the destination print port name, make sure that the entries are incorrect, click the "Back" button to return to let you check your...

AL-1651CS | AL-1661CS Operation Manual
Page 54
...a network, follow these steps to restart your computer. In this step. This completes the installation of the SHARP software is selected automatically.) 52 Note To configure the appropriate settings in the "Welcome" window and then click the "Next" button. 15 Select whether or not you are running... may appear before this case, click the "Yes" button to install the printer driver in the client computer. Sharing the printer using windows networking If the machine will be your default printer and click the "Next" button. Note After the installation, a message prompting you wish...
...a network, follow these steps to restart your computer. In this step. This completes the installation of the SHARP software is selected automatically.) 52 Note To configure the appropriate settings in the "Welcome" window and then click the "Next" button. 15 Select whether or not you are running... may appear before this case, click the "Yes" button to install the printer driver in the client computer. Sharing the printer using windows networking If the machine will be your default printer and click the "Next" button. Note After the installation, a message prompting you wish...

AL-1651CS | AL-1661CS Operation Manual
Page 55
SET UP THE SOFTWARE 4 The "SOFTWARE LICENCE" window will appear. Make sure that you understand the contents of the software licence, and then click the "Yes" button. 5 Click the "Printer Driver" button. 6 Read the message in the "Welcome" window and then click the "Next" button. 7 Select "Shared Printer" and click the "Next" 5 button. 53
SET UP THE SOFTWARE 4 The "SOFTWARE LICENCE" window will appear. Make sure that you understand the contents of the software licence, and then click the "Yes" button. 5 Click the "Printer Driver" button. 6 Read the message in the "Welcome" window and then click the "Next" button. 7 Select "Shared Printer" and click the "Next" 5 button. 53

AL-1651CS | AL-1661CS Operation Manual
Page 56
Note If the shared printer does not appear in the list, check the settings in the window that appears. For the model name of the software. 54 Note After the installation, a message prompting you to restart your computer. This completes the installation ..." button. SET UP THE SOFTWARE 8 For the port to be shared (the machine) by browsing the network in the printer server. 9 When the model selection window appears, select model name of your machine, see the operation panel on the machine. 10 Follow the on-screen instructions. 11 When the "Finish" screen...
Note If the shared printer does not appear in the list, check the settings in the window that appears. For the model name of the software. 54 Note After the installation, a message prompting you to restart your computer. This completes the installation ..." button. SET UP THE SOFTWARE 8 For the port to be shared (the machine) by browsing the network in the printer server. 9 When the model selection window appears, select model name of your machine, see the operation panel on the machine. 10 Follow the on-screen instructions. 11 When the "Finish" screen...

AL-1651CS | AL-1661CS Operation Manual
Page 57
Windows XP 1 Click the "start" button, click "Control Panel", click "Printers and Other Hardware", and then click "Scanners and Cameras". 2 Click the "SHARP AL-XXXXCS" icon and select "Properties" from the "File" menu. 3 In the "Properties" screen, click the "Events" tab. 4 Select "SC1:" from the machine. SETTING UP BUTTON ...
Windows XP 1 Click the "start" button, click "Control Panel", click "Printers and Other Hardware", and then click "Scanners and Cameras". 2 Click the "SHARP AL-XXXXCS" icon and select "Properties" from the "File" menu. 3 In the "Properties" screen, click the "Events" tab. 4 Select "SC1:" from the machine. SETTING UP BUTTON ...


