
AL-1631 | AL-1641CS Operation Manual
Page 5
...THE PAPER TRAY..... 15 OF COPIES 56 BYPASS FEED (including special paper 17 4 INSTALLING THE SOFTWARE (AL-1641CS) 7 MAINTENANCE TD CARTRIDGE REPLACEMENT 57 5 SOFTWARE FOR THE SHARP DRUM CARTRIDGE PERSONAL MFP SERIES .......... 19 REPLACEMENT 58 HARDWARE AND SOFTWARE REQUIREMENTS 20 BEFORE INSTALLATION 20 CLEANING ... MODE..... 32 USING THE SCANNER MODE... 34 MISFEED REMOVAL 63 9 APPENDIX 7 HOW TO USE THE ONLINE SPECIFICATIONS 68 MANUAL 43 ABOUT SUPPLIES AND USING OTHER INSTALLED DRIVERS 44 CONNECTING THE INTERFACE OPTIONS 70 MOVING AND STORING 8 THE UNIT 71 ...
...THE PAPER TRAY..... 15 OF COPIES 56 BYPASS FEED (including special paper 17 4 INSTALLING THE SOFTWARE (AL-1641CS) 7 MAINTENANCE TD CARTRIDGE REPLACEMENT 57 5 SOFTWARE FOR THE SHARP DRUM CARTRIDGE PERSONAL MFP SERIES .......... 19 REPLACEMENT 58 HARDWARE AND SOFTWARE REQUIREMENTS 20 BEFORE INSTALLATION 20 CLEANING ... MODE..... 32 USING THE SCANNER MODE... 34 MISFEED REMOVAL 63 9 APPENDIX 7 HOW TO USE THE ONLINE SPECIFICATIONS 68 MANUAL 43 ABOUT SUPPLIES AND USING OTHER INSTALLED DRIVERS 44 CONNECTING THE INTERFACE OPTIONS 70 MOVING AND STORING 8 THE UNIT 71 ...
AL-1631 | AL-1641CS Operation Manual
Page 6
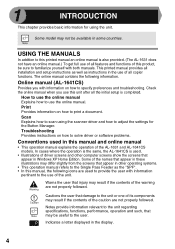
...on how to specify preferences and troubleshooting. Online manual (AL-1641CS) Provides you use of the AL-1631 and AL-1641CS models. How to use the online manual Explains how to use of the unit. In cases where the operation is the same, the AL-1641CS is completed. Cautions the user that appear in... in other computer screens show the screens that damage to the unit or one of the caution are not properly followed. Print Provides information on how to print a document. Check the online manual when you with information on how to solve driver or software problems. Conventions...
...on how to specify preferences and troubleshooting. Online manual (AL-1641CS) Provides you use of the AL-1631 and AL-1641CS models. How to use the online manual Explains how to use of the unit. In cases where the operation is the same, the AL-1641CS is completed. Cautions the user that appear in... in other computer screens show the screens that damage to the unit or one of the caution are not properly followed. Print Provides information on how to print a document. Check the online manual when you with information on how to solve driver or software problems. Conventions...

AL-1631 | AL-1641CS Operation Manual
Page 8
...one-sided originals. Selected copy ratio is used as a printer and scanner. Selected mode is shown by a lit indicator. (p.51) 8 Copy ratio display (%) key (p.51) 9 Display Displays the specified copy quantity, zoom copy ratio, user program code, and error code. 10 SCANNER key and indicator (p.31, p.39) (AL-1641CS... (p.55) 6 Selected exposure level is on Short Edge can be selected. 2 Exposure mode selector key and indicators Use to adjust the MANUAL or PHOTO exposure level. For description of the ONLINE indicator, see "INDICATORS ON THE OPERATION PANEL" (p.31). 12 Power save mode. (p....
...one-sided originals. Selected copy ratio is used as a printer and scanner. Selected mode is shown by a lit indicator. (p.51) 8 Copy ratio display (%) key (p.51) 9 Display Displays the specified copy quantity, zoom copy ratio, user program code, and error code. 10 SCANNER key and indicator (p.31, p.39) (AL-1641CS... (p.55) 6 Selected exposure level is on Short Edge can be selected. 2 Exposure mode selector key and indicators Use to adjust the MANUAL or PHOTO exposure level. For description of the ONLINE indicator, see "INDICATORS ON THE OPERATION PANEL" (p.31). 12 Power save mode. (p....

AL-1631 | AL-1641CS Operation Manual
Page 10
If anything is not included or is damaged, contact our Technical Assistance Department at 1-(630)378-3590 in the USA or 905-568-7140 in unit) TD cartridge PREPARING THE UNIT FOR INSTALLATION 1 Be sure to hold the handles on both sides of the unit to unpack the unit and carry it to the installation location. 8 CHECKING PACKED COMPONENTS AND ACCESSORIES Open the carton and check if the following components and accessories are included. Operation manual AL-1641CS Software CD-ROM Drum cartridge (installed in Canada.
If anything is not included or is damaged, contact our Technical Assistance Department at 1-(630)378-3590 in the USA or 905-568-7140 in unit) TD cartridge PREPARING THE UNIT FOR INSTALLATION 1 Be sure to hold the handles on both sides of the unit to unpack the unit and carry it to the installation location. 8 CHECKING PACKED COMPONENTS AND ACCESSORIES Open the carton and check if the following components and accessories are included. Operation manual AL-1641CS Software CD-ROM Drum cartridge (installed in Canada.

AL-1631 | AL-1641CS Operation Manual
Page 20
...use non-standard envelopes, and envelopes that have labels or stamps attached. • Envelopes of embossing may cause the copies/prints to the online manual.) • It is not flat because of which are filled with air or envelopes that are flat and crisply folded. Do not let ... (print face down) all the way into the feed slot. • Special papers such as transparency film, labels, and envelopes must be fed one sheet at a time. • Do not use envelopes that have metal clasps, plastic snappers, string closures, windows, linings, self-adhesive, patches or synthetic...
...use non-standard envelopes, and envelopes that have labels or stamps attached. • Envelopes of embossing may cause the copies/prints to the online manual.) • It is not flat because of which are filled with air or envelopes that are flat and crisply folded. Do not let ... (print face down) all the way into the feed slot. • Special papers such as transparency film, labels, and envelopes must be fed one sheet at a time. • Do not use envelopes that have metal clasps, plastic snappers, string closures, windows, linings, self-adhesive, patches or synthetic...

AL-1631 | AL-1641CS Operation Manual
Page 22
... (SVGA) display with USB interface equipped as standard. *2 Printing is required to install this installer. To set the parallel port mode, refer to your computer manual or ask the manufacturer of your computer. *2 Sharpdesk can only be used when the parallel port is connected through the parallel port, the Print Status...
... (SVGA) display with USB interface equipped as standard. *2 Printing is required to install this installer. To set the parallel port mode, refer to your computer manual or ask the manufacturer of your computer. *2 Sharpdesk can only be used when the parallel port is connected through the parallel port, the Print Status...
AL-1631 | AL-1641CS Operation Manual
Page 34
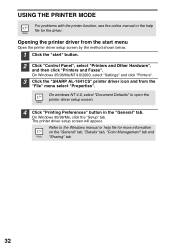
...appear. USING THE PRINTER MODE For problems with the printer function, see the online manual or the help file for the driver. On Windows 95/98/Me/NT4.0/2000, select "Settings" and click "Printers". 3 Click the "SHARP AL-1641CS" printer driver icon and from the start menu Open the printer driver setup screen ... Preferences" button in the "General" tab. On Windows 95/98/Me, click the "Setup" tab. On windows NT 4.0, select "Document Defaults" to the Windows manual or help file for more information on the "General" tab, "Details" tab, "Color Management" tab and "Sharing" tab. 32
...appear. USING THE PRINTER MODE For problems with the printer function, see the online manual or the help file for the driver. On Windows 95/98/Me/NT4.0/2000, select "Settings" and click "Printers". 3 Click the "SHARP AL-1641CS" printer driver icon and from the start menu Open the printer driver setup screen ... Preferences" button in the "General" tab. On Windows 95/98/Me, click the "Setup" tab. On windows NT 4.0, select "Document Defaults" to the Windows manual or help file for more information on the "General" tab, "Details" tab, "Color Management" tab and "Sharing" tab. 32

AL-1631 | AL-1641CS Operation Manual
Page 35
.... On Windows 95/98/Me/NT 4.0, click the "OK" button to print, and select "Print" from the application's "File" menu. 3 Make sure that "SHARP AL-1641CS" is selected as for the 4 printer driver. • If copying is being performed when printing is started . • If the paper size specified from the... by switching the tab in the printer, part of the image that the paper of the paper may remain on print settings, see the online manual or the help file for loading copy paper. After copying is complete, printing will begin. 33 On Windows 2000, the "Properties" button does...
.... On Windows 95/98/Me/NT 4.0, click the "OK" button to print, and select "Print" from the application's "File" menu. 3 Make sure that "SHARP AL-1641CS" is selected as for the 4 printer driver. • If copying is being performed when printing is started . • If the paper size specified from the... by switching the tab in the printer, part of the image that the paper of the paper may remain on print settings, see the online manual or the help file for loading copy paper. After copying is complete, printing will begin. 33 On Windows 2000, the "Properties" button does...

AL-1631 | AL-1641CS Operation Manual
Page 36
..."Apply". 4 Repeat Step3 to enable scanning using the operation panel of the unit. For problems with the scanner function, see the online manual or the help file for starting Button Manager and adjusting settings, see "Scan Button Destination Setting Dialog Box" (p.36). 34 For the ... screen, click the "Events" tab. 3 Click the "Select an event" button and select "ScanMenu SC1" from the pulldown menu. Right click the "SHARP AL1641CS" icon and click "Properties" in the following. Click the "Select an event" button and select "ScanMenu SC2" from the pull-down menu. Adjust...
..."Apply". 4 Repeat Step3 to enable scanning using the operation panel of the unit. For problems with the scanner function, see the online manual or the help file for starting Button Manager and adjusting settings, see "Scan Button Destination Setting Dialog Box" (p.36). 34 For the ... screen, click the "Events" tab. 3 Click the "Select an event" button and select "ScanMenu SC1" from the pulldown menu. Right click the "SHARP AL1641CS" icon and click "Properties" in the following. Click the "Select an event" button and select "ScanMenu SC2" from the pull-down menu. Adjust...

AL-1631 | AL-1641CS Operation Manual
Page 38
... Button Destination Setting Dialog Box After you have completed the Button Manager settings in Windows, configure the scan settings in Button Manager, see the online manual or the help file. This is the corresponding setting in the Button Manager to Sharpdesk using the operation panel "SC1" SCANNER ( ) key selection. To configure...
... Button Destination Setting Dialog Box After you have completed the Button Manager settings in Windows, configure the scan settings in Button Manager, see the online manual or the help file. This is the corresponding setting in the Button Manager to Sharpdesk using the operation panel "SC1" SCANNER ( ) key selection. To configure...
AL-1631 | AL-1641CS Operation Manual
Page 42
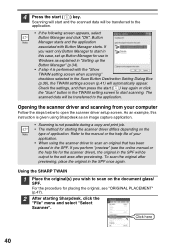
...or click the "Scan" button in the SPF will be transferred to the application. Refer to the manual or the help file for placing the original, see the online manual or the help file of application. For the procedure for the scanner driver), the original in the ...area after previewing, place the original in "Setting up Button Manager for starting Sharpdesk, click the "File" menu and select "Select Scanner". Using the SHARP TWAIN 1 Place the original(s) you perform "preview" (see "ORIGINAL PLACEMENT" (p.47). 2 After starting the scanner driver differs depending on the document...
...or click the "Scan" button in the SPF will be transferred to the application. Refer to the manual or the help file for placing the original, see the online manual or the help file of application. For the procedure for the scanner driver), the original in the ...area after previewing, place the original in "Setting up Button Manager for starting Sharpdesk, click the "File" menu and select "Select Scanner". Using the SHARP TWAIN 1 Place the original(s) you perform "preview" (see "ORIGINAL PLACEMENT" (p.47). 2 After starting the scanner driver differs depending on the document...

AL-1631 | AL-1641CS Operation Manual
Page 43
Scan is started. 41 For more than one scanning device, select the scanner you use more information, see the online manual or the help file), and click the "Scan" button. The method for scanning (refer to use through the application. Click here If you want to the online manual and help file of your application. 4 Select "Acquire Image" from the "File" menu, or click the "Acquire" button ( ) . 4 5 Set the configuration for accessing the "Select Scanner" option, depends upon the application. 3 Select "SHARP Personal MFP series", and click the "Select" button.
Scan is started. 41 For more than one scanning device, select the scanner you use more information, see the online manual or the help file), and click the "Scan" button. The method for scanning (refer to use through the application. Click here If you want to the online manual and help file of your application. 4 Select "Acquire Image" from the "File" menu, or click the "Acquire" button ( ) . 4 5 Set the configuration for accessing the "Select Scanner" option, depends upon the application. 3 Select "SHARP Personal MFP series", and click the "Select" button.

AL-1631 | AL-1641CS Operation Manual
Page 45
... 3 Click the "start " button, click "My Computer" ( ), and then double-click the CD-ROM ( ) icon. SHARP recommends printing out the sections which you refer to regularly. • Refer to read the online manual. Installing Acrobat Reader 1 Turn on the operation and function of Acrobat Reader for more details on your... the CD-ROM ( ) icon. 4 Double-click the "Acrobat" folder, and then double-click the "ar500enu.exe" icon. HOW TO USE THE ONLINE MANUAL The online manual provides detailed instructions for operating the unit as the printer or scanner and a list of the window. • The online...
... 3 Click the "start " button, click "My Computer" ( ), and then double-click the CD-ROM ( ) icon. SHARP recommends printing out the sections which you refer to regularly. • Refer to read the online manual. Installing Acrobat Reader 1 Turn on the operation and function of Acrobat Reader for more details on your... the CD-ROM ( ) icon. 4 Double-click the "Acrobat" folder, and then double-click the "ar500enu.exe" icon. HOW TO USE THE ONLINE MANUAL The online manual provides detailed instructions for operating the unit as the printer or scanner and a list of the window. • The online...

AL-1631 | AL-1641CS Operation Manual
Page 46
... of the printer to be used and click "Properties". 6 Click the "Ports" tab ("Details" tab - To uninstall the printer driver, see the online manual. 1 Click the "start" button. 2 Click "Control Panel", click "Printer and Other Hardware" and then click "Printer and Faxes". If another GDI printer...OK" button. On Windows 95/98/Me/NT4.0/2000, select "Settings" and then click "Printers". 3 Right-click the "SHARP AL-1641CS" icon in step 4. 44 To use another printer does not operate properly when the SHARP Personal MFP series printer driver is set to "FILE" as described below, uninstall the...
... of the printer to be used and click "Properties". 6 Click the "Ports" tab ("Details" tab - To uninstall the printer driver, see the online manual. 1 Click the "start" button. 2 Click "Control Panel", click "Printer and Other Hardware" and then click "Printer and Faxes". If another GDI printer...OK" button. On Windows 95/98/Me/NT4.0/2000, select "Settings" and then click "Printers". 3 Right-click the "SHARP AL-1641CS" icon in step 4. 44 To use another printer does not operate properly when the SHARP Personal MFP series printer driver is set to "FILE" as described below, uninstall the...
AL-1631 | AL-1641CS Operation Manual
Page 51
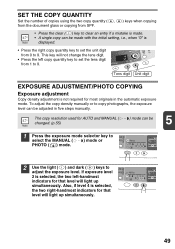
.... If exposure level 2 is selected, the two left copy quantity key to set the unit digit from 1 to 9. To adjust the copy density manually or to copy photographs, the exposure level can be adjusted in the automatic exposure mode. Also, if level 4 is selected, the two right-handmost ...indicators for that level will light up simultaneously. 49 The copy resolution used for most originals in five steps manually. SET THE COPY QUANTITY Set the number of copies using the two copy quantity ( , from the document glass or copying from SPF. ) keys...
.... If exposure level 2 is selected, the two left copy quantity key to set the unit digit from 1 to 9. To adjust the copy density manually or to copy photographs, the exposure level can be adjusted in the automatic exposure mode. Also, if level 4 is selected, the two right-handmost ...indicators for that level will light up simultaneously. 49 The copy resolution used for most originals in five steps manually. SET THE COPY QUANTITY Set the number of copies using the two copy quantity ( , from the document glass or copying from SPF. ) keys...

AL-1631 | AL-1641CS Operation Manual
Page 56
... a longer time before . The auto power shut-off mode, press the start ( ) key. Auto clear (page 55) The unit returns to select the MANUAL ( ) mode. 54 Preheat mode When the unit enters the preheat mode, the power save modes of copy, or scanner job. Stream feeding mode (page 55...) For description of time (auto clear time) can set the copy resolution used for AUTO and MANUAL ( mode. ) exposure TONER SAVE MODE 1 Press the exposure mode selector key to the initial settings a preset amount of time after the end of operation...
... a longer time before . The auto power shut-off mode, press the start ( ) key. Auto clear (page 55) The unit returns to select the MANUAL ( ) mode. 54 Preheat mode When the unit enters the preheat mode, the power save modes of copy, or scanner job. Stream feeding mode (page 55...) For description of time (auto clear time) can set the copy resolution used for AUTO and MANUAL ( mode. ) exposure TONER SAVE MODE 1 Press the exposure mode selector key to the initial settings a preset amount of time after the end of operation...
AL-1631 | AL-1641CS Operation Manual
Page 57
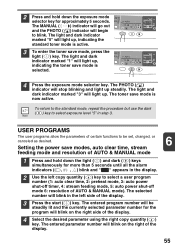
... ( ) key to blink. The entered parameter number will light up steadily. The toner save modes, auto clear time, stream feeding mode and resolution of AUTO & MANUAL mode 1 Press and hold down the light ( ) and dark ( ) keys simultaneously for more than 5 seconds until all the alarm indicators ( , , ) blink... on the right side of the display. 55 The PHOTO ( ) indicator will blink in the display. 2 Use the left side of AUTO & MANUAL mode). The selected number will stop blinking and light up , indicating the toner save mode, press the light ( ) key. USER PROGRAMS The user...
... ( ) key to blink. The entered parameter number will light up steadily. The toner save modes, auto clear time, stream feeding mode and resolution of AUTO & MANUAL mode 1 Press and hold down the light ( ) and dark ( ) keys simultaneously for more than 5 seconds until all the alarm indicators ( , , ) blink... on the right side of the display. 55 The PHOTO ( ) indicator will blink in the display. 2 Use the left side of AUTO & MANUAL mode). The selected number will stop blinking and light up , indicating the toner save mode, press the light ( ) key. USER PROGRAMS The user...

AL-1631 | AL-1641CS Operation Manual
Page 58
... COPIES Use the following procedure to display the total number of copies is 1,234. 56 Example: Total number of copies. The total number of AUTO & MANUAL mode *0 300dpi, 1 600dpi * Factory default settings are indicated with three digits. The unit will be stored. Mode Parameters 1 Auto clear time 0 OFF, 1 10sec., 2 30sec., *3 60sec...
... COPIES Use the following procedure to display the total number of copies is 1,234. 56 Example: Total number of copies. The total number of AUTO & MANUAL mode *0 300dpi, 1 600dpi * Factory default settings are indicated with three digits. The unit will be stored. Mode Parameters 1 Auto clear time 0 OFF, 1 10sec., 2 30sec., *3 60sec...

AL-1631 | AL-1641CS Operation Manual
Page 63
... from the paper tray and store it 71 in its wrapper in the SPF. 47, 48 Is original image too dark or Adjust the exposure manually. Gently close the front cover and then close the side cover. 11 Front cover closed securely? dark or too light. Document glass or SPF dirty... - If using special papers, feed the paper through the 14 multi-bypass tray. Replace with the printer function or the scanner function, see the online manual or the Help file for long time, remove the paper from the paper tray or multi-bypass tray. Clean regularly. Store paper flat in the...
... from the paper tray and store it 71 in its wrapper in the SPF. 47, 48 Is original image too dark or Adjust the exposure manually. Gently close the front cover and then close the side cover. 11 Front cover closed securely? dark or too light. Document glass or SPF dirty... - If using special papers, feed the paper through the 14 multi-bypass tray. Replace with the printer function or the scanner function, see the online manual or the Help file for long time, remove the paper from the paper tray or multi-bypass tray. Clean regularly. Store paper flat in the...

AL-1631 | AL-1641CS Operation Manual
Page 70
... cathode fluorescent lamp Resolution Copier Printer 600 x 300dpi (Auto/Manual mode) 600 x 600dpi (Photo mode) - 600dpi Scanner - 600 x 1200dpi Gradation Scan Output 256 levels 2 levels Bit depth 1 bit or 8 bit/pixel Sensor Color CCD 68 9 APPENDIX SPECIFICATIONS Model AL-1631 AL-1641CS Type Digital laser copier, desk-top type Digital multifunctional system, desk-top type...
... cathode fluorescent lamp Resolution Copier Printer 600 x 300dpi (Auto/Manual mode) 600 x 600dpi (Photo mode) - 600dpi Scanner - 600 x 1200dpi Gradation Scan Output 256 levels 2 levels Bit depth 1 bit or 8 bit/pixel Sensor Color CCD 68 9 APPENDIX SPECIFICATIONS Model AL-1631 AL-1641CS Type Digital laser copier, desk-top type Digital multifunctional system, desk-top type...


