Owners Manual
Page 5
... to questions or problems concerning camera operation in this manual, SD Memory Card and Multi Media Card are used in the sections "COMMONLY ASKED QUESTIONS" (see page 112) and "TROUBLESHOOTING" (see page xx) Refer to . * 1: About the SD Memory Card This digital camera can use either an SD Memory Card or a Multi Media Card for detailed information. You may prove useful when using the digital camera. English 2 Therefore, your recorded video clips will be...
... to questions or problems concerning camera operation in this manual, SD Memory Card and Multi Media Card are used in the sections "COMMONLY ASKED QUESTIONS" (see page 112) and "TROUBLESHOOTING" (see page xx) Refer to . * 1: About the SD Memory Card This digital camera can use either an SD Memory Card or a Multi Media Card for detailed information. You may prove useful when using the digital camera. English 2 Therefore, your recorded video clips will be...
Owners Manual
Page 7
„ CAMERA SETTINGS CHANGING THE CAMERA SETTINGS 81 LCD MONITOR SETTING 83 DATE AND TIME SETTING 85 HELP DISPLAY 88 LANGUAGE 89 INITIALIZING THE CARD MEMORY AND INTERNAL MEMORY .......90 POWER SAVE SETTING 92 FILE NO. RESET FUNCTION 94 RESETTING THE CAMERA SETTINGS 96 CHECKING THE REMAINING CARD MEMORY AND INTERNAL MEMORY 97 CHECKING THE REMAINING BATTERY CHARGE 98 „ OTHER FUNCTIONS AND CONNECTIONS CONNECTING TO A COMPUTER 100 DIRECT-PRINT 103 „ APPENDICES COMMONLY ASKED QUESTIONS 112 TROUBLESHOOTING 121 SPECIFICATIONS 128 HINTS FOR TAKING PICTURES 135 English 4
„ CAMERA SETTINGS CHANGING THE CAMERA SETTINGS 81 LCD MONITOR SETTING 83 DATE AND TIME SETTING 85 HELP DISPLAY 88 LANGUAGE 89 INITIALIZING THE CARD MEMORY AND INTERNAL MEMORY .......90 POWER SAVE SETTING 92 FILE NO. RESET FUNCTION 94 RESETTING THE CAMERA SETTINGS 96 CHECKING THE REMAINING CARD MEMORY AND INTERNAL MEMORY 97 CHECKING THE REMAINING BATTERY CHARGE 98 „ OTHER FUNCTIONS AND CONNECTIONS CONNECTING TO A COMPUTER 100 DIRECT-PRINT 103 „ APPENDICES COMMONLY ASKED QUESTIONS 112 TROUBLESHOOTING 121 SPECIFICATIONS 128 HINTS FOR TAKING PICTURES 135 English 4

Owners Manual
Page 14
... your eyes, you purchase before removing them. Always read the instruction manuals that may be warm immediately after fully recharging with the exclusive battery charger. Do not rub your eyes, but immediately rinse your eyes with clean water. i If a battery is used. USING YOUR DIGITAL CAMERA SAFELY AND CORRECTLY WARNING i The batteries may come with the batteries you risk losing your eyesight. i If the digital camera is...
... your eyes, you purchase before removing them. Always read the instruction manuals that may be warm immediately after fully recharging with the exclusive battery charger. Do not rub your eyes, but immediately rinse your eyes with clean water. i If a battery is used. USING YOUR DIGITAL CAMERA SAFELY AND CORRECTLY WARNING i The batteries may come with the batteries you risk losing your eyesight. i If the digital camera is...
Owners Manual
Page 23
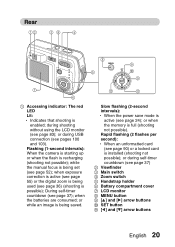
... 90) or a locked card is active (see page 55) or the digital zoom is possible); or during shooting without using the LCD monitor (see page 37) 2 Viewfinder 3 Main switch 4 Zoom switch 5 Handstrap holder 6 Battery compartment cover 7 LCD monitor 8 MENU button 9 [n] and [m] arrow buttons 0 SET button A [l] and [o] arrow buttons English 20 Slow flashing (2-second intervals): h When the power save mode is installed (shooting not possible); Rear 12 38 4 8 MENU 9 5 0 9 SET 7 A A 6 1 Accessing indicator: The red LED Lit: h Indicates that shooting is recharging (shooting not...
... 90) or a locked card is active (see page 55) or the digital zoom is possible); or during shooting without using the LCD monitor (see page 37) 2 Viewfinder 3 Main switch 4 Zoom switch 5 Handstrap holder 6 Battery compartment cover 7 LCD monitor 8 MENU button 9 [n] and [m] arrow buttons 0 SET button A [l] and [o] arrow buttons English 20 Slow flashing (2-second intervals): h When the power save mode is installed (shooting not possible); Rear 12 38 4 8 MENU 9 5 0 9 SET 7 A A 6 1 Accessing indicator: The red LED Lit: h Indicates that shooting is recharging (shooting not...
Owners Manual
Page 25
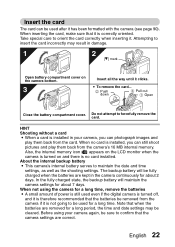
.... Before using the camera for a long time, remove the batteries i A small amount of power is still used even if the digital camera is turned off, and it is correctly oriented. English 22 Take special care to be used after it clicks. About the internal backup battery i This camera's internal battery serves to forcefully remove the card. When inserting the card, make sure that the camera settings are removed for a long period, the time and date settings may result...
.... Before using the camera for a long time, remove the batteries i A small amount of power is still used even if the digital camera is turned off, and it is correctly oriented. English 22 Take special care to be used after it clicks. About the internal backup battery i This camera's internal battery serves to forcefully remove the card. When inserting the card, make sure that the camera settings are removed for a long period, the time and date settings may result...

Owners Manual
Page 27
... , and model VAR-G4AU for Europe, U.K. h Press the shutter release button. h Press the SET button. English 24 h Press the MENU button. i After the power save function is restored after any of no use during shooting, or five minutes of the following operations: h Press the power button. i When the camera is extended, it automatically retracts. Accessing indicator Power button LCD monitor Turning the power on (factory-preset setting). h If the lens is connected to save the battery power, the power save function will turn off...
... , and model VAR-G4AU for Europe, U.K. h Press the shutter release button. h Press the SET button. English 24 h Press the MENU button. i After the power save function is restored after any of no use during shooting, or five minutes of the following operations: h Press the power button. i When the camera is extended, it automatically retracts. Accessing indicator Power button LCD monitor Turning the power on (factory-preset setting). h If the lens is connected to save the battery power, the power save function will turn off...
Owners Manual
Page 30
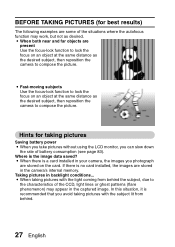
... a card installed in the camera's internal memory. BEFORE TAKING PICTURES (for taking pictures with the light coming from behind the subject, due to compose the picture. i When there is the image data saved? In this situation, it is no card installed, the images are present Use the focus-lock function to lock the focus on the card. i When taking pictures with the subject lit from behind . 27 English If there is recommended that you avoid taking pictures Saving battery power i When you take pictures...
... a card installed in the camera's internal memory. BEFORE TAKING PICTURES (for taking pictures with the light coming from behind the subject, due to compose the picture. i When there is the image data saved? In this situation, it is no card installed, the images are present Use the focus-lock function to lock the focus on the card. i When taking pictures with the subject lit from behind . 27 English If there is recommended that you avoid taking pictures Saving battery power i When you take pictures...
Owners Manual
Page 31
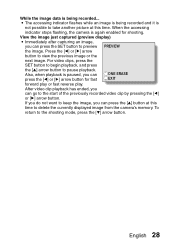
... accessing indicator stops flashing, the camera is not possible to the start of the previously recorded video clip by pressing the [l] or [m] arrow button. For video clips, press the SET button to begin playback, and press the [n] arrow button to view the previous image or the next image. View the image just captured (preview display) i Immediately after capturing an image, you can press the [n] button at this time to the shooting mode, press...
... accessing indicator stops flashing, the camera is not possible to the start of the previously recorded video clip by pressing the [l] or [m] arrow button. For video clips, press the SET button to begin playback, and press the [n] arrow button to view the previous image or the next image. View the image just captured (preview display) i Immediately after capturing an image, you can press the [n] button at this time to the shooting mode, press...
Owners Manual
Page 38
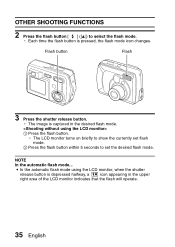
... of the LCD monitor indicates that the flash will operate. 35 English Flash button Flash 3 Press the shutter release button. NOTE In the automatic flash mode... i In the automatic flash mode using the LCD monitor, when the shutter release button is pressed, the flash mode icon changes. h The LCD monitor turns on briefly to show the currently set the desired flash mode. OTHER SHOOTING FUNCTIONS 2 Press the flash button [ ] ([n]) to set flash mode. 2 Press the flash button within 5 seconds to select the flash mode. h Each time the flash button is depressed...
... of the LCD monitor indicates that the flash will operate. 35 English Flash button Flash 3 Press the shutter release button. NOTE In the automatic flash mode... i In the automatic flash mode using the LCD monitor, when the shutter release button is pressed, the flash mode icon changes. h The LCD monitor turns on briefly to show the currently set the desired flash mode. OTHER SHOOTING FUNCTIONS 2 Press the flash button [ ] ([n]) to set flash mode. 2 Press the flash button within 5 seconds to select the flash mode. h Each time the flash button is depressed...
Owners Manual
Page 45
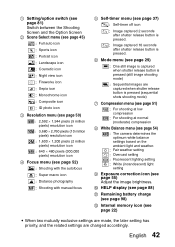
... when shutter release button is pressed (sequential shots shooting mode) 7 Compression menu (see page 51) : For shooting at low compression : For shooting at normal (moderate) compression 8 White Balance menu (see page 54) : The camera determines the optimum white balance settings based on the ambient light and weather. : Fair weather setting : Overcast setting : Fluorescent lighting setting : White (incandescent) light setting 9 Exposure correction icon (see page 55) Adjust the image brightness. 0 HELP display (see page 88) A Remaining battery charge (see page 98) B Internal memory icon (see...
... when shutter release button is pressed (sequential shots shooting mode) 7 Compression menu (see page 51) : For shooting at low compression : For shooting at normal (moderate) compression 8 White Balance menu (see page 54) : The camera determines the optimum white balance settings based on the ambient light and weather. : Fair weather setting : Overcast setting : Fluorescent lighting setting : White (incandescent) light setting 9 Exposure correction icon (see page 55) Adjust the image brightness. 0 HELP display (see page 88) A Remaining battery charge (see page 98) B Internal memory icon (see...
Owners Manual
Page 48
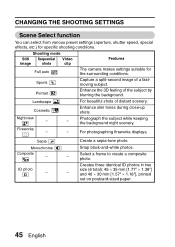
Sports Capture a split-second image of distant scenery. For photographing fireworks displays. Create a sepia-tone photo. Night view - - ID photo - CHANGING THE SHOOTING SETTINGS Scene Select function You can select from various preset settings (aperture, shutter speed, special effects, etc.) for the surrounding conditions. Landscape Cosmetic For beautiful shots of a fastmoving subject. Fireworks - - size (6 total): 45 × 35 mm [1.77" × 1.38"] and 40 × 30...
Sports Capture a split-second image of distant scenery. For photographing fireworks displays. Create a sepia-tone photo. Night view - - ID photo - CHANGING THE SHOOTING SETTINGS Scene Select function You can select from various preset settings (aperture, shutter speed, special effects, etc.) for the surrounding conditions. Landscape Cosmetic For beautiful shots of a fastmoving subject. Fireworks - - size (6 total): 45 × 35 mm [1.77" × 1.38"] and 40 × 30...
Owners Manual
Page 54
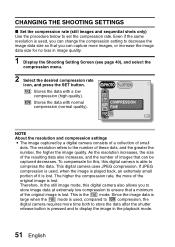
... in the still image mode, this digital camera is lost. CHANGING THE SHOOTING SETTINGS k Set the compression rate (still images and sequential shots only) Use the procedure below to the number of these dots, and the greater the number, the higher the image quality. The higher the compression rate, the more time both to display the image in the playback mode. 51 English Therefore, in image quality. 1 Display the Shooting Setting Screen (see page 40...
... in the still image mode, this digital camera is lost. CHANGING THE SHOOTING SETTINGS k Set the compression rate (still images and sequential shots only) Use the procedure below to the number of these dots, and the greater the number, the higher the image quality. The higher the compression rate, the more time both to display the image in the playback mode. 51 English Therefore, in image quality. 1 Display the Shooting Setting Screen (see page 40...
Owners Manual
Page 58
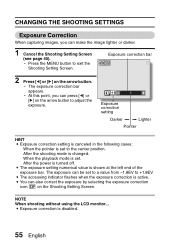
... indicator flashes when the exposure correction is set to a value from -1.8EV to +1.8EV. h Press the MENU button to exit the Shooting Setting Screen. h At this point, you can make the image lighter or darker. 1 Cancel the Shooting Setting Screen (see page 40). When the playback mode is active. i The exposure setting numerical value is changed. h The exposure correction bar appears. Exposure correction bar 2 Press [l] or [m] on the Shooting Setting Screen. NOTE When shooting without using...
... indicator flashes when the exposure correction is set to a value from -1.8EV to +1.8EV. h Press the MENU button to exit the Shooting Setting Screen. h At this point, you can make the image lighter or darker. 1 Cancel the Shooting Setting Screen (see page 40). When the playback mode is active. i The exposure setting numerical value is changed. h The exposure correction bar appears. Exposure correction bar 2 Press [l] or [m] on the Shooting Setting Screen. NOTE When shooting without using...
Owners Manual
Page 62
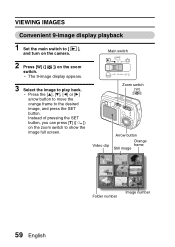
... the zoom switch. h Press the [n], [o], [l] or [m] arrow button to move the orange frame to play back. PC Zoom switch [W] Video clip Arrow button Orange frame Still image 100 0001 0002 0003 0004 0005 0006 0007 0008 0009 Folder number Image number 59 English h The 9-image display appears. 3 Select the image to the desired image, and press the SET button. Main switch 2 Press [W] ([ ]) on the zoom switch to [ ], and turn on the camera. VIEWING IMAGES Convenient 9-image display playback 1 Set the main switch...
... the zoom switch. h Press the [n], [o], [l] or [m] arrow button to move the orange frame to play back. PC Zoom switch [W] Video clip Arrow button Orange frame Still image 100 0001 0002 0003 0004 0005 0006 0007 0008 0009 Folder number Image number 59 English h The 9-image display appears. 3 Select the image to the desired image, and press the SET button. Main switch 2 Press [W] ([ ]) on the zoom switch to [ ], and turn on the camera. VIEWING IMAGES Convenient 9-image display playback 1 Set the main switch...
Owners Manual
Page 85
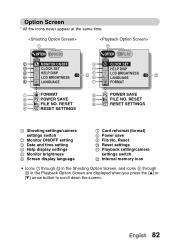
...SAVE FILE NO. English 82 Reset 0 Reset settings A Playback setting/camera settings switch B Internal memory icon i Icons 7 through 0 in the Shooting Option Screen, and icons 8 through 0 in the Playback Option Screen are displayed when you press the [n] or [o] arrow button to scroll down the screen. RESET RESET SETTINGS CLOCK SET HELP DISP LCD BRIGHTNESS LANGUAGE FORMAT POWER SAVE FILE NO. RESET RESET SETTINGS 1 Shooting settings/camera settings switch 2 Monitor ON/OFF setting 3 Date and time setting 4 Help display settings 5 Monitor brightness 6 Screen display language 7 Card...
...SAVE FILE NO. English 82 Reset 0 Reset settings A Playback setting/camera settings switch B Internal memory icon i Icons 7 through 0 in the Shooting Option Screen, and icons 8 through 0 in the Playback Option Screen are displayed when you press the [n] or [o] arrow button to scroll down the screen. RESET RESET SETTINGS CLOCK SET HELP DISP LCD BRIGHTNESS LANGUAGE FORMAT POWER SAVE FILE NO. RESET RESET SETTINGS 1 Shooting settings/camera settings switch 2 Monitor ON/OFF setting 3 Date and time setting 4 Help display settings 5 Monitor brightness 6 Screen display language 7 Card...
Owners Manual
Page 95
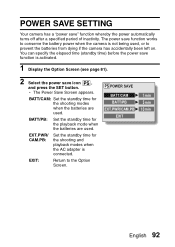
... time (standby time) before the power save function works to conserve the battery power when the camera is not being used, or to the Option Screen. POWER SAVE SETTING Your camera has a "power save icon , and press the SET button. BATT/CAM min BATT/CAM: Set the standby time for the shooting modes BATT/PB min when the batteries are used . EXIT BATT/PB: Set the standby time for the shooting and playback modes when the AC adapter is activated. 1 Display the Option Screen...
... time (standby time) before the power save function works to conserve the battery power when the camera is not being used, or to the Option Screen. POWER SAVE SETTING Your camera has a "power save icon , and press the SET button. BATT/CAM min BATT/CAM: Set the standby time for the shooting modes BATT/PB min when the batteries are used . EXIT BATT/PB: Set the standby time for the shooting and playback modes when the AC adapter is activated. 1 Display the Option Screen...
Owners Manual
Page 97
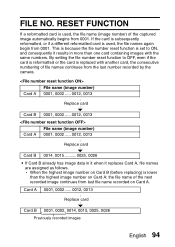
... file name recorded on Card B (before replacing) is used , the file name (image number) of the next recorded image continues from 0001. Card A 0001, 0002...... 0012, 0013 Replace card Card B 0001, 0002, 0014, 0015, 0025, 0026 Previously recorded images English 94 h When the highest image number on Card A. If the card is subsequently reformatted, or if a different reformatted card is lower than one card containing images with another card, the consecutive numbering of file names continues from 0001. FILE NO. RESET FUNCTION...
... file name recorded on Card B (before replacing) is used , the file name (image number) of the next recorded image continues from 0001. Card A 0001, 0002...... 0012, 0013 Replace card Card B 0001, 0002, 0014, 0015, 0025, 0026 Previously recorded images English 94 h When the highest image number on Card A. If the card is subsequently reformatted, or if a different reformatted card is lower than one card containing images with another card, the consecutive numbering of file names continues from 0001. FILE NO. RESET FUNCTION...
Owners Manual
Page 102
....) or the environmental conditions (temperature, etc.) the number of images that you don't miss capturing images of important moments due to use.) 99 English CHECKING THE REMAINING BATTERY CHARGE HINT i Battery life may differ even among batteries of times the flash is recommended for taking pictures at a wedding or while traveling, for example, so you prepare extra batteries when taking photos in cold environments. (In a ski area...
....) or the environmental conditions (temperature, etc.) the number of images that you don't miss capturing images of important moments due to use.) 99 English CHECKING THE REMAINING BATTERY CHARGE HINT i Battery life may differ even among batteries of times the flash is recommended for taking pictures at a wedding or while traveling, for example, so you prepare extra batteries when taking photos in cold environments. (In a ski area...
Owners Manual
Page 104
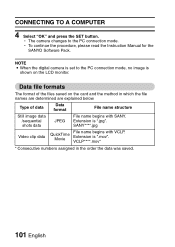
... the order the data was saved. 101 English Type of the files saved on the LCD monitor. VCLP****.mov* * Consecutive numbers assigned in which the file names are determined are explained below. h The camera changes to the PC connection mode, no image is set to the PC connection mode. SANY****.jpg Video clip data QuickTime Movie File name begins with SANY. h To continue the procedure, please read the Instruction Manual for the SANYO Software Pack.
... the order the data was saved. 101 English Type of the files saved on the LCD monitor. VCLP****.mov* * Consecutive numbers assigned in which the file names are determined are explained below. h The camera changes to the PC connection mode, no image is set to the PC connection mode. SANY****.jpg Video clip data QuickTime Movie File name begins with SANY. h To continue the procedure, please read the Instruction Manual for the SANYO Software Pack.
Owners Manual
Page 105
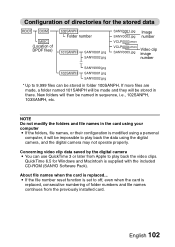
... card using your computer i If the folders, file names, or their configuration is modified using the digital camera, and the digital camera may not operate properly. English 102 Concerning video clip data saved by the digital camera i You can be named in folder 100SANPH. New folders will then be stored in sequence, i.e., 102SANPH, 103SANPH, etc. Configuration of directories for Windows and Macintosh is supplied with the included CD-ROM (SANYO Software...
... card using your computer i If the folders, file names, or their configuration is modified using the digital camera, and the digital camera may not operate properly. English 102 Concerning video clip data saved by the digital camera i You can be named in folder 100SANPH. New folders will then be stored in sequence, i.e., 102SANPH, 103SANPH, etc. Configuration of directories for Windows and Macintosh is supplied with the included CD-ROM (SANYO Software...


