Owners Manual
Page 2
...RAIN OR MOISTURE. Be especially careful that children do not stare directly into the lens as possible. q Take appropriate space on the projector. q If the projector is not to be built into a compartment or similarly enclosed, the minimum distances must be maintained. THIS SYMBOL INDICATES THAT DANGEROUS ... and try the solutions in the "Trouble-shooting" section of the end of this manual thoroughly and operate the projector properly. If your projector, and can near the projector, hot air is to be dangerous. Eye damage could result. If not, it in better condition for an ...
...RAIN OR MOISTURE. Be especially careful that children do not stare directly into the lens as possible. q Take appropriate space on the projector. q If the projector is not to be built into a compartment or similarly enclosed, the minimum distances must be maintained. THIS SYMBOL INDICATES THAT DANGEROUS ... and try the solutions in the "Trouble-shooting" section of the end of this manual thoroughly and operate the projector properly. If your projector, and can near the projector, hot air is to be dangerous. Eye damage could result. If not, it in better condition for an ...
Owners Manual
Page 3
...or over a radiator or heat register. Refer all servicing to lightning and power line surges. If liquid has been spilled into this projector on the projector. e. When replacement parts are covered by following conditions: a. SAFETY INSTRUCTIONS All the safety and operating instructions should not be placed ...in the back and bottom of the cabinet are not sure of the type of other controls may be covered with the projector. This projector should be sure the service technician has used replacement parts specified by the manufacturer, or sold with cloth or other materials...
...or over a radiator or heat register. Refer all servicing to lightning and power line surges. If liquid has been spilled into this projector on the projector. e. When replacement parts are covered by following conditions: a. SAFETY INSTRUCTIONS All the safety and operating instructions should not be placed ...in the back and bottom of the cabinet are not sure of the type of other controls may be covered with the projector. This projector should be sure the service technician has used replacement parts specified by the manufacturer, or sold with cloth or other materials...

Owners Manual
Page 4
... Communication Commission Notice This equipment has been tested and found to comply with the limits for help. This is encouraged to try to defeat this projector meets the requirement for the United States and Canada : AC Power Cord used in accordance with this safety feature. AC Power Cord has a grounding-type...
... Communication Commission Notice This equipment has been tested and found to comply with the limits for help. This is encouraged to try to defeat this projector meets the requirement for the United States and Canada : AC Power Cord used in accordance with this safety feature. AC Power Cord has a grounding-type...
Owners Manual
Page 5
... AIR FILTER CARE AND CLEANING 38 20 CLEANING THE PROJECTION LENS 38 LAMP REPLACEMENT 39 TURNING ON / OFF PROJECTOR 20 LAMP REPLACE COUNTER TROUBLESHOOTING 39 40 ADJUSTING SCREEN ZOOM ADJUSTMENT 21 21 TECHNICAL SPECIFICATIONS 42 FOCUS ADJUSTMENT 21 ...AC POWER CORD 8 PICTURE IMAGE ADJUSTMENT 28 POSITIONING PROJECTOR 9 IMAGE LEVEL SELECT 28 ADJUSTABLE FEET 10 IMAGE LEVEL ADJUSTMENT 29 MOVING PROJECTOR 10 PICTURE SCREEN ADJUSTMENT 30 CONNECTING PROJECTOR 11 VIDEO MODE 31 TERMINALS OF PROJECTOR 11 SELECTING INPUT SOURCE 31 CONNECTING TO VIDEO EQUIPMENT...
... AIR FILTER CARE AND CLEANING 38 20 CLEANING THE PROJECTION LENS 38 LAMP REPLACEMENT 39 TURNING ON / OFF PROJECTOR 20 LAMP REPLACE COUNTER TROUBLESHOOTING 39 40 ADJUSTING SCREEN ZOOM ADJUSTMENT 21 21 TECHNICAL SPECIFICATIONS 42 FOCUS ADJUSTMENT 21 ...AC POWER CORD 8 PICTURE IMAGE ADJUSTMENT 28 POSITIONING PROJECTOR 9 IMAGE LEVEL SELECT 28 ADJUSTABLE FEET 10 IMAGE LEVEL ADJUSTMENT 29 MOVING PROJECTOR 10 PICTURE SCREEN ADJUSTMENT 30 CONNECTING PROJECTOR 11 VIDEO MODE 31 TERMINALS OF PROJECTOR 11 SELECTING INPUT SOURCE 31 CONNECTING TO VIDEO EQUIPMENT...
Owners Manual
Page 6
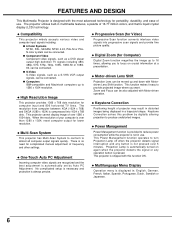
...projector is not in a trapezoid shape. x Digital Zoom (for computer input and 800 horizontal TV lines. x Motor-driven Lens Shift Projection Lens can be connected. x Multilanguage Menu Display Operation menu is displayed in multimedia features, a palette of 16.77 million colors, and matrix liquid crystal display (LCD...output high definition TV signals including 480i, 480p, 575i, 575p, 720p, 1035i, 1080i-50 or 1080i60, can be connected. This projector cannot display image of over than 1280 x 1024, reset computer output for lower resolution. There is over 1280 x 1024 dots. x ...
...projector is not in a trapezoid shape. x Digital Zoom (for computer input and 800 horizontal TV lines. x Motor-driven Lens Shift Projection Lens can be connected. x Multilanguage Menu Display Operation menu is displayed in multimedia features, a palette of 16.77 million colors, and matrix liquid crystal display (LCD...output high definition TV signals including 480i, 480p, 575i, 575p, 720p, 1035i, 1080i-50 or 1080i60, can be connected. This projector cannot display image of over than 1280 x 1024, reset computer output for lower resolution. There is over 1280 x 1024 dots. x ...
Owners Manual
Page 7
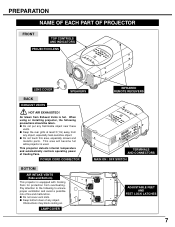
...SWITCH ADJUSTABLE FEET AND FEET LOCK LATCHES 7 q Keep bottom clear of any flammable object near these vents. When using or installing projector, the following to ensure proper ventilation and avoid a possible risk of Cooling Fans. q Do not put any object. PREPARATION NAME ...! q Keep the rear grills at least 3'(1m) away from overheating. This area will become hot while projector is hot. Obstructions may block cooling air. This projector detects internal temperature and automatically controls operating power of fire and malfunction. Air blown from Exhaust Vents is used...
...SWITCH ADJUSTABLE FEET AND FEET LOCK LATCHES 7 q Keep bottom clear of any flammable object near these vents. When using or installing projector, the following to ensure proper ventilation and avoid a possible risk of Cooling Fans. q Do not put any object. PREPARATION NAME ...! q Keep the rear grills at least 3'(1m) away from overheating. This area will become hot while projector is hot. Obstructions may block cooling air. This projector detects internal temperature and automatically controls operating power of fire and malfunction. Air blown from Exhaust Vents is used...
Owners Manual
Page 8
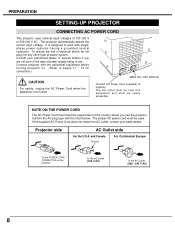
...power cord must meet the requirement of the country where you are not sure of the type of power supply being in use the projector. The projector automatically selects the correct input voltage. To reduce the risk of electrical shock, do not plug into any other type of 100-120... V or 200-240 V AC. MAIN ON / OFF SWITCH Connect AC Power Cord (supplied) to projector. Projector side AC Outlet side For the U.S.A. PREPARATION SETTING-UP PROJECTOR CONNECTING AC POWER CORD This projector uses nominal input voltages of power system. If the supplied AC Power Cord does not match the AC...
...power cord must meet the requirement of the country where you are not sure of the type of power supply being in use the projector. The projector automatically selects the correct input voltage. To reduce the risk of electrical shock, do not plug into any other type of 100-120... V or 200-240 V AC. MAIN ON / OFF SWITCH Connect AC Power Cord (supplied) to projector. Projector side AC Outlet side For the U.S.A. PREPARATION SETTING-UP PROJECTOR CONNECTING AC POWER CORD This projector uses nominal input voltages of power system. If the supplied AC Power Cord does not match the AC...

Owners Manual
Page 9
PREPARATION POSITIONING THE PROJECTOR This projector is recommended to limit ambient lighting in the room has a great influence on picture quality. It is designed to provide the best image. 11.5' (3.5m) 4....
PREPARATION POSITIONING THE PROJECTOR This projector is recommended to limit ambient lighting in the room has a great influence on picture quality. It is designed to provide the best image. 11.5' (3.5m) 4....
Owners Manual
Page 10
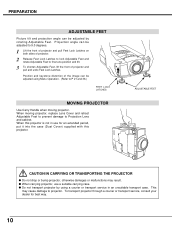
...can be adjusted by using Menu Operation. (Refer to Projection Lens and cabinet. When this projector. q When carrying projector, use for best way. 10 This may result. To transport projector through a courier or transport service, consult your dealer for an extended period, put it into...fine tune position and tilt. 3 To shorten Adjustable Feet, lift the front of projector. 2 Release Feet Lock Latches to lock Adjustable Feet and rotate Adjustable Feet to projector. q Do not transport projector by rotating Adjustable Feet. Projection angle can be adjusted using a courier or transport ...
...can be adjusted by using Menu Operation. (Refer to Projection Lens and cabinet. When this projector. q When carrying projector, use for best way. 10 This may result. To transport projector through a courier or transport service, consult your dealer for an extended period, put it into...fine tune position and tilt. 3 To shorten Adjustable Feet, lift the front of projector. 2 Release Feet Lock Latches to lock Adjustable Feet and rotate Adjustable Feet to projector. q Do not transport projector by rotating Adjustable Feet. Projection angle can be adjusted using a courier or transport ...
Owners Manual
Page 11
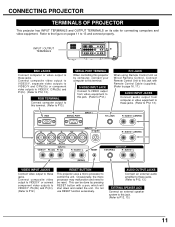
... not use RESET function excessively. Occasionally, the micro processor may malfunction and need to be done by computer, connect your computer to this projector by pressing RESET button with Remote Control Cable (supplied). (Refer to page 16, 17.) AUDIO INPUT JACKS Connect audio output from video ... composite video output to VIDEO/Y or connect component video outputs to VIDEO/Y, Pb(Cb) and Pr(Cr). (Refer to P12.) RESET BUTTON This projector uses a micro processor to control the unit. S-VIDEO INPUT JACK Connect S-VIDEO output from computer or video equipment to these jacks. (Refer to...
... not use RESET function excessively. Occasionally, the micro processor may malfunction and need to be done by computer, connect your computer to this projector by pressing RESET button with Remote Control Cable (supplied). (Refer to page 16, 17.) AUDIO INPUT JACKS Connect audio output from video ... composite video output to VIDEO/Y or connect component video outputs to VIDEO/Y, Pb(Cb) and Pr(Cr). (Refer to P12.) RESET BUTTON This projector uses a micro processor to control the unit. S-VIDEO INPUT JACK Connect S-VIDEO output from computer or video equipment to these jacks. (Refer to...
Owners Manual
Page 12
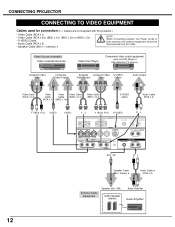
...Audio Equipment Speaker (8Ω / 2W) Audio Speaker (stereo) Audio Amplifier Audio Amplifier 12 CONNECTING PROJECTOR CONNECTING TO VIDEO EQUIPMENT Cables used for connection (✽ = Cables are not supplied with this projector.) • Video Cable (RCA x 1) • Video Cable (RCA x 3)✽, (...; Audio Cable (RCA x 2) • Speaker Cable (Mini x 1 (stereo)) ✽ NOTE : When connecting projector, AC Power Cords of both projector and external equipment should be disconnected from AC outlet. Video Source (example) Video Cassette Recorder Video Disc Player Component video...
...Audio Equipment Speaker (8Ω / 2W) Audio Speaker (stereo) Audio Amplifier Audio Amplifier 12 CONNECTING PROJECTOR CONNECTING TO VIDEO EQUIPMENT Cables used for connection (✽ = Cables are not supplied with this projector.) • Video Cable (RCA x 1) • Video Cable (RCA x 3)✽, (...; Audio Cable (RCA x 2) • Speaker Cable (Mini x 1 (stereo)) ✽ NOTE : When connecting projector, AC Power Cords of both projector and external equipment should be disconnected from AC outlet. Video Source (example) Video Cassette Recorder Video Disc Player Component video...
Owners Manual
Page 13
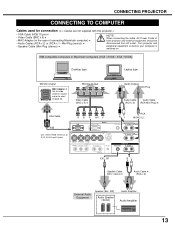
...✽ Audio Cable ✽ (RCA x 2) External Audio Equipment Speaker (8Ω / 2W) Audio Speaker (stereo) Audio Amplifier Audio Amplifier 13 Turn projector and peripheral equipment on before your computer is switched on page 43. RGB SERIAL PORT INPUT 1 R/C JACK R-AUDIO-L(MONO) INPUT 2 G B R H/V...Pr (Cr) R-AUDIO-L RESET AUDIO OUT EXT.SP(8Ω) R-AUDIO-L (MONO) EXT. CONNECTING PROJECTOR CONNECTING TO COMPUTER Cables used for connection (✽ = Cables are not supplied with this projector.) • VGA Cable (HDB 15 pin) ✽ • Video Cable (BNC x ...
...✽ Audio Cable ✽ (RCA x 2) External Audio Equipment Speaker (8Ω / 2W) Audio Speaker (stereo) Audio Amplifier Audio Amplifier 13 Turn projector and peripheral equipment on before your computer is switched on page 43. RGB SERIAL PORT INPUT 1 R/C JACK R-AUDIO-L(MONO) INPUT 2 G B R H/V...Pr (Cr) R-AUDIO-L RESET AUDIO OUT EXT.SP(8Ω) R-AUDIO-L (MONO) EXT. CONNECTING PROJECTOR CONNECTING TO COMPUTER Cables used for connection (✽ = Cables are not supplied with this projector.) • VGA Cable (HDB 15 pin) ✽ • Video Cable (BNC x ...
Owners Manual
Page 14
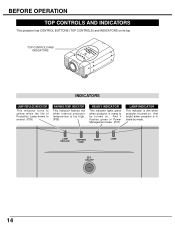
... CONTROL BUTTONS (TOP CONTROLS) and INDICATORS on . INDICATOR This indicator flashes red when internal projector temperature is too high. (P38) READY INDICATOR This indicator lights green when projector is turned on. LAMP REPLACE WARNING TEMP. TOP CONTROLS AND INDICATORS INDICATORS LAMP REPLACE INDICATOR This indicator ...to yellow when the life of Projection Lamp draws to be turned on its top. And bright when projector is in Power Management mode. (P37) LAMP INDICATOR This indicator is dim when projector is ready to an end. (P39) WARNING TEMP. READY LAMP ON-OFF 14
... CONTROL BUTTONS (TOP CONTROLS) and INDICATORS on . INDICATOR This indicator flashes red when internal projector temperature is too high. (P38) READY INDICATOR This indicator lights green when projector is turned on. LAMP REPLACE WARNING TEMP. TOP CONTROLS AND INDICATORS INDICATORS LAMP REPLACE INDICATOR This indicator ...to yellow when the life of Projection Lamp draws to be turned on its top. And bright when projector is in Power Management mode. (P37) LAMP INDICATOR This indicator is dim when projector is ready to an end. (P39) WARNING TEMP. READY LAMP ON-OFF 14
Owners Manual
Page 15
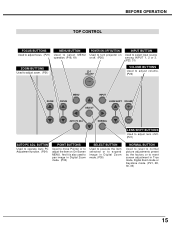
... TOP CONTROL FOCUS BUTTONS Used to adjust focus. (P21) MENU BUTTON Used to select MENU operation. (P18, 19) POWER ON-OFF BUTTON Used to turn projector on On-Screen MENU. BUTTON Used to operate Auto PC Adjustment function. (P24) POINT BUTTONS Used to move Pointer or to adjust the item on...
... TOP CONTROL FOCUS BUTTONS Used to adjust focus. (P21) MENU BUTTON Used to select MENU operation. (P18, 19) POWER ON-OFF BUTTON Used to turn projector on On-Screen MENU. BUTTON Used to operate Auto PC Adjustment function. (P24) POINT BUTTONS Used to move Pointer or to adjust the item on...
Owners Manual
Page 16
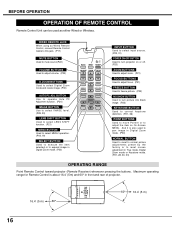
... select Digital Zoom mode and resize image. (P30) AUTO PC ADJ. And it is about 16.4' (5m) and 60° in front and rear of projector. 16.4' (5 m) 60° 60° 16.4' (5 m) 16 BUTTON Use to operate Auto PC Adjustment function. (P24) IMAGE BUTTON Use to select IMAGE level. (P28, 33... Used to adjust zoom. (P21) FOCUS BUTTONS Used to adjust focus. (P21) FREEZE BUTTON Used to freeze picture. (P22) NO SHOW BUTTON Used to turn projector on On-Screen MENU. BEFORE OPERATION OPERATION OF REMOTE CONTROL Remote Control Unit can be used to pan image in Digital Zoom mode. (P30) NORMAL...
... select Digital Zoom mode and resize image. (P30) AUTO PC ADJ. And it is about 16.4' (5m) and 60° in front and rear of projector. 16.4' (5 m) 60° 60° 16.4' (5 m) 16 BUTTON Use to operate Auto PC Adjustment function. (P24) IMAGE BUTTON Use to select IMAGE level. (P28, 33... Used to adjust zoom. (P21) FOCUS BUTTONS Used to adjust focus. (P21) FREEZE BUTTON Used to freeze picture. (P22) NO SHOW BUTTON Used to turn projector on On-Screen MENU. BEFORE OPERATION OPERATION OF REMOTE CONTROL Remote Control Unit can be used to pan image in Digital Zoom mode. (P30) NORMAL...
Owners Manual
Page 18
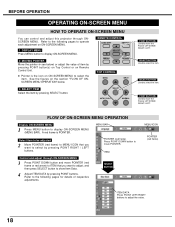
... move the Pointer UP/ DOWN/ RIGHT/ LEFT. BEFORE OPERATION OPERATING ON-SCREEN MENU HOW TO OPERATE ON-SCREEN MENU You can control and adjust this projector through ON-SCREEN MENU 3 Press POINT DOWN button and move POINTER (red frame or red arrow) to ITEM that you want to move the Pointer...
... move the Pointer UP/ DOWN/ RIGHT/ LEFT. BEFORE OPERATION OPERATING ON-SCREEN MENU HOW TO OPERATE ON-SCREEN MENU You can control and adjust this projector through ON-SCREEN MENU 3 Press POINT DOWN button and move POINTER (red frame or red arrow) to ITEM that you want to move the Pointer...
Owners Manual
Page 19
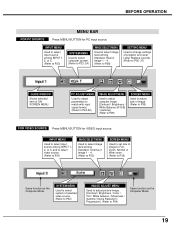
... to P31) IMAGE SELECT MENU Used to select image level among Standard, Real or Image 1 ~ 4. (Refer to P28) SETTING MENU Used to change settings of projector and reset Lamp Replace Counter. (Refer to P36, 37) GUIDE WINDOW Shows selected item of image. (Refer to adjust size of ONSCREEN MENU. PC ADJUST...
... to P31) IMAGE SELECT MENU Used to select image level among Standard, Real or Image 1 ~ 4. (Refer to P28) SETTING MENU Used to change settings of projector and reset Lamp Replace Counter. (Refer to P36, 37) GUIDE WINDOW Shows selected item of image. (Refer to adjust size of ONSCREEN MENU. PC ADJUST...
Owners Manual
Page 20
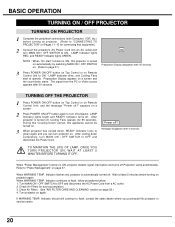
...page 37.) 3 Press POWER ON-OFF button on Top Control or on Remote Control Unit to ON. Indicator should still continue to "CONNECTING TO PROJECTOR" on a screen. 2 Press POWER ON-OFF button again to OFF and disconnect AC Power Cord. Preparation Display appears on Remote Control Unit,.... The signal from a AC outlet. 2. When WARNING TEMP. Refer to green again and you purchased this appliance cannot be turned on. 3 When projector has cooled down completely, turn MAIN ON / OFF SWITCH to turn off . Check Air Filters for dust accumulation. 3. LAMP Indicator lights bright and READY...
...page 37.) 3 Press POWER ON-OFF button on Top Control or on Remote Control Unit to ON. Indicator should still continue to "CONNECTING TO PROJECTOR" on a screen. 2 Press POWER ON-OFF button again to OFF and disconnect AC Power Cord. Preparation Display appears on Remote Control Unit,.... The signal from a AC outlet. 2. When WARNING TEMP. Refer to green again and you purchased this appliance cannot be turned on. 3 When projector has cooled down completely, turn MAIN ON / OFF SWITCH to turn off . Check Air Filters for dust accumulation. 3. LAMP Indicator lights bright and READY...
Owners Manual
Page 23
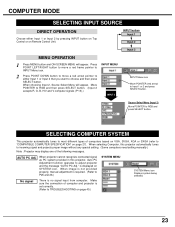
... INPUT button on Top Control or on SYSTEM icon. AUTO PC Adj. is no signal input from computer. SELECTING COMPUTER SYSTEM This projector automatically tunes to most different types of computers based on VGA, SVGA, XGA or SXGA (refer to "COMPATIBLE COMPUTER SPECIFICATION" on page... Input 3 INPUT Menu icon Move POINTER (red arrow) to RGB and press SELECT button. When selecting Computer, this projector, Auto PC Adjustment function operates to adjust projector and the message "AUTO PC Adj." COMPUTER MODE SELECTING INPUT SOURCE DIRECT OPERATION Choose either Input 1 or Input 2 that...
... INPUT button on Top Control or on SYSTEM icon. AUTO PC Adj. is no signal input from computer. SELECTING COMPUTER SYSTEM This projector automatically tunes to most different types of computers based on VGA, SVGA, XGA or SXGA (refer to "COMPATIBLE COMPUTER SPECIFICATION" on page... Input 3 INPUT Menu icon Move POINTER (red arrow) to RGB and press SELECT button. When selecting Computer, this projector, Auto PC Adjustment function operates to adjust projector and the message "AUTO PC Adj." COMPUTER MODE SELECTING INPUT SOURCE DIRECT OPERATION Choose either Input 1 or Input 2 that...
Owners Manual
Page 24
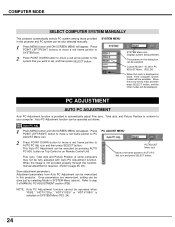
Auto PC Adjustment function can be memorized in this projector. icon and then press SELECT button. This Auto PC Adjustment can be executed by selecting Mode in SYSTEM Menu (above). Adjustment parameters from Auto PC ..., manual adjustment is displayed as follows. button on Top Control or on SYSTEM Menu (P23, 24). COMPUTER MODE SELECT COMPUTER SYSTEM MANUALLY This projector automatically selects PC system among those provided in this projector and PC system can be also selected manually. 1 Press MENU button and ON-SCREEN MENU will be available.
Auto PC Adjustment function can be memorized in this projector. icon and then press SELECT button. This Auto PC Adjustment can be executed by selecting Mode in SYSTEM Menu (above). Adjustment parameters from Auto PC ..., manual adjustment is displayed as follows. button on Top Control or on SYSTEM Menu (P23, 24). COMPUTER MODE SELECT COMPUTER SYSTEM MANUALLY This projector automatically selects PC system among those provided in this projector and PC system can be also selected manually. 1 Press MENU button and ON-SCREEN MENU will be available.


