Owners Manual
Page 2
... INDICATES THAT DANGEROUS VOLTAGE CONSTITUTING A RISK OF ELECTRIC SHOCK IS PRESENT WITHIN THIS UNIT. This projector provides many convenient features and functions. q This projector should be dangerous. q If the projector is to operate improperly, read this booklet. NO USERSERVICEABLE PARTS INSIDE EXCEPT LAMP REPLACEMENT. TO THE OWNER Before operating this projector, read this manual again, check operations and cable connections and try the solutions in the "Trouble...
... INDICATES THAT DANGEROUS VOLTAGE CONSTITUTING A RISK OF ELECTRIC SHOCK IS PRESENT WITHIN THIS UNIT. This projector provides many convenient features and functions. q This projector should be dangerous. q If the projector is to operate improperly, read this booklet. NO USERSERVICEABLE PARTS INSIDE EXCEPT LAMP REPLACEMENT. TO THE OWNER Before operating this projector, read this manual again, check operations and cable connections and try the solutions in the "Trouble...
Owners Manual
Page 3
... retain them for cleaning. If you to dangerous voltage or other controls may expose you are covered by the operating instructions as improper adjustment of power source indicated on an unstable cart, stand, or table. Do not attempt to normal operation. If liquid has been spilled into this projector, ask the service technician to perform routine safety checks to lightning and power line surges...
... retain them for cleaning. If you to dangerous voltage or other controls may expose you are covered by the operating instructions as improper adjustment of power source indicated on an unstable cart, stand, or table. Do not attempt to normal operation. If liquid has been spilled into this projector, ask the service technician to perform routine safety checks to lightning and power line surges...
Owners Manual
Page 5
...SETTING MENU 36 REMOTE CONTROL BATTERIES INSTALLATION 17 OPERATING ON-SCREEN MENU 18 HOW TO OPERATE ON-SCREEN MENU 18 APPENDIX 38 FLOW OF ON-SCREEN MENU OPERATION 18 MENU BAR 19 MAINTENANCE 38 WARNING TEMP. INDICATOR 38 BASIC OPERATION AIR FILTER CARE AND CLEANING 38 20 CLEANING THE PROJECTION LENS 38 LAMP REPLACEMENT 39 TURNING ON / OFF PROJECTOR 20 LAMP REPLACE COUNTER TROUBLESHOOTING 39 40 ADJUSTING SCREEN ZOOM ADJUSTMENT 21 21 TECHNICAL SPECIFICATIONS 42 FOCUS ADJUSTMENT 21 LENS SHIFT ADJUSTMENT 21 KEYSTONE ADJUSTMENT 21 NO SHOW FUNCTION 22 PICTURE...
...SETTING MENU 36 REMOTE CONTROL BATTERIES INSTALLATION 17 OPERATING ON-SCREEN MENU 18 HOW TO OPERATE ON-SCREEN MENU 18 APPENDIX 38 FLOW OF ON-SCREEN MENU OPERATION 18 MENU BAR 19 MAINTENANCE 38 WARNING TEMP. INDICATOR 38 BASIC OPERATION AIR FILTER CARE AND CLEANING 38 20 CLEANING THE PROJECTION LENS 38 LAMP REPLACEMENT 39 TURNING ON / OFF PROJECTOR 20 LAMP REPLACE COUNTER TROUBLESHOOTING 39 40 ADJUSTING SCREEN ZOOM ADJUSTMENT 21 21 TECHNICAL SPECIFICATIONS 42 FOCUS ADJUSTMENT 21 LENS SHIFT ADJUSTMENT 21 KEYSTONE ADJUSTMENT 21 NO SHOW FUNCTION 22 PICTURE...
Owners Manual
Page 6
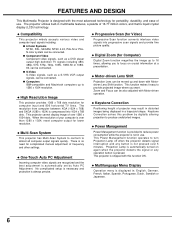
... displayed in use . No complicated setup is necessary and projection is not pressed over 5 minutes. x Motor-driven Lens Shift Projection Lens can be moved up to 16 times, allowing you want. x Multilanguage Menu Display Operation menu is automatically set by digitally altering projection to provide projected image where you to reduce power consumption while the projector is pressed. x Compatibility This projector widely accepts various video and computer input signals including; x One-Touch Auto PC Adjustment...
... displayed in use . No complicated setup is necessary and projection is not pressed over 5 minutes. x Motor-driven Lens Shift Projection Lens can be moved up to 16 times, allowing you want. x Multilanguage Menu Display Operation menu is automatically set by digitally altering projection to provide projected image where you to reduce power consumption while the projector is pressed. x Compatibility This projector widely accepts various video and computer input signals including; x One-Touch Auto PC Adjustment...
Owners Manual
Page 7
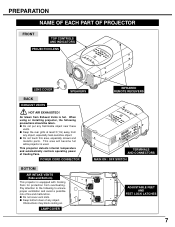
... touch this area, especially screws and metallic parts. q Keep bottom clear of fire and malfunction. Obstructions may block cooling air. This projector detects internal temperature and automatically controls operating power of Cooling Fans. q Do not put any object, especially heat-sensitive object. PREPARATION NAME OF EACH PART OF PROJECTOR FRONT TOP CONTROLS AND INDICATORS PROJECTION LENS LENS COVER SPEAKERS BACK EXHAUST VENTS HOT AIR EXHAUSTED ! q Keep the rear grills at...
... touch this area, especially screws and metallic parts. q Keep bottom clear of fire and malfunction. Obstructions may block cooling air. This projector detects internal temperature and automatically controls operating power of Cooling Fans. q Do not put any object, especially heat-sensitive object. PREPARATION NAME OF EACH PART OF PROJECTOR FRONT TOP CONTROLS AND INDICATORS PROJECTION LENS LENS COVER SPEAKERS BACK EXHAUST VENTS HOT AIR EXHAUSTED ! q Keep the rear grills at...
Owners Manual
Page 8
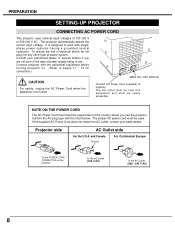
... turning projector on the projector. MAIN ON / OFF SWITCH Connect AC Power Cord (supplied) to work with singlephase power systems having a grounded neutral conductor. It is not used . and Canada Ground For Continental Europe To the POWER CORD CONNECTOR on . (Refer to pages 11 ~ 13 for connection.) CAUTION For safety, unplug the AC Power Cord when the appliance is designed to projector. PREPARATION SETTING-UP PROJECTOR CONNECTING AC POWER CORD This projector uses nominal input...
... turning projector on the projector. MAIN ON / OFF SWITCH Connect AC Power Cord (supplied) to work with singlephase power systems having a grounded neutral conductor. It is not used . and Canada Ground For Continental Europe To the POWER CORD CONNECTOR on . (Refer to pages 11 ~ 13 for connection.) CAUTION For safety, unplug the AC Power Cord when the appliance is designed to projector. PREPARATION SETTING-UP PROJECTOR CONNECTING AC POWER CORD This projector uses nominal input...
Owners Manual
Page 13
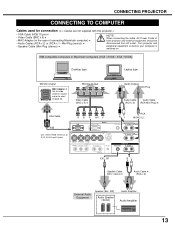
... Use either RGB Terminal or G, B, R, H/V and V jacks. RGB SERIAL PORT INPUT 1 R/C JACK R-AUDIO-L(MONO) INPUT 2 G B R H/V V S-VIDEO R-AUDIO-L(MONO) VIDEO/Y C/Pb (Cb) Pr (Cr) INPUT 3 VIDEO/Y Pb (Cb) Pr (Cr) R-AUDIO-L RESET AUDIO OUT EXT.SP(8Ω) R-AUDIO-L (MONO) EXT. Turn projector and peripheral equipment on before your computer is switched on page 43. Mini Plug (mono)) ✽ • Speaker Cable (Mini Plug (stereo)) ✽ NOTE : When connecting the cable, AC Power Cords of connecting...
... Use either RGB Terminal or G, B, R, H/V and V jacks. RGB SERIAL PORT INPUT 1 R/C JACK R-AUDIO-L(MONO) INPUT 2 G B R H/V V S-VIDEO R-AUDIO-L(MONO) VIDEO/Y C/Pb (Cb) Pr (Cr) INPUT 3 VIDEO/Y Pb (Cb) Pr (Cr) R-AUDIO-L RESET AUDIO OUT EXT.SP(8Ω) R-AUDIO-L (MONO) EXT. Turn projector and peripheral equipment on before your computer is switched on page 43. Mini Plug (mono)) ✽ • Speaker Cable (Mini Plug (stereo)) ✽ NOTE : When connecting the cable, AC Power Cords of connecting...
Owners Manual
Page 14
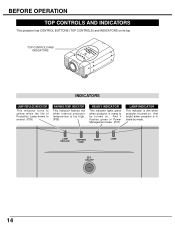
... INDICATORS INDICATORS LAMP REPLACE INDICATOR This indicator turns to yellow when the life of Projection Lamp draws to be turned on its top. INDICATOR This indicator flashes red when internal projector temperature is too high. (P38) READY INDICATOR This indicator lights green when projector is turned on. And it flashes green in stand-by mode. And bright when projector is in Power Management mode. (P37) LAMP INDICATOR This indicator is dim when projector is ready to an end. (P39) WARNING TEMP. BEFORE OPERATION TOP CONTROLS AND INDICATORS This projector has CONTROL BUTTONS...
... INDICATORS INDICATORS LAMP REPLACE INDICATOR This indicator turns to yellow when the life of Projection Lamp draws to be turned on its top. INDICATOR This indicator flashes red when internal projector temperature is too high. (P38) READY INDICATOR This indicator lights green when projector is turned on. And it flashes green in stand-by mode. And bright when projector is in Power Management mode. (P37) LAMP INDICATOR This indicator is dim when projector is ready to an end. (P39) WARNING TEMP. BEFORE OPERATION TOP CONTROLS AND INDICATORS This projector has CONTROL BUTTONS...
Owners Manual
Page 15
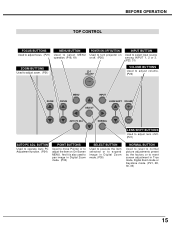
...) ZOOM BUTTONS Used to adjust zoom. (P21) ON-OFF VOLUME BUTTONS Used to adjust volume. (P22) ZOOM FOCUS MENU SELECT INPUT LENS SHIFT VOLUME AUTO PC ADJ. BEFORE OPERATION TOP CONTROL FOCUS BUTTONS Used to adjust focus. (P21) MENU BUTTON Used to select MENU operation. (P18, 19) POWER ON-OFF BUTTON Used to turn projector on On-Screen MENU. And it is also used to pan image in Digital Zoom mode. (P30) SELECT BUTTON Used to execute the item selected or to expand image in Digital Zoom mode. (P30) NORMAL BUTTON Used to reset to normal picture adjustments preset...
...) ZOOM BUTTONS Used to adjust zoom. (P21) ON-OFF VOLUME BUTTONS Used to adjust volume. (P22) ZOOM FOCUS MENU SELECT INPUT LENS SHIFT VOLUME AUTO PC ADJ. BEFORE OPERATION TOP CONTROL FOCUS BUTTONS Used to adjust focus. (P21) MENU BUTTON Used to select MENU operation. (P18, 19) POWER ON-OFF BUTTON Used to turn projector on On-Screen MENU. And it is also used to pan image in Digital Zoom mode. (P30) SELECT BUTTON Used to execute the item selected or to expand image in Digital Zoom mode. (P30) NORMAL BUTTON Used to reset to normal picture adjustments preset...
Owners Manual
Page 16
... image in Digital Zoom mode. (P30) NORMAL BUTTON Used to reset to normal picture adjustments preset by the factory or to reset screen adjustment in Digital Zoom mode. (P30) MUTE INPUT ON-OFF VOLUME ZOOM FOCUS AUTO PC ADJ. Maximum operating range for Remote Control is also used as Wired Remote Control, connect Remote Control Cable to this jack. (P17) MUTE BUTTON Used to mute sound.(P22) VOLUME BUTTONS Used to adjust volume. (P22) D.ZOOM BUTTONS Used to adjust the item on On-Screen MENU. WIRED REMOTE JACK When using as either Wired or Wireless...
... image in Digital Zoom mode. (P30) NORMAL BUTTON Used to reset to normal picture adjustments preset by the factory or to reset screen adjustment in Digital Zoom mode. (P30) MUTE INPUT ON-OFF VOLUME ZOOM FOCUS AUTO PC ADJ. Maximum operating range for Remote Control is also used as Wired Remote Control, connect Remote Control Cable to this jack. (P17) MUTE BUTTON Used to mute sound.(P22) VOLUME BUTTONS Used to adjust volume. (P22) D.ZOOM BUTTONS Used to adjust the item on On-Screen MENU. WIRED REMOTE JACK When using as either Wired or Wireless...
Owners Manual
Page 18
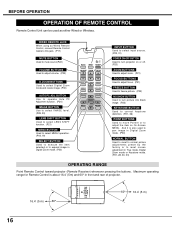
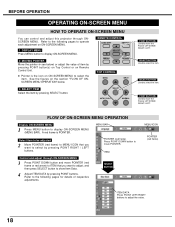
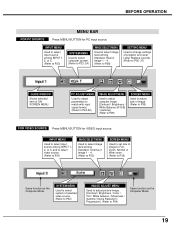
... buttons. REMOTE CONTROL LENS SHIFT KEYSTONE 1 DISPLAY MENU Press MENU button to select by pressing SELECT button. NORMAL POINT BUTTONS Used to display ON-SCREEN MENU (MENU BAR). SELECT BUTTON Used to operate each adjustment on ON-SCREEN MENU. Refer to the following pages for details of item by pressing POINT buttons. MENU BAR Select item to be adjusted 2 Move POINTER (red frame) to MENU ICON that you want to adjust, and then press SELECT button to show Item Data. 4 Adjust...
... buttons. REMOTE CONTROL LENS SHIFT KEYSTONE 1 DISPLAY MENU Press MENU button to select by pressing SELECT button. NORMAL POINT BUTTONS Used to display ON-SCREEN MENU (MENU BAR). SELECT BUTTON Used to operate each adjustment on ON-SCREEN MENU. Refer to the following pages for details of item by pressing POINT buttons. MENU BAR Select item to be adjusted 2 Move POINTER (red frame) to MENU ICON that you want to adjust, and then press SELECT button to show Item Data. 4 Adjust...
Owners Manual
Page 19
... Image 1 ~ 4. (Refer to P33) SCREEN MENU Used to P35) Same function as the Computer Mode. 19 INPUT MENU Used to select input source among INPUT 1, 2, or 3, and to select video source. (Refer to P31) IMAGE SELECT MENU Used to select image level among Standard, Real or Image 1 ~ 4. (Refer to P28) SETTING MENU Used to change settings of projector and reset Lamp Replace Counter. (Refer to P36, 37) GUIDE WINDOW Shows selected item of image to Full, Zoom, Normal or Wide zoom. (Refer to set size...
... Image 1 ~ 4. (Refer to P33) SCREEN MENU Used to P35) Same function as the Computer Mode. 19 INPUT MENU Used to select input source among INPUT 1, 2, or 3, and to select video source. (Refer to P31) IMAGE SELECT MENU Used to select image level among Standard, Real or Image 1 ~ 4. (Refer to P28) SETTING MENU Used to change settings of projector and reset Lamp Replace Counter. (Refer to P36, 37) GUIDE WINDOW Shows selected item of image to Full, Zoom, Normal or Wide zoom. (Refer to set size...
Owners Manual
Page 20
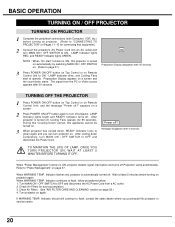
... Power off . When WARNING TEMP. LAMP Indicator dims, and Cooling Fans start " function is ON, this projector is turned off Projection Lamp automatically. TO MAINTAIN THE LIFE OF LAMP, ONCE YOU TURN PROJECTOR ON, WAIT AT LEAST 5 MINUTES BEFORE TURNING IT OFF. Refer to ON. When WARNING TEMP. Clean Air Filters. (See "AIR FILTER CARE AND CLEANING" section on a screen and the count-down , READY Indicator turns to green again and you can turn MAIN ON / OFF SWITCH to operate. Preparation Display...
... Power off . When WARNING TEMP. LAMP Indicator dims, and Cooling Fans start " function is ON, this projector is turned off Projection Lamp automatically. TO MAINTAIN THE LIFE OF LAMP, ONCE YOU TURN PROJECTOR ON, WAIT AT LEAST 5 MINUTES BEFORE TURNING IT OFF. Refer to ON. When WARNING TEMP. Clean Air Filters. (See "AIR FILTER CARE AND CLEANING" section on a screen and the count-down , READY Indicator turns to green again and you can turn MAIN ON / OFF SWITCH to operate. Preparation Display...
Owners Manual
Page 23
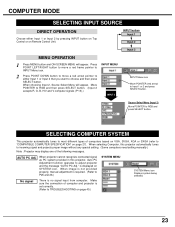
... selected. 23 Source Select Menu (Input 2) Move POINTER to incoming signal and projects proper image without any special setting. (Some computers need setting manually.) Note : Projector may display one of the following messages. When selecting Computer, this projector, Auto PC Adjustment function operates to "COMPATIBLE COMPUTER SPECIFICATION" on VGA, SVGA, XGA or SXGA (refer to adjust projector and the message "AUTO PC Adj." is set correctly. (Refer to choose and then press SELECT button. SELECTING...
... selected. 23 Source Select Menu (Input 2) Move POINTER to incoming signal and projects proper image without any special setting. (Some computers need setting manually.) Note : Projector may display one of the following messages. When selecting Computer, this projector, Auto PC Adjustment function operates to "COMPATIBLE COMPUTER SPECIFICATION" on VGA, SVGA, XGA or SXGA (refer to adjust projector and the message "AUTO PC Adj." is set correctly. (Refer to choose and then press SELECT button. SELECTING...

Owners Manual
Page 36
... the On-Screen Displays. message Logo When this function is "On," picture is selectable from a ceiling mounted projector. This function is used to KEYSTONE ADJUSTMENT on the screen when the input source is "On," projector displays logo when starting up. q ON SCREEN MENU q "Power off . Refer to project the image from among English, German, French, Italian, Spanish, Portuguese, Dutch, Swedish and Japanese. SETTING SETTING MENU 1 Press MENU button and ON-SCREEN MENU will produce a blue image instead of the video noise...
... the On-Screen Displays. message Logo When this function is "On," picture is selectable from a ceiling mounted projector. This function is used to KEYSTONE ADJUSTMENT on the screen when the input source is "On," projector displays logo when starting up. q ON SCREEN MENU q "Power off . Refer to project the image from among English, German, French, Italian, Spanish, Portuguese, Dutch, Swedish and Japanese. SETTING SETTING MENU 1 Press MENU button and ON-SCREEN MENU will produce a blue image instead of the video noise...
Owners Manual
Page 37
... turned on again (Power Management mode). Cooling Fans operate and Projection Lamp is turned off . Time left until Lamp off when the input signal is interrupted and projector is not operated over 10 seconds. Set the Remote control in "Code 2," both MENU and NORMAL buttons on .) 3. After changing the code, make sure the Remote Control operates properly. When replacing Projection Lamp, reset Lamp Replace Counter by switching MAIN ON / OFF SWITCH on the Remote Control Unit. Refer to "Code 2." SETTING Power management This function turns Projection Lamp off when projector...
... turned on again (Power Management mode). Cooling Fans operate and Projection Lamp is turned off . Time left until Lamp off when the input signal is interrupted and projector is not operated over 10 seconds. Set the Remote control in "Code 2," both MENU and NORMAL buttons on .) 3. After changing the code, make sure the Remote Control operates properly. When replacing Projection Lamp, reset Lamp Replace Counter by switching MAIN ON / OFF SWITCH on the Remote Control Unit. Refer to "Code 2." SETTING Power management This function turns Projection Lamp off when projector...
Owners Manual
Page 38
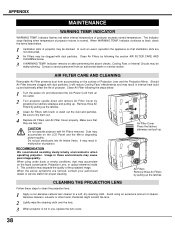
... the life of projector. CAUTION Do not operate projector with dust particles, it . When WARNING TEMP. Should Air Filter become clogged with Air Filters removed. Usage in malfunction of projector. CLEANING THE PROJECTION LENS Follow these environments may degrade the quality of projector may be malfunctioning. The Indicator stops flashing when temperature of cleaner. Contact a service personnel from an AC outlet. 2 Turn projector upside down and remove Air Filter Cover by following the steps below . 3 If WARNING TEMP. Be...
... the life of projector. CAUTION Do not operate projector with dust particles, it . When WARNING TEMP. Should Air Filter become clogged with Air Filters removed. Usage in malfunction of projector. CLEANING THE PROJECTION LENS Follow these environments may degrade the quality of projector may be malfunctioning. The Indicator stops flashing when temperature of cleaner. Contact a service personnel from an AC outlet. 2 Turn projector upside down and remove Air Filter Cover by following the steps below . 3 If WARNING TEMP. Be...
Owners Manual
Page 39
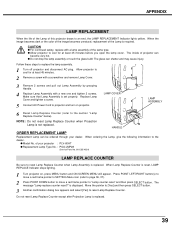
... the color of the image becomes unnatural, replacement of the Lamp is displayed. q Do not drop the lamp assembly or touch the glass bulb! Allow projector to projector and turn on , press MENU button and ON-SCREEN MENU will appear. is required. Follow these steps to the section "Lamp Replace Counter" below). LAMP COVER LAMP ASSEMBLY 6 Reset Lamp Replace Counter (refer to replace the lamp assembly. 1 Turn off projector and disconnect AC plug. When Lamp Replace Counter is reset, LAMP REPLACE Indicator stops lighting. 1 Turn projector on projector. q Model No...
... the color of the image becomes unnatural, replacement of the Lamp is displayed. q Do not drop the lamp assembly or touch the glass bulb! Allow projector to projector and turn on , press MENU button and ON-SCREEN MENU will appear. is required. Follow these steps to the section "Lamp Replace Counter" below). LAMP COVER LAMP ASSEMBLY 6 Reset Lamp Replace Counter (refer to replace the lamp assembly. 1 Turn off projector and disconnect AC plug. When Lamp Replace Counter is reset, LAMP REPLACE Indicator stops lighting. 1 Turn projector on projector. q Model No...
Owners Manual
Page 40
... temperature location may be turned on. (See "TURNING ON/OFF THE PROJECTOR" section on by pressing the power ON-OFF button. Indicator. q Press MUTE button. 40 If the problem still exists, check the following chart. q Be sure READY Indicator light is out of focus. Image is On. Picture is not out of : projector and computer.) 6. If this indicator flashes red, projector cannot be turned on page 20.) q Check the Projection Lamp. (Refer to page 39.) q Adjust...
... temperature location may be turned on. (See "TURNING ON/OFF THE PROJECTOR" section on by pressing the power ON-OFF button. Indicator. q Press MUTE button. 40 If the problem still exists, check the following chart. q Be sure READY Indicator light is out of focus. Image is On. Picture is not out of : projector and computer.) 6. If this indicator flashes red, projector cannot be turned on page 20.) q Check the Projection Lamp. (Refer to page 39.) q Adjust...
Owners Manual
Page 42
... SPECIFICATIONS Projector Type Dimensions (W x H x D) Net Weight LCD Panel System Panel Resolution Number of Pixels Color System High Definition TV Signal Scanning Frequency Projection Image size (Diagonal) Horizontal Resolution Projection Lens Throw Distance Projection Lamp Computer / AV Input Jacks Audio Input Jacks (Input 1/2/3) Serial Port Terminal R/C Jack Audio Output Jacks External Speaker Jack Internal Audio Amp Built-in Speakers Feet Adjustment Voltage and Power Consumption Operating Temperature Storage Temperature Remote Control Transmitter Accessories Multi-media Projector...
... SPECIFICATIONS Projector Type Dimensions (W x H x D) Net Weight LCD Panel System Panel Resolution Number of Pixels Color System High Definition TV Signal Scanning Frequency Projection Image size (Diagonal) Horizontal Resolution Projection Lens Throw Distance Projection Lamp Computer / AV Input Jacks Audio Input Jacks (Input 1/2/3) Serial Port Terminal R/C Jack Audio Output Jacks External Speaker Jack Internal Audio Amp Built-in Speakers Feet Adjustment Voltage and Power Consumption Operating Temperature Storage Temperature Remote Control Transmitter Accessories Multi-media Projector...


