Sanyo PLC-WXU10N - WXGA LCD Projector Support and Manuals
Get Help and Manuals for this Sanyo item
View All Support Options Below
Free Sanyo PLC-WXU10N manuals!
Problems with Sanyo PLC-WXU10N?
Ask a Question
Free Sanyo PLC-WXU10N manuals!
Problems with Sanyo PLC-WXU10N?
Ask a Question
Popular Sanyo PLC-WXU10N Manual Pages
Owners Manual - Page 2

... other accidents. If the problem still persists, contact the dealer where you to be built into the beam. - If the projector is to operate improperly, read this booklet. To the Owner
Before operating this projector, read this manual again, check operations and cable connections and try the solutions in the "Troubleshooting" section in the end...
Owners Manual - Page 4
... company. Adjust only those controls that are required, be operated only from overheating. This projector should be sure the service technician has used replacement parts specified by following conditions: a. If the projector has been dropped or the cabinet has been damaged. Read all servicing to rest on the marking label. Do not allow anything to qualified...
Owners Manual - Page 5
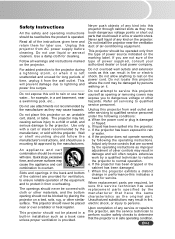
...especially screws and metallic part. Installing the Projector in an unsuitable transport case.
Do not drop or bump the projector, otherwise damages or malfunctions may reduce the lamp life and cause ... using a courier or transport service in Proper Position
Install the projector properly. Moving the Projector When moving the projector, replace the lens cap and retract the elevator feet to...
Owners Manual - Page 6

... A LIVE SOCKET OUTLET. If this projector meets the requirement for the United States and Canada: AC Power Cord used of the
equipment. Reorient or relocate the receiving antenna.
- red or orange).
THE SOCKET-OUTLET SHOULD BE INSTALLED NEAR THE EQUIPMENT AND EASILY ACCESSIBLE. Model Number : PLC-WXU10N
Trade Name
: Sanyo
Responsible party : SANYO FISHER COMPANY
Address
: 21605...
Owners Manual - Page 8
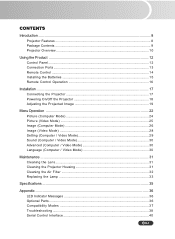
...28 Setting (Computer / Video Mode 29 Sound (Computer / Video Mode 30 Advanced (Computer / Video Mode 30 Language (Computer / Video Mode 30
Maintenance ...31 Cleaning the Lens ...31 Cleaning the Projector Housing 31 Cleaning the Air Filter 32 Replacing the Lamp ...33
Specifications ...35
Appendix ...36 LED Indicator Messages 36 Optional Parts ...36 Compatibility Modes ...37 Troubleshooting...
Owners Manual - Page 9
... signal DVI 24-pin terminal for connecting DVI output from a computer User-friendly, multi-language on-screen display (OSD) Advanced electronic keystone correction
* means compressed.
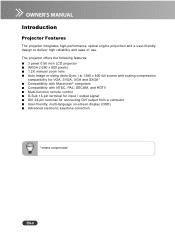
The projector offers the following features:
3 panel 0.56 inch LCD projector WXGA (1280 x 800 pixels) 1.2X manual zoom lens Auto image re-sizing (Auto-Sync.) to deliver high reliability...
Owners Manual - Page 10
... components may vary by retailer and region. EN-9
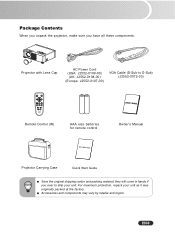
Package Contents
When you unpack the projector, make sure you ever to D-Sub) (J2552-0072-03)
Remote Control (IR)
AAA size batteries for remote control
Owner's Manual
Projector Carrying Case
Quick Start Guide
Save the original shipping carton and packing material; For maximum protection, repack your...
Owners Manual - Page 12

EN-11 The ceiling mount is not included in the package. Rear View
1 Ventilation holes
2 Connection ports
3 Kensington lock
4 Rear IR remote control sensor
5 Speaker
1
2
Bottom View
1 Air filter cover
2 Lamp cover
3 Ceiling mount (3-M4*6)
1
3
3
5
43
2 3
This projector can be used with a ceiling mount for support.
Owners Manual - Page 13

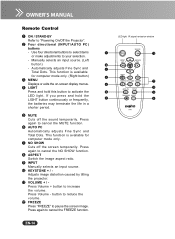
.../Off the Projector". 4 Four directional (INPUT/AUTO PC ) buttons
- This function is available for
computer mode only. (Right button) 5 MENU
Displays or exits the on-screen display menus. EN-12 Automatically adjusts Fine Sync and Total Dots.
Manually selects an input source. (Left button) - Using the Product
Control Panel
1
2
LED 1 Lamp LED indicator...
Owners Manual - Page 15
...
8 ASPECT Switch the image aspect ratio.
9 INPUT Manually selects an input source.
10 KEYSTONE + / Adjusts image distortion caused by tilting the projector.
11 VOLUME + / Press Volume + button to...function is available for computer mode only.
7 NO SHOW Cuts off the sound temporarily. Press Volume -
Manually selects an input source. (Left button) - Remote Control
1 ON / STAND-BY Refer to your...
Owners Manual - Page 24
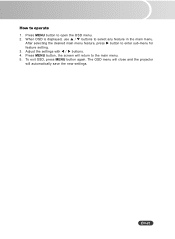
... X button to the main menu. 5.
Press MENU button, the screen will automatically save the new settings.
EN-23 Adjust the settings with W / X buttons. 4. The OSD menu will close and the projector will return to enter sub-menu for feature setting. 3. Press MENU button to open the OSD menu. 2. To exit OSD, press MENU button...
Owners Manual - Page 25
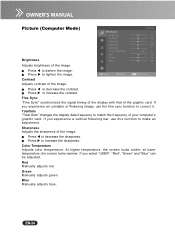
...24 At higher temperature, the screen looks colder; Red Manually adjusts red.
Fine Sync "Fine Sync" synchronizes the signal timing of the display with that of... Manually adjusts green. Contrast Adjusts contrast of the image. If you select "USER", "Red", "Green" and "Blue" can be adjusted. Press W to increase the sharpness. at lower temperature, the screen looks warmer. Blue Manually ...
Owners Manual - Page 35

... in injury or accidents. Model No. Dispose of the projector.
6. Turn off the projector and unplug the AC power cord before replacing the lamp. Turn the projector over so you can be ordered through your projector: Replacement Lamp Type No.:
PLC-WXU10N/ WXU10E/ WXU10B POA-LMP113
(Service Parts No. 610 336 0362)
EN-34 ORDER REPLACEMENT LAMP
Replacement lamp can access the lamp cover.
3.
Owners Manual - Page 36
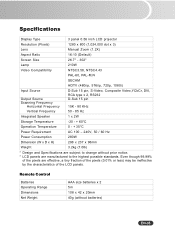
... (0.01% or less) may be ineffective by the characteristics of the LCD panels. Specifications
Display Type
3 panel 0.56 inch LCD projector
Resolution (Pixels)
1280 x 800 (1,024,000 dot x 3)
Lens
Manual Zoom (1.2X)
Aspect Ratio
16:10 (Default)
Screen Size
26.7" - 302"
Lamp
210W
Video Compatibility
NTSC3.58, NTSC4.43
PAL-60, PAL-M,N
SECAM
HDTV...
Owners Manual - Page 39

... .
"NO SHOW" function is loose. button. (p. 12, 14, 27)
displayed image. Change the monitor color setting
from your local reseller or service center. range. Please refer to Picture
computer's graphic card.
The lamp cover is activated. wait for repairs.
section. (p. 12, 14, 24)
Check and reconfigure the
display mode of your adjustment. The AC...
Sanyo PLC-WXU10N Reviews
We have not received any reviews for Sanyo yet.