
Owners Manual
Page 2
... can reduce the service life of the projector cabinet for an extended time, unplug the projector from the projection lens. If the problem still persists, contact the dealer where you to operate improperly, read this booklet. Do not stare directly into the beam. - If the projector is not to be built into a compartment or similarly enclosed, the minimum distances must be...
... can reduce the service life of the projector cabinet for an extended time, unplug the projector from the projection lens. If the problem still persists, contact the dealer where you to operate improperly, read this booklet. Do not stare directly into the beam. - If the projector is not to be built into a compartment or similarly enclosed, the minimum distances must be...
Owners Manual
Page 4
... blocked by the manufacturers. Refer all of power source indicated on a bed, sofa, rug, or other materials, and the bottom opening or removing covers may cause hazards. This will often require extensive work by the operating instructions as improper adjustment of time, unplug it from wall outlet and refer servicing to service this projector from overheating. The openings should be placed near the ventilation duct of...
... blocked by the manufacturers. Refer all of power source indicated on a bed, sofa, rug, or other materials, and the bottom opening or removing covers may cause hazards. This will often require extensive work by the operating instructions as improper adjustment of time, unplug it from wall outlet and refer servicing to service this projector from overheating. The openings should be placed near the ventilation duct of...
Owners Manual
Page 5
... the projector is changed according to the temperature inside the projector. Installing the Projector in Proper Position Install the projector properly. USE CAUTION IN CARRYING OR TRANSPORTING THE PROJECTOR - When carrying the projector, use for an extended period, put it into a suitable case with the lens side up to project an image. Keep the exhaust vent at least 90 cm away from overheating, and these openings must not...
... the projector is changed according to the temperature inside the projector. Installing the Projector in Proper Position Install the projector properly. USE CAUTION IN CARRYING OR TRANSPORTING THE PROJECTOR - When carrying the projector, use for an extended period, put it into a suitable case with the lens side up to project an image. Keep the exhaust vent at least 90 cm away from overheating, and these openings must not...

Owners Manual
Page 6
... electrician. Model Number : PLC-WXU10N Trade Name : Sanyo Responsible party : SANYO FISHER COMPANY Address : 21605 Plummer Street, Chatsworth, California 91311 Telephone No. : (818)998-7322 AC Power Cord Requirement The AC Power Cord supplied with the letter N or coloured black. AC Power Cord for help. This is coloured brown must be cut off and on a circuit different from the Parts Department indicated in a residential installation. If a replacement fuse cover is...
... electrician. Model Number : PLC-WXU10N Trade Name : Sanyo Responsible party : SANYO FISHER COMPANY Address : 21605 Plummer Street, Chatsworth, California 91311 Telephone No. : (818)998-7322 AC Power Cord Requirement The AC Power Cord supplied with the letter N or coloured black. AC Power Cord for help. This is coloured brown must be cut off and on a circuit different from the Parts Department indicated in a residential installation. If a replacement fuse cover is...
Owners Manual
Page 8
... Remote Control Operation 16 Installation ...17 Connecting the Projector 17 Powering On/Off the Projector 18 Adjusting the Projected Image 19 Menu Operation ...22 Picture (Computer Mode 24 Picture (Video Mode) ...25 Image (Computer Mode 26 Image (Video Mode) ...28 Setting (Computer / Video Mode 29 Sound (Computer / Video Mode 30 Advanced (Computer / Video Mode 30 Language (Computer / Video Mode 30 Maintenance ...31 Cleaning the Lens ...31 Cleaning the Projector Housing 31 Cleaning the Air Filter 32 Replacing the Lamp ...33 Specifications ...35 Appendix ...36 LED Indicator Messages...
... Remote Control Operation 16 Installation ...17 Connecting the Projector 17 Powering On/Off the Projector 18 Adjusting the Projected Image 19 Menu Operation ...22 Picture (Computer Mode 24 Picture (Video Mode) ...25 Image (Computer Mode 26 Image (Video Mode) ...28 Setting (Computer / Video Mode 29 Sound (Computer / Video Mode 30 Advanced (Computer / Video Mode 30 Language (Computer / Video Mode 30 Maintenance ...31 Cleaning the Lens ...31 Cleaning the Projector Housing 31 Cleaning the Air Filter 32 Replacing the Lamp ...33 Specifications ...35 Appendix ...36 LED Indicator Messages...
Owners Manual
Page 9
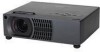
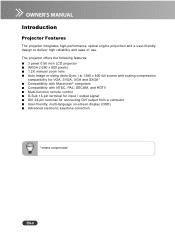
EN-8 The projector offers the following features: 3 panel 0.56 inch LCD projector WXGA (1280 x 800 pixels) 1.2X manual zoom lens Auto image re-sizing (Auto-Sync.) to deliver high reliability and ease of use. Introduction Projector Features The projector integrates high-performance optical engine projection and a user-friendly design to 1280 x 800 full screen with scaling compression compatibility for VGA, SVGA, XGA and SXGA* Compatibility with Macintosh® computers Compatibility with NTSC, PAL, SECAM...
EN-8 The projector offers the following features: 3 panel 0.56 inch LCD projector WXGA (1280 x 800 pixels) 1.2X manual zoom lens Auto image re-sizing (Auto-Sync.) to deliver high reliability and ease of use. Introduction Projector Features The projector integrates high-performance optical engine projection and a user-friendly design to 1280 x 800 full screen with scaling compression compatibility for VGA, SVGA, XGA and SXGA* Compatibility with Macintosh® computers Compatibility with NTSC, PAL, SECAM...

Owners Manual
Page 12
Rear View 1 Ventilation holes 2 Connection ports 3 Kensington lock 4 Rear IR remote control sensor 5 Speaker 1 2 Bottom View 1 Air filter cover 2 Lamp cover 3 Ceiling mount (3-M4*6) 1 3 3 5 43 2 3 This projector can be used with a ceiling mount for support. The ceiling mount is not included in the package. EN-11
Rear View 1 Ventilation holes 2 Connection ports 3 Kensington lock 4 Rear IR remote control sensor 5 Speaker 1 2 Bottom View 1 Air filter cover 2 Lamp cover 3 Ceiling mount (3-M4*6) 1 3 3 5 43 2 3 This projector can be used with a ceiling mount for support. The ceiling mount is not included in the package. EN-11

Owners Manual
Page 13
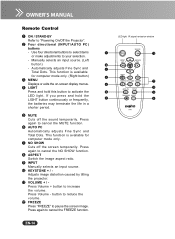
... This function is available for computer mode only. (Right button) 5 MENU Displays or exits the on-screen display menus. Using the Product Control Panel 1 2 LED 1 Lamp LED indicator Refer to "LED Indicator Messages". 2 Power LED indicator Refer to "LED Indicator Messages". 5 4 3 Button Function 3 ON / STAND-BY Refer to your selection. - Manually selects an input source. (Left button) - Use four directional buttons to select items or make adjustments to "Powering On/Off the Projector". 4 Four directional (INPUT/AUTO PC ) buttons - Automatically adjusts Fine Sync and Total Dots.
... This function is available for computer mode only. (Right button) 5 MENU Displays or exits the on-screen display menus. Using the Product Control Panel 1 2 LED 1 Lamp LED indicator Refer to "LED Indicator Messages". 2 Power LED indicator Refer to "LED Indicator Messages". 5 4 3 Button Function 3 ON / STAND-BY Refer to your selection. - Manually selects an input source. (Left button) - Use four directional buttons to select items or make adjustments to "Powering On/Off the Projector". 4 Four directional (INPUT/AUTO PC ) buttons - Automatically adjusts Fine Sync and Total Dots.
Owners Manual
Page 15
..." to "Powering On/Off the Projector". 2 Four directional (INPUT/AUTO PC) buttons - This function is available for computer mode only. 7 NO SHOW Cuts off the sound temporarily. EN-14 LED light IR signal emission window 1 12 2 3 4 11 5 10 6 9 7 8 Remote Control 1 ON / STAND-BY Refer to pause the screen image. Press Volume - This function is available for computer mode only. (Right button) 3 MENU Displays or exits the on-screen display menus. 4 LIGHT Press...
..." to "Powering On/Off the Projector". 2 Four directional (INPUT/AUTO PC) buttons - This function is available for computer mode only. 7 NO SHOW Cuts off the sound temporarily. EN-14 LED light IR signal emission window 1 12 2 3 4 11 5 10 6 9 7 8 Remote Control 1 ON / STAND-BY Refer to pause the screen image. Press Volume - This function is available for computer mode only. (Right button) 3 MENU Displays or exits the on-screen display menus. 4 LIGHT Press...
Owners Manual
Page 19
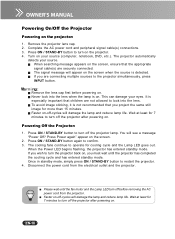
... connecting multiple sources to turn off the projector after powering on the screen, ensure that you project the same still image for 7 minutes to confirm. 3. The projector automatically detects your source (computer, notebook, DVD, etc.). EN-18 J When searching message appears on . Press ON / STAND-BY button to look into the lens. Complete the AC power cord and peripheral signal cable(s) connections. 3. J The signal message will damage the lamp and reduce lamp life...
... connecting multiple sources to turn off the projector after powering on the screen, ensure that you project the same still image for 7 minutes to confirm. 3. The projector automatically detects your source (computer, notebook, DVD, etc.). EN-18 J When searching message appears on . Press ON / STAND-BY button to look into the lens. Complete the AC power cord and peripheral signal cable(s) connections. 3. J The signal message will damage the lamp and reduce lamp life...
Owners Manual
Page 23
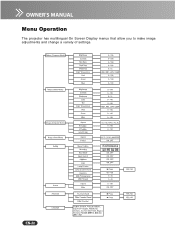
EN-22 Menu Operation The projector has multilingual On Screen Display menus that allow you to make image adjustments and change a variety of settings.
EN-22 Menu Operation The projector has multilingual On Screen Display menus that allow you to make image adjustments and change a variety of settings.
Owners Manual
Page 25
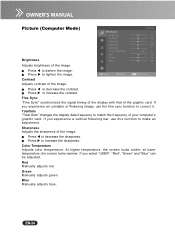
Fine Sync "Fine Sync" synchronizes the signal timing of the display with that of the image. Sharpness Adjusts the sharpness of the graphic card. Color Temperature Adjusts color temperature. EN-24 Press W to increase the contrast. Red Manually adjusts red. Contrast Adjusts contrast of the image. At higher temperature, the screen looks colder; Press X to decrease the contrast. Total Dots "Total Dots" changes the display data frequency to increase the sharpness. Press X to match the frequency...
Fine Sync "Fine Sync" synchronizes the signal timing of the display with that of the image. Sharpness Adjusts the sharpness of the graphic card. Color Temperature Adjusts color temperature. EN-24 Press W to increase the contrast. Red Manually adjusts red. Contrast Adjusts contrast of the image. At higher temperature, the screen looks colder; Press X to decrease the contrast. Total Dots "Total Dots" changes the display data frequency to increase the sharpness. Press X to match the frequency...
Owners Manual
Page 30
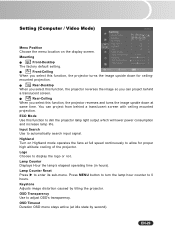
... factory default setting. Lamp Counter Reset Press X to 0 hours. Press MENU button to turn the lamp hour counter to enter its sub-menu. EN-29 You can project behind a translucent screen with ceiling mounted projection. OSD Transparency Use to automatically search input signal. Rear-Desktop When you select this function, the projector turns the image upside down at same time. Rear-Ceiling When you select this function to dim the projector lamp light output which will lower power consumption and increase lamp life. Lamp Counter Displays Hour the lamp...
... factory default setting. Lamp Counter Reset Press X to 0 hours. Press MENU button to turn the lamp hour counter to enter its sub-menu. EN-29 You can project behind a translucent screen with ceiling mounted projection. OSD Transparency Use to automatically search input signal. Rear-Desktop When you select this function, the projector turns the image upside down at same time. Rear-Ceiling When you select this function to dim the projector lamp light output which will lower power consumption and increase lamp life. Lamp Counter Displays Hour the lamp...

Owners Manual
Page 32
... service personnel. Cleaning the Projector Housing Gently wipe with a soft, dry cloth. You should keep the lens clean as dust, dirt or spots will project on the projector. Cleaning the Lens Gently wipe the lens with your dealer or qualified service personnel. If any other parts need replacing, contact your hands. Refer all servicing to service this product yourself. Warning: Never open any part of the covers on the screen and diminish image...
... service personnel. Cleaning the Projector Housing Gently wipe with a soft, dry cloth. You should keep the lens clean as dust, dirt or spots will project on the projector. Cleaning the Lens Gently wipe the lens with your dealer or qualified service personnel. If any other parts need replacing, contact your hands. Refer all servicing to service this product yourself. Warning: Never open any part of the covers on the screen and diminish image...
Owners Manual
Page 33
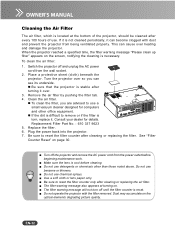
... lens is reset. The filter warning message also appears at the bottom of use. Do not operate the projector with dust and prevent the projector from being ventilated properly. Switch the projector off the projector and remove the AC power cord from the wall socket. 2. Plug the power back into the projector. 7. EN-32 Be sure to reset the filter counter only after turning it . See "Filter Counter Reset" on the optical elements degrading picture...
... lens is reset. The filter warning message also appears at the bottom of use. Do not operate the projector with dust and prevent the projector from being ventilated properly. Switch the projector off the projector and remove the AC power cord from the wall socket. 2. Plug the power back into the projector. 7. EN-32 Be sure to reset the filter counter only after turning it . See "Filter Counter Reset" on the optical elements degrading picture...
Owners Manual
Page 34
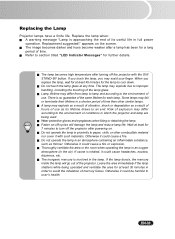
... with the ON/ STAND-BY button. If ozone is involved in the air). appears on -off the projector with such materials. The lamp may scald your finger. Faster on the screen. Replace the lamp when: A warning message "Lamp is no guarantee of time than other combustible material nor cover it could be harmful to section titled "LED Indicator Messages" for each lamp. The lamp becomes high temperature after powering on.
... with the ON/ STAND-BY button. If ozone is involved in the air). appears on -off the projector with such materials. The lamp may scald your finger. Faster on the screen. Replace the lamp when: A warning message "Lamp is no guarantee of time than other combustible material nor cover it could be harmful to section titled "LED Indicator Messages" for each lamp. The lamp becomes high temperature after powering on.

Owners Manual
Page 35
... the projector. 6. Do not use the projector with the new lamp. 7. Turn the projector over so you can be ordered through your projector: Replacement Lamp Type No.: PLC-WXU10N/ WXU10E/ WXU10B POA-LMP113 (Service Parts No. 610 336 0362) EN-34 Tighten the screw on the lamp cover. 9. Be sure to the "Setting (Computer/Video Mode)" menu. Loosen the access panel screw and open the panel. 4. Replace with the lamp cover removed. 1. Do not reuse the old lamp. Reset the lamp hour. Model No...
... the projector. 6. Do not use the projector with the new lamp. 7. Turn the projector over so you can be ordered through your projector: Replacement Lamp Type No.: PLC-WXU10N/ WXU10E/ WXU10B POA-LMP113 (Service Parts No. 610 336 0362) EN-34 Tighten the screw on the lamp cover. 9. Be sure to the "Setting (Computer/Video Mode)" menu. Loosen the access panel screw and open the panel. 4. Replace with the lamp cover removed. 1. Do not reuse the old lamp. Reset the lamp hour. Model No...
Owners Manual
Page 36
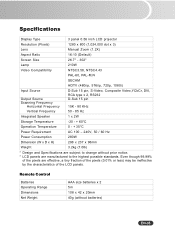
Specifications Display Type 3 panel 0.56 inch LCD projector Resolution (Pixels) 1280 x 800 (1,024,000 dot x 3) Lens Manual Zoom (1.2X) Aspect Ratio 16:10 (Default) Screen Size 26.7" - 302" Lamp 210W Video Compatibility NTSC3.58, NTSC4.43 PAL-60, PAL-M,N SECAM HDTV (480i/p, 576i/p, 720p, 1080i) Input Source Output Source Scanning Frequency Horizontal Frequency D-Sub 15 pin, S-Video, Composite Video,YCbCr, DVI, RCA type x 2, RS232 D-Sub 15 pin 15K - 80 KHz Vertical...
Specifications Display Type 3 panel 0.56 inch LCD projector Resolution (Pixels) 1280 x 800 (1,024,000 dot x 3) Lens Manual Zoom (1.2X) Aspect Ratio 16:10 (Default) Screen Size 26.7" - 302" Lamp 210W Video Compatibility NTSC3.58, NTSC4.43 PAL-60, PAL-M,N SECAM HDTV (480i/p, 576i/p, 720p, 1080i) Input Source Output Source Scanning Frequency Horizontal Frequency D-Sub 15 pin, S-Video, Composite Video,YCbCr, DVI, RCA type x 2, RS232 D-Sub 15 pin 15K - 80 KHz Vertical...
Owners Manual
Page 37
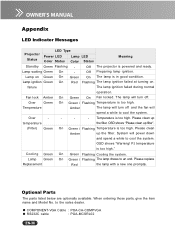
... Replacement On Green Flashing Cooling the system. to an end. On The lamp is too high. The lamp will turn off . On Green / Flashing Temperature is too high." PJ temperature is too high. OSD shows "Warning! Over - - - Please clean up the filter. Lamp waiting Green On - Lamp on . Flashing The lamp ignition failed at turning on Green On Green Lamp ignition Green On Red failure Off The projector is too high. Appendix LED Indicator Messages Projector Status LED Type Power LED Color Status Lamp LED Color Status Meaning Standby...
... Replacement On Green Flashing Cooling the system. to an end. On The lamp is too high. The lamp will turn off . On Green / Flashing Temperature is too high." PJ temperature is too high. OSD shows "Warning! Over - - - Please clean up the filter. Lamp waiting Green On - Lamp on . Flashing The lamp ignition failed at turning on Green On Green Lamp ignition Green On Red failure Off The projector is too high. Appendix LED Indicator Messages Projector Status LED Type Power LED Color Status Lamp LED Color Status Meaning Standby...

Owners Manual
Page 39
... focus focus. I m a g e i s o u t o f The lens focus is activated. The lamp cover is not Place the projector within the within the projector's supported supported range. wait for repairs. Turn the projector on screen. Change the monitor color setting from your adjustment. optimally. Unplug the AC power cord and during use. not match the frequency of the display Use "Fine Sync" to correct it compatible with the to Picture section. (p. 12, 14, 24) graphic card. ring. (p. 20) The projection distance...
... focus focus. I m a g e i s o u t o f The lens focus is activated. The lamp cover is not Place the projector within the within the projector's supported supported range. wait for repairs. Turn the projector on screen. Change the monitor color setting from your adjustment. optimally. Unplug the AC power cord and during use. not match the frequency of the display Use "Fine Sync" to correct it compatible with the to Picture section. (p. 12, 14, 24) graphic card. ring. (p. 20) The projection distance...


