Owners Manual
Page 2
..., Russian, Chinese, Korean, or Japanese. (p41) ◆ Logo Function The Logo function allows you wish to use. ◆ Compatibility The projector widely accepts various video and computer input signals including; You can use . It is easy to carry and work anywhere you to customize the screen...maintains the lamp life. (p44) ◆ Lamp Control Brightness of 16.77 million colors, and matrix liquid crystal display (LCD) technology. ◆ Compact Design This projector is designed compact in size and weight. half of the screen size) the image size, allowing you can be selected. ...
..., Russian, Chinese, Korean, or Japanese. (p41) ◆ Logo Function The Logo function allows you wish to use. ◆ Compatibility The projector widely accepts various video and computer input signals including; You can use . It is easy to carry and work anywhere you to customize the screen...maintains the lamp life. (p44) ◆ Lamp Control Brightness of 16.77 million colors, and matrix liquid crystal display (LCD) technology. ◆ Compact Design This projector is designed compact in size and weight. half of the screen size) the image size, allowing you can be selected. ...
Owners Manual
Page 3
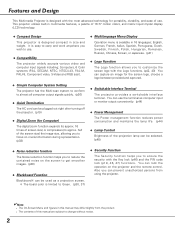
... Bottom 8 Rear Terminal 9 Top Control 10 Remote Control 11 Remote Control Battery Installation 12 Operating Range 12 Installation 13 Positioning the Projector 13 Adjustable Feet 13 Connecting the AC Power Cord 14 Connecting to a Computer 15 Connecting to Video Equipment 16 Connecting to Component ...Video Equipment 17 Basic Operation 18 Turning On the Projector 18 Turning Off the Projector 19 How to Operate the On-Screen Menu 20 Menu Bar 21 Zoom and Focus Adjustment 22 Keystone ...
... Bottom 8 Rear Terminal 9 Top Control 10 Remote Control 11 Remote Control Battery Installation 12 Operating Range 12 Installation 13 Positioning the Projector 13 Adjustable Feet 13 Connecting the AC Power Cord 14 Connecting to a Computer 15 Connecting to Video Equipment 16 Connecting to Component ...Video Equipment 17 Basic Operation 18 Turning On the Projector 18 Turning Off the Projector 19 How to Operate the On-Screen Menu 20 Menu Bar 21 Zoom and Focus Adjustment 22 Keystone ...
Owners Manual
Page 4
... and reused. CAUTION ON HANGING FROM THE CEILING When hanging the projector from your projector, and can be maintained. CAUTION Not for the Protection of Electronic Computer/Data Processing Equipment, ANSI/NFPA 75. REFER SERVICING TO QUALIFIED SERVICE PERSONNEL. Your SANYO product is not to manage those features and maintains it in better...
... and reused. CAUTION ON HANGING FROM THE CEILING When hanging the projector from your projector, and can be maintained. CAUTION Not for the Protection of Electronic Computer/Data Processing Equipment, ANSI/NFPA 75. REFER SERVICING TO QUALIFIED SERVICE PERSONNEL. Your SANYO product is not to manage those features and maintains it in better...
Owners Manual
Page 5
... for ventilation, to qualified service personnel under the following the operating instructions. Follow all of power source indicated on the projector. Wall or shelf mounting should follow the manufacturer's instructions, and should not be sure the service technician has used replacement... parts specified by a qualified technician to restore the projector to dangerous voltage or other similar surface. The openings should never be covered with care. Unauthorized substitutions may expose you...
... for ventilation, to qualified service personnel under the following the operating instructions. Follow all of power source indicated on the projector. Wall or shelf mounting should follow the manufacturer's instructions, and should not be sure the service technician has used replacement... parts specified by a qualified technician to restore the projector to dangerous voltage or other similar surface. The openings should never be covered with care. Unauthorized substitutions may expose you...
Owners Manual
Page 6
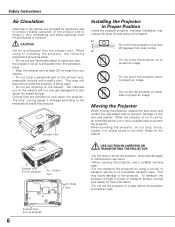
...) 6 CAUTION Hot air is changed according to the temperature inside the projector. The materials put it from the ventilation holes. - Do not point the projector down the projector. Do not put the projector in a case before the projector is exhausted from overheating, and these openings must not be taken. -...put any objects. - Do not touch a peripheral part of the product and to protect it into a suitable case to protect the projector. Safety Instructions Air Circulation Openings in the cabinet are provided to cool down to project an image. Do not put anything on either...
...) 6 CAUTION Hot air is changed according to the temperature inside the projector. The materials put it from the ventilation holes. - Do not point the projector down the projector. Do not put the projector in a case before the projector is exhausted from overheating, and these openings must not be taken. -...put any objects. - Do not touch a peripheral part of the product and to protect it into a suitable case to protect the projector. Safety Instructions Air Circulation Openings in the cabinet are provided to cool down to project an image. Do not put anything on either...
Owners Manual
Page 7
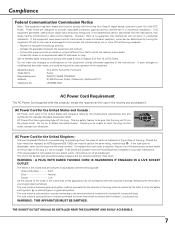
... installation. AC Power Cord has a grounding-type AC line plug. Use of shielded cable is required to comply with this projector meets the requirement for the United Kingdom : This cord is already fitted with the coloured markings identifying the terminals in Subpart...yellow must be determined by turning the equipment off and destroyed. Model Numbers Trade Name Responsible party Address Telephone No. : PLC-XU73, PLC-XU70, PLC-SU70 : Sanyo : SANYO FISHER COMPANY : 21605 Plummer Street, Chatsworth, California 91311 : (818)998-7322 AC Power Cord Requirement The AC Power ...
... installation. AC Power Cord has a grounding-type AC line plug. Use of shielded cable is required to comply with this projector meets the requirement for the United Kingdom : This cord is already fitted with the coloured markings identifying the terminals in Subpart...yellow must be determined by turning the equipment off and destroyed. Model Numbers Trade Name Responsible party Address Telephone No. : PLC-XU73, PLC-XU70, PLC-SU70 : Sanyo : SANYO FISHER COMPANY : 21605 Plummer Street, Chatsworth, California 91311 : (818)998-7322 AC Power Cord Requirement The AC Power ...
Owners Manual
Page 9
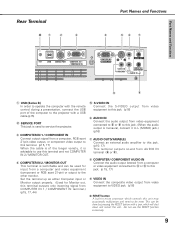
... computer to this terminal and not COMPUTER IN 2 / MONITOR OUT. e COMPUTER IN 1 / COMPONENT IN Connect output signal from video equipment connected to t or o to the projector with a pen, which will shut down and restart the unit. r COMPUTER IN 2 / MONITOR OUT This terminal is advisable to service the...
... computer to this terminal and not COMPUTER IN 2 / MONITOR OUT. e COMPUTER IN 1 / COMPONENT IN Connect output signal from video equipment connected to t or o to the projector with a pen, which will shut down and restart the unit. r COMPUTER IN 2 / MONITOR OUT This terminal is advisable to service the...
Owners Manual
Page 10
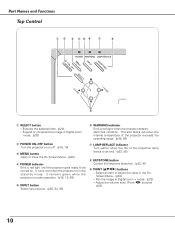
... e rt y u i POWER WARNING LAMP REPLACE ON - Pan the image in the OnScreen Menu. (p20) - It remains green while the projector is in Digital zoom mode. (p33) w POWER ON-OFF button Turn the projector on or off. (p18, 19) e MENU button Open or close the On-Screen Menu. (p20) r POWER indicator Emit a red...by mode. Select an item or adjust the value in Digital zoom + mode. (p33) - This also blinks red when the internal temperature of the projector exceeds the operating range. (p49, 58) u LAMP REPLACE indicator Turn yellow when the life of the projection lamp draws to be turned on. It ...
... e rt y u i POWER WARNING LAMP REPLACE ON - Pan the image in the OnScreen Menu. (p20) - It remains green while the projector is in Digital zoom mode. (p33) w POWER ON-OFF button Turn the projector on or off. (p18, 19) e MENU button Open or close the On-Screen Menu. (p20) r POWER indicator Emit a red...by mode. Select an item or adjust the value in Digital zoom + mode. (p33) - This also blinks red when the internal temperature of the projector exceeds the operating range. (p49, 58) u LAMP REPLACE indicator Turn yellow when the life of the projection lamp draws to be turned on. It ...
Owners Manual
Page 11
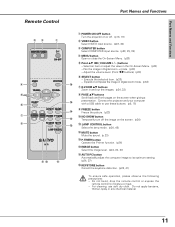
...) r MENU button Open or close the On-Screen Menu. (p20) t Point ed 7 8 ( VOLUME + / - ) buttons - Pan the image in the On-Screen Menu. (p20) - Connect the projector and your computer with a USB cable to moisture or heat. - Part Names and Functions Remote Control ew q r t y u i o !0 !1 Part Names and Functions q POWER ON-OFF button...
...) r MENU button Open or close the On-Screen Menu. (p20) t Point ed 7 8 ( VOLUME + / - ) buttons - Pan the image in the On-Screen Menu. (p20) - Connect the projector and your computer with a USB cable to moisture or heat. - Part Names and Functions Remote Control ew q r t y u i o !0 !1 Part Names and Functions q POWER ON-OFF button...

Owners Manual
Page 12
Maximum operating range for the remote control is replaced by an incorrect type. ● Dispose of the projector. 16.4' (5 m) 30° 30° 12 To insure safe operation, please observe the following precautions: ● Use (2) AA or LR6 ...type alkaline batteries. ● Always replace batteries in the compartment. Replace the compartment lid. Operating Range Point the remote control toward the projector (Infrared Remote Receiver) when pressing any button. Part Names and Functions Remote Control Battery Installation 1 Open the battery compartment lid. 2 Install new...
Maximum operating range for the remote control is replaced by an incorrect type. ● Dispose of the projector. 16.4' (5 m) 30° 30° 12 To insure safe operation, please observe the following precautions: ● Use (2) AA or LR6 ...type alkaline batteries. ● Always replace batteries in the compartment. Replace the compartment lid. Operating Range Point the remote control toward the projector (Infrared Remote Receiver) when pressing any button. Part Names and Functions Remote Control Battery Installation 1 Open the battery compartment lid. 2 Install new...
Owners Manual
Page 13
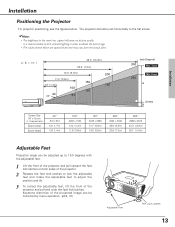
.... (p22, 41) Adjustable Feet Feet Lock Latches 13 Zoom 250 Min. Keystone distortion of the projector and pull upward the feet lock latches on picture quality. Installation Positioning the Projector For projector positioning, see the figures below are approximate and may vary from the actual sizes. The...10004;Note: • The brightness in order to adjust the position and tilt. 3 To retract the adjustable feet, lift the front of the projector. 2 Release the feet lock latches to lock the adjustable feet and rotate the adjustable feet to obtain the best image. • The values...
.... (p22, 41) Adjustable Feet Feet Lock Latches 13 Zoom 250 Min. Keystone distortion of the projector and pull upward the feet lock latches on picture quality. Installation Positioning the Projector For projector positioning, see the figures below are approximate and may vary from the actual sizes. The...10004;Note: • The brightness in order to adjust the position and tilt. 3 To retract the adjustable feet, lift the front of the projector. 2 Release the feet lock latches to lock the adjustable feet and rotate the adjustable feet to obtain the best image. • The values...

Owners Manual
Page 14
... neutral conductor. To power cord connector on . (See page 15-17 for connection.) CAUTION For safety, unplug the AC power cord when the projector is connected to the projector. To the AC outlet. (120 V AC) To the AC outlet. (200 - 240 V AC) To the AC outlet. (200 - 240 V AC) 14 NOTE ON... THE POWER CORD AC power cord must be near this projector is not in Stand-by mode and consumes a little electric power. Consult your authorized dealer or service station if you use . The AC outlet must...
... neutral conductor. To power cord connector on . (See page 15-17 for connection.) CAUTION For safety, unplug the AC power cord when the projector is connected to the projector. To the AC outlet. (120 V AC) To the AC outlet. (200 - 240 V AC) To the AC outlet. (200 - 240 V AC) 14 NOTE ON... THE POWER CORD AC power cord must be near this projector is not in Stand-by mode and consumes a little electric power. Consult your authorized dealer or service station if you use . The AC outlet must...

Owners Manual
Page 15
...15 pin) (Only one cable is supplied.) •USB Cable ✽ • Audio Cables (Mini Plug: stereo Not supplied with this projector.) Installation Installation Audio Output USB port Monitor Output Monitor Output or Monitor Input USB cable ✽ VGA cable VGA cable External Audio Equipment Audio ...Input Audio cable (stereo) ✽ USB COMPUTER IN 1/ COMPUTER IN 2/ COMPONENT IN MONITOR OUT This terminal is of both the projector and the external equipment should be disconnected from AC outlet. 15 Set up the terminal as either Computer input or Monitor output. (See...
...15 pin) (Only one cable is supplied.) •USB Cable ✽ • Audio Cables (Mini Plug: stereo Not supplied with this projector.) Installation Installation Audio Output USB port Monitor Output Monitor Output or Monitor Input USB cable ✽ VGA cable VGA cable External Audio Equipment Audio ...Input Audio cable (stereo) ✽ USB COMPUTER IN 1/ COMPUTER IN 2/ COMPONENT IN MONITOR OUT This terminal is of both the projector and the external equipment should be disconnected from AC outlet. 15 Set up the terminal as either Computer input or Monitor output. (See...
Owners Manual
Page 16
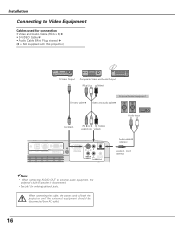
... • Video and Audio Cable (RCA x 3) ✽ • S-VIDEO Cable ✽ • Audio Cable (Mini Plug: stereo Not supplied with this projector.) S-Video Output Composite Video and Audio Output (R) (L) (Video) S-Video cable ✽ External Audio Equipment Video and audio cable✽ S-VIDEO (R) (L) (Video)... ✽ (stereo) AUDIO OUT (stereo) ✔Note: • When connecting AUDIO OUT to external audio equipment, the projector's built-in speaker is disconnected. • See p61 for ordering optional parts. When connecting the cable, the power cords of both the...
... • Video and Audio Cable (RCA x 3) ✽ • S-VIDEO Cable ✽ • Audio Cable (Mini Plug: stereo Not supplied with this projector.) S-Video Output Composite Video and Audio Output (R) (L) (Video) S-Video cable ✽ External Audio Equipment Video and audio cable✽ S-VIDEO (R) (L) (Video)... ✽ (stereo) AUDIO OUT (stereo) ✔Note: • When connecting AUDIO OUT to external audio equipment, the projector's built-in speaker is disconnected. • See p61 for ordering optional parts. When connecting the cable, the power cords of both the...
Owners Manual
Page 17
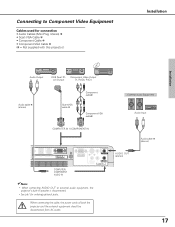
... Cable ✽ • Component Cable ✽ • Component-VGA Cable ✽ (✽ = Not supplied with this projector.) Installation Installation Audio Output RGB Scart 21- When connecting the cable, the power cords of both the projector and the external equipment should be disconnected from AC outlet. AUDIO OUT (stereo) Audio cable ✽ (stereo...
... Cable ✽ • Component Cable ✽ • Component-VGA Cable ✽ (✽ = Not supplied with this projector.) Installation Installation Audio Output RGB Scart 21- When connecting the cable, the power cords of both the projector and the external equipment should be disconnected from AC outlet. AUDIO OUT (stereo) Audio cable ✽ (stereo...
Owners Manual
Page 18
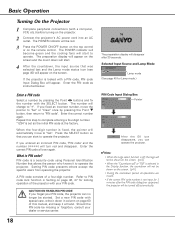
... initial PIN code at hand. Setting PIN code prevents others except the specific users from operating the projector. Set a new PIN code with special care, write it down will appear. "1234" is ... count down in the Display function, the countdown will automatically move the pointer to operate the projector. If the projector is PIN code? If you can start to "Set" or "Clear" once by pressing ... red. 3 Press the POWER ON-OFF button on the top control or on the projector. 2 Connect the projector's AC power cord into an AC outlet. The POWER indicator will become green and the...
... initial PIN code at hand. Setting PIN code prevents others except the specific users from operating the projector. Set a new PIN code with special care, write it down will appear. "1234" is ... count down in the Display function, the countdown will automatically move the pointer to operate the projector. If the projector is PIN code? If you can start to "Set" or "Clear" once by pressing ... red. 3 Press the POWER ON-OFF button on the top control or on the projector. 2 Connect the projector's AC power cord into an AC outlet. The POWER indicator will become green and the...
Owners Manual
Page 19
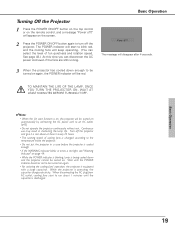
...AC power cord even if the fans are still running speed of fun quietness and rotation speed. Wait until the capacitor is discharged. While the projector is being cooled down enough to be red. When disconnecting the AC plug from AC outlet, cooling fans start to run about an hour in... you can select the level of cooling fans is equipped with a large capacitor. See page 48.) At this projector will be turned on . Turn off ?" Basic Operation 19 Turning Off the Projector 1 Press the POWER ON-OFF button on the top control or on automatically by connecting the AC power cord...
...AC power cord even if the fans are still running speed of fun quietness and rotation speed. Wait until the capacitor is discharged. While the projector is being cooled down enough to be red. When disconnecting the AC plug from AC outlet, cooling fans start to run about an hour in... you can select the level of cooling fans is equipped with a large capacitor. See page 48.) At this projector will be turned on . Turn off ?" Basic Operation 19 Turning Off the Projector 1 Press the POWER ON-OFF button on the top control or on automatically by connecting the AC power cord...

Owners Manual
Page 20
Top Control POWER WARNING LAMP REP ON - Refer to Operate the On-Screen Menu The projector can be adjusted or set via the On-Screen Menu. Basic Operation How to the following pages regarding each adjustment. Refer to the following pages ...
Top Control POWER WARNING LAMP REP ON - Refer to Operate the On-Screen Menu The projector can be adjusted or set via the On-Screen Menu. Basic Operation How to the following pages regarding each adjustment. Refer to the following pages ...
Owners Manual
Page 21
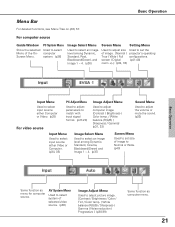
..., Blackboard(Green), and Image 1 ~ 4. (p30) Screen Menu Setting Menu Used to adjust size Used to set the of image to set size of image. [Normal / projector's operating True / Wide / Full configurations.
..., Blackboard(Green), and Image 1 ~ 4. (p30) Screen Menu Setting Menu Used to adjust size Used to set the of image to set size of image. [Normal / projector's operating True / Wide / Full configurations.
Owners Manual
Page 26
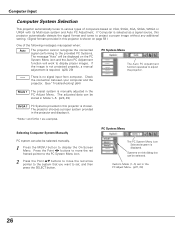
... on page 59 ) One of computers based on this projector is manually adjusted in the PC Adjust Menu. (p27, 29) 26 PC System Menu The PC System Menu icon Selected system is no signal input from computer. Systems on VGA, SVGA, XGA, SXGA, WXGA or UXGA with its Multi-scan system... and Auto PC Adjustment. If Computer is required. (p28, 29) PC System Menu The Auto PC Adjustment function operates to various types of the following messages may appear when: Auto The projector cannot recognize the connected signal...
... on page 59 ) One of computers based on this projector is manually adjusted in the PC Adjust Menu. (p27, 29) 26 PC System Menu The PC System Menu icon Selected system is no signal input from computer. Systems on VGA, SVGA, XGA, SXGA, WXGA or UXGA with its Multi-scan system... and Auto PC Adjustment. If Computer is required. (p28, 29) PC System Menu The Auto PC Adjustment function operates to various types of the following messages may appear when: Auto The projector cannot recognize the connected signal...


