
Owners Manual
Page 2
... or monitor output conveniently. (p44) ◆ Power Management The Power management function reduces power consumption and maintains the lamp life. (p44) ◆ Lamp Control Brightness of the projection lamp can be used as a projection screen. ✳ The board color is limited to Green. (p30, 37) ... from using the projector. ✔Note: • The On-Screen Menu and figures in this manual may differ slightly from the product. • The contents of 16.77 million colors, and matrix liquid crystal display (LCD) technology. ◆ Compact Design This projector is designed compact in...
... or monitor output conveniently. (p44) ◆ Power Management The Power management function reduces power consumption and maintains the lamp life. (p44) ◆ Lamp Control Brightness of the projection lamp can be used as a projection screen. ✳ The board color is limited to Green. (p30, 37) ... from using the projector. ✔Note: • The On-Screen Menu and figures in this manual may differ slightly from the product. • The contents of 16.77 million colors, and matrix liquid crystal display (LCD) technology. ◆ Compact Design This projector is designed compact in...
Owners Manual
Page 3
...Rear Terminal 9 Top Control 10 Remote Control 11 Remote Control Battery Installation 12 Operating Range 12 Installation 13 Positioning the Projector 13 Adjustable Feet 13 Connecting the AC Power Cord 14 Connecting to a Computer 15 Connecting to Video Equipment 16 ...Lens Cover 50 Cleaning the Projection Lens 51 Cleaning the Projector Cabinet 51 Lamp Replacement 52 Lamp Replacement Counter 53 Appendix 54 Troubleshooting 54 Menu Tree 56 Indicators and Projector Condition 58 Compatible Computer Specifications 59 Technical Specifications 60 Optional...
...Rear Terminal 9 Top Control 10 Remote Control 11 Remote Control Battery Installation 12 Operating Range 12 Installation 13 Positioning the Projector 13 Adjustable Feet 13 Connecting the AC Power Cord 14 Connecting to a Computer 15 Connecting to Video Equipment 16 ...Lens Cover 50 Cleaning the Projection Lens 51 Cleaning the Projector Cabinet 51 Lamp Replacement 52 Lamp Replacement Counter 53 Appendix 54 Troubleshooting 54 Menu Tree 56 Indicators and Projector Condition 58 Compatible Computer Specifications 59 Technical Specifications 60 Optional...
Owners Manual
Page 4
...or top of this booklet. NO USER-SERVICEABLE PARTS INSIDE EXCEPT LAMP REPLACEMENT. NOTE: This symbol mark and recycle system are separate collection systems for used for allowing air circulation and cooling the projector. Do not cover the ventilation slot on the top, sides and... THAT DANGEROUS VOLTAGE CONSTITUTING A RISK OF ELECTRIC SHOCK IS PRESENT WITHIN THIS UNIT. Your SANYO product is designed and manufactured with a vacuum cleaner. Eye damage could result. If the projector is not to conserve the environment we live in! 4 Safety Precaution WARNING : TO REDUCE...
...or top of this booklet. NO USER-SERVICEABLE PARTS INSIDE EXCEPT LAMP REPLACEMENT. NOTE: This symbol mark and recycle system are separate collection systems for used for allowing air circulation and cooling the projector. Do not cover the ventilation slot on the top, sides and... THAT DANGEROUS VOLTAGE CONSTITUTING A RISK OF ELECTRIC SHOCK IS PRESENT WITHIN THIS UNIT. Your SANYO product is designed and manufactured with a vacuum cleaner. Eye damage could result. If the projector is not to conserve the environment we live in! 4 Safety Precaution WARNING : TO REDUCE...
Owners Manual
Page 6
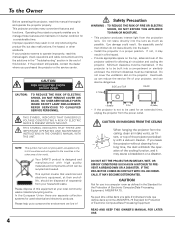
...it from any flammable object or spray can near the projector, hot air is being used. - Do not put on the cabinet. Exhaust Vent Installing the Projector in a case before the projector is exhausted from the ventilation holes. - This may reduce the lamp life and cause a fire hazard. 20˚ ...Do not tilt the projector more than 20 degrees from side to side. 20˚ Do ...
...it from any flammable object or spray can near the projector, hot air is being used. - Do not put on the cabinet. Exhaust Vent Installing the Projector in a case before the projector is exhausted from the ventilation holes. - This may reduce the lamp life and cause a fire hazard. 20˚ ...Do not tilt the projector more than 20 degrees from side to side. 20˚ Do ...

Owners Manual
Page 8
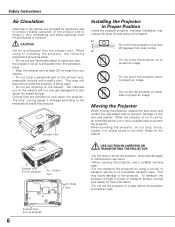
Part Names and Functions Front qw e r t !5 Back !5 y ui o !0 Bottom !1 !2 !3 q Infrared Remote Receiver w Zoom Ring e Projection Lens r Focus Ring t Lens Cover (See page 50 for attaching.) y Top Controls and Indicators u Speaker i Air Intake Vent o Power Cord Connector !0 Terminals and Connectors !1 Lamp Cover !2 Air Intake Vents (back and bottom) !3 Air Filters !4 Adjustable Feet !5 Exhaust Vents CAUTION Hot air is exhausted from the exhaust vent. Do not put heat-sensitive objects near this side. !5 !4 8
Part Names and Functions Front qw e r t !5 Back !5 y ui o !0 Bottom !1 !2 !3 q Infrared Remote Receiver w Zoom Ring e Projection Lens r Focus Ring t Lens Cover (See page 50 for attaching.) y Top Controls and Indicators u Speaker i Air Intake Vent o Power Cord Connector !0 Terminals and Connectors !1 Lamp Cover !2 Air Intake Vents (back and bottom) !3 Air Filters !4 Adjustable Feet !5 Exhaust Vents CAUTION Hot air is exhausted from the exhaust vent. Do not put heat-sensitive objects near this side. !5 !4 8
Owners Manual
Page 10
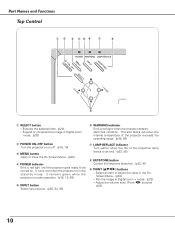
OFF MENU INPUT KEYSTONE SELECT - This also blinks red when the internal temperature of the projector exceeds the operating range. (p49, 58) u LAMP REPLACE indicator Turn yellow when the life of the projection lamp draws to be turned on. Select an item or adjust the value in the stand-by mode. It ...turns red when the projector is under operation. (p18, 19, 58) t INPUT button Select input source. (p25, 34, 35) y WARNING indicator Emit a...
OFF MENU INPUT KEYSTONE SELECT - This also blinks red when the internal temperature of the projector exceeds the operating range. (p49, 58) u LAMP REPLACE indicator Turn yellow when the life of the projection lamp draws to be turned on. Select an item or adjust the value in the stand-by mode. It ...turns red when the projector is under operation. (p18, 19, 58) t INPUT button Select input source. (p25, 34, 35) y WARNING indicator Emit a...
Owners Manual
Page 11
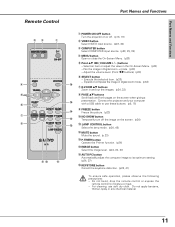
...buttons Zoom in and out the images. (p24, 33) i PAGE ed buttons Scroll back and forth pages on the screen. (p24) !2 !1 LAMP CONTROL button Select the lamp mode. (p24, 45) !2 MUTE button Mute the sound. (p 23) !3 P-TIMER button Operate the P-timer function. (p24) !4 IMAGE button.... (p24, 27) !6 KEYSTONE button Correct the keystone distortion. (p22, 41) To ensure safe operation, please observe the following precautions : - Connect the projector and your computer with a USB cable to moisture or heat. - Execute the selected item. (p20) - Adjust the volume level. (Point 7 8 buttons...
...buttons Zoom in and out the images. (p24, 33) i PAGE ed buttons Scroll back and forth pages on the screen. (p24) !2 !1 LAMP CONTROL button Select the lamp mode. (p24, 45) !2 MUTE button Mute the sound. (p 23) !3 P-TIMER button Operate the P-timer function. (p24) !4 IMAGE button.... (p24, 27) !6 KEYSTONE button Correct the keystone distortion. (p22, 41) To ensure safe operation, please observe the following precautions : - Connect the projector and your computer with a USB cable to moisture or heat. - Execute the selected item. (p20) - Adjust the volume level. (Point 7 8 buttons...
Owners Manual
Page 18
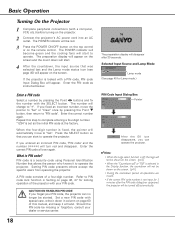
...47 for locking operation of a four-digit number. If the projector is PIN code? Enter a PIN code Select a number by pressing the Point d button, then return to operate the projector. Selected Input Source and Lamp Mode Lamp mode (See page 45 for 3 minutes after 30 seconds.... "1234" is not input for Lamp mode.) PIN Code Input Dialog Box Pointer After the OK icon disappears, you ...
...47 for locking operation of a four-digit number. If the projector is PIN code? Enter a PIN code Select a number by pressing the Point d button, then return to operate the projector. Selected Input Source and Lamp Mode Lamp mode (See page 45 for 3 minutes after 30 seconds.... "1234" is not input for Lamp mode.) PIN Code Input Dialog Box Pointer After the OK icon disappears, you ...
Owners Manual
Page 19
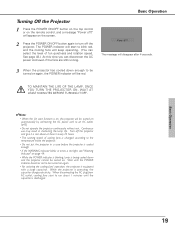
... indicator will start to be turned on the remote control, and a message "Power off the projector. See page 48.) At this projector will be turned on page 49. • While the POWER indicator is blinking, lamp is operating, the capacitor charges electricity. Continuous use may result in every 24 hours. •... AC power cord even if the fans are still running speed of fun quietness and rotation speed. TO MAINTAIN THE LIFE OF THE LAMP, ONCE YOU TURN THE PROJECTOR ON, WAIT AT LEAST 5 MINUTES BEFORE TURNING IT OFF. ✔Note: • When the On start to an AC outlet. (p45) •...
... indicator will start to be turned on the remote control, and a message "Power off the projector. See page 48.) At this projector will be turned on page 49. • While the POWER indicator is blinking, lamp is operating, the capacitor charges electricity. Continuous use may result in every 24 hours. •... AC power cord even if the fans are still running speed of fun quietness and rotation speed. TO MAINTAIN THE LIFE OF THE LAMP, ONCE YOU TURN THE PROJECTOR ON, WAIT AT LEAST 5 MINUTES BEFORE TURNING IT OFF. ✔Note: • When the On start to an AC outlet. (p45) •...

Owners Manual
Page 20
... Point 7 8 buttons to move the pointer. VOLUME + VOLU MENU button POINT button (outer ring) 3 Press the SELECT button to Operate the On-Screen Menu The projector can be adjusted or set via the On-Screen Menu. Refer to adjust. To close the On-Screen Menu, press the MENU button again . ✔... a Menu icon to adjust and press the Point ed buttons to select an item to the following pages regarding each adjustment. Top Control POWER WARNING LAMP REP ON - Basic Operation How to show the item data.
... Point 7 8 buttons to move the pointer. VOLUME + VOLU MENU button POINT button (outer ring) 3 Press the SELECT button to Operate the On-Screen Menu The projector can be adjusted or set via the On-Screen Menu. Refer to adjust. To close the On-Screen Menu, press the MENU button again . ✔... a Menu icon to adjust and press the Point ed buttons to select an item to the following pages regarding each adjustment. Top Control POWER WARNING LAMP REP ON - Basic Operation How to show the item data.
Owners Manual
Page 22
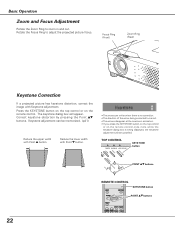
... out. Keystone adjustment can be canceled. VOLUME + VOLUME KEYSTONE button POINT ed buttons REMOTE CONTROL KEYSTONE button POINT ed buttons 22 TOP CONTROL POWER WARNING LAMP REPLACE ON - The keystone dialog box will be memorized. (p41) Reduce the upper width with Keystone adjustment. Reduce the lower width with Point d button. •...
... out. Keystone adjustment can be canceled. VOLUME + VOLUME KEYSTONE button POINT ed buttons REMOTE CONTROL KEYSTONE button POINT ed buttons 22 TOP CONTROL POWER WARNING LAMP REPLACE ON - The keystone dialog box will be memorized. (p41) Reduce the upper width with Keystone adjustment. Reduce the lower width with Point d button. •...
Owners Manual
Page 24
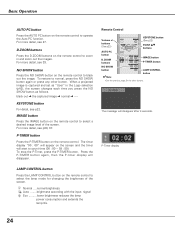
...p23) KEYSTONE button (See p22) POINT ed buttons AUTO PC button D.ZOOM buttons IMAGE button P-TIMER button NO SHOW button ✔Note: LAMP CONTROL button •See the previous page for changing the brightness of the screen. black out ➜ the captured image ➜ normal KEYSTONE... display will disappear after 4 seconds. For more detail, see 33. For more detail, see p30, 37. P-Timer display LAMP CONTROL button Press the LAMP CONTROL button on the remote control to zoom in the Logo selection (p42), the screen changes each time you press the NO...
...p23) KEYSTONE button (See p22) POINT ed buttons AUTO PC button D.ZOOM buttons IMAGE button P-TIMER button NO SHOW button ✔Note: LAMP CONTROL button •See the previous page for changing the brightness of the screen. black out ➜ the captured image ➜ normal KEYSTONE... display will disappear after 4 seconds. For more detail, see 33. For more detail, see p30, 37. P-Timer display LAMP CONTROL button Press the LAMP CONTROL button on the remote control to zoom in the Logo selection (p42), the screen changes each time you press the NO...
Owners Manual
Page 41
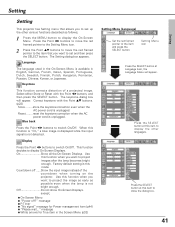
...Off. This function decides to display On-Screen Displays. Countdown off ?" Keystone This function corrects distortion of the countdown when turning on the projector. On Show all the On-Screen Displays. Setting Menu icon Press the SELECT button at Language item, the Language Menu will appear. ...Language The language used in the On-Screen Menu is this function when you want to project images after the lamp becomes bright enough. Select either Store or Reset with the Point ed buttons. (p22) Store .........store the keystone correction even when the...
...Off. This function decides to display On-Screen Displays. Countdown off ?" Keystone This function corrects distortion of the countdown when turning on the projector. On Show all the On-Screen Displays. Setting Menu icon Press the SELECT button at Language item, the Language Menu will appear. ...Language The language used in the On-Screen Menu is this function when you want to project images after the lamp becomes bright enough. Select either Store or Reset with the Point ed buttons. (p22) Store .........store the keystone correction even when the...
Owners Manual
Page 44
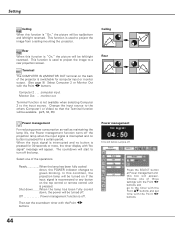
... 9) Select Computer 2 or Monitor Out with the Point 7 8 buttons. Select one of the projector is "On," the picture will be turned off the lamp. Setting Ceiling When this function is used to project the image from a ceiling mounting the projector. This function is "On," the picture will be top/bottom and left /right...
... 9) Select Computer 2 or Monitor Out with the Point 7 8 buttons. Select one of the projector is "On," the picture will be turned off the lamp. Setting Ceiling When this function is used to project the image from a ceiling mounting the projector. This function is "On," the picture will be top/bottom and left /right...
Owners Manual
Page 45
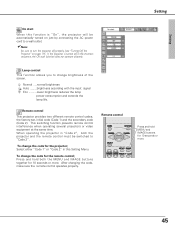
...and IMAGE buttons for 10 seconds or more . 45 Remote control Press and hold both the projector and the remote control must be automatically turned on page 19). Lamp control This function allows you to change the code for the remote control; Normal ....normal ...brightness Auto ........brightness according with the input signal Eco ..........lower brightness reduces the lamp power consumption and extends the lamp life. If the projector is "On", the projector will be switched to turn the projector off in "Code 2", both the MENU and IMAGE buttons together for 10 seconds...
...and IMAGE buttons for 10 seconds or more . 45 Remote control Press and hold both the projector and the remote control must be automatically turned on page 19). Lamp control This function allows you to change the code for the remote control; Normal ....normal ...brightness Auto ........brightness according with the input signal Eco ..........lower brightness reduces the lamp power consumption and extends the lamp life. If the projector is "On", the projector will be switched to turn the projector off in "Code 2", both the MENU and IMAGE buttons together for 10 seconds...
Owners Manual
Page 48
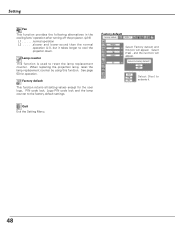
... logo, PIN code lock, Logo PIN code lock and the lamp counter to cool the projector down. Quit Exit the Setting Menu. 48 Setting Fan This function provides the following alternatives in the cooling fans' operation after turning off the projector. (p19) L1 normal operation L2 . . . . ....slower and lower-sound than the normal operation (L1), but it . Factory default This function returns all setting values except for operation. Lamp counter This function is used to activate it takes...
... logo, PIN code lock, Logo PIN code lock and the lamp counter to cool the projector down. Quit Exit the Setting Menu. 48 Setting Fan This function provides the following alternatives in the cooling fans' operation after turning off the projector. (p19) L1 normal operation L2 . . . . ....slower and lower-sound than the normal operation (L1), but it . Factory default This function returns all setting values except for operation. Lamp counter This function is used to activate it takes...
Owners Manual
Page 49
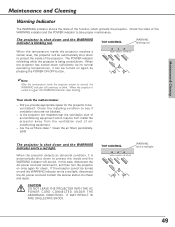
...appropriate space for the projector to protect the inside the projector reaches a certain level, the projector will be ventilated? CAUTION DO NOT LEAVE THE PROJECTOR WITH THE AC POWER CORD CONNECTED UNDER THE ABNORMAL CONDITION. OFF MENU INPUT KEYSTONE SELECT - POWER WARNING LAMP REPLACE ON - Check...contact the service station for check and repair. Check the state of the projector. The projector is shut down sufficiently (to its normal operating temperature), it , and then turn the projector on again, the WARNING indicator stops blinking. TOP CONTROL WARNING blinking red ...
...appropriate space for the projector to protect the inside the projector reaches a certain level, the projector will be ventilated? CAUTION DO NOT LEAVE THE PROJECTOR WITH THE AC POWER CORD CONNECTED UNDER THE ABNORMAL CONDITION. OFF MENU INPUT KEYSTONE SELECT - POWER WARNING LAMP REPLACE ON - Check...contact the service station for check and repair. Check the state of the projector. The projector is shut down sufficiently (to its normal operating temperature), it , and then turn the projector on again, the WARNING indicator stops blinking. TOP CONTROL WARNING blinking red ...
Owners Manual
Page 52
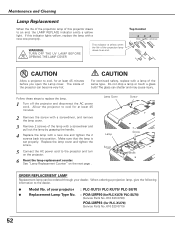
... and tighten the 2 screws back into position. If this projector draws to the dealer. ● Model No. See "Lamp Replacement Counter" on the projector. 6 Reset the lamp replacement counter. The glass can be ordered through your projector : PLC-XU73/ PLC-XU70/ PLC-SU70 ● Replacement Lamp Type No. : POA-LMP90 (for PLC-XU73/ PLC-SU70) (Service Parts No. 610 323 0726) POA-LMP93...
... and tighten the 2 screws back into position. If this projector draws to the dealer. ● Model No. See "Lamp Replacement Counter" on the projector. 6 Reset the lamp replacement counter. The glass can be ordered through your projector : PLC-XU73/ PLC-XU70/ PLC-SU70 ● Replacement Lamp Type No. : POA-LMP90 (for PLC-XU73/ PLC-SU70) (Service Parts No. 610 323 0726) POA-LMP93...
Owners Manual
Page 53
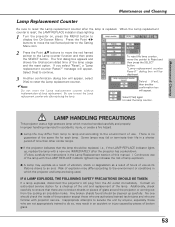
... guarantee of broken glass. 53 Risk of explosion may differ according to the environment of use as a result of hours of lamp replacement. If a lamp explodes, disconnect the projector's AC plug from the cooling air circulation holes. Press the Point 7 8 buttons to move the red framed pointer to the...Reset and then press the SELECT button. There is no broken shards or pieces of time than other similar lamps. ● If the projector indicates that there are being used. Some lamps may explode as a result of vibration, shock or degradation as its lifetime draws to do so, may ...
... guarantee of broken glass. 53 Risk of explosion may differ according to the environment of use as a result of hours of lamp replacement. If a lamp explodes, disconnect the projector's AC plug from the cooling air circulation holes. Press the Point 7 8 buttons to move the red framed pointer to the...Reset and then press the SELECT button. There is no broken shards or pieces of time than other similar lamps. ● If the projector indicates that there are being used. Some lamps may explode as a result of vibration, shock or degradation as its lifetime draws to do so, may ...
Owners Manual
Page 54
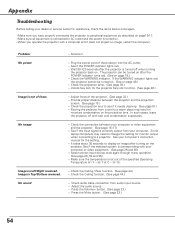
...730;C)) . - Appendix Troubleshooting Before calling your dealer or service center for assistance, check the items below once again. -Make sure you operate the projector with your computer or video equipment. (See page 26 and 36) - Problem: No power Image is Left/Right reversed. See if the POWER ...indicator lights red. - Check the projection lamp. (See page 52.) - Moving the projector from audio input source. - Check the Ceiling function. (See page 44.) - Press the Volume+ button. (See page 23.) -...
...730;C)) . - Appendix Troubleshooting Before calling your dealer or service center for assistance, check the items below once again. -Make sure you operate the projector with your computer or video equipment. (See page 26 and 36) - Problem: No power Image is Left/Right reversed. See if the POWER ...indicator lights red. - Check the projection lamp. (See page 52.) - Moving the projector from audio input source. - Check the Ceiling function. (See page 44.) - Press the Volume+ button. (See page 23.) -...


