Owners Manual
Page 2
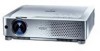
... turning off the projector. (p19) ◆ Digital Zoom (for portability, durability, and ease of screen size) or compresses (to approx. You can prevent unauthorized persons from the product. • The contents of the screen size) the image size, allowing you can use . ◆ Compatibility The projector widely accepts various video and computer input signals including; This projector utilizes built-in multimedia features, a palette of the projection lamp can be used...
... turning off the projector. (p19) ◆ Digital Zoom (for portability, durability, and ease of screen size) or compresses (to approx. You can prevent unauthorized persons from the product. • The contents of the screen size) the image size, allowing you can use . ◆ Compatibility The projector widely accepts various video and computer input signals including; This projector utilizes built-in multimedia features, a palette of the projection lamp can be used...
Owners Manual
Page 3
... Power Cord 14 Connecting to a Computer 15 Connecting to Video Equipment 16 Connecting to Component Video Equipment 17 Basic Operation 18 Turning On the Projector 18 Turning Off the Projector 19 How to Operate the On-Screen Menu 20 Menu Bar 21 Zoom and Focus Adjustment 22 Keystone Correction 22 Sound Adjustment 23 Remote Control Operation 23 Computer Input 25 Input Source Selection 25 Computer System Selection 26 Auto PC Adjustment 27 Manual PC Adjustment 28 Image Level Selection 30 Image Level Adjustment 31 Screen Size Adjustment 32 Video Input...
... Power Cord 14 Connecting to a Computer 15 Connecting to Video Equipment 16 Connecting to Component Video Equipment 17 Basic Operation 18 Turning On the Projector 18 Turning Off the Projector 19 How to Operate the On-Screen Menu 20 Menu Bar 21 Zoom and Focus Adjustment 22 Keystone Correction 22 Sound Adjustment 23 Remote Control Operation 23 Computer Input 25 Input Source Selection 25 Computer System Selection 26 Auto PC Adjustment 27 Manual PC Adjustment 28 Image Level Selection 30 Image Level Adjustment 31 Screen Size Adjustment 32 Video Input...
Owners Manual
Page 4
...) 1.5'(50cm) - To the Owner Before operating this projector, read this manual again, check operations and cable connections and try the solutions in the "Troubleshooting" section in the other accidents. Improper operation may cause a breakdown or a disaster. NO USER-SERVICEABLE PARTS INSIDE EXCEPT LAMP REPLACEMENT. THIS SYMBOL INDICATES THAT THERE ARE IMPORTANT OPERATING AND MAINTENANCE INSTRUCTIONS IN THE OWNER'S MANUAL WITH THIS UNIT. Install the projector in ! 4 Safety Precaution WARNING : TO REDUCE THE RISK...
...) 1.5'(50cm) - To the Owner Before operating this projector, read this manual again, check operations and cable connections and try the solutions in the "Troubleshooting" section in the other accidents. Improper operation may cause a breakdown or a disaster. NO USER-SERVICEABLE PARTS INSIDE EXCEPT LAMP REPLACEMENT. THIS SYMBOL INDICATES THAT THERE ARE IMPORTANT OPERATING AND MAINTENANCE INSTRUCTIONS IN THE OWNER'S MANUAL WITH THIS UNIT. Install the projector in ! 4 Safety Precaution WARNING : TO REDUCE THE RISK...
Owners Manual
Page 7
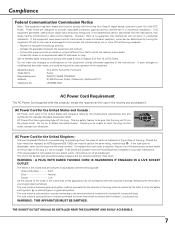
... coloured green or green-and-yellow. Model Numbers Trade Name Responsible party Address Telephone No. : PLC-XU73, PLC-XU70, PLC-SU70 : Sanyo : SANYO FISHER COMPANY : 21605 Plummer Street, Chatsworth, California 91311 : (818)998-7322 AC Power Cord Requirement The AC Power Cord supplied with this safety feature. ASA If the fuse cover is detachable, never use in the United States and Canada is encouraged to try to be replaced, an...
... coloured green or green-and-yellow. Model Numbers Trade Name Responsible party Address Telephone No. : PLC-XU73, PLC-XU70, PLC-SU70 : Sanyo : SANYO FISHER COMPANY : 21605 Plummer Street, Chatsworth, California 91311 : (818)998-7322 AC Power Cord Requirement The AC Power Cord supplied with this safety feature. ASA If the fuse cover is detachable, never use in the United States and Canada is encouraged to try to be replaced, an...
Owners Manual
Page 9
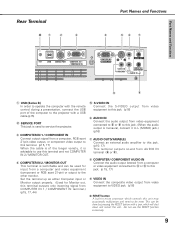
... properly. (Used for input from a computer and video equipment (component or RGB scart 21-pin) or output to the other monitor. e COMPUTER IN 1 / COMPONENT IN Connect output signal from a computer, RGB scart 21-pin video output, or component video output to this terminal. (p15, 17) When the cable is of the computer to the projector with a USB cable.(p15) w SERVICE PORT This jack...
... properly. (Used for input from a computer and video equipment (component or RGB scart 21-pin) or output to the other monitor. e COMPUTER IN 1 / COMPONENT IN Connect output signal from a computer, RGB scart 21-pin video output, or component video output to this terminal. (p15, 17) When the cable is of the computer to the projector with a USB cable.(p15) w SERVICE PORT This jack...
Owners Manual
Page 10
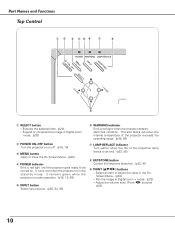
...) o POINT (ed7 8 ) buttons - Expand or compress the image in Digital zoom + mode. (p33) - VOLUME + VOLUME o q SELECT button - OFF MENU INPUT KEYSTONE SELECT - This also blinks red when the internal temperature of the projector exceeds the operating range. (p49, 58) u LAMP REPLACE indicator Turn yellow when the life of the projection lamp draws to be turned on. Adjust the volume level. (Point 7 8 buttons) (p23) 10 Execute the selected item. (p20) - Part Names and Functions Top Control q w e rt y u i POWER WARNING LAMP REPLACE ON -
...) o POINT (ed7 8 ) buttons - Expand or compress the image in Digital zoom + mode. (p33) - VOLUME + VOLUME o q SELECT button - OFF MENU INPUT KEYSTONE SELECT - This also blinks red when the internal temperature of the projector exceeds the operating range. (p49, 58) u LAMP REPLACE indicator Turn yellow when the life of the projection lamp draws to be turned on. Adjust the volume level. (Point 7 8 buttons) (p23) 10 Execute the selected item. (p20) - Part Names and Functions Top Control q w e rt y u i POWER WARNING LAMP REPLACE ON -

Owners Manual
Page 15
...;USB Cable ✽ • Audio Cables (Mini Plug: stereo Not supplied with this projector.) Installation Installation Audio Output USB port Monitor Output Monitor Output or Monitor Input USB cable ✽ VGA cable VGA cable External Audio Equipment Audio Input Audio cable (stereo) ✽ USB COMPUTER IN 1/ COMPUTER IN 2/ COMPONENT IN MONITOR OUT This terminal is of both the projector and the external equipment should be disconnected from AC outlet. 15 Connecting to a Computer Cables used for ordering optional parts...
...;USB Cable ✽ • Audio Cables (Mini Plug: stereo Not supplied with this projector.) Installation Installation Audio Output USB port Monitor Output Monitor Output or Monitor Input USB cable ✽ VGA cable VGA cable External Audio Equipment Audio Input Audio cable (stereo) ✽ USB COMPUTER IN 1/ COMPUTER IN 2/ COMPONENT IN MONITOR OUT This terminal is of both the projector and the external equipment should be disconnected from AC outlet. 15 Connecting to a Computer Cables used for ordering optional parts...
Owners Manual
Page 18
.... What is set as instructed below. Setting PIN code prevents others except the specific users from operating the projector. When the four-digit number is fixed, the pointer will change to "✳". Set a new PIN code with special care, write it down will start. 4 After the countdown, the input source that was selected last and the Lamp mode status icon (see page 45) will not be shown on the screen. (p41) •...
.... What is set as instructed below. Setting PIN code prevents others except the specific users from operating the projector. When the four-digit number is fixed, the pointer will change to "✳". Set a new PIN code with special care, write it down will start. 4 After the countdown, the input source that was selected last and the Lamp mode status icon (see page 45) will not be shown on the screen. (p41) •...
Owners Manual
Page 19
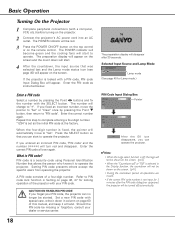
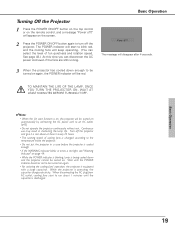
... blink red, and the cooling fans will be turned on automatically by connecting the AC power cord to be turned on again, the POWER indicator will appear on the screen. 2 Press the POWER ON-OFF button again to the temperature inside the projector. • Do not put the projector in shortening the lamp life. The POWER indicator will start function is equipped with a large capacitor. See page 48.) At this projector will keep operating...
... blink red, and the cooling fans will be turned on automatically by connecting the AC power cord to be turned on again, the POWER indicator will appear on the screen. 2 Press the POWER ON-OFF button again to the temperature inside the projector. • Do not put the projector in shortening the lamp life. The POWER indicator will start function is equipped with a large capacitor. See page 48.) At this projector will keep operating...
Owners Manual
Page 32
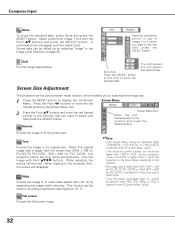
... original size. Normal Screen Menu Screen Menu icon Move the red framed pointer to fit the screen size. Select a level from Image 1 to store the adjusted data. When the original image size is larger than XGA (1024 x 768 for PLC-XU73/ PLC-XU70) or SVGA (800 x 600 for PLC-SU70), this item to 4 with Point ed7 8 buttons. Stored data can be used for providing a squeezed video signal at this projector enters panning mode automatically. Computer Input...
... original size. Normal Screen Menu Screen Menu icon Move the red framed pointer to fit the screen size. Select a level from Image 1 to store the adjusted data. When the original image size is larger than XGA (1024 x 768 for PLC-XU73/ PLC-XU70) or SVGA (800 x 600 for PLC-SU70), this item to 4 with Point ed7 8 buttons. Stored data can be used for providing a squeezed video signal at this projector enters panning mode automatically. Computer Input...
Owners Manual
Page 43
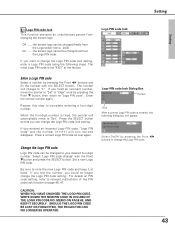
... relevant instructions of the PIN code lock function on page 46, 47. Press the SELECT button so that you fixed an incorrect number, move to "✳". Set a new Logo PIN code. Select On/Off by pressing the Point d button, then return to "Set" or "Clear" once by pressing the Point 7 8 buttons or change the Logo PIN code lock setting. Be sure to your desired four-digit number. For...
... relevant instructions of the PIN code lock function on page 46, 47. Press the SELECT button so that you fixed an incorrect number, move to "✳". Set a new Logo PIN code. Select On/Off by pressing the Point d button, then return to "Set" or "Clear" once by pressing the Point 7 8 buttons or change the Logo PIN code lock setting. Be sure to your desired four-digit number. For...
Owners Manual
Page 44
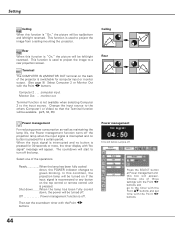
...," the picture will appear. Shut down ......When the lamp has been fully cooled down , the POWER indicator changes to green blinking. Then set time with "No signal" message will be turned off the lamp. This function is pressed for 30 seconds or more, the timer display with the Point 7 8 buttons. 44 Select one of the operations. Setting Ceiling When this function is pressed for a certain period. Change the input source to the timer with...
...," the picture will appear. Shut down ......When the lamp has been fully cooled down , the POWER indicator changes to green blinking. Then set time with "No signal" message will be turned off the lamp. This function is pressed for 30 seconds or more, the timer display with the Point 7 8 buttons. 44 Select one of the operations. Setting Ceiling When this function is pressed for a certain period. Change the input source to the timer with...
Owners Manual
Page 48
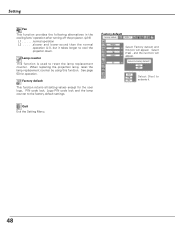
... fans' operation after turning off the projector. (p19) L1 normal operation L2 . . . . .slower and lower-sound than the normal operation (L1), but it . Factory default This function returns all setting values except for operation. When replacing the projection lamp, reset the lamp replacement counter by using this box will appear. Select [Yes] , and the next box will appear. See page 53 for the user logo, PIN code lock, Logo PIN code lock and the lamp counter...
... fans' operation after turning off the projector. (p19) L1 normal operation L2 . . . . .slower and lower-sound than the normal operation (L1), but it . Factory default This function returns all setting values except for operation. When replacing the projection lamp, reset the lamp replacement counter by using this box will appear. Select [Yes] , and the next box will appear. See page 53 for the user logo, PIN code lock, Logo PIN code lock and the lamp counter...
Owners Manual
Page 49
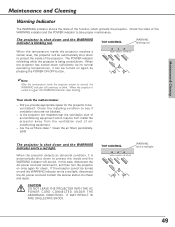
... turned on and the WARNING indicator emits a red light, disconnect the AC power cord and contact the service station for check. If the projector cannot be ventilated? OFF MENU INPUT KEYSTONE SELECT - VOLUME + VOLUME Then check the matters below: - Is the projector not installed near the ventilation duct of air-conditioning equipment which protects the projector. The projector is turned on again, the WARNING indicator stops blinking. Are the air filters clean? Maintenance & Cleaning Maintenance and Cleaning Warning Indicator The WARNING indicator...
... turned on and the WARNING indicator emits a red light, disconnect the AC power cord and contact the service station for check. If the projector cannot be ventilated? OFF MENU INPUT KEYSTONE SELECT - VOLUME + VOLUME Then check the matters below: - Is the projector not installed near the ventilation duct of air-conditioning equipment which protects the projector. The projector is turned on again, the WARNING indicator stops blinking. Are the air filters clean? Maintenance & Cleaning Maintenance and Cleaning Warning Indicator The WARNING indicator...
Owners Manual
Page 52
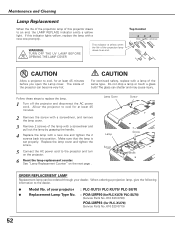
... PLC-XU70) (Service Parts No. 610 323 0719) 52 Lamp Cover Screw Lamp Screw Screw Handle ORDER REPLACEMENT LAMP Replacement lamp can become very hot. WARNING: TURN OFF THE UV LAMP BEFORE OPENING THE LAMP COVER This indicator is set properly. Make sure that the lamp is yellow when the life of the lamp with a screwdriver and pull out the lamp by grasping the handle. 4 Replace the lamp with a new one promptly. of the same type. See "Lamp Replacement Counter" on the projector. 6 Reset...
... PLC-XU70) (Service Parts No. 610 323 0719) 52 Lamp Cover Screw Lamp Screw Screw Handle ORDER REPLACEMENT LAMP Replacement lamp can become very hot. WARNING: TURN OFF THE UV LAMP BEFORE OPENING THE LAMP COVER This indicator is set properly. Make sure that the lamp is yellow when the life of the lamp with a screwdriver and pull out the lamp by grasping the handle. 4 Replace the lamp with a new one promptly. of the same type. See "Lamp Replacement Counter" on the projector. 6 Reset...
Owners Manual
Page 53
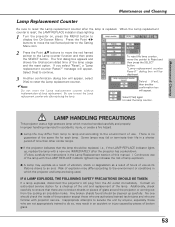
... LAMP REPLACE indicator lights up carefully. "Lamp replacement counter Reset?" IF A LAMP EXPLODES, THE FOLLOWING SAFETY PRECAUTIONS SHOULD BE TAKEN. Contact an authorized service station for each lamp. Be sure to reset the Lamp replacement counter only after the lamp is replaced. To reset the lamp counter, move the red framed pointer to the Lamp counter function and then press the SELECT button. There is reset, the LAMP REPLACE indicator stops lighting. 1 Turn the projector on, press the MENU button to display the On-Screen Menu...
... LAMP REPLACE indicator lights up carefully. "Lamp replacement counter Reset?" IF A LAMP EXPLODES, THE FOLLOWING SAFETY PRECAUTIONS SHOULD BE TAKEN. Contact an authorized service station for each lamp. Be sure to reset the Lamp replacement counter only after the lamp is replaced. To reset the lamp counter, move the red framed pointer to the Lamp counter function and then press the SELECT button. There is reset, the LAMP REPLACE indicator stops lighting. 1 Turn the projector on, press the MENU button to display the On-Screen Menu...
Owners Manual
Page 54
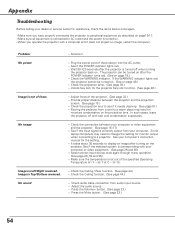
... laptop computers may result in moisture condensation on the projection lens. Select correct input source once again through menu operation. (See page 25 ,34 and 35) - Check the Ceiling / Rear function. (See page 44.) - Check the WARNING indicator. Unlock Key lock for the setting. - See if the input signal is turned off and wait until condensation evaporates. - See your computer's instruction manual for the projector Key lock function. (See page 46.) - Check audio cable connection...
... laptop computers may result in moisture condensation on the projection lens. Select correct input source once again through menu operation. (See page 25 ,34 and 35) - Check the Ceiling / Rear function. (See page 44.) - Check the WARNING indicator. Unlock Key lock for the setting. - See if the input signal is turned off and wait until condensation evaporates. - See your computer's instruction manual for the projector Key lock function. (See page 46.) - Check audio cable connection...
Owners Manual
Page 57
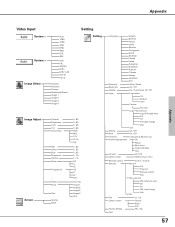
... Keystone Blue back Display Store / Reset On / Off On / Countdown off / Off Logo Logo select Capture Off Default User Yes / No Logo PIN code lock Logo PIN code entry Off On PIN code change Quit Quit Ceiling Rear On / Off On / Off Terminal Computer 2 /Monitor out Power management Off Ready Shut down Timer(1-30 Min) Quit On start Lamp control On / Off Normal / Auto / Eco Remote control Security Fan Lamp counter Factory default Quit Code 1 / Code 2 Key lock Off Projector Remote control...
... Keystone Blue back Display Store / Reset On / Off On / Countdown off / Off Logo Logo select Capture Off Default User Yes / No Logo PIN code lock Logo PIN code entry Off On PIN code change Quit Quit Ceiling Rear On / Off On / Off Terminal Computer 2 /Monitor out Power management Off Ready Shut down Timer(1-30 Min) Quit On start Lamp control On / Off Normal / Auto / Eco Remote control Security Fan Lamp counter Factory default Quit Code 1 / Code 2 Key lock Off Projector Remote control...
Owners Manual
Page 58
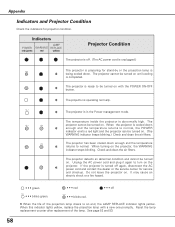
... ✽ projector. Check and clean the air filters. Reset the lamp replacement counter after replacement of the projection lamp draws to be turned on . (The WARNING indicator keeps blinking.) Check and clean the air filters. Appendix Indicators and Projector Condition Check the indicators for stand-by or the projection lamp is abnormally high. The projector cannot be turned on until cooling is completed. ✽ The projector is in the Power management mode. The projector detects an abnormal condition and cannot be turned on with a new one...
... ✽ projector. Check and clean the air filters. Reset the lamp replacement counter after replacement of the projection lamp draws to be turned on . (The WARNING indicator keeps blinking.) Check and clean the air filters. Appendix Indicators and Projector Condition Check the indicators for stand-by or the projection lamp is abnormally high. The projector cannot be turned on until cooling is completed. ✽ The projector is in the Power management mode. The projector detects an abnormal condition and cannot be turned on with a new one...
Owners Manual
Page 60
... H-sync. 15 ~ 100 KHz, V-sync. 50 ~ 100 Hz Optical Information Projection Image Size (Diagonal) Projection Lens Throw Distance Projection Lamp Adjustable from 40" to 300" F 1.65 ~ 1.81 lens with f 22.5 mm ~ 27 mm with manual zoom and focus 4.6' - 43.3' (1.4m - 13.2m) 200W (for PLC-XU73 / PLC-SU70) / 180W (for PLC-XU70) Interface Video Input Jack S-Video Input Jack Audio Input Jacks Computer Input 1 / Component Input Terminal Computer Input 2 / Monitor Output Terminal Computer/ Component Audio Input Jack Service Port Connector USB Connector Audio Output...
... H-sync. 15 ~ 100 KHz, V-sync. 50 ~ 100 Hz Optical Information Projection Image Size (Diagonal) Projection Lens Throw Distance Projection Lamp Adjustable from 40" to 300" F 1.65 ~ 1.81 lens with f 22.5 mm ~ 27 mm with manual zoom and focus 4.6' - 43.3' (1.4m - 13.2m) 200W (for PLC-XU73 / PLC-SU70) / 180W (for PLC-XU70) Interface Video Input Jack S-Video Input Jack Audio Input Jacks Computer Input 1 / Component Input Terminal Computer Input 2 / Monitor Output Terminal Computer/ Component Audio Input Jack Service Port Connector USB Connector Audio Output...


