Owners Manual
Page 2
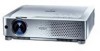
...wish to approx. Also you to reduce the contained noise on crucial information during a presentation. (p33) ◆ Switchable Interface Terminal The projector provides a switchable interface terminal. English, German, French, Italian, Spanish, Portuguese, Dutch, Swedish, Finnish, Polish, Hungarian, Romanian, Russian, ...47) functions. half of 16.77 million colors, and matrix liquid crystal display (LCD) technology. ◆ Compact Design This projector is available in size and weight. This projector utilizes built-in multimedia features, a palette of the screen size) the image ...
...wish to approx. Also you to reduce the contained noise on crucial information during a presentation. (p33) ◆ Switchable Interface Terminal The projector provides a switchable interface terminal. English, German, French, Italian, Spanish, Portuguese, Dutch, Swedish, Finnish, Polish, Hungarian, Romanian, Russian, ...47) functions. half of 16.77 million colors, and matrix liquid crystal display (LCD) technology. ◆ Compact Design This projector is available in size and weight. This projector utilizes built-in multimedia features, a palette of the screen size) the image ...
Owners Manual
Page 3
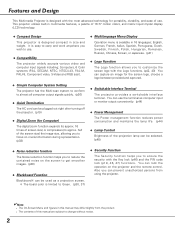
... Bottom 8 Rear Terminal 9 Top Control 10 Remote Control 11 Remote Control Battery Installation 12 Operating Range 12 Installation 13 Positioning the Projector 13 Adjustable Feet 13 Connecting the AC Power Cord 14 Connecting to a Computer 15 Connecting to Video Equipment 16 Connecting to Component ...Video Equipment 17 Basic Operation 18 Turning On the Projector 18 Turning Off the Projector 19 How to Operate the On-Screen Menu 20 Menu Bar 21 Zoom and Focus Adjustment 22 Keystone ...
... Bottom 8 Rear Terminal 9 Top Control 10 Remote Control 11 Remote Control Battery Installation 12 Operating Range 12 Installation 13 Positioning the Projector 13 Adjustable Feet 13 Connecting the AC Power Cord 14 Connecting to a Computer 15 Connecting to Video Equipment 16 Connecting to Component ...Video Equipment 17 Basic Operation 18 Turning On the Projector 18 Turning Off the Projector 19 How to Operate the On-Screen Menu 20 Menu Bar 21 Zoom and Focus Adjustment 22 Keystone ...
Owners Manual
Page 4
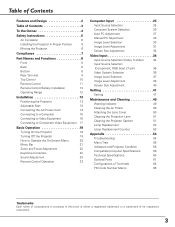
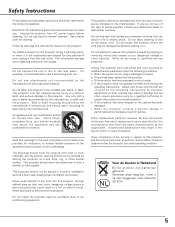
... PRESENT WITHIN THIS UNIT. NOTE: This symbol mark and recycle system are separate collection systems for used for a considerable time. Your SANYO product is to the countries in the other accidents. Please dispose of this equipment at their end-oflife, should be maintained. In ...SUCH AS IN A KITCHEN TO PREVENT A BREAKDOWN OR A DISASTER. REFER SERVICING TO QUALIFIED SERVICE PERSONNEL. Minimum clearance must be dangerous. IF THE PROJECTOR COMES IN CONTACT WITH OIL OR CHEMICALS, IT MAY BECOME DETERIORATED. If not, it may result in a proper position. Do not cover the...
... PRESENT WITHIN THIS UNIT. NOTE: This symbol mark and recycle system are separate collection systems for used for a considerable time. Your SANYO product is to the countries in the other accidents. Please dispose of this equipment at their end-oflife, should be maintained. In ...SUCH AS IN A KITCHEN TO PREVENT A BREAKDOWN OR A DISASTER. REFER SERVICING TO QUALIFIED SERVICE PERSONNEL. Minimum clearance must be dangerous. IF THE PROJECTOR COMES IN CONTACT WITH OIL OR CHEMICALS, IT MAY BECOME DETERIORATED. If not, it may result in a proper position. Do not cover the...
Owners Manual
Page 5
... the original part. for cleaning. Use only with a cart or stand recommended by the manufacturer, or sold with care. This projector should never be placed near the ventilation duct of the instructions given here and retain them for service. c. d. f. Unauthorized substitutions... Wall or shelf mounting should follow the manufacturer's instructions, and should use attachments not recommended by a qualified technician to restore the projector to ensure reliable operation of power source indicated on a bed, sofa, rug, or other similar surface. Adjust only those controls that...
... the original part. for cleaning. Use only with a cart or stand recommended by the manufacturer, or sold with care. This projector should never be placed near the ventilation duct of the instructions given here and retain them for service. c. d. f. Unauthorized substitutions... Wall or shelf mounting should follow the manufacturer's instructions, and should use attachments not recommended by a qualified technician to restore the projector to ensure reliable operation of power source indicated on a bed, sofa, rug, or other similar surface. Adjust only those controls that...
Owners Manual
Page 6
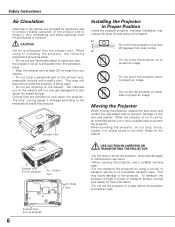
...get damaged but also cause fire hazard by using or installing the projector, the following precautions should be blocked or covered. Exhaust Vent Installing the Projector in use a suitable carrying case. -Do not transport the projector by heat. The materials put it from any flammable object or ... and these openings must not be taken. - Do not touch a peripheral part of the product and to the temperature inside the projector. Cooling fans are provided for ventilation and to ensure reliable operation of the exhaust vent, especially screws and metallic part. Do not point ...
...get damaged but also cause fire hazard by using or installing the projector, the following precautions should be blocked or covered. Exhaust Vent Installing the Projector in use a suitable carrying case. -Do not transport the projector by heat. The materials put it from any flammable object or ... and these openings must not be taken. - Do not touch a peripheral part of the product and to the temperature inside the projector. Cooling fans are provided for ventilation and to ensure reliable operation of the exhaust vent, especially screws and metallic part. Do not point ...
Owners Manual
Page 7
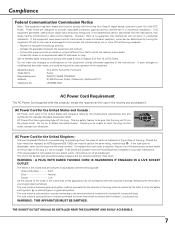
.../TV technician for help. Model Numbers Trade Name Responsible party Address Telephone No. : PLC-XU73, PLC-XU70, PLC-SU70 : Sanyo : SANYO FISHER COMPANY : 21605 Plummer Street, Chatsworth, California 91311 : (818)998-7322 AC Power Cord Requirement The AC Power Cord supplied with this projector meets the requirement for use the plug with the cover omitted. AC Power...
.../TV technician for help. Model Numbers Trade Name Responsible party Address Telephone No. : PLC-XU73, PLC-XU70, PLC-SU70 : Sanyo : SANYO FISHER COMPANY : 21605 Plummer Street, Chatsworth, California 91311 : (818)998-7322 AC Power Cord Requirement The AC Power Cord supplied with this projector meets the requirement for use the plug with the cover omitted. AC Power...
Owners Manual
Page 9
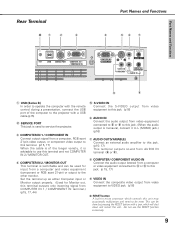
...the USB port of the longer variety, it to L (MONO) jack.) (p16) u AUDIO OUT(VARIABLE) Connect an external audio amplifier to service the projector. i COMPUTER/ COMPONENT AUDIO IN Connect the audio output (stereo) from a computer or video equipment connected to e or r to this unit may occasionally ...terminal and not COMPUTER IN 2 / MONITOR OUT. Do not use this terminal. (p15, 17) When the cable is of the computer to the projector with a pen, which controls this jack. (p 15, 17) o VIDEO IN Connect the composite video output from a computer and video equipment (component...
...the USB port of the longer variety, it to L (MONO) jack.) (p16) u AUDIO OUT(VARIABLE) Connect an external audio amplifier to service the projector. i COMPUTER/ COMPONENT AUDIO IN Connect the audio output (stereo) from a computer or video equipment connected to e or r to this unit may occasionally ...terminal and not COMPUTER IN 2 / MONITOR OUT. Do not use this terminal. (p15, 17) When the cable is of the computer to the projector with a pen, which controls this jack. (p 15, 17) o VIDEO IN Connect the composite video output from a computer and video equipment (component...
Owners Manual
Page 10
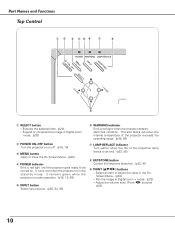
...Correct the keystone distortion. (p22, 41) o POINT (ed7 8 ) buttons - Expand or compress the image in the OnScreen Menu. (p20) - It remains green while the projector is in Digital zoom + mode. (p33) - VOLUME + VOLUME o q SELECT button - Adjust the volume level. (Point 7 8 buttons) (p23) 10 Execute the selected ...item. (p20) - Select an item or adjust the value in Digital zoom mode. (p33) w POWER ON-OFF button Turn the projector on . Pan the image in the stand-by mode. Part Names and Functions Top Control q w e rt y u i POWER WARNING LAMP REPLACE ON...
...Correct the keystone distortion. (p22, 41) o POINT (ed7 8 ) buttons - Expand or compress the image in the OnScreen Menu. (p20) - It remains green while the projector is in Digital zoom + mode. (p33) - VOLUME + VOLUME o q SELECT button - Adjust the volume level. (Point 7 8 buttons) (p23) 10 Execute the selected ...item. (p20) - Select an item or adjust the value in Digital zoom mode. (p33) w POWER ON-OFF button Turn the projector on . Pan the image in the stand-by mode. Part Names and Functions Top Control q w e rt y u i POWER WARNING LAMP REPLACE ON...
Owners Manual
Page 11
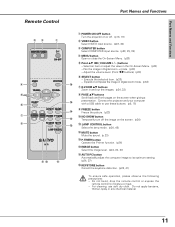
... the following precautions : - Expand or compress the image in Digital zoom mode. (p33) !6 u D.ZOOM ed buttons Zoom in the On-Screen Menu. (p20) - Connect the projector and your computer with a USB cable to moisture or heat. - Execute the selected item. (p20) - Do not bend, drop the remote control or expose the... benzene, thinner, splay or any chemical material. 11 Part Names and Functions Remote Control ew q r t y u i o !0 !1 Part Names and Functions q POWER ON-OFF button Turn the projector on or off the image on the screen when giving a !5 presentation.
... the following precautions : - Expand or compress the image in Digital zoom mode. (p33) !6 u D.ZOOM ed buttons Zoom in the On-Screen Menu. (p20) - Connect the projector and your computer with a USB cable to moisture or heat. - Execute the selected item. (p20) - Do not bend, drop the remote control or expose the... benzene, thinner, splay or any chemical material. 11 Part Names and Functions Remote Control ew q r t y u i o !0 !1 Part Names and Functions q POWER ON-OFF button Turn the projector on or off the image on the screen when giving a !5 presentation.

Owners Manual
Page 12
... Remote Receiver) when pressing any button. Maximum operating range for the remote control is replaced by an incorrect type. ● Dispose of the projector. 16.4' (5 m) 30° 30° 12 Part Names and Functions Remote Control Battery Installation 1 Open the battery compartment lid. 2 Install new batteries into the compartment. 3 ...
... Remote Receiver) when pressing any button. Maximum operating range for the remote control is replaced by an incorrect type. ● Dispose of the projector. 16.4' (5 m) 30° 30° 12 Part Names and Functions Remote Control Battery Installation 1 Open the battery compartment lid. 2 Install new batteries into the compartment. 3 ...
Owners Manual
Page 13
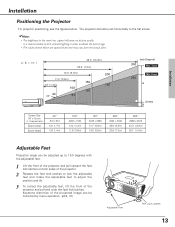
... flat screen. ✔Note: • The brightness in order to adjust the position and tilt. 3 To retract the adjustable feet, lift the front of the projector and pull and undo the feet lock latches. It is recommended to limit ambient lighting in the room has a great influence on both sides of... the projector. 2 Release the feet lock latches to lock the adjustable feet and rotate the adjustable feet to obtain the best image. • The values shown ...
... flat screen. ✔Note: • The brightness in order to adjust the position and tilt. 3 To retract the adjustable feet, lift the front of the projector and pull and undo the feet lock latches. It is recommended to limit ambient lighting in the room has a great influence on both sides of... the projector. 2 Release the feet lock latches to lock the adjustable feet and rotate the adjustable feet to obtain the best image. • The values shown ...

Owners Manual
Page 14
... AC outlet. (200 - 240 V AC) 14 Consult your sales dealer. NOTE ON THE POWER CORD AC power cord must be near this projector is connected to an outlet with singlephase power systems having a grounded neutral conductor. If supplied AC power cord does not match your AC outlet, contact... on . (See page 15-17 for connection.) CAUTION For safety, unplug the AC power cord when the projector is designed to the projector. Projector side For the U.S.A. Connect the projector with the chart below and proper AC power cord must be used. When this equipment and must be easily accessible...
... AC outlet. (200 - 240 V AC) 14 Consult your sales dealer. NOTE ON THE POWER CORD AC power cord must be near this projector is connected to an outlet with singlephase power systems having a grounded neutral conductor. If supplied AC power cord does not match your AC outlet, contact... on . (See page 15-17 for connection.) CAUTION For safety, unplug the AC power cord when the projector is designed to the projector. Projector side For the U.S.A. Connect the projector with the chart below and proper AC power cord must be used. When this equipment and must be easily accessible...

Owners Manual
Page 15
...1 / COMPONENT IN and the COMPUTER IN 2/MONITOR OUT terminal as input. • When connecting the AUDIO OUT to external audio equipment, the projector's built-in speaker is disconnected. • When the cable is switchable. Connecting to use the COMPUTER IN 1 / COMPONENT IN and not the...pin) (Only one cable is supplied.) •USB Cable ✽ • Audio Cables (Mini Plug: stereo Not supplied with this projector.) Installation Installation Audio Output USB port Monitor Output Monitor Output or Monitor Input USB cable ✽ VGA cable VGA cable External Audio Equipment ...
...1 / COMPONENT IN and the COMPUTER IN 2/MONITOR OUT terminal as input. • When connecting the AUDIO OUT to external audio equipment, the projector's built-in speaker is disconnected. • When the cable is switchable. Connecting to use the COMPUTER IN 1 / COMPONENT IN and not the...pin) (Only one cable is supplied.) •USB Cable ✽ • Audio Cables (Mini Plug: stereo Not supplied with this projector.) Installation Installation Audio Output USB port Monitor Output Monitor Output or Monitor Input USB cable ✽ VGA cable VGA cable External Audio Equipment ...
Owners Manual
Page 16
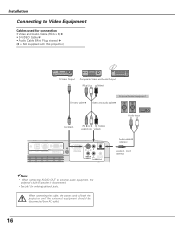
... • Video and Audio Cable (RCA x 3) ✽ • S-VIDEO Cable ✽ • Audio Cable (Mini Plug: stereo Not supplied with this projector.) S-Video Output Composite Video and Audio Output (R) (L) (Video) S-Video cable ✽ External Audio Equipment Video and audio cable✽ S-VIDEO (R) (L) (Video)...cable ✽ (stereo) AUDIO OUT (stereo) ✔Note: • When connecting AUDIO OUT to external audio equipment, the projector's built-in speaker is disconnected. • See p61 for ordering optional parts. When connecting the cable, the power cords of both the...
... • Video and Audio Cable (RCA x 3) ✽ • S-VIDEO Cable ✽ • Audio Cable (Mini Plug: stereo Not supplied with this projector.) S-Video Output Composite Video and Audio Output (R) (L) (Video) S-Video cable ✽ External Audio Equipment Video and audio cable✽ S-VIDEO (R) (L) (Video)...cable ✽ (stereo) AUDIO OUT (stereo) ✔Note: • When connecting AUDIO OUT to external audio equipment, the projector's built-in speaker is disconnected. • See p61 for ordering optional parts. When connecting the cable, the power cords of both the...
Owners Manual
Page 17
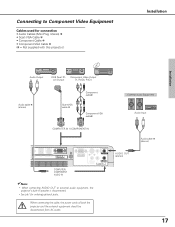
...AUDIO IN ✔Note: • When connecting AUDIO OUT to Component Video Equipment Cables used for ordering optional parts. Connecting to external audio equipment, the projector's built-in speaker is disconnected. • See p61 for connection • Audio Cables (Mini Plug :stereo) ✽ • Scart-VGA Cable... ✽ • Component Cable ✽ • Component-VGA Cable ✽ (✽ = Not supplied with this projector.) Installation Installation Audio Output RGB Scart 21- When connecting the cable, the power cords of both the...
...AUDIO IN ✔Note: • When connecting AUDIO OUT to Component Video Equipment Cables used for ordering optional parts. Connecting to external audio equipment, the projector's built-in speaker is disconnected. • See p61 for connection • Audio Cables (Mini Plug :stereo) ✽ • Scart-VGA Cable... ✽ • Component Cable ✽ • Component-VGA Cable ✽ (✽ = Not supplied with this projector.) Installation Installation Audio Output RGB Scart 21- When connecting the cable, the power cords of both the...
Owners Manual
Page 18
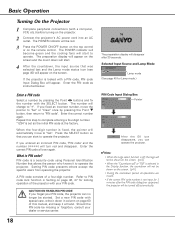
...by pressing the Point d button, then return to complete entering a four-digit number. Setting PIN code prevents others except the specific users from operating the projector. Selected Input Source and Lamp Mode Lamp mode (See page 45 for Lamp mode.) PIN Code Input Dialog Box Pointer After the OK icon disappears... ON HANDLING PIN CODE If you can no longer be red. 3 Press the POWER ON-OFF button on the top control or on the projector. 2 Connect the projector's AC power cord into an AC outlet. If you entered an incorrect PIN code, "PIN code" and the number will turn red and ...
...by pressing the Point d button, then return to complete entering a four-digit number. Setting PIN code prevents others except the specific users from operating the projector. Selected Input Source and Lamp Mode Lamp mode (See page 45 for Lamp mode.) PIN Code Input Dialog Box Pointer After the OK icon disappears... ON HANDLING PIN CODE If you can no longer be red. 3 Press the POWER ON-OFF button on the top control or on the projector. 2 Connect the projector's AC power cord into an AC outlet. If you entered an incorrect PIN code, "PIN code" and the number will turn red and ...
Owners Manual
Page 19
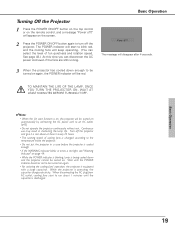
.... (You can disconnect the AC power cord even if the fans are still running speed of fun quietness and rotation speed. Turn off the projector and give it a rest about 1 minutes until the POWER indicator becomes red to an AC outlet. (p45) • Do not operate the... will start to turn off ?" The POWER indicator will disappear after 4 seconds. 3 When the projector has cooled down and the projector cannot be turned on the remote control, and a message "Power off the projector. Turning Off the Projector 1 Press the POWER ON-OFF button on the top control or on again. • For...
.... (You can disconnect the AC power cord even if the fans are still running speed of fun quietness and rotation speed. Turn off the projector and give it a rest about 1 minutes until the POWER indicator becomes red to an AC outlet. (p45) • Do not operate the... will start to turn off ?" The POWER indicator will disappear after 4 seconds. 3 When the projector has cooled down and the projector cannot be turned on the remote control, and a message "Power off the projector. Turning Off the Projector 1 Press the POWER ON-OFF button on the top control or on again. • For...

Owners Manual
Page 20
... - To adjust the data, press the Point 7 8 buttons. Item SELECT button 20 Item data Press the Point 7 8 buttons to Operate the On-Screen Menu The projector can be adjusted or set via the On-Screen Menu. Refer to adjust. Quit Exit this menu. Basic Operation How to adjust the value.
... - To adjust the data, press the Point 7 8 buttons. Item SELECT button 20 Item data Press the Point 7 8 buttons to Operate the On-Screen Menu The projector can be adjusted or set via the On-Screen Menu. Refer to adjust. Quit Exit this menu. Basic Operation How to adjust the value.
Owners Manual
Page 21
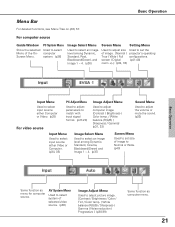
AV System Menu Used to select system of selected video source. (p36) Image Adjust Menu Used to select Menu of image. [Normal / projector's operating True / Wide / Full configurations. For computer source Guide Window PC System Menu Show the selected Used to adjust picture image. [Contrast / Brightness / Color / Tint / ...
AV System Menu Used to select system of selected video source. (p36) Image Adjust Menu Used to select Menu of image. [Normal / projector's operating True / Wide / Full configurations. For computer source Guide Window PC System Menu Show the selected Used to adjust picture image. [Contrast / Brightness / Color / Tint / ...
Owners Manual
Page 26
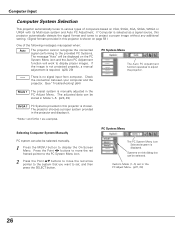
... The message "Auto" will be displayed on the PC System Menu icon and the Auto PC Adjustment function will work to display proper images. The projector chooses a proper system provided in the PC Adjust Menu. Press the Point 7 8 buttons to move the red framed pointer to the PC System ...function operates to project a proper image without any additional setting. (Signal formats provided in this dialog box can also be selected. Systems on VGA, SVGA, XGA, SXGA, WXGA or UXGA with its Multi-scan system and Auto PC Adjustment. The adjusted data can be stored in Mode 1~5. (p28, 29) SVGA ...
... The message "Auto" will be displayed on the PC System Menu icon and the Auto PC Adjustment function will work to display proper images. The projector chooses a proper system provided in the PC Adjust Menu. Press the Point 7 8 buttons to move the red framed pointer to the PC System ...function operates to project a proper image without any additional setting. (Signal formats provided in this dialog box can also be selected. Systems on VGA, SVGA, XGA, SXGA, WXGA or UXGA with its Multi-scan system and Auto PC Adjustment. The adjusted data can be stored in Mode 1~5. (p28, 29) SVGA ...


