Owners Manual
Page 2
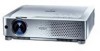
... Features and Design This Multimedia Projector is designed with the most advanced...off the projector. (p19) ◆ Digital Zoom... System Setting The projector has the Multi...during a presentation. (p33) ◆ Switchable Interface Terminal The projector provides a switchable interface terminal. English, German, French, Italian...slightly from using the projector. ✔Note: •...matrix liquid crystal display (LCD) technology. ◆ Compact Design This projector is designed compact in...of use . ◆ Compatibility The projector widely accepts various video and computer ...
... Features and Design This Multimedia Projector is designed with the most advanced...off the projector. (p19) ◆ Digital Zoom... System Setting The projector has the Multi...during a presentation. (p33) ◆ Switchable Interface Terminal The projector provides a switchable interface terminal. English, German, French, Italian...slightly from using the projector. ✔Note: •...matrix liquid crystal display (LCD) technology. ◆ Compact Design This projector is designed compact in...of use . ◆ Compatibility The projector widely accepts various video and computer ...
Owners Manual
Page 3
... 3 To the Owner 4 Safety Instructions 5 Air Circulation 6 Installing the Projector in Proper Position 6 Moving the Projector 6 Compliance 7 Part Names and Functions 8 Front 8 Back 8 Bottom 8 Rear Terminal 9 Top Control 10 Remote Control 11 Remote Control Battery Installation 12 Operating Range 12 Installation 13 Positioning the Projector 13 Adjustable Feet 13 Connecting the AC Power Cord 14...
... 3 To the Owner 4 Safety Instructions 5 Air Circulation 6 Installing the Projector in Proper Position 6 Moving the Projector 6 Compliance 7 Part Names and Functions 8 Front 8 Back 8 Bottom 8 Rear Terminal 9 Top Control 10 Remote Control 11 Remote Control Battery Installation 12 Operating Range 12 Installation 13 Positioning the Projector 13 Adjustable Feet 13 Connecting the AC Power Cord 14...

Owners Manual
Page 8
Do not put heat-sensitive objects near this side. !5 !4 8 Part Names and Functions Front qw e r t !5 Back !5 y ui o !0 Bottom !1 !2 !3 q Infrared Remote Receiver w Zoom Ring e Projection Lens r Focus Ring t Lens Cover (See page 50 for attaching.) y Top Controls and Indicators u Speaker i Air Intake Vent o Power Cord Connector !0 Terminals and Connectors !1 Lamp Cover !2 Air Intake Vents (back and bottom) !3 Air Filters !4 Adjustable Feet !5 Exhaust Vents CAUTION Hot air is exhausted from the exhaust vent.
Do not put heat-sensitive objects near this side. !5 !4 8 Part Names and Functions Front qw e r t !5 Back !5 y ui o !0 Bottom !1 !2 !3 q Infrared Remote Receiver w Zoom Ring e Projection Lens r Focus Ring t Lens Cover (See page 50 for attaching.) y Top Controls and Indicators u Speaker i Air Intake Vent o Power Cord Connector !0 Terminals and Connectors !1 Lamp Cover !2 Air Intake Vents (back and bottom) !3 Air Filters !4 Adjustable Feet !5 Exhaust Vents CAUTION Hot air is exhausted from the exhaust vent.
Owners Manual
Page 9
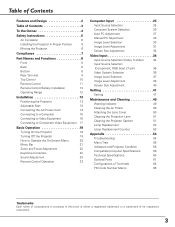
...y AUDIO IN Connect the audio output from video equipment connected to t or o to this jack. (When the audio output is used to service the projector. Do not use this terminal and not COMPUTER IN 2 / MONITOR OUT. i COMPUTER/ COMPONENT AUDIO IN Connect the audio output (stereo) from a ...OUT R AUDIO OUT VIDEO IN L (MONO) COMPUTER / COMPONENT S-VIDEO IN AUDIO IN o i q USB (Series B) In order to operate the computer with the remote control during a presentation, connect the USB port of the longer variety, it to L (MONO) jack.) (p16) u AUDIO OUT(VARIABLE) Connect an external audio amplifier...
...y AUDIO IN Connect the audio output from video equipment connected to t or o to this jack. (When the audio output is used to service the projector. Do not use this terminal and not COMPUTER IN 2 / MONITOR OUT. i COMPUTER/ COMPONENT AUDIO IN Connect the audio output (stereo) from a ...OUT R AUDIO OUT VIDEO IN L (MONO) COMPUTER / COMPONENT S-VIDEO IN AUDIO IN o i q USB (Series B) In order to operate the computer with the remote control during a presentation, connect the USB port of the longer variety, it to L (MONO) jack.) (p16) u AUDIO OUT(VARIABLE) Connect an external audio amplifier...
Owners Manual
Page 11
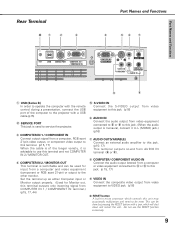
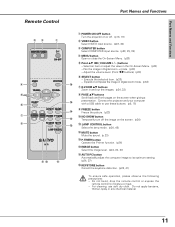
...Screen Menu. (p20) t Point ed 7 8 ( VOLUME + / - ) buttons - Adjust the volume level. (Point 7 8 buttons) (p23) y SELECT button - Connect the projector and your computer with a USB cable to use soft dry cloth. Pan the image in and out the images. (p24, 33) i PAGE ed buttons Scroll...p33) !6 u D.ZOOM ed buttons Zoom in Digital zoom + mode. (p33) - Part Names and Functions Remote Control ew q r t y u i o !0 !1 Part Names and Functions q POWER ON-OFF button Turn the projector on the screen when giving a !5 presentation. Select an item or adjust the value in the On-Screen ...
...Screen Menu. (p20) t Point ed 7 8 ( VOLUME + / - ) buttons - Adjust the volume level. (Point 7 8 buttons) (p23) y SELECT button - Connect the projector and your computer with a USB cable to use soft dry cloth. Pan the image in and out the images. (p24, 33) i PAGE ed buttons Scroll...p33) !6 u D.ZOOM ed buttons Zoom in Digital zoom + mode. (p33) - Part Names and Functions Remote Control ew q r t y u i o !0 !1 Part Names and Functions q POWER ON-OFF button Turn the projector on the screen when giving a !5 presentation. Select an item or adjust the value in the On-Screen ...

Owners Manual
Page 12
... contact with pins in contact with water or liquid. ● Do not expose the remote control to the instructions. Operating Range Point the remote control toward the projector (Infrared Remote Receiver) when pressing any button. Replace the compartment lid. Maximum operating range for the... remote control is replaced by an incorrect type. ● Dispose of the projector. 16.4' (5 m) 30° 30° 12 Part Names and Functions Remote Control Battery Installation 1 Open the battery compartment lid. 2 ...
... contact with pins in contact with water or liquid. ● Do not expose the remote control to the instructions. Operating Range Point the remote control toward the projector (Infrared Remote Receiver) when pressing any button. Replace the compartment lid. Maximum operating range for the... remote control is replaced by an incorrect type. ● Dispose of the projector. 16.4' (5 m) 30° 30° 12 Part Names and Functions Remote Control Battery Installation 1 Open the battery compartment lid. 2 ...
Owners Manual
Page 18
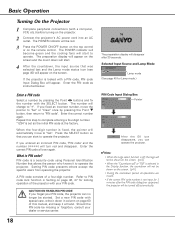
... to "Set". Refer to operate. Should the PIN code be red. 3 Press the POWER ON-OFF button on the top control or on the projector. 2 Connect the projector's AC power cord into an AC outlet. When the four-digit number is selected in Setting on the screen. (p42) • When the "...incorrect number, move to "Set" or "Clear" once by pressing the Point 7 8 buttons and fix the number with a computer, VCR, etc.) before turning on the remote control. The POWER indicator will appear. If you can no longer be turned off " or "Off" is fixed, the pointer will disappear after the PIN...
... to "Set". Refer to operate. Should the PIN code be red. 3 Press the POWER ON-OFF button on the top control or on the projector. 2 Connect the projector's AC power cord into an AC outlet. When the four-digit number is selected in Setting on the screen. (p42) • When the "...incorrect number, move to "Set" or "Clear" once by pressing the Point 7 8 buttons and fix the number with a computer, VCR, etc.) before turning on the remote control. The POWER indicator will appear. If you can no longer be turned off " or "Off" is fixed, the pointer will disappear after the PIN...
Owners Manual
Page 19
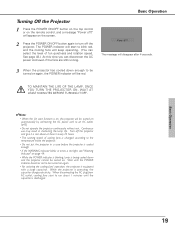
... appear on the screen. 2 Press the POWER ON-OFF button again to be red. TO MAINTAIN THE LIFE OF THE LAMP, ONCE YOU TURN THE PROJECTOR ON, WAIT AT LEAST 5 MINUTES BEFORE TURNING IT OFF. ✔Note: • When the On start function is on, this time you can select ... cooled down enough to run about an hour in shortening the lamp life. Turning Off the Projector 1 Press the POWER ON-OFF button on the top control or on the remote control, and a message "Power off the projector. Wait until the capacitor is operating, the capacitor charges electricity. The POWER indicator will start...
... appear on the screen. 2 Press the POWER ON-OFF button again to be red. TO MAINTAIN THE LIFE OF THE LAMP, ONCE YOU TURN THE PROJECTOR ON, WAIT AT LEAST 5 MINUTES BEFORE TURNING IT OFF. ✔Note: • When the On start function is on, this time you can select ... cooled down enough to run about an hour in shortening the lamp life. Turning Off the Projector 1 Press the POWER ON-OFF button on the top control or on the remote control, and a message "Power off the projector. Wait until the capacitor is operating, the capacitor charges electricity. The POWER indicator will start...

Owners Manual
Page 20
... icon to adjust and press the Point ed buttons to select an item to the following pages regarding each adjustment. Refer to adjust. SELECT button Remote Control MENU button POINT buttons SELECT button On-Screen Menu Menu icon Menu bar Pointer (red framed ) Pointer (red framed ) Press the Point ed... buttons to show the item data. Item SELECT button 20 Item data Press the Point 7 8 buttons to Operate the On-Screen Menu The projector can be adjusted or set via the On-Screen Menu. Top Control POWER WARNING LAMP REP ON - Basic Operation How to adjust the value. To...
... icon to adjust and press the Point ed buttons to select an item to the following pages regarding each adjustment. Refer to adjust. SELECT button Remote Control MENU button POINT buttons SELECT button On-Screen Menu Menu icon Menu bar Pointer (red framed ) Pointer (red framed ) Press the Point ed... buttons to show the item data. Item SELECT button 20 Item data Press the Point 7 8 buttons to Operate the On-Screen Menu The projector can be adjusted or set via the On-Screen Menu. Top Control POWER WARNING LAMP REP ON - Basic Operation How to adjust the value. To...
Owners Manual
Page 22
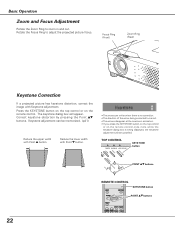
...Ring (Rear) Keystone Correction If a projected picture has keystone distortion, correct the image with Point e button. VOLUME + VOLUME KEYSTONE button POINT ed buttons REMOTE CONTROL KEYSTONE button POINT ed buttons 22 Rotate the Focus Ring to zoom in and out. Press the KEYSTONE button on the top control or... on the remote control once more while the keystone dialog box is no correction. • The direction of the arrow being displayed, the keystone adjustment will...
...Ring (Rear) Keystone Correction If a projected picture has keystone distortion, correct the image with Point e button. VOLUME + VOLUME KEYSTONE button POINT ed buttons REMOTE CONTROL KEYSTONE button POINT ed buttons 22 Rotate the Focus Ring to zoom in and out. Press the KEYSTONE button on the top control or... on the remote control once more while the keystone dialog box is no correction. • The direction of the arrow being displayed, the keystone adjustment will...
Owners Manual
Page 23
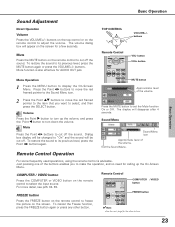
... 1 Press the MENU button to set the Mute function On or Off. Volume Press the Point 8 button to turn up the On-Screen Menu. Remote Control Operation Press the MUTE button to display the On-Screen Menu. For some frequently used operations, using the...TOP CONTROL SELECT - Dialog box display will be cut off the sound. VOLUME + VOLUME VOLUME+/buttons Remote Control VOL- Exit the Sound Menu. COMPUTER / VIDEO button Press the COMPUTER or VIDEO button on the remote control to select the input source. MUTE button Approximate level of the volume. 2 Press the Point ...
... 1 Press the MENU button to set the Mute function On or Off. Volume Press the Point 8 button to turn up the On-Screen Menu. Remote Control Operation Press the MUTE button to display the On-Screen Menu. For some frequently used operations, using the...TOP CONTROL SELECT - Dialog box display will be cut off the sound. VOLUME + VOLUME VOLUME+/buttons Remote Control VOL- Exit the Sound Menu. COMPUTER / VIDEO button Press the COMPUTER or VIDEO button on the remote control to select the input source. MUTE button Approximate level of the volume. 2 Press the Point ...
Owners Manual
Page 24
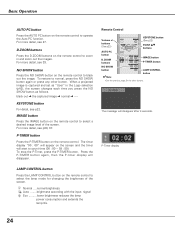
... out the images. black out ➜ the captured image ➜ normal KEYSTONE button For detail, see 27. IMAGE button Press the IMAGE button on the remote control to normal, press the NO SHOW button again or press any other buttons. For more detail, see p30, 37. To restore to zoom in... consumption and extends the lamp life. 24 NO SHOW button Press the NO SHOW button on the screen and the timer will appear on the remote control to count time (00 : 00 ~ 59 : 59). The timer display "00 : 00" will start to black out the image. Press the P-TIMER button again...
... out the images. black out ➜ the captured image ➜ normal KEYSTONE button For detail, see 27. IMAGE button Press the IMAGE button on the remote control to normal, press the NO SHOW button again or press any other buttons. For more detail, see p30, 37. To restore to zoom in... consumption and extends the lamp life. 24 NO SHOW button Press the NO SHOW button on the screen and the timer will appear on the remote control to count time (00 : 00 ~ 59 : 59). The timer display "00 : 00" will start to black out the image. Press the P-TIMER button again...
Owners Manual
Page 25
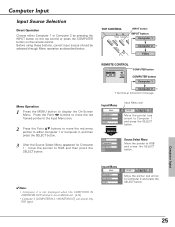
... pointer to either Computer 1 or Computer 2 by pressing the INPUT button on the top control or press the COMPUTER button on the remote control. Source Select Menu Move the pointer to RGB and then press the SELECT button. OFF MENU INPUT KE SELECT Computer 1 Computer... 2 ✳ Video Menu Operation 1 Press the MENU button to Computer 1 and press the SELECT button. Computer Input 25 REMOTE CONTROL COMPUTER button COMPUTER button Computer 1 Computer 2 ✳ ✳ See Note at the bottom of this page. Input Menu Input Menu icon ...
... pointer to either Computer 1 or Computer 2 by pressing the INPUT button on the top control or press the COMPUTER button on the remote control. Source Select Menu Move the pointer to RGB and then press the SELECT button. OFF MENU INPUT KE SELECT Computer 1 Computer... 2 ✳ Video Menu Operation 1 Press the MENU button to Computer 1 and press the SELECT button. Computer Input 25 REMOTE CONTROL COMPUTER button COMPUTER button Computer 1 Computer 2 ✳ ✳ See Note at the bottom of this page. Input Menu Input Menu icon ...

Owners Manual
Page 27
... Menu. "Please wait..." message will appear while Auto PC adjustment is in the PC System Menu (p26). See "Store" on the remote control unit. Computer Input 27 Computer Input Auto PC Adjustment Auto PC Adjustment function is provided to automatically adjust Fine sync, Total dots, ...Auto PC Adjustment function can be operated when 480i, 575i, 480p, 575p, 720p,1035i, or 1080i is not provided properly with this projector. When the image is selected in this Auto PC Adjustment function. To store adjustment parameters Adjustment parameters from Auto PC Adjustment can be ...
... Menu. "Please wait..." message will appear while Auto PC adjustment is in the PC System Menu (p26). See "Store" on the remote control unit. Computer Input 27 Computer Input Auto PC Adjustment Auto PC Adjustment function is provided to automatically adjust Fine sync, Total dots, ...Auto PC Adjustment function can be operated when 480i, 575i, 480p, 575p, 720p,1035i, or 1080i is not provided properly with this projector. When the image is selected in this Auto PC Adjustment function. To store adjustment parameters Adjustment parameters from Auto PC Adjustment can be ...

Owners Manual
Page 30
... for viewing picture in a bright room. Standard Normal picture level preset on this projector. Image 1~4 User preset image in the Image Adjust Menu (p32). Menu Operation 1 Press the MENU button to the level and press the SELECT button. Remote Control IMAGE button IMAGE button Dynamic Standard Real Blackboard(Green) Image 1 Image 2 Image...
... for viewing picture in a bright room. Standard Normal picture level preset on this projector. Image 1~4 User preset image in the Image Adjust Menu (p32). Menu Operation 1 Press the MENU button to the level and press the SELECT button. Remote Control IMAGE button IMAGE button Dynamic Standard Real Blackboard(Green) Image 1 Image 2 Image...

Owners Manual
Page 33
... zoom -" will be limited depending on the input signal or when the Keystone function is working. • True, Full screen, and Digital zoom +/- Remote Control POINT buttons SELECT button D.ZOOM + button D.ZOOM - button ✔Note: •The panning function may not operate properly if the stored Mode in...screen or True is used. (p29) •The minimum compression ratio can be also expanded by pressing the D.ZOOM ▼ button on the remote control. Computer Input For zooming in and out the images Digital zoom + When the Digital zoom + is selected, the On-Screen Menu will ...
... zoom -" will be limited depending on the input signal or when the Keystone function is working. • True, Full screen, and Digital zoom +/- Remote Control POINT buttons SELECT button D.ZOOM + button D.ZOOM - button ✔Note: •The panning function may not operate properly if the stored Mode in...screen or True is used. (p29) •The minimum compression ratio can be also expanded by pressing the D.ZOOM ▼ button on the remote control. Computer Input For zooming in and out the images Digital zoom + When the Digital zoom + is selected, the On-Screen Menu will ...
Owners Manual
Page 34
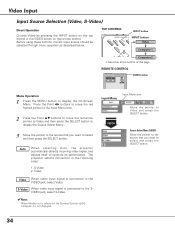
... SELECT button. The projector selects connection in the Terminal function (p44) , Computer 2 is not displayed. S-Video When video input signal is connected to the SVIDEO jack, select S-Video. ✔Note: When Monitor out is connected to select and press the SELECT button. 34 REMOTE CONTROL VIDEO button Menu... Source Selection (Video, S-Video) Direct Operation Choose Video by pressing the INPUT button on the top control or the VIDEO button on the remote control. Press the Point 7 8 buttons to move the red framed pointer to the Input Menu icon. 2 Press the Point ed buttons ...
... SELECT button. The projector selects connection in the Terminal function (p44) , Computer 2 is not displayed. S-Video When video input signal is connected to the SVIDEO jack, select S-Video. ✔Note: When Monitor out is connected to select and press the SELECT button. 34 REMOTE CONTROL VIDEO button Menu... Source Selection (Video, S-Video) Direct Operation Choose Video by pressing the INPUT button on the top control or the VIDEO button on the remote control. Press the Point 7 8 buttons to move the red framed pointer to the Input Menu icon. 2 Press the Point ed buttons ...
Owners Manual
Page 35
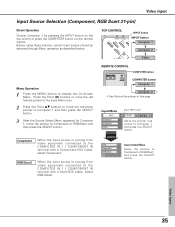
...-pin) Direct Operation Choose Computer 1 by pressing the INPUT button on the top control or press the COMPUTER button on the remote control. TOP CONTROL INPUT button POWER WARNING LA ON - REMOTE CONTROL COMPUTER button COMPUTER button Computer 1 Computer 2 ✳ ✳ See Note at the bottom of this page. Source Select Menu...
...-pin) Direct Operation Choose Computer 1 by pressing the INPUT button on the top control or press the COMPUTER button on the remote control. TOP CONTROL INPUT button POWER WARNING LA ON - REMOTE CONTROL COMPUTER button COMPUTER button Computer 1 Computer 2 ✳ ✳ See Note at the bottom of this page. Source Select Menu...
Owners Manual
Page 37
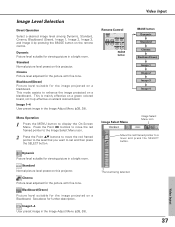
... image in the Image Adjust Menu (p38, 39). Standard Normal picture level preset on a Blackboard. See above for the image projected on this projector. Press the Point 7 8 buttons to move the red framed pointer to the Image Select Menu icon. 2 Press the Point ed buttons to ...move the red framed pointer to the level that you want to enhance the image projected on this projector. Blackboard(Green) Picture level suitable for further description. Video Input Remote Control IMAGE button IMAGE button Dynamic Standard Cinema Blackboard(Green) Image 1 Image 2 Image 3 Image 4 Image...
... image in the Image Adjust Menu (p38, 39). Standard Normal picture level preset on a Blackboard. See above for the image projected on this projector. Press the Point 7 8 buttons to move the red framed pointer to the Image Select Menu icon. 2 Press the Point ed buttons to ...move the red framed pointer to the level that you want to enhance the image projected on this projector. Blackboard(Green) Picture level suitable for further description. Video Input Remote Control IMAGE button IMAGE button Dynamic Standard Cinema Blackboard(Green) Image 1 Image 2 Image 3 Image 4 Image...
Owners Manual
Page 44
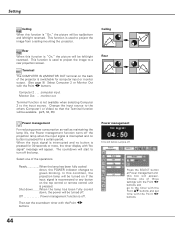
...at Power management and this box will start to green blinking. Choose one of the operations. The countdown will appear. Select one of the projector is switchable for 30 seconds or more, the timer display with the Point 7 8 buttons. Off Power management function is off . Terminal The... COMPUTER IN 2/MONITOR OUT terminal on the top control or remote control unit is pressed. Setting Ceiling When this function is "On," the picture will appear. This function is pressed for computer input or monitor...
...at Power management and this box will start to green blinking. Choose one of the operations. The countdown will appear. Select one of the projector is switchable for 30 seconds or more, the timer display with the Point 7 8 buttons. Off Power management function is off . Terminal The... COMPUTER IN 2/MONITOR OUT terminal on the top control or remote control unit is pressed. Setting Ceiling When this function is "On," the picture will appear. This function is pressed for computer input or monitor...


