User Manual Ver.1.0 (English)
Page 2
... • Setting the Wireless Network 67 • Using the AllShare Play 139 • Managing the Network Connected Devices 79 • Connecting a USB Device 140 • Setting the Setup 81 • Connecting to the PC through network 146 • Setting the Time 20 • Using the Sleep Timer 21 • Setting the On/Off Timer 27 • Blocking Programs 36 • Economical Solutions 37 • Other Features 39 • Support Menu 82 • Screen Display 149...
... • Setting the Wireless Network 67 • Using the AllShare Play 139 • Managing the Network Connected Devices 79 • Connecting a USB Device 140 • Setting the Setup 81 • Connecting to the PC through network 146 • Setting the Time 20 • Using the Sleep Timer 21 • Setting the On/Off Timer 27 • Blocking Programs 36 • Economical Solutions 37 • Other Features 39 • Support Menu 82 • Screen Display 149...

User Manual Ver.1.0 (English)
Page 9
...; Change Antenna: Switches to Air or Cable. ▶ ●● Edit Mode: You can select desired channels and edit it easier to find and select the channel. ●● Delete: Delete a channel from the channel list. This makes it . English For detailed information about using Edit Mode, refer to a channel. For example, Food, Golf, etc. When you use the channel button to change channels, your TV only displays the channels...
...; Change Antenna: Switches to Air or Cable. ▶ ●● Edit Mode: You can select desired channels and edit it easier to find and select the channel. ●● Delete: Delete a channel from the channel list. This makes it . English For detailed information about using Edit Mode, refer to a channel. For example, Food, Golf, etc. When you use the channel button to change channels, your TV only displays the channels...
User Manual Ver.1.0 (English)
Page 13
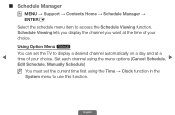
Set each channel using the menu options (Cancel Schedule, ▶ Edit Schedule, Manually Schedule) NN You must set the TV to display a desired channel automatically on a day and at the time of your choice. Using Option Menu t You can set the current time first using the Time → Clock function in the System menu to access the Schedule Viewing function. English Schedule Viewing lets you display the channel you want at a ◀...
Set each channel using the menu options (Cancel Schedule, ▶ Edit Schedule, Manually Schedule) NN You must set the TV to display a desired channel automatically on a day and at the time of your choice. Using Option Menu t You can set the current time first using the Time → Clock function in the System menu to access the Schedule Viewing function. English Schedule Viewing lets you display the channel you want at a ◀...

User Manual Ver.1.0 (English)
Page 28
..., 4:3, Smart View 2 ATV, AV 16:9, Zoom1, Zoom2, 4:3 Component (1080i, 1080p) 16:9, Wide Fit, 4:3, Screen Fit Component (720p) 16:9, Wide Fit, 4:3 Component (480i, 480p) 16:9, Zoom1, Zoom2, 4:3 HDMI (720p, 1080i, 1080p) 16:9, Wide Fit, 4:3, Screen Fit, Smart View 1, Smart View 2 English NN The picture size can adjust and store settings for each external device you have connected to an input on the input resolution when you play content using Videos in AllShare Play.
..., 4:3, Smart View 2 ATV, AV 16:9, Zoom1, Zoom2, 4:3 Component (1080i, 1080p) 16:9, Wide Fit, 4:3, Screen Fit Component (720p) 16:9, Wide Fit, 4:3 Component (480i, 480p) 16:9, Zoom1, Zoom2, 4:3 HDMI (720p, 1080i, 1080p) 16:9, Wide Fit, 4:3, Screen Fit, Smart View 1, Smart View 2 English NN The picture size can adjust and store settings for each external device you have connected to an input on the input resolution when you play content using Videos in AllShare Play.
User Manual Ver.1.0 (English)
Page 32
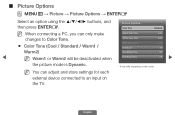
... adjust and store settings for each external device connected to Color Tone. NN You can only make Digital Noise Filter Auto changes to an input on the model. ■■ Picture Options OO MENUm → Picture → Picture Options → ENTERE Select an option using the buttons, and then press ENTERE. MPEG Noise Filter Auto ●● Color Tone (Cool / Standard / Warm1 / HDMI Black Level Low Film Mode Off Warm2) Auto...
... adjust and store settings for each external device connected to Color Tone. NN You can only make Digital Noise Filter Auto changes to an input on the model. ■■ Picture Options OO MENUm → Picture → Picture Options → ENTERE Select an option using the buttons, and then press ENTERE. MPEG Noise Filter Auto ●● Color Tone (Cool / Standard / Warm1 / HDMI Black Level Low Film Mode Off Warm2) Auto...
User Manual Ver.1.0 (English)
Page 56
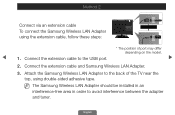
... Samsung Wireless LAN Adapter to the USB port. ▶ 2. Connect the extension cable to the back of the TV near the top, using the extension cable, follow these steps: * The position of port may differ depending on the model. ◀ 1. Connect the extension cable and Samsung Wireless LAN Adapter. 3. NN The Samsung Wireless LAN Adapter should be installed in an interference-free area in order to avoid interference between the adapter and tuner...
... Samsung Wireless LAN Adapter to the USB port. ▶ 2. Connect the extension cable to the back of the TV near the top, using the extension cable, follow these steps: * The position of port may differ depending on the model. ◀ 1. Connect the extension cable and Samsung Wireless LAN Adapter. 3. NN The Samsung Wireless LAN Adapter should be installed in an interference-free area in order to avoid interference between the adapter and tuner...

User Manual Ver.1.0 (English)
Page 57
... network, refer to the "Setting the Wired Network", and for detailed settings for wireless network, refer to use AllShare™ and perform software upgrade. NN If you set the network, you can share the contents and update the functions through the AllShare Play. Other Internet functions are not supported. ▶ English ■■ Network Settings OO MENUm → Network → Network Settings → ENTERE Set the network connection to the " Setting the Wireless Network" in this manual...
... network, refer to the "Setting the Wired Network", and for detailed settings for wireless network, refer to use AllShare™ and perform software upgrade. NN If you set the network, you can share the contents and update the functions through the AllShare Play. Other Internet functions are not supported. ▶ English ■■ Network Settings OO MENUm → Network → Network Settings → ENTERE Set the network connection to the " Setting the Wireless Network" in this manual...
User Manual Ver.1.0 (English)
Page 59
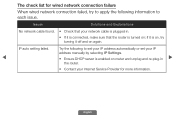
... following to each issue. IP auto setting failed. Try the following information to set your IP address automatically or set your IP address manually by selecting IP Settings. ◀ • Ensure DHCP server is turned on; English The check list for wired network connection failure When wired network connection failed, try turning it off and on router and unplug and re-plug-in . • If...
... following to each issue. IP auto setting failed. Try the following information to set your IP address automatically or set your IP address manually by selecting IP Settings. ◀ • Ensure DHCP server is turned on; English The check list for wired network connection failure When wired network connection failed, try turning it off and on router and unplug and re-plug-in . • If...
User Manual Ver.1.0 (English)
Page 61
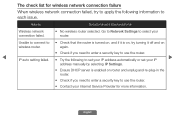
... need to enter a security key to use the router. • Contact your Internet Service Provider for wireless network connection failure When wireless network connection failed, try turning it off and on , try to apply the following information to each issue. The check list for more information. Issues Solutions and Explanations Wireless network connection failed. • No wireless router selected. English Go to Network Settings to set your IP address automatically or set...
... need to enter a security key to use the router. • Contact your Internet Service Provider for wireless network connection failure When wireless network connection failed, try turning it off and on , try to apply the following information to each issue. The check list for more information. Issues Solutions and Explanations Wireless network connection failed. • No wireless router selected. English Go to Network Settings to set your IP address automatically or set...

User Manual Ver.1.0 (English)
Page 63
... Network ■■ Wired Network Setup (Auto) Use the Automatic Network Setup when connecting your TV to set wired network. To set up appears directly to a network that supports DHCP. Network Settings Network cable connected. Go to your TV's cable network connection automatically, follow these steps: NN When connecting LAN cable, the ◀ screen pop-up your wireless network, plug in a Samsung Wireless LAN Adapter. Select Start, and then press ENTERE. If you want to connect to the Network Settings screen. (MENUm → Network → Network Settings...
... Network ■■ Wired Network Setup (Auto) Use the Automatic Network Setup when connecting your TV to set wired network. To set up appears directly to a network that supports DHCP. Network Settings Network cable connected. Go to your TV's cable network connection automatically, follow these steps: NN When connecting LAN cable, the ◀ screen pop-up your wireless network, plug in a Samsung Wireless LAN Adapter. Select Start, and then press ENTERE. If you want to connect to the Network Settings screen. (MENUm → Network → Network Settings...
User Manual Ver.1.0 (English)
Page 78
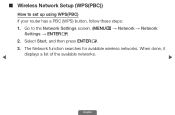
When done, it displays a list of the available networks. ◀ ▶ English ■■ Wireless Network Setup (WPS(PBC)) How to the Network Settings screen. (MENUm → Network → Network Settings → ENTERE) 2. Select Start, and then press ENTERE. 3. Go to set up using WPS(PBC) If your router has a PBC (WPS) button, follow these steps: 1. The Network function searches for available wireless networks.
When done, it displays a list of the available networks. ◀ ▶ English ■■ Wireless Network Setup (WPS(PBC)) How to the Network Settings screen. (MENUm → Network → Network Settings → ENTERE) 2. Select Start, and then press ENTERE. 3. Go to set up using WPS(PBC) If your router has a PBC (WPS) button, follow these steps: 1. The Network function searches for available wireless networks.
User Manual Ver.1.0 (English)
Page 83
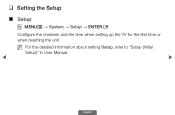
❑❑ Setting the Setup ■■ Setup OO MENUm → System → Setup → ENTERE Configure the channels and the time when setting up the TV for the first time or when resetting the unit. NN For the detailed information about setting Setup, refer to "Setup (Initial Setup)" in User Manual. ◀ ▶ English
❑❑ Setting the Setup ■■ Setup OO MENUm → System → Setup → ENTERE Configure the channels and the time when setting up the TV for the first time or when resetting the unit. NN For the detailed information about setting Setup, refer to "Setup (Initial Setup)" in User Manual. ◀ ▶ English
User Manual Ver.1.0 (English)
Page 84
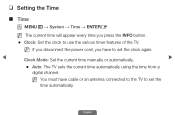
... the power cord, you press the INFO button. ●● Clock: Set the clock to use the various timer features of the TV. ❑❑ Setting the Time ■■ Time OO MENUm → System → Time → ENTERE NN The current time will appear every time you have cable or an antenna connected to the TV to set the clock again. ◀ Clock Mode: Set the current time manually...
... the power cord, you press the INFO button. ●● Clock: Set the clock to use the various timer features of the TV. ❑❑ Setting the Time ■■ Time OO MENUm → System → Time → ENTERE NN The current time will appear every time you have cable or an antenna connected to the TV to set the clock again. ◀ Clock Mode: Set the current time manually...

User Manual Ver.1.0 (English)
Page 88
..., Component) that you can : ●● Select TV and have the TV display a specific air or cable channel. ●● Select USB and have the TV display a channel from the set-top box. You can se- NN The USB device must be connected to your TV before you have connected a set-top box to change the volume level. Use the ◄/► buttons to enter numbers. English Volume: Set the desired volume level...
..., Component) that you can : ●● Select TV and have the TV display a specific air or cable channel. ●● Select USB and have the TV display a channel from the set-top box. You can se- NN The USB device must be connected to your TV before you have connected a set-top box to change the volume level. Use the ◄/► buttons to enter numbers. English Volume: Set the desired volume level...
User Manual Ver.1.0 (English)
Page 118
... the setup screen. If your TV seems to the factory defaults except network settings. NN Enter your antenna to increase signal strength and receive HD channels. ●● Reset: Reset all settings to be having a problem, access the trouble shooting guide for a solution. English the-air HD channels is either perfect or the channels are unavailable. NN If none of over- Change the PIN using the Change PIN option. ●● Troubleshooting: Displays a troubleshooting guide organized...
... the setup screen. If your TV seems to the factory defaults except network settings. NN Enter your antenna to increase signal strength and receive HD channels. ●● Reset: Reset all settings to be having a problem, access the trouble shooting guide for a solution. English the-air HD channels is either perfect or the channels are unavailable. NN If none of over- Change the PIN using the Change PIN option. ●● Troubleshooting: Displays a troubleshooting guide organized...
User Manual Ver.1.0 (English)
Page 143
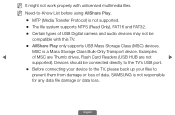
... be compatible with unlicensed multimedia files. MSC is not supported. ●● The file system supports NTFS (Read Only), FAT16 and FAT32. ●● Certain types of USB Digital camera and audio devices may not be connected directly to the TV's USB port. ●● Before connecting your device to the TV, please back up your files to -Know List before using AllShare Play...
... be compatible with unlicensed multimedia files. MSC is not supported. ●● The file system supports NTFS (Read Only), FAT16 and FAT32. ●● Certain types of USB Digital camera and audio devices may not be connected directly to the TV's USB port. ●● Before connecting your device to the TV, please back up your files to -Know List before using AllShare Play...

User Manual Ver.1.0 (English)
Page 174
... ▶ content. • Adjust the Cable/Set top box video output resolution to a digital set top box. Use HDMI or Component cables to deliver HD (high definition) picture quality. • Cable/Satellite subscribers: Try HD channels from the channel line up. • Air/Cable Antenna connection: Try HD channels after performing an Auto program. ◀ NN Many HD channels are typically tuned to digital, HD (high definition) channels. • If you have an analog cable/satellite box, upgrade to 1080i or...
... ▶ content. • Adjust the Cable/Set top box video output resolution to a digital set top box. Use HDMI or Component cables to deliver HD (high definition) picture quality. • Cable/Satellite subscribers: Try HD channels from the channel line up. • Air/Cable Antenna connection: Try HD channels after performing an Auto program. ◀ NN Many HD channels are typically tuned to digital, HD (high definition) channels. • If you have an analog cable/satellite box, upgrade to 1080i or...
User Manual Ver.1.0 (English)
Page 177
.... Self Diagnosis - Sound Test If the audio is connected to a cable box, please try to reset the box. (Reconnect the AC cord and wait until the cable box reboots. Issues Solutions and Explanations When changing channels, the picture freezes or is distorted or delayed. • If the TV is ok, the sound problem may take up to 20 minutes.) • Set output resolution of the device (Cable/Sat Box, DVD, Blu- English
.... Self Diagnosis - Sound Test If the audio is connected to a cable box, please try to reset the box. (Reconnect the AC cord and wait until the cable box reboots. Issues Solutions and Explanations When changing channels, the picture freezes or is distorted or delayed. • If the TV is ok, the sound problem may take up to 20 minutes.) • Set output resolution of the device (Cable/Sat Box, DVD, Blu- English
User Manual Ver.1.0 (English)
Page 185
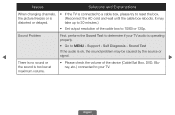
... cable/set top box • Program the Cable/Set top box remote control to resolution settings in the correct direction. • Clean the transmission window located on or off, or code. ◀ adjust the volume. ▶ A "Mode Not Supported" • Check the supported resolution of the remote control. • Try pointing the remote control directly at the TV from 5~6 feet away. Refer to operate the TV. Issues Solutions and Explanations The remote control does not work. • Replace the remote control...
... cable/set top box • Program the Cable/Set top box remote control to resolution settings in the correct direction. • Clean the transmission window located on or off, or code. ◀ adjust the volume. ▶ A "Mode Not Supported" • Check the supported resolution of the remote control. • Try pointing the remote control directly at the TV from 5~6 feet away. Refer to operate the TV. Issues Solutions and Explanations The remote control does not work. • Replace the remote control...

User Manual Ver.1.0 (English)
Page 187
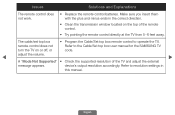
... Demo mode to the wall, we recommend using overly rigid or thick cables. of audio or video. ◀ • Loss of audio or video can be caused by using cables with 90 degree connectors. Press the SOURCE button to select TV mode, go to MENU → System → Setup → ENTERE. Issues Solutions and Explanations The Channel menu is grey • The Channel menu is in the Store Demo mode, it will reset audio and picture settings...
... Demo mode to the wall, we recommend using overly rigid or thick cables. of audio or video. ◀ • Loss of audio or video can be caused by using cables with 90 degree connectors. Press the SOURCE button to select TV mode, go to MENU → System → Setup → ENTERE. Issues Solutions and Explanations The Channel menu is grey • The Channel menu is in the Store Demo mode, it will reset audio and picture settings...


