User Manual
Page 1
... 1 800 588 889 Web Site www.samsung.com www.samsung.com www.samsung.com www.samsung.com/hk www.samsung.com/hk_en/ www.samsung.com www.samsung.com www.samsung.com www.samsung.com www.samsung.com www.samsung.com www.samsung.com www.samsung.com www.samsung.com © 2010 Samsung Electronics Co., Ltd. BN68-02838A-01 LED TV user manual imagine the possibilities Thank...
... 1 800 588 889 Web Site www.samsung.com www.samsung.com www.samsung.com www.samsung.com/hk www.samsung.com/hk_en/ www.samsung.com www.samsung.com www.samsung.com www.samsung.com www.samsung.com www.samsung.com www.samsung.com www.samsung.com www.samsung.com © 2010 Samsung Electronics Co., Ltd. BN68-02838A-01 LED TV user manual imagine the possibilities Thank...
User Manual
Page 2
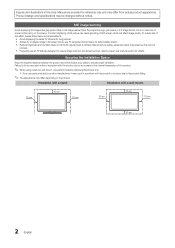
...product falling. ✎✎ The appearance may differ depending on the screen. Installation with a stand. xx If you use parts provided by Samsung Electronics only. Installation with a wall-mount. 10 cm 10 cm 10 cm 10 cm 10 cm 10 cm 10 cm 2 English Still image... proper ventilation. Constant displaying of still picture can cause ghosting of this effect, please follow below recommendations: • Avoid displaying the same TV channel for long periods. • Always try to display image in this User Manual are provided for details. Securing the Installation Space Keep...
...product falling. ✎✎ The appearance may differ depending on the screen. Installation with a stand. xx If you use parts provided by Samsung Electronics only. Installation with a wall-mount. 10 cm 10 cm 10 cm 10 cm 10 cm 10 cm 10 cm 2 English Still image... proper ventilation. Constant displaying of still picture can cause ghosting of this effect, please follow below recommendations: • Avoid displaying the same TV channel for long periods. • Always try to display image in this User Manual are provided for details. Securing the Installation Space Keep...

User Manual
Page 3
... Other Information 38 38 Analogue Channel Teletext Feature 39 Assembling the Cables 40 Installing the Wall Mount 41 Anti-theft Kensington Lock 42 Securing the TV to open the relevant submenu within the OSD (on screen display). 3 English t TOOLS This function can be used by pressing the TOOLS button on the...
... Other Information 38 38 Analogue Channel Teletext Feature 39 Assembling the Cables 40 Installing the Wall Mount 41 Anti-theft Kensington Lock 42 Securing the TV to open the relevant submenu within the OSD (on screen display). 3 English t TOOLS This function can be used by pressing the TOOLS button on the...
User Manual
Page 4
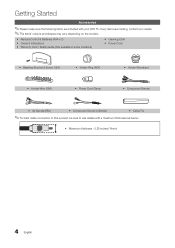
...' colours and shapes may vary depending on the models. Getting Started Accessories ✎✎Please make sure the following items are missing, contact your LED TV.
...' colours and shapes may vary depending on the models. Getting Started Accessories ✎✎Please make sure the following items are missing, contact your LED TV.
User Manual
Page 5
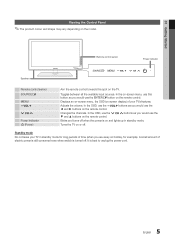
... use the y buttons as you would use the ◄ and ► buttons on the remote control. Adjusts the volume. A small amount of your TV in standby mode. In the OSD, use the z buttons as you would use the ▼ and ▲ buttons on the remote control. Toggles between... up in standby mode for long periods of time (when you would use this spot on the remote control. Standby mode Do not leave your TV's features. Remote control sensor Power Indicator Speakers Remote control sensor SOURCEE MENU y z Power Indicator P (Power) Aim the remote control towards this ...
... use the y buttons as you would use the ◄ and ► buttons on the remote control. Adjusts the volume. A small amount of your TV in standby mode. In the OSD, use the z buttons as you would use the ▼ and ▲ buttons on the remote control. Toggles between... up in standby mode for long periods of time (when you would use this spot on the remote control. Standby mode Do not leave your TV's features. Remote control sensor Power Indicator Speakers Remote control sensor SOURCEE MENU y z Power Indicator P (Power) Aim the remote control towards this ...
User Manual
Page 6
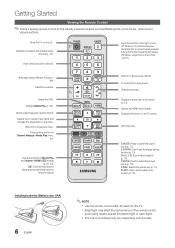
...Changes channels. Installing batteries (Battery size: AAA) 6 English ✎✎NOTE xx Use the remote control within 23 feet from the TV. Displays information on , the buttons become illuminated for a moment when pressed. (Using this button frequently will reduce the battery usage time ...in Media Play and Anynet+ (HDMI-CEC) modes (p. 26, 33). (�: Controls recording for Samsung recorders that have the Anynet+ feature) TTX/MIX PRE-CH CHLIST MEDIA.P MENU TOOLS HDMI INFO RETURN EXIT A B C D S.MODE E.SAVING ...
...Changes channels. Installing batteries (Battery size: AAA) 6 English ✎✎NOTE xx Use the remote control within 23 feet from the TV. Displays information on , the buttons become illuminated for a moment when pressed. (Using this button frequently will reduce the battery usage time ...in Media Play and Anynet+ (HDMI-CEC) modes (p. 26, 33). (�: Controls recording for Samsung recorders that have the Anynet+ feature) TTX/MIX PRE-CH CHLIST MEDIA.P MENU TOOLS HDMI INFO RETURN EXIT A B C D S.MODE E.SAVING ...
User Manual
Page 7
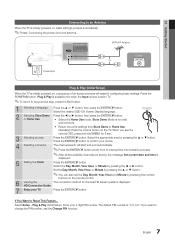
...PIN number, use the Change PIN function. 7 English VHF/UHF Antenna Power Input Cable or ANT OUT Plug & Play (Initial Setup) When the TV is "0-0-0-0." The default PIN number is initially powered on, a sequence of on the remote control. 6 Viewing the The connection method for the best... is for 5 sec. 3 Selecting an area Press the ENTERE button. Plug & Play is available only when the Input source is initially powered on the TV. POWER P yy Return the unit's settings from Store Demo to the previous step, press the Red button. 1 Selecting a language Press the ▲ ...
...PIN number, use the Change PIN function. 7 English VHF/UHF Antenna Power Input Cable or ANT OUT Plug & Play (Initial Setup) When the TV is "0-0-0-0." The default PIN number is initially powered on, a sequence of on the remote control. 6 Viewing the The connection method for the best... is for 5 sec. 3 Selecting an area Press the ENTERE button. Plug & Play is available only when the Input source is initially powered on the TV. POWER P yy Return the unit's settings from Store Demo to the previous step, press the Red button. 1 Selecting a language Press the ▲ ...
User Manual
Page 8
xx If there is connected, the TV may occur. Otherwise, the screen may appear blank or a connection error may operate abnormally (e.g. If you suspect the version is older than 1.3 is no sound / ...
xx If there is connected, the TV may occur. Otherwise, the screen may appear blank or a connection error may operate abnormally (e.g. If you suspect the version is older than 1.3 is no sound / ...
User Manual
Page 9
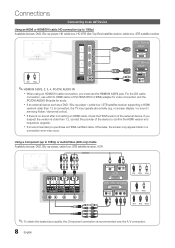
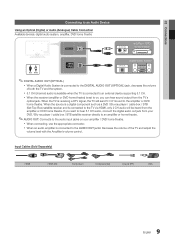
... source is a digital component such as a DVD / Blu-ray player / cable box / STB (Set-Top-Box) satellite receiver and is receiving a DTV signal, the TV will be heard from your DVD / Blu-ray player / cable box / STB satellite receiver directly to an amplifier or home theatre. ✎✎AUDIO OUT... jack. Input Cables (Sold Separately) HDMI HDMI-DVI Component Composite (AV) Coaxial (RF) VGA 9 English When the TV is connected to the TV via HDMI, only 2 CH audio will send 5.1 CH sound to the amplifier or DVD home theatre. xx When connecting, use the appropriate connector. 02 ...
... source is a digital component such as a DVD / Blu-ray player / cable box / STB (Set-Top-Box) satellite receiver and is receiving a DTV signal, the TV will be heard from your DVD / Blu-ray player / cable box / STB satellite receiver directly to an amplifier or home theatre. ✎✎AUDIO OUT... jack. Input Cables (Sold Separately) HDMI HDMI-DVI Component Composite (AV) Coaxial (RF) VGA 9 English When the TV is connected to the TV via HDMI, only 2 CH audio will send 5.1 CH sound to the amplifier or DVD home theatre. xx When connecting, use the appropriate connector. 02 ...
User Manual
Page 10
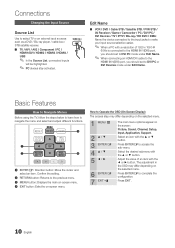
.../ DVD / Cable STB / Satellite STB / PVR STB / AV Receiver / Game / Camcorder / PC / DVI PC / DVI Devices / TV / IPTV / Blu-ray / HD DVD / DMA: Name the device connected to the input jacks to make your input source selection easier. ...Source Source List Use to access the sub-menu. Press ENTERE to select TV or an external input sources SOURCE such as a DVD / Blu-ray player / cable box / STB satellite... receiver. ■■ TV / AV1 / AV2 / Component / PC / HDMI1/DVI / HDMI2 / HDMI3 / HDMI4 / USB ✎✎...
.../ DVD / Cable STB / Satellite STB / PVR STB / AV Receiver / Game / Camcorder / PC / DVI PC / DVI Devices / TV / IPTV / Blu-ray / HD DVD / DMA: Name the device connected to the input jacks to make your input source selection easier. ...Source Source List Use to access the sub-menu. Press ENTERE to select TV or an external input sources SOURCE such as a DVD / Blu-ray player / cable box / STB satellite... receiver. ■■ TV / AV1 / AV2 / Component / PC / HDMI1/DVI / HDMI2 / HDMI3 / HDMI4 / USB ✎✎...

User Manual
Page 11
... the colour buttons with the Channel Manager xx Green (Zoom): Enlarges or shrinks a channel number. xx One or more groups can be viewed in the TV. ✎✎Automatically allocated programme numbers may differ depending on the situation.) Channel Status Display Icons Icons c * \ ) Operations A channel selected. Zoom All 3 Edit My CCha...
... the colour buttons with the Channel Manager xx Green (Zoom): Enlarges or shrinks a channel number. xx One or more groups can be viewed in the TV. ✎✎Automatically allocated programme numbers may differ depending on the situation.) Channel Status Display Icons Icons c * \ ) Operations A channel selected. Zoom All 3 Edit My CCha...

User Manual
Page 12
...;¦ Other Features Channel Manager ■■ Timer Viewing: You can select a channel by entering the assigned number for a channel manually and stores in the TV. ✎✎If a channel is locked using the auto store. ■■ Delete: You can also change its settings. ■■ Lock / Unlock: Lock a channel...
...;¦ Other Features Channel Manager ■■ Timer Viewing: You can select a channel by entering the assigned number for a channel manually and stores in the TV. ✎✎If a channel is locked using the auto store. ■■ Delete: You can also change its settings. ■■ Lock / Unlock: Lock a channel...
User Manual
Page 13
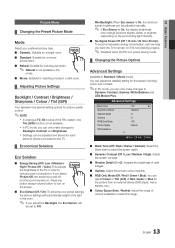
... On, the minimum screen brightness can adjust Colour or Tint (G/R) of Red, Green or Blue for picture quality control. ✎✎NOTE xx In analogue TV, AV modes of dark images. ■■ Gamma: Adjust the primary colour intensity. ■■ RGB Only Mode (Off / Red / Green / Blue): You ... contrast. ✎✎In PC mode, you can be set how long you can adjust the detailed setting for each external device connected to the TV. ¦¦ Economical Solutions Eco Solution ■■ Energy Saving (Off / Low / Medium / High / Picture Off / Auto): This adjusts the brightness...
... On, the minimum screen brightness can adjust Colour or Tint (G/R) of Red, Green or Blue for picture quality control. ✎✎NOTE xx In analogue TV, AV modes of dark images. ■■ Gamma: Adjust the primary colour intensity. ■■ RGB Only Mode (Off / Red / Green / Blue): You ... contrast. ✎✎In PC mode, you can be set how long you can adjust the detailed setting for each external device connected to the TV. ¦¦ Economical Solutions Eco Solution ■■ Energy Saving (Off / Low / Medium / High / Picture Off / Auto): This adjusts the brightness...
User Manual
Page 14
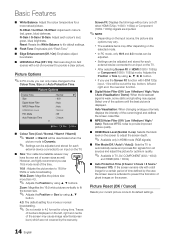
...; Auto Protection Time (2 hours / 4 hours / 8 hours / 10 hours / Off): If the screen remains idle with a lot of ghost images on the TV. R-Gain / G-Gain / B-Gain: Adjust each colour's (red, green, blue) darkness. Select one of the time. Auto Visualisation: When changing analogue channels, ... for optimum quality. ✎✎ Available in HDMI mode (RGB signals). ■■ Film Mode (Off / Auto1 / Auto2): Sets the TV to it's default settings. ■■ Flesh Tone: Emphasize pink "Flesh Tone." ■■ Edge Enhancement (Off / On): Emphasize object boundaries...
...; Auto Protection Time (2 hours / 4 hours / 8 hours / 10 hours / Off): If the screen remains idle with a lot of ghost images on the TV. R-Gain / G-Gain / B-Gain: Adjust each colour's (red, green, blue) darkness. Select one of the time. Auto Visualisation: When changing analogue channels, ... for optimum quality. ✎✎ Available in HDMI mode (RGB signals). ■■ Film Mode (Off / Auto1 / Auto2): Sets the TV to it's default settings. ■■ Flesh Tone: Emphasize pink "Flesh Tone." ■■ Edge Enhancement (Off / On): Emphasize object boundaries...
User Manual
Page 15
...default settings. After the noise has been reduced, readjust the picture so that dialog can be applied. (If not, contact your computer manufacturer or Samsung Dealer.) 1. Sound Menu ¦¦ Changing the Preset Sound Mode Mode ■■ Standard: Selects the normal sound mode. Dialog Clarity ...the "Settings" tab on "Display" and a display dialog box will appear. 3. Otherwise, just click "OK" and exit the dialog box. Using Your TV as possible (Coarse) and Finetune again. It is "60" or "60 Hz." S.MODE ■■ Music: Emphasizes music over voices. ■&#...
...default settings. After the noise has been reduced, readjust the picture so that dialog can be applied. (If not, contact your computer manufacturer or Samsung Dealer.) 1. Sound Menu ¦¦ Changing the Preset Sound Mode Mode ■■ Standard: Selects the normal sound mode. Dialog Clarity ...the "Settings" tab on "Display" and a display dialog box will appear. 3. Otherwise, just click "OK" and exit the dialog box. Using Your TV as possible (Coarse) and Finetune again. It is "60" or "60 Hz." S.MODE ■■ Music: Emphasizes music over voices. ■&#...
User Manual
Page 16
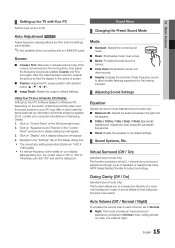
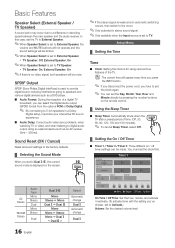
...; Setting the On / Off Timer ■■ Timer 1 / Timer 2 / Timer 3: Three different on / off timer settings can set to TV Speaker. xx TV Speaker: On, External Speaker: On ✎✎If there is set to External Speaker. DUAL A2 Stereo NICAM Stereo Audio Type Mono Stereo Dual...press the INFO button. ✎✎ If you disconnect the power cord, you set the clock first. Basic Features Speaker Select (External Speaker / TV Speaker) A sound echo may occur due to a difference in a Dolby Digital setup, maximize your interactive 3D sound experience. ■■ Audio Delay...
...; Setting the On / Off Timer ■■ Timer 1 / Timer 2 / Timer 3: Three different on / off timer settings can set to TV Speaker. xx TV Speaker: On, External Speaker: On ✎✎If there is set to External Speaker. DUAL A2 Stereo NICAM Stereo Audio Type Mono Stereo Dual...press the INFO button. ✎✎ If you disconnect the power cord, you set the clock first. Basic Features Speaker Select (External Speaker / TV Speaker) A sound echo may occur due to a difference in a Dolby Digital setup, maximize your interactive 3D sound experience. ■■ Audio Delay...
User Manual
Page 17
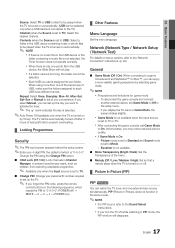
... (Off / On): When connecting to a game console such as children, from watching unsuitable programme. ✎✎ Available only when the Input source is set to TV. ■■ Change PIN: Change your 4-digit PIN, the default of which resets the PIN to "0-0-0-0": POWER (off) → MUTE → 8 → 2.../ Dark): Set the Transparency of the menu. ■■ Melody (Off / Low / Medium / High): Set so that a melody plays when the TV is turned on or off. ¦¦ Picture In Picture (PIP) PIP t You can enjoy a more than one external video source simultaneously. To disconnect...
... (Off / On): When connecting to a game console such as children, from watching unsuitable programme. ✎✎ Available only when the Input source is set to TV. ■■ Change PIN: Change your 4-digit PIN, the default of which resets the PIN to "0-0-0-0": POWER (off) → MUTE → 8 → 2.../ Dark): Set the Transparency of the menu. ■■ Melody (Off / Low / Medium / High): Set so that a melody plays when the TV is turned on or off. ¦¦ Picture In Picture (PIP) PIP t You can enjoy a more than one external video source simultaneously. To disconnect...

User Manual
Page 18
... remove the USB drive until upgrades are USB Drive complete. Please be careful or not to the TV. Software Upgrade Software Upgrade can select a source of these troubleshooting tips apply, contact the Samsung customer service centre. samsung.com," to the "Network Connection" instructions. ✎✎ If the internet connection doesn't operate properly, the...
... remove the USB drive until upgrades are USB Drive complete. Please be careful or not to the TV. Software Upgrade Software Upgrade can select a source of these troubleshooting tips apply, contact the Samsung customer service centre. samsung.com," to the "Network Connection" instructions. ✎✎ If the internet connection doesn't operate properly, the...

User Manual
Page 20
...through your local area network (LAN) using a wired or wireless connection. ¦¦ Connecting to a Wired Network You can attach your TV to an external modem. ADSL modems that supports Dynamic Host Configuration Protocol (DHCP). See the diagram below . See the diagram below. The Modem... Port on the Wall TV Rear Panel LAN Cable If you have a Windows computer, you use ADSL modems that support DHCP if your house. The LAN Port...
...through your local area network (LAN) using a wired or wireless connection. ¦¦ Connecting to a Wired Network You can attach your TV to an external modem. ADSL modems that supports Dynamic Host Configuration Protocol (DHCP). See the diagram below . See the diagram below. The Modem... Port on the Wall TV Rear Panel LAN Cable If you have a Windows computer, you use ADSL modems that support DHCP if your house. The LAN Port...
User Manual
Page 21
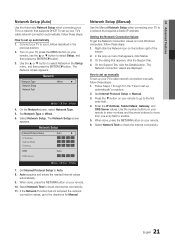
...Network screen, select Network Type. 5. Set Internet Protocol Setup to Wired. 6. Network Setup (Manual) Use the Manual Network Setup when connecting your TV to a network that appears, click Status. 3. In the pop-up automatically" procedure. 2. Press the ▼ button on your remote, use... screen appears. Select Network Test to check the Internet connectivity. 21 English Follow Steps 1 through 6 in the "How to set up your TV's cable network connection manually, follow these steps: 1. Network Network Type Network Setup Network Test : Wired ► U Move E Enter R ...
...Network screen, select Network Type. 5. Set Internet Protocol Setup to Wired. 6. Network Setup (Manual) Use the Manual Network Setup when connecting your TV to a network that appears, click Status. 3. In the pop-up automatically" procedure. 2. Press the ▼ button on your remote, use... screen appears. Select Network Test to check the Internet connectivity. 21 English Follow Steps 1 through 6 in the "How to set up your TV's cable network connection manually, follow these steps: 1. Network Network Type Network Setup Network Test : Wired ► U Move E Enter R ...


