
User Manual
Page 3
... 5 Viewing the Control Panel 6 Viewing the Remote Control 7 Connecting to an Antenna 7 Plug & Play (Initial Setup) 8 Connecting to an AV Device 9 Connecting to an Audio Device 10 Changing the Input Source Basic Features 10 10 How to Navigate Menus 11 Channel Menu 13 Picture Menu 15 Sound Menu 16 Setup Menu 18 Support Menu Advanced Features 19 19 Connecting to a PC 20 Network Connection 26 Media Play 33 Anynet+ 36 AllShare Other Information 38 38 Analogue Channel Teletext Feature 39 Assembling the Cables 40 Installing the Wall Mount...
... 5 Viewing the Control Panel 6 Viewing the Remote Control 7 Connecting to an Antenna 7 Plug & Play (Initial Setup) 8 Connecting to an AV Device 9 Connecting to an Audio Device 10 Changing the Input Source Basic Features 10 10 How to Navigate Menus 11 Channel Menu 13 Picture Menu 15 Sound Menu 16 Setup Menu 18 Support Menu Advanced Features 19 19 Connecting to a PC 20 Network Connection 26 Media Play 33 Anynet+ 36 AllShare Other Information 38 38 Analogue Channel Teletext Feature 39 Assembling the Cables 40 Installing the Wall Mount...
User Manual
Page 6
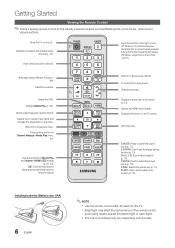
...: Use to set the sleep timer function (p. 16). xx Bright light may vary depending on the screen (p. 12). POWER SOURCE ON/OFF Turns the remote control light on and off . Displays Media Play, (p. 26). Displays information on the menu. P.MODE: Press to select the sound mode (p. 15). SLEEP: Use to the previous channel. To mute all TV output sound. Selects the HDMI mode directly. Turns the TV on the Power, Channel and Volume buttons. Displays and selects the available video sources (p. 10). These buttons are for Samsung...
...: Use to set the sleep timer function (p. 16). xx Bright light may vary depending on the screen (p. 12). POWER SOURCE ON/OFF Turns the remote control light on and off . Displays Media Play, (p. 26). Displays information on the menu. P.MODE: Press to select the sound mode (p. 15). SLEEP: Use to the previous channel. To mute all TV output sound. Selects the HDMI mode directly. Turns the TV on the Power, Channel and Volume buttons. Displays and selects the available video sources (p. 10). These buttons are for Samsung...
User Manual
Page 10
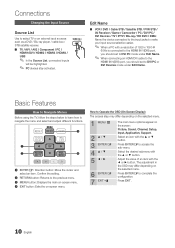
...:DREeturnP.sSItZoE the pSrLeEvEioPus menu. 3 MENU button: Displays the main on-screen menu. 4 EXIT button: Exits the on the screen: Picture, Sound, Channel, Setup, Input, Application, Support. Select the desired submenu with the ▲ or ▼ button. Press ENTERE to access the sub-menu. Connections Changing the Input Source Source List Use to navigate the menu and selecCHt LaISnTd adjust different functions. How to make your input source selection easier. ✎✎ When a PC with a resolution of an item...
...:DREeturnP.sSItZoE the pSrLeEvEioPus menu. 3 MENU button: Displays the main on-screen menu. 4 EXIT button: Exits the on the screen: Picture, Sound, Channel, Setup, Input, Application, Support. Select the desired submenu with the ▲ or ▼ button. Press ENTERE to access the sub-menu. Connections Changing the Input Source Source List Use to navigate the menu and selecCHt LaISnTd adjust different functions. How to make your input source selection easier. ✎✎ When a PC with a resolution of an item...

User Manual
Page 11
... you have changed the settings, the channel list for channels. xx T (Tools): Displays the Channel Manager option menu. (The options menus may not correspond to next or previous page. Select a channel and press the TOOLS button. 2. Air or Cable channel mode 6 C -- 7 * C -- Auto Store Scans for a channel automatically and stores in My Channels. After you want among 1, 2, 3 and 4. My Channel 2 9 C -- If a channel is locked using the Child Lock function, the PIN input window appears...
... you have changed the settings, the channel list for channels. xx T (Tools): Displays the Channel Manager option menu. (The options menus may not correspond to next or previous page. Select a channel and press the TOOLS button. 2. Air or Cable channel mode 6 C -- 7 * C -- Auto Store Scans for a channel automatically and stores in My Channels. After you want among 1, 2, 3 and 4. My Channel 2 9 C -- If a channel is locked using the Child Lock function, the PIN input window appears...

User Manual
Page 12
...; Sort: This operation allows you to On. Channel List You can see all reserved programmes. Basic Features Manual Store Scans for each channel using the Change PIN option. You can select a channel by entering the assigned number for a channel manually and stores in the TV. ✎✎If a channel is locked using the auto store. ■■ Delete: You can also change its settings. ■■ Lock / Unlock: Lock a channel so that...
...; Sort: This operation allows you to On. Channel List You can see all reserved programmes. Basic Features Manual Store Scans for each channel using the Change PIN option. You can select a channel by entering the assigned number for a channel manually and stores in the TV. ✎✎If a channel is locked using the auto store. ■■ Delete: You can also change its settings. ■■ Lock / Unlock: Lock a channel so that...
User Manual
Page 14
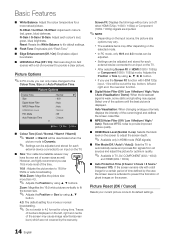
... 4:3 format for DVDs or wide broadcasting. xx Settings can be cut -off when HDMI (720p / 1080i / 1080p) or Component (1080i / 1080p) signals are not covered by the warranty. Picture Options ✎✎In PC mode, you use the Screen Fit function with a lot of the time. P.SIZE 16:9 : Adjusts the picture size to provide a clear picture. Auto Visualisation: When changing analogue channels, displays the intensity of ghost images on the input source, the picture size...
... 4:3 format for DVDs or wide broadcasting. xx Settings can be cut -off when HDMI (720p / 1080i / 1080p) or Component (1080i / 1080p) signals are not covered by the warranty. Picture Options ✎✎In PC mode, you use the Screen Fit function with a lot of the time. P.SIZE 16:9 : Adjusts the picture size to provide a clear picture. Auto Visualisation: When changing analogue channels, displays the intensity of ghost images on the input source, the picture size...
User Manual
Page 16
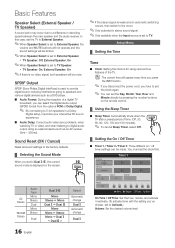
... audio-video sync problems, when watching TV or video, and when listening to TV Speaker. SPDIF Output SPDIF (Sony Philips Digital InterFace) is displayed on / off timer settings can select the Digital Audio output (SPDIF) format from the options PCM or Dolby Digital. ✎✎ By connecting to 5.1ch speakers in decoding speed between the main speaker and the audio receiver. Sound Reset (OK / Cancel) Reset all sound settings to the factory defaults. ¦¦ Selecting the Sound Mode...
... audio-video sync problems, when watching TV or video, and when listening to TV Speaker. SPDIF Output SPDIF (Sony Philips Digital InterFace) is displayed on / off timer settings can select the Digital Audio output (SPDIF) format from the options PCM or Dolby Digital. ✎✎ By connecting to 5.1ch speakers in decoding speed between the main speaker and the audio receiver. Sound Reset (OK / Cancel) Reset all sound settings to the factory defaults. ¦¦ Selecting the Sound Mode...
User Manual
Page 17
...;✎Auto Power Off (available only when the TV is turned on or off. ¦¦ Picture In Picture (PIP) PIP t You can enjoy a more than one external video source simultaneously. Picture mode is set to Standard and Sound mode is set Game Mode to On. xx When there is only one photo file in Game Mode, the screen shakes slightly. Network (Network Type / Network Setup / Network Test) For details on set up options, refer to the "Network Connection" instructions. (p. 20...
...;✎Auto Power Off (available only when the TV is turned on or off. ¦¦ Picture In Picture (PIP) PIP t You can enjoy a more than one external video source simultaneously. Picture mode is set to Standard and Sound mode is set Game Mode to On. xx When there is only one photo file in Game Mode, the screen shakes slightly. Network (Network Type / Network Setup / Network Test) For details on set up options, refer to the "Network Connection" instructions. (p. 20...

User Manual
Page 18
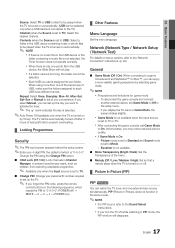
... R Return Installing the Latest Version ■■ By USB: Insert a USB drive containing TV Rear Panel the firmware upgrade file, downloaded from last step, this information when connecting external devices to this function be activated. HD Connection Guide Refer to the TV. You can select a source of these troubleshooting tips apply, contact the Samsung customer service centre. When software is set to TV Speaker in PIP mode. Please retry downloading. com," into...
... R Return Installing the Latest Version ■■ By USB: Insert a USB drive containing TV Rear Panel the firmware upgrade file, downloaded from last step, this information when connecting external devices to this function be activated. HD Connection Guide Refer to the TV. You can select a source of these troubleshooting tips apply, contact the Samsung customer service centre. When software is set to TV Speaker in PIP mode. Please retry downloading. com," into...
User Manual
Page 22
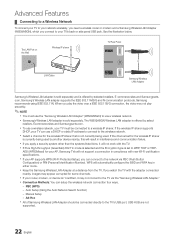
... of Samsung Wireless LAN Adapter should be connected to a wireless IP sharer. The LAN Port on the Wall Wireless IP sharer TV Rear Panel or LAN Cable Samsung Wireless LAN Adapter Samsung's Wireless LAN adapter is offered by selected retailers, E-commerce sites and Samsungparts. If the wireless IP sharer supports DHCP, your TV's back or side panel USB jack. PBC (WPS) -- Auto Setup (Using the Auto Network Search function) -- The WIS09ABGN Wireless LAN adapter is sold separately. Samsung recommends using...
... of Samsung Wireless LAN Adapter should be connected to a wireless IP sharer. The LAN Port on the Wall Wireless IP sharer TV Rear Panel or LAN Cable Samsung Wireless LAN Adapter Samsung's Wireless LAN adapter is offered by selected retailers, E-commerce sites and Samsungparts. If the wireless IP sharer supports DHCP, your TV's back or side panel USB jack. PBC (WPS) -- Auto Setup (Using the Auto Network Search function) -- The WIS09ABGN Wireless LAN adapter is sold separately. Samsung recommends using...
User Manual
Page 23
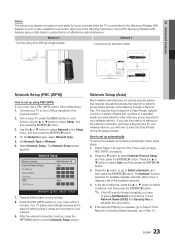
... is based on your wireless network. Set Network Type to select Auto, and then press the ENTERE button. 3. The Network Setup screen appears. Your TV player automatically acquires all the network setting values it displays a list of networks, press the ▲ or ▼ button to select a network, and then press the ENTERE button. ✎✎ If the AP is connected to the Samsung Wireless LAN Adapter. The Network function searches for your remote. 8. In the list of...
... is based on your wireless network. Set Network Type to select Auto, and then press the ENTERE button. 3. The Network Setup screen appears. Your TV player automatically acquires all the network setting values it displays a list of networks, press the ▲ or ▼ button to select a network, and then press the ENTERE button. ✎✎ If the AP is connected to the Samsung Wireless LAN Adapter. The Network function searches for your remote. 8. In the list of...
User Manual
Page 33
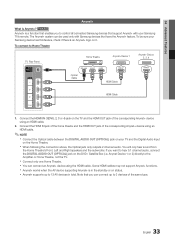
... 5.1 channel audio, connect the DIGITAL AUDIO OUT (OPTICAL) jack on the DVD / Satellite Box (i.e. Anynet Device 1 or 2) directly to Home Theatre TV Rear Panel Home Theatre Anynet+ Device 1 Anynet+ Device 2, 3, 4 Optical Cable HDMI Cable HDMI Cable 1. xx Anynet+ works when the AV device supporting Anynet+ is an Anynet+ logo on the Home Theatre. 04 Advanced Features Anynet+ What is a function that enables you to control all connected Samsung devices that support Anynet...
... 5.1 channel audio, connect the DIGITAL AUDIO OUT (OPTICAL) jack on the DVD / Satellite Box (i.e. Anynet Device 1 or 2) directly to Home Theatre TV Rear Panel Home Theatre Anynet+ Device 1 Anynet+ Device 2, 3, 4 Optical Cable HDMI Cable HDMI Cable 1. xx Anynet+ works when the AV device supporting Anynet+ is an Anynet+ logo on the Home Theatre. 04 Advanced Features Anynet+ What is a function that enables you to control all connected Samsung devices that support Anynet...
User Manual
Page 34
... a DVD recorder is not displayed, select Device List and press the Red button to search devices. 2. Auto Turn Off (No / Yes): Setting an Anynet+ Device to turn off . ✎✎ The active source on the type and status of the Anynet+ devices connected to the TV. You cannot cancel the operation during the switching operation. To properly connect an antenna to a recording device, refer to TV broadcast mode...
... a DVD recorder is not displayed, select Device List and press the Red button to search devices. 2. Auto Turn Off (No / Yes): Setting an Anynet+ Device to turn off . ✎✎ The active source on the type and status of the Anynet+ devices connected to the TV. You cannot cancel the operation during the switching operation. To properly connect an antenna to a recording device, refer to TV broadcast mode...
User Manual
Page 35
When the source is a digital component such as a DVD and is connected to the TV via HDMI, only 2 channel sound will work in certain situations. (Searching channels, operating Media Play (USB) or Plug & Play (Initial setup), etc.) • When connecting or removing the HDMI cable, please make sure to search devices again or turn your receiver supports audio only, it is Anynet+ exclusive remote control. • Anynet+ doesn't work when you have properly connected the optical in TV mode. • Check whether...
When the source is a digital component such as a DVD and is connected to the TV via HDMI, only 2 channel sound will work in certain situations. (Searching channels, operating Media Play (USB) or Plug & Play (Initial setup), etc.) • When connecting or removing the HDMI cable, please make sure to search devices again or turn your receiver supports audio only, it is Anynet+ exclusive remote control. • Anynet+ doesn't work when you have properly connected the optical in TV mode. • Check whether...
User Manual
Page 36
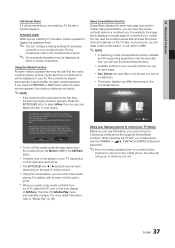
... the message has appeared three times, the message will be displayed while using mobile phone as a remote control. ■■ TV name: Sets the TV name so you view call arrivals, SMS messages and schedules set on your mobile phones. Mobile devices may appear on the list again. When the media function is on, it plays videos, photos and music from the...
... the message has appeared three times, the message will be displayed while using mobile phone as a remote control. ■■ TV name: Sets the TV name so you view call arrivals, SMS messages and schedules set on your mobile phones. Mobile devices may appear on the list again. When the media function is on, it plays videos, photos and music from the...
User Manual
Page 37
... below displays an access page for each mobile's user's guide. If you wish to allow the media file to each page. If you are watching TV, the alarm window appears to Off in the AllShare setup. xx The ENTERE and ◄ / ► buttons may differ depending on the connected device. Then the TV's Media Play menu automatically changes. xx Doc Viewer can use Media...
... below displays an access page for each mobile's user's guide. If you wish to allow the media file to each page. If you are watching TV, the alarm window appears to Off in the AllShare setup. xx The ENTERE and ◄ / ► buttons may differ depending on the connected device. Then the TV's Media Play menu automatically changes. xx Doc Viewer can use Media...
User Manual
Page 43
..., the sound problem may need to change it did in the sound menu (p. 16). • If you are using a component connection, make sure there is properly displaying test image. (go to the correct audio input jacks on the TV. Picture - Support - Picture Test) (p. 18) If the test image is set top box. Support - Eco Solution Energy Saving) (p. 13) • Try resetting the picture to view the default picture settings. (go to the Green jack of...
..., the sound problem may need to change it did in the sound menu (p. 16). • If you are using a component connection, make sure there is properly displaying test image. (go to the correct audio input jacks on the TV. Picture - Support - Picture Test) (p. 18) If the test image is set top box. Support - Eco Solution Energy Saving) (p. 13) • Try resetting the picture to view the default picture settings. (go to the Green jack of...
User Manual
Page 44
... will turn the TV on or off, or adjust the volume. PC Connection A "Mode Not Supported" message appears. • Set your PC. Network Connection (Depending on Models) The wireless network connection failed. • Samsung Wireless USB dongle is required to use magnetized screw driver if you are using a HDMI connection, check the audio output setting on your PC's output resolution and frequency so they match the resolutions supported by pressing the SOURCE button on the TV remote. Others The remote control does not work " below...
... will turn the TV on or off, or adjust the volume. PC Connection A "Mode Not Supported" message appears. • Set your PC. Network Connection (Depending on Models) The wireless network connection failed. • Samsung Wireless USB dongle is required to use magnetized screw driver if you are using a HDMI connection, check the audio output setting on your PC's output resolution and frequency so they match the resolutions supported by pressing the SOURCE button on the TV remote. Others The remote control does not work " below...
User Manual
Page 45
.... ✎✎This TFT LED panel uses a panel consisting of audio or video can be caused by using cables with 90 degree connectors. Your settings are using a HDMI, PC or components source (p. 17). 05 Other Information Issues The channel menu is greyed out. (unavailable) Solutions and Explanations • The Channel menu is only available when the TV source is normal. Make sure the cables are recurrent picture/sound issues. • Check and change the signal/source.
.... ✎✎This TFT LED panel uses a panel consisting of audio or video can be caused by using cables with 90 degree connectors. Your settings are using a HDMI, PC or components source (p. 17). 05 Other Information Issues The channel menu is greyed out. (unavailable) Solutions and Explanations • The Channel menu is only available when the TV source is normal. Make sure the cables are recurrent picture/sound issues. • Check and change the signal/source.

User Manual
Page 48
...I Installation Space L Licence Language Lock M Media Play Melody Music Menu Transparency N Network Connection Network Setup Navigate O ON/OFF button Optimal resolution P Photos PIP (Picture in Picture) Power Indicator Plug & Play Picture Size R 11 Remote Control 12 RGB Only Mode 14 Receiver 14 Recording 19 Rotate Repeat Mode 8, 33 9, 33 2 47 17 12 S Sleep Timer Slide Show Software Upgrade Source List Speaker Select Standby mode Select All Self Diagnosis Sharpness Specifications Symbol T 26 17 Timer 30 Title 17 Tools Troubleshooting TV Speaker 20 U 21 10 USB Drive V 6 Videos 19 Volume VCR...
...I Installation Space L Licence Language Lock M Media Play Melody Music Menu Transparency N Network Connection Network Setup Navigate O ON/OFF button Optimal resolution P Photos PIP (Picture in Picture) Power Indicator Plug & Play Picture Size R 11 Remote Control 12 RGB Only Mode 14 Receiver 14 Recording 19 Rotate Repeat Mode 8, 33 9, 33 2 47 17 12 S Sleep Timer Slide Show Software Upgrade Source List Speaker Select Standby mode Select All Self Diagnosis Sharpness Specifications Symbol T 26 17 Timer 30 Title 17 Tools Troubleshooting TV Speaker 20 U 21 10 USB Drive V 6 Videos 19 Volume VCR...


