User Manual
Page 3
... & Top 10 Back & Bottom 10 Side/ 5-function button 11 Mode switch 11 Connecting to a Power Source 13 Using the batteries 14 Removing the battery 14 Instructions on how to use the menu 36 Mode 36 Size 37 Quality 38 Metering 39 Continuous shot 39 Effect 40 Photo ...Frame 41 Sharpness 42 Save / Load the camera configuration (MYSET) 43 PLAY Starting play mode 44 Playing back a still image 44 Playing back...
... & Top 10 Back & Bottom 10 Side/ 5-function button 11 Mode switch 11 Connecting to a Power Source 13 Using the batteries 14 Removing the battery 14 Instructions on how to use the menu 36 Mode 36 Size 37 Quality 38 Metering 39 Continuous shot 39 Effect 40 Photo ...Frame 41 Sharpness 42 Save / Load the camera configuration (MYSET) 43 PLAY Starting play mode 44 Playing back a still image 44 Playing back...

User Manual
Page 5
... are registered trademarks of the camera malfunction (such as Batteries, Memory card etc.) to the A/S center. Prior to use it (e.g. About the icons This manual contains instructions on using this camera that the camera is operating properly prior to when you to using this camera safely and correctly. for buying a Samsung Digital Camera. Getting to avoid disappointment. DANGER...
... are registered trademarks of the camera malfunction (such as Batteries, Memory card etc.) to the A/S center. Prior to use it (e.g. About the icons This manual contains instructions on using this camera that the camera is operating properly prior to when you to using this camera safely and correctly. for buying a Samsung Digital Camera. Getting to avoid disappointment. DANGER...
User Manual
Page 6
.... Do not operate this be carried out by your dealer or Samsung Camera Service Center. Switch off the camera, and then disconnect the power source. Should this camera with wet hands. Do not recharge non rechargeable batteries. When in use, do not use the camera as a sealed vehicle, direct sunlight or other places of extreme variances...
.... Do not operate this be carried out by your dealer or Samsung Camera Service Center. Switch off the camera, and then disconnect the power source. Should this camera with wet hands. Do not recharge non rechargeable batteries. When in use, do not use the camera as a sealed vehicle, direct sunlight or other places of extreme variances...
User Manual
Page 7
...cables to provide protection against harmful interference in accordance with the limits of a class B digital device under item 15 of batteries in fire. Increase distance between the camera and the affected device. Changes or modifications not expressly approved by the party responsible for ...the affected device. Change the location and direction of the FCC Rules. Please contact a Samsung agent or a radio/TV engineer. It may leak corrosive electrolyte and irreparably damage the camera's components. Use a different socket away from the wall socket. This device complies with...
...cables to provide protection against harmful interference in accordance with the limits of a class B digital device under item 15 of batteries in fire. Increase distance between the camera and the affected device. Changes or modifications not expressly approved by the party responsible for ...the affected device. Change the location and direction of the FCC Rules. Please contact a Samsung agent or a radio/TV engineer. It may leak corrosive electrolyte and irreparably damage the camera's components. Use a different socket away from the wall socket. This device complies with...
User Manual
Page 8
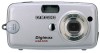
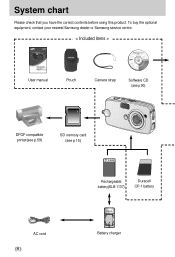
To buy the optional equipment, contact your nearest Samsung dealer or Samsung service centre. < Included items > User manual Pouch Camera strap Software CD (see p.90) DPOF compatible printer(see p.59) SD memory card (see p.15) Rechargeable battery(SLB-1137) Duracell CP-1 battery AC cord 8 CHARGE Battery charger System chart Please check that you have the correct contents before using this product.
To buy the optional equipment, contact your nearest Samsung dealer or Samsung service centre. < Included items > User manual Pouch Camera strap Software CD (see p.90) DPOF compatible printer(see p.59) SD memory card (see p.15) Rechargeable battery(SLB-1137) Duracell CP-1 battery AC cord 8 CHARGE Battery charger System chart Please check that you have the correct contents before using this product.
User Manual
Page 11
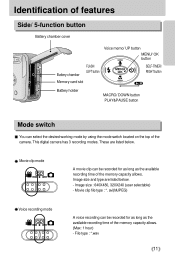
...the available recording time of the camera. File type : *.wav 11 Identification of features Side/ 5-function button Battery chamber cover Voice memo/ UP button MENU/ OK button Battery chamber FLASH/ LEFT button SELF-TIMER/ RIGHT button Memory card slot Battery holder MACRO/ DOWN button PLAY&...PAUSE button Mode switch You can select the desired working mode by using the mode switch located on the top of the memory capacity allows. (Max: 1 hour) - These are listed below . Image size and type are listed below . - This digital camera...
...the available recording time of the camera. File type : *.wav 11 Identification of features Side/ 5-function button Battery chamber cover Voice memo/ UP button MENU/ OK button Battery chamber FLASH/ LEFT button SELF-TIMER/ RIGHT button Memory card slot Battery holder MACRO/ DOWN button PLAY&...PAUSE button Mode switch You can select the desired working mode by using the mode switch located on the top of the memory capacity allows. (Max: 1 hour) - These are listed below . Image size and type are listed below . - This digital camera...
User Manual
Page 13
.... Connecting to leaking if kept inside the camera. It may become warm. Batteries will not be used , turn off the camera power. Do not recharge the non rechargeable batteries. This is not used for a digital camera (Within a year from the date of the batteries and you may experience reduced battery life. Batteries can affect the performance of manufacture). The...
.... Connecting to leaking if kept inside the camera. It may become warm. Batteries will not be used , turn off the camera power. Do not recharge the non rechargeable batteries. This is not used for a digital camera (Within a year from the date of the batteries and you may experience reduced battery life. Batteries can affect the performance of manufacture). The...
User Manual
Page 14
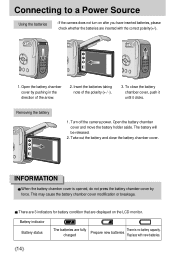
... are inserted with new batteries. 14 Battery indicator Battery status The batteries are fully There is opened, do not press the battery chamber cover by pushing in the direction of the polarity (+ / -). 3. Insert the batteries taking note of the arrow. 2. Turn off the camera power. Connecting to a Power Source Using the batteries : If the camera does not turn on...
... are inserted with new batteries. 14 Battery indicator Battery status The batteries are fully There is opened, do not press the battery chamber cover by pushing in the direction of the polarity (+ / -). 3. Insert the batteries taking note of the arrow. 2. Turn off the camera power. Connecting to a Power Source Using the batteries : If the camera does not turn on...

User Manual
Page 17
Turn the power off the camera's power and pull the battery chamber cover in the image and release. 2. Turn off using the power button. Removing the memory card 1. To close the battery chamber cover. 17 Do not insert the memory card the wrong way round. Check the direction of insertion, and then ...insert it by force. Open the battery chamber cover and press the memory card as shown in the direction of the camera (LCD monitor), and then push the memory card into the card slot until you hear a click. 3. If...
Turn the power off the camera's power and pull the battery chamber cover in the image and release. 2. Turn off using the power button. Removing the memory card 1. To close the battery chamber cover. 17 Do not insert the memory card the wrong way round. Check the direction of insertion, and then ...insert it by force. Open the battery chamber cover and press the memory card as shown in the direction of the camera (LCD monitor), and then push the memory card into the card slot until you hear a click. 3. If...

User Manual
Page 18
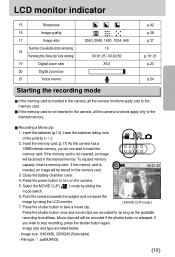
LCD monitor indicator The LCD monitor displays information about the shooting functions and selections. [ Image & Full Status ] No. Description 1 Battery 2 Recording mode 3 Continuous shot 4 Flash 5 Self-timer 6 Macro 7 Metering 8 Card inserted indicator 9 Auto focus frame 10 Camera shake warning 11 Date/ Time 12 Exposure compensation 13 White Balance 14 ISO 18 Icons 2004/10/01 01:00 PM LT Page p.14 p.11~12,p.36 p.39 p.27 p.28 p.25 p.39 p.27 p.73 ~ 74 p.29, p.32 p.30 p.31
LCD monitor indicator The LCD monitor displays information about the shooting functions and selections. [ Image & Full Status ] No. Description 1 Battery 2 Recording mode 3 Continuous shot 4 Flash 5 Self-timer 6 Macro 7 Metering 8 Card inserted indicator 9 Auto focus frame 10 Camera shake warning 11 Date/ Time 12 Exposure compensation 13 White Balance 14 ISO 18 Icons 2004/10/01 01:00 PM LT Page p.14 p.11~12,p.36 p.39 p.27 p.28 p.25 p.39 p.27 p.73 ~ 74 p.29, p.32 p.30 p.31
User Manual
Page 19
... to turn on the memory card. 3. Movie clips will be stored on the camera. 5. Insert the batteries taking note of available shots remaining 18 Remaining time ( Movie clip/ Voice recording) 19 Digital zoom rate 20 Digital zoom bar 21 Voice memo 2560, 2048, 1600, 1024, 640 18 00:01... will be stored in the internal memory. To expand memory capacity, insert a memory card. Close the battery chamber cover. 4. If the memory card is inserted in the camera, all the camera functions apply only to take a movie clip. [ MOVIE CLIP mode ] Press the shutter button once and...
... to turn on the memory card. 3. Movie clips will be stored on the camera. 5. Insert the batteries taking note of available shots remaining 18 Remaining time ( Movie clip/ Voice recording) 19 Digital zoom rate 20 Digital zoom bar 21 Voice memo 2560, 2048, 1600, 1024, 640 18 00:01... will be stored in the internal memory. To expand memory capacity, insert a memory card. Close the battery chamber cover. 4. If the memory card is inserted in the camera, all the camera functions apply only to take a movie clip. [ MOVIE CLIP mode ] Press the shutter button once and...
User Manual
Page 21
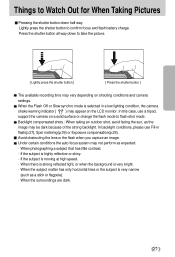
... a solid surface or change the flash mode to confirm focus and flash battery charge. In this case, use Fill-in a low lighting condition, the camera shake warning indicator ( ) may appear on shooting conditions and camera settings. Backlight compensated shots : When taking an outdoor shot, avoid facing the sun, as expected. - When the surroundings...
... a solid surface or change the flash mode to confirm focus and flash battery charge. In this case, use Fill-in a low lighting condition, the camera shake warning indicator ( ) may appear on shooting conditions and camera settings. Backlight compensated shots : When taking an outdoor shot, avoid facing the sun, as expected. - When the surroundings...
User Manual
Page 22
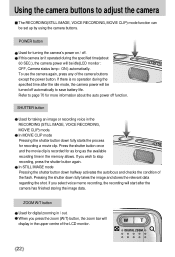
... automatically to save battery life. POWER button Used for recording a movie clip. If you select voice memo recording, the recording will be set up by using the camera buttons. To use the camera again, press any of the LCD monitor. 22 If you wish to page 70 for digital zooming in the ...RECORDING (STILL IMAGE, VOICE RECORDING, MOVIE CLIP) mode. In MOVIE CLIP mode Pressing the shutter button down fully starts the process for turning the camera's power on / off function. In STILL IMAGE mode Pressing the...
... automatically to save battery life. POWER button Used for recording a movie clip. If you select voice memo recording, the recording will be set up by using the camera buttons. To use the camera again, press any of the LCD monitor. 22 If you wish to page 70 for digital zooming in the ...RECORDING (STILL IMAGE, VOICE RECORDING, MOVIE CLIP) mode. In MOVIE CLIP mode Pressing the shutter button down fully starts the process for turning the camera's power on / off function. In STILL IMAGE mode Pressing the...
User Manual
Page 26
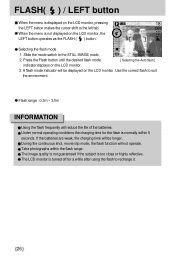
Use the correct flash to the left tab. If the batteries are weak, the charging time will not operate. During the continuous shot, movie clip mode, the flash function will be displayed on the LCD monitor. ... monitor is not displayed on the LCD monitor. 3. Selecting the flash mode 1. Take photographs within 5 seconds. A flash mode indicator will reduce the life of the batteries.
Use the correct flash to the left tab. If the batteries are weak, the charging time will not operate. During the continuous shot, movie clip mode, the flash function will be displayed on the LCD monitor. ... monitor is not displayed on the LCD monitor. 3. Selecting the flash mode 1. Take photographs within 5 seconds. A flash mode indicator will reduce the life of the batteries.
User Manual
Page 34
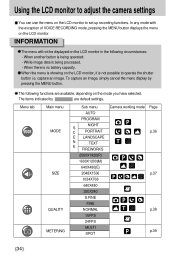
...MENU button displays the menu on the LCD monitor, it is being operated. - The following circumstances: - When another button is no battery capacity. Menu tab Main menu MODE SIZE QUALITY METERING Sub menu AUTO PROGRAM NIGHT S C PORTRAIT E LANDSCAPE N TEXT E FIREWORKS ...2560X1920(P) 1600X1200(M) 640X480(E) 2048X1536 1024X768 640X480 320X240 S.FINE FINE NORMAL 15FPS 24FPS MULTI SPOT Camera working mode Page p.36 p.37 p.38 p.39 34 When there is being processed. - INFORMATION The menu will not be displayed ...
...MENU button displays the menu on the LCD monitor, it is being operated. - The following circumstances: - When another button is no battery capacity. Menu tab Main menu MODE SIZE QUALITY METERING Sub menu AUTO PROGRAM NIGHT S C PORTRAIT E LANDSCAPE N TEXT E FIREWORKS ...2560X1920(P) 1600X1200(M) 640X480(E) 2048X1536 1024X768 640X480 320X240 S.FINE FINE NORMAL 15FPS 24FPS MULTI SPOT Camera working mode Page p.36 p.37 p.38 p.39 34 When there is being processed. - INFORMATION The menu will not be displayed ...
User Manual
Page 46
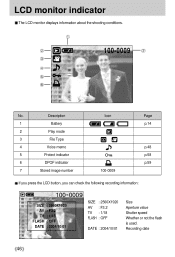
Recording date 46 Description 1 Battery 2 Play mode 3 File Type 4 Voice memo 5 Protect indicator 6 DPOF indicator 7 Stored image number Icon 100-0009 Page p.14 p.48 p.58 p.59 If you press the LCD button, you can check the following recording information: SIZE : 2560X1920 AV : F3.2 TV : 1/18 FLASH : OFF DATE : 2004/10/01 SIZE : 2560X1920 AV : F3.2 TV : 1/18 FLASH : OFF DATE : 2004/10/01 Size Aperture value Shutter speed Whether or not the flash is used. LCD monitor indicator The LCD monitor displays information about the shooting conditions. 100-0009 No.
Recording date 46 Description 1 Battery 2 Play mode 3 File Type 4 Voice memo 5 Protect indicator 6 DPOF indicator 7 Stored image number Icon 100-0009 Page p.14 p.48 p.58 p.59 If you press the LCD button, you can check the following recording information: SIZE : 2560X1920 AV : F3.2 TV : 1/18 FLASH : OFF DATE : 2004/10/01 SIZE : 2560X1920 AV : F3.2 TV : 1/18 FLASH : OFF DATE : 2004/10/01 Size Aperture value Shutter speed Whether or not the flash is used. LCD monitor indicator The LCD monitor displays information about the shooting conditions. 100-0009 No.
User Manual
Page 70
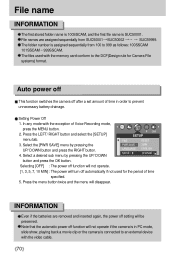
...function will turn off function will not operate. [1, 3, 5, 7, 10 MIN] : The power will not operate if the camera is assigned sequentially from SUC50001 SUC50002 ~ SUC59999. INFORMATION Even if the batteries are assigned sequentially from 100 to an external device with the memory card conform to prevent unnecessary...removed and inserted again, the power off after a set amount of time in PC mode, slide show, playing back a movie clip or the camera is SUC50001. Select the [PWR SAVE] menu by pressing the UP/ DOWN P 2560 SETUP FILE PWR SAVE LANGUAGE MOVE : RESET 3MIN ENGLISH ...
...function will turn off function will not operate. [1, 3, 5, 7, 10 MIN] : The power will not operate if the camera is assigned sequentially from SUC50001 SUC50002 ~ SUC59999. INFORMATION Even if the batteries are assigned sequentially from 100 to an external device with the memory card conform to prevent unnecessary...removed and inserted again, the power off after a set amount of time in PC mode, slide show, playing back a movie clip or the camera is SUC50001. Select the [PWR SAVE] menu by pressing the UP/ DOWN P 2560 SETUP FILE PWR SAVE LANGUAGE MOVE : RESET 3MIN ENGLISH ...

User Manual
Page 71
... SET : OK button and press the OK button. Language There is a choice of Voice Recording mode, press the MENU button. 2. Setting Language 1. Even if the batteries are removed and inserted again, the language setting will disappear. 71 Press the menu button twice and the menu will be displayed on the LCD...
... SET : OK button and press the OK button. Language There is a choice of Voice Recording mode, press the MENU button. 2. Setting Language 1. Even if the batteries are removed and inserted again, the language setting will disappear. 71 Press the menu button twice and the menu will be displayed on the LCD...
User Manual
Page 80
...high explosives or highly flammable materials. Doing so may cause problems. - If this happens, turn the camera off the camera and remove the memory card. Areas exposed to direct sunlight, it on Using the Lens - Moisture build...wait for an extended period of a vehicle in the following precautions! Pay attention not to remove the batteries and the memory card if you do not intend using it could result in discoloration and deterioration of ..., for at least 1 hour until the moisture has dispersed. If the digital camera is high magnetism or excessive vibration. -
...high explosives or highly flammable materials. Doing so may cause problems. - If this happens, turn the camera off the camera and remove the memory card. Areas exposed to direct sunlight, it on Using the Lens - Moisture build...wait for an extended period of a vehicle in the following precautions! Pay attention not to remove the batteries and the memory card if you do not intend using it could result in discoloration and deterioration of ..., for at least 1 hour until the moisture has dispersed. If the digital camera is high magnetism or excessive vibration. -
User Manual
Page 83
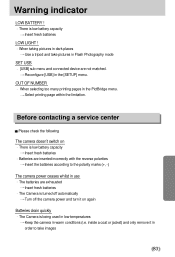
... and turn it on There is low battery capacity Insert fresh batteries Batteries are not matched. Warning indicator LOW BATTERY ! Reconfigure [USB] in the PictBridge menu. Before contacting a service center Please check the following The camera doesn't switch on again Batteries drain quickly The Camera is low battery capacity Insert fresh batteries LOW LIGHT ! There is being used in...
... and turn it on There is low battery capacity Insert fresh batteries Batteries are not matched. Warning indicator LOW BATTERY ! Reconfigure [USB] in the PictBridge menu. Before contacting a service center Please check the following The camera doesn't switch on again Batteries drain quickly The Camera is low battery capacity Insert fresh batteries LOW LIGHT ! There is being used in...


