User Manual
Page 1
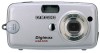
Please read this manual carefully before using the application software. Figures (Images) used for buying a Samsung Camera. This manual will guide you for the manual are based on model Digimax U-CA 501. ENGLISH Digimax U-CA 505 User's Manual Thank you through using the camera, including capturing images, downloading images and using your new camera.
Please read this manual carefully before using the application software. Figures (Images) used for buying a Samsung Camera. This manual will guide you for the manual are based on model Digimax U-CA 501. ENGLISH Digimax U-CA 505 User's Manual Thank you through using the camera, including capturing images, downloading images and using your new camera.

User Manual
Page 2
... power is contained in the following order Set up the camera driver Before connecting the camera to a PC, via the USB cable, you use a card reader to copy the images on the memory card to turn on the memory card due to your PC, the images could be sure to use the supplied USB cable to connect the camera to the use of images on . Instructions Use this camera in the Application S/W CD-ROM.(p.90) Take a picture Take a picture (p.19) Insert the USB cable...
... power is contained in the following order Set up the camera driver Before connecting the camera to a PC, via the USB cable, you use a card reader to copy the images on the memory card to turn on the memory card due to your PC, the images could be sure to use the supplied USB cable to connect the camera to the use of images on . Instructions Use this camera in the Application S/W CD-ROM.(p.90) Take a picture Take a picture (p.19) Insert the USB cable...
User Manual
Page 3
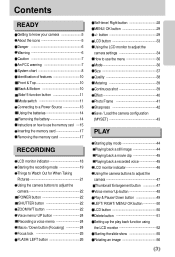
.../ MENU/ OK button 50 LCD button 50 Delete button 51 Setting up the play mode 44 Playing back a still image 44 Playing back a movie clip 45 Playing back a recorded voice 45 LCD monitor indicator 46 Using the camera buttons to adjust the camera 22 POWER button 22 SHUTTER button 22 ZOOM W/T button 22 Voice memo/ UP button 24 Recording a voice memo 24 Macro / Down button (Focusing) 24 Focus lock 25 FLASH/ LEFT button 26 Self-timer/ Right button 28 MENU/ OK button 29 +/- Contents READY Getting to know your camera 5 About the icons 5 Danger...
.../ MENU/ OK button 50 LCD button 50 Delete button 51 Setting up the play mode 44 Playing back a still image 44 Playing back a movie clip 45 Playing back a recorded voice 45 LCD monitor indicator 46 Using the camera buttons to adjust the camera 22 POWER button 22 SHUTTER button 22 ZOOM W/T button 22 Voice memo/ UP button 24 Recording a voice memo 24 Macro / Down button (Focusing) 24 Focus lock 25 FLASH/ LEFT button 26 Self-timer/ Right button 28 MENU/ OK button 29 +/- Contents READY Getting to know your camera 5 About the icons 5 Danger...
User Manual
Page 4
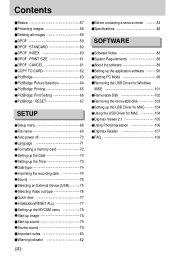
...: Print Setting 66 Removable Disk 102 PictBridge : RESET 67 Removing the removable disk 103 Setting up the USB Driver for MAC 104 SETUP Using the USB Driver for MAC 104 Digimax Viewer 2.1 105 Setup menu 68 Using PhotoImpression 106 File name 69 Digimax Reader 107 Auto power off 70 FAQ 109 Language 71 Formatting a memory card 72 Setting up the Date 73 Setting up the Time 73 Date type 74 Imprinting the recording date 74 Sound 75 Selecting an External Device (USB) 75 Selecting Video out type 76 Quick view 77...
...: Print Setting 66 Removable Disk 102 PictBridge : RESET 67 Removing the removable disk 103 Setting up the USB Driver for MAC 104 SETUP Using the USB Driver for MAC 104 Digimax Viewer 2.1 105 Setup menu 68 Using PhotoImpression 106 File name 69 Digimax Reader 107 Auto power off 70 FAQ 109 Language 71 Formatting a memory card 72 Setting up the Date 73 Setting up the Time 73 Date type 74 Imprinting the recording date 74 Sound 75 Selecting an External Device (USB) 75 Selecting Video out type 76 Quick view 77...

User Manual
Page 15
... the memory card in use a memory card that the memory card is removed while recording, deleting (formatting) or reading. Should this be held responsible for the shot, a [CARD FULL !] message will appear and the camera will need to copy important data onto other media as back-up e.g. This is an electronic precision device. When the memory card is not covered by another digital camera or memory card reader. If the power is switched off the camera power whenever the memory card...
... the memory card in use a memory card that the memory card is removed while recording, deleting (formatting) or reading. Should this be held responsible for the shot, a [CARD FULL !] message will appear and the camera will need to copy important data onto other media as back-up e.g. This is an electronic precision device. When the memory card is not covered by another digital camera or memory card reader. If the power is switched off the camera power whenever the memory card...

User Manual
Page 17
... by force. Check the direction of the camera (LCD monitor), and then push the memory card into the card slot until you hear a click. 3. Do not insert the memory card the wrong way round. To close the battery chamber cover. 17 Turn off using the power button. Doing so may damage the memory card slot. Remove the memory card and close , push the battery chamber cover until you hear...
... by force. Check the direction of the camera (LCD monitor), and then push the memory card into the card slot until you hear a click. 3. Do not insert the memory card the wrong way round. To close the battery chamber cover. 17 Turn off using the power button. Doing so may damage the memory card slot. Remove the memory card and close , push the battery chamber cover until you hear...
User Manual
Page 19
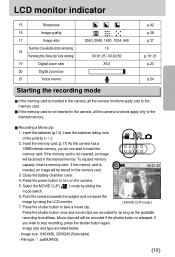
... the camera, all the camera functions apply only to stop recording, press the shutter button again. Press the power button to the memory card. Close the battery chamber cover. 4. Select the MOVIE CLIP( ) mode by using the LCD monitor. 7. Image size : 640X480, 320X240 (Selectable) - Press the shutter button to insert the memory card. Insert the batteries (p.14). To expand memory capacity, insert a memory card. If you do not need to take a movie clip. [ MOVIE CLIP mode ] Press the shutter button once and movie...
... the camera, all the camera functions apply only to stop recording, press the shutter button again. Press the power button to the memory card. Close the battery chamber cover. 4. Select the MOVIE CLIP( ) mode by using the LCD monitor. 7. Image size : 640X480, 320X240 (Selectable) - Press the shutter button to insert the memory card. Insert the batteries (p.14). To expand memory capacity, insert a memory card. If you do not need to take a movie clip. [ MOVIE CLIP mode ] Press the shutter button once and movie...
User Manual
Page 21
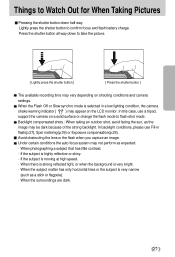
... Lightly press the shutter button to take the picture. [ Lightly press the shutter button ] [ Press the shutter button ] The available recording time may appear on shooting conditions and camera settings. Things to Watch Out for When Taking Pictures Pressing the shutter button down to confirm focus and flash battery charge. When there is strong reflected light, or when the background is moving at high speed. - In this case, use Fill-in a low lighting condition, the camera shake warning indicator...
... Lightly press the shutter button to take the picture. [ Lightly press the shutter button ] [ Press the shutter button ] The available recording time may appear on shooting conditions and camera settings. Things to Watch Out for When Taking Pictures Pressing the shutter button down to confirm focus and flash battery charge. When there is strong reflected light, or when the background is moving at high speed. - In this case, use Fill-in a low lighting condition, the camera shake warning indicator...
User Manual
Page 22
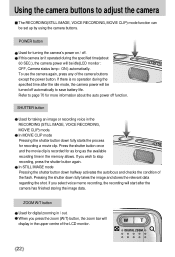
...) mode function can be set up by using the camera buttons. SHUTTER button Used for recording a movie clip. In STILL IMAGE mode Pressing the shutter button down fully takes the image and stores the relevant data regarding the shot. If you press the zoom (W/T) button, the zoom bar will be idle(LCD monitor : OFF, Camera status lamp : ON ) automatically. If there is recorded for turning the camera's power on / off automatically to page 70 for digital zooming in the memory allows. POWER button Used...
...) mode function can be set up by using the camera buttons. SHUTTER button Used for recording a movie clip. In STILL IMAGE mode Pressing the shutter button down fully takes the image and stores the relevant data regarding the shot. If you press the zoom (W/T) button, the zoom bar will be idle(LCD monitor : OFF, Camera status lamp : ON ) automatically. If there is recorded for turning the camera's power on / off automatically to page 70 for digital zooming in the memory allows. POWER button Used...

User Manual
Page 59
... memory card, the unprotected files in the camera's internal memory (i.e., not on the memory card) and it will display on the LCD monitor when an image that this menu is selected : press the OK button and images are deleted. - The DPOF indicator will not be deleted. Important shots should be printed and how many prints to confirm the EXIT : MENU MOVE: delete. - The startup image is not available for Movie clips and Voice recording files. Press the play mode button...
... memory card, the unprotected files in the camera's internal memory (i.e., not on the memory card) and it will display on the LCD monitor when an image that this menu is selected : press the OK button and images are deleted. - The DPOF indicator will not be deleted. Important shots should be printed and how many prints to confirm the EXIT : MENU MOVE: delete. - The startup image is not available for Movie clips and Voice recording files. Press the play mode button...

User Manual
Page 60
... file) are printed as index type. 1. Use the UP and DOWN buttons to embed print quantity information on a stored image. 1. The DPOF icon ( ) will disappear. 60 Press the menu button twice and the menu will appear by pressing the UP/ DOWN button. 2048 DPOF STANDARD NO INDEX YES SIZE BACK: SET:OK If [NO] is selected : The image will be printed in index format. 5. Press the play mode button...
... file) are printed as index type. 1. Use the UP and DOWN buttons to embed print quantity information on a stored image. 1. The DPOF icon ( ) will disappear. 60 Press the menu button twice and the menu will appear by pressing the UP/ DOWN button. 2048 DPOF STANDARD NO INDEX YES SIZE BACK: SET:OK If [NO] is selected : The image will be printed in index format. 5. Press the play mode button...
User Manual
Page 63
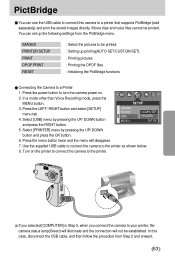
... can set up printing(AUTO SET/CUSTOM SET) : Printing pictures : Printing the DPOF files : Initializing the PictBridge functions Connecting the Camera to a printer that supports PictBridge (sold separately) and print the stored images directly. In a mode other than Voice Recording mode, press the 2048 MENU button. Select [USB] menu by pressing the UP/ DOWN button and press the OK button. 6. Select [PRINTER] menu by pressing the UP/ DOWN button and press the RIGHT button. Use the supplied USB cable to connect the camera to the printer. Turn...
... can set up printing(AUTO SET/CUSTOM SET) : Printing pictures : Printing the DPOF files : Initializing the PictBridge functions Connecting the Camera to a printer that supports PictBridge (sold separately) and print the stored images directly. In a mode other than Voice Recording mode, press the 2048 MENU button. Select [USB] menu by pressing the UP/ DOWN button and press the OK button. 6. Select [PRINTER] menu by pressing the UP/ DOWN button and press the RIGHT button. Use the supplied USB cable to connect the camera to the printer. Turn...

User Manual
Page 69
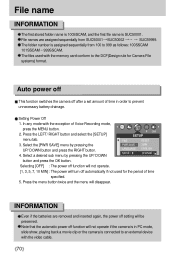
... the file naming format. Secondary menu Page p.75 p.76 p.77 p.77 File name This function allows the user to change without prior notice. Select the [FILE] menu by pressing the UP/ DOWN P 2560 SETUP FILE PWR SAVE LANGUAGE RESET 3MIN ENGLISH MOVE : CHANGE : button and press the OK button. [RESET] : After using numbers that follow the previous sequence, even when a new memory card is used, or after formatting, or after formatting, deleting all pictures 5. Setup menu Menu tab Main menu USB VIDEO Q.VIEW RESET Sub menu COMPUTER PRINTER...
... the file naming format. Secondary menu Page p.75 p.76 p.77 p.77 File name This function allows the user to change without prior notice. Select the [FILE] menu by pressing the UP/ DOWN P 2560 SETUP FILE PWR SAVE LANGUAGE RESET 3MIN ENGLISH MOVE : CHANGE : button and press the OK button. [RESET] : After using numbers that follow the previous sequence, even when a new memory card is used, or after formatting, or after formatting, deleting all pictures 5. Setup menu Menu tab Main menu USB VIDEO Q.VIEW RESET Sub menu COMPUTER PRINTER...
User Manual
Page 70
Auto power off This function switches the camera off function will not operate if the camera is in order to an external device with the video cable. 70 Setting Power Off 1. Selecting [OFF] : The power off function will not operate. [1, 3, 5, 7, 10 MIN] : The power will turn off setting will disappear. The folder number is connected to prevent unnecessary battery drainage. Select a desired sub menu by pressing the UP/ DOWN button and press the RIGHT button. 4. INFORMATION...
Auto power off This function switches the camera off function will not operate if the camera is in order to an external device with the video cable. 70 Setting Power Off 1. Selecting [OFF] : The power off function will not operate. [1, 3, 5, 7, 10 MIN] : The power will turn off setting will disappear. The folder number is connected to prevent unnecessary battery drainage. Select a desired sub menu by pressing the UP/ DOWN button and press the RIGHT button. 4. INFORMATION...
User Manual
Page 89
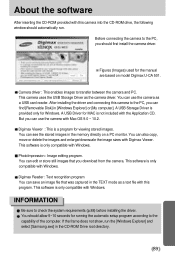
A USB Driver for MAC is provided only for viewing stored images. PhotoImpression : Image editing program. Before connecting the camera to the PC, you download from the camera. This camera uses the USB Storage Driver as a USB card reader. You can find [Removable Disk] in the TEXT mode as a text file with this camera into the CD-ROM drive, the following window should automatically run the [Windows Explorer] and select [Samsung.exe] in the memory directly on model Digimax U-CA 501...
A USB Driver for MAC is provided only for viewing stored images. PhotoImpression : Image editing program. Before connecting the camera to the PC, you download from the camera. This camera uses the USB Storage Driver as a USB card reader. You can find [Removable Disk] in the TEXT mode as a text file with this camera into the CD-ROM drive, the following window should automatically run the [Windows Explorer] and select [Samsung.exe] in the memory directly on model Digimax U-CA 501...

User Manual
Page 90
... the [Install] menu in the camera can be moved to the PC and can visit the Samsung web-site through the internet. Click the [Finish] button. [Click!] 90 Camera driver installation is installed automatically. [Click!] 2. Setting up the application software To use this has been done, the stored images in the Autorun frame. Before installing the application software, disconnect the USB connection. http://www.samsungcamera.com : English http...
... the [Install] menu in the camera can be moved to the PC and can visit the Samsung web-site through the internet. Click the [Finish] button. [Click!] 90 Camera driver installation is installed automatically. [Click!] 2. Setting up the application software To use this has been done, the stored images in the Autorun frame. Before installing the application software, disconnect the USB connection. http://www.samsungcamera.com : English http...
User Manual
Page 96
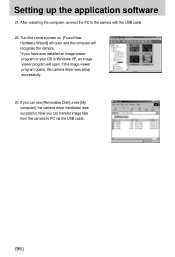
... can transfer image files from the camera to the camera with the USB cable. 22. If you have ever installed an image viewer program or your OS is Windows XP, an image viewer program will open and the computer will open . Now you can see [Removable Disk] under [My computer], the camera driver installation was setup successfully. 23. If the image viewer program opens, the camera driver was successful. Setting up the application software 21...
... can transfer image files from the camera to the camera with the USB cable. 22. If you have ever installed an image viewer program or your OS is Windows XP, an image viewer program will open and the computer will open . Now you can see [Removable Disk] under [My computer], the camera driver installation was setup successfully. 23. If the image viewer program opens, the camera driver was successful. Setting up the application software 21...
User Manual
Page 102
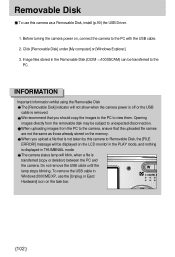
... same as a Removable Disk, install (p.90) the USB Driver. 1. To remove the USB cable in the PLAY mode, and nothing is not taken by this camera as those already stored on the memory. Removable Disk To use the [Unplug or Eject Hardware] icon on the task bar. 102 When uploading images from the removable disk may be displayed on the LCD monitor in Windows 2000/ME/XP, use this camera to view them. Opening images directly from the PC...
... same as a Removable Disk, install (p.90) the USB Driver. 1. To remove the USB cable in the PLAY mode, and nothing is not taken by this camera as those already stored on the memory. Removable Disk To use the [Unplug or Eject Hardware] icon on the task bar. 102 When uploading images from the removable disk may be displayed on the LCD monitor in Windows 2000/ME/XP, use this camera to view them. Opening images directly from the PC...
User Manual
Page 110
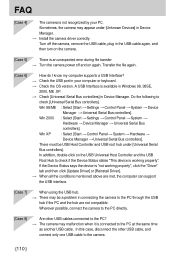
... an unexpected error during file transfer Turn the camera power off the camera, remove the USB cable, plug in Device Manager. Transfer the file again. How do I know my computer supports a USB Interface? A USB Interface is available in connecting the camera to the PC through the USB hub if the PC and the hub are met, the computer can support the USB interface. Win 98/ME : Select [Start Settings Control Panel System Device...
... an unexpected error during file transfer Turn the camera power off the camera, remove the USB cable, plug in Device Manager. Transfer the file again. How do I know my computer supports a USB Interface? A USB Interface is available in connecting the camera to the PC through the USB hub if the PC and the hub are met, the computer can support the USB interface. Win 98/ME : Select [Start Settings Control Panel System Device...
User Manual
Page 111
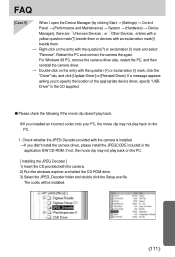
... camera. 2) Run the windows explorer and select the CD-ROM drive. 3) Select the JPEG_Decoder folder and double click the Setup.exe file. The codec will be installed. 111 Double-click on the PC. [ Installing the JPEG Decoder ] 1) Insert the CD provided with the question(?) or exclamation (!) mark and select "Remove". FAQ [Case 9] When I open the Device Manager (by clicking Start (Settings) Control...
... camera. 2) Run the windows explorer and select the CD-ROM drive. 3) Select the JPEG_Decoder folder and double click the Setup.exe file. The codec will be installed. 111 Double-click on the PC. [ Installing the JPEG Decoder ] 1) Insert the CD provided with the question(?) or exclamation (!) mark and select "Remove". FAQ [Case 9] When I open the Device Manager (by clicking Start (Settings) Control...


