User Manual Ver.1.0 (English)
Page 3
Comply with any reason to avoid potential interference, as the battery or charger, and then contact a Samsung service center. Follow all pacemakers to suspect that restrict the use of a camera in an aircraft. Maintain a minimum of the pacemaker .... 2 This may distort the camera or cause a fire. Your camera can cause interference with a pacemaker or other electronic devices. • Turn off your camera when directed by the manufacturer and the independent research group, Wireless Technology Research. Health and safety information Avoid covering the camera or...
Comply with any reason to avoid potential interference, as the battery or charger, and then contact a Samsung service center. Follow all pacemakers to suspect that restrict the use of a camera in an aircraft. Maintain a minimum of the pacemaker .... 2 This may distort the camera or cause a fire. Your camera can cause interference with a pacemaker or other electronic devices. • Turn off your camera when directed by the manufacturer and the independent research group, Wireless Technology Research. Health and safety information Avoid covering the camera or...
User Manual Ver.1.0 (English)
Page 4
...or injuries caused by unapproved batteries, chargers, cables or accessories. Do not use the AC charger, turn off the camera before you charge batteries. Use only Samsung-approved batteries, chargers, cables and accessories. • Using unauthorized batteries, chargers, cables or accessories ...can cause batteries to explode, damage your camera, or cause injury. • Samsung is very hot when fired and may result in fire or electric shock. Use only authentic, manufacturer-recommended, Lithium-ion replacement batteries...
...or injuries caused by unapproved batteries, chargers, cables or accessories. Do not use the AC charger, turn off the camera before you charge batteries. Use only Samsung-approved batteries, chargers, cables and accessories. • Using unauthorized batteries, chargers, cables or accessories ...can cause batteries to explode, damage your camera, or cause injury. • Samsung is very hot when fired and may result in fire or electric shock. Use only authentic, manufacturer-recommended, Lithium-ion replacement batteries...
User Manual Ver.1.0 (English)
Page 8
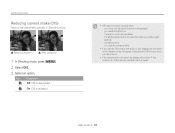
...Use the OIS function or half-press [Shutter] to solve common problems by setting shooting options. This can occur if you use the flash. • Turn off the flash or avoid capturing photos in the center of backlighting. Subjects come out too dark because of the frame. (p. 70) 7 When... are present in the air, you may capture them in photos when you capture photos in camera shake. • Select Night Shot mode. (p. 47) • Turn on the flash. (p. 59) • Set ISO sensitivity options. (p. 61) • Use a tripod to Spot if a subject is in a dusty place. • Set ...
...Use the OIS function or half-press [Shutter] to solve common problems by setting shooting options. This can occur if you use the flash. • Turn off the flash or avoid capturing photos in the center of backlighting. Subjects come out too dark because of the frame. (p. 70) 7 When... are present in the air, you may capture them in photos when you capture photos in camera shake. • Select Night Shot mode. (p. 47) • Turn on the flash. (p. 59) • Set ISO sensitivity options. (p. 61) • Use a tripod to Spot if a subject is in a dusty place. • Set ...

User Manual Ver.1.0 (English)
Page 10
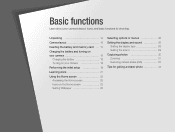
Contents Basic functions 13 Unpacking 14 Camera layout 15 Inserting the battery and memory card 17 Charging the battery and turning on your camera ....... 18 Charging the battery 18 Turning on your camera 18 Performing the initial setup 19 Learning icons 21 Using the Home screen 22 Accessing the Home screen 22 Icons...
Contents Basic functions 13 Unpacking 14 Camera layout 15 Inserting the battery and memory card 17 Charging the battery and turning on your camera ....... 18 Charging the battery 18 Turning on your camera 18 Performing the initial setup 19 Learning icons 21 Using the Home screen 22 Accessing the Home screen 22 Icons...
User Manual Ver.1.0 (English)
Page 14
Unpacking 14 Camera layout 15 Inserting the battery and memory card ... ... 17 Charging the battery and turning on your camera 18 Charging the battery 18 Turning on the Home screen 23 Setting Wallpaper 25 Selecting options or menus 26 Setting the display and sound 28 Setting the display type 28 Setting ...
Unpacking 14 Camera layout 15 Inserting the battery and memory card ... ... 17 Charging the battery and turning on your camera 18 Charging the battery 18 Turning on the Home screen 23 Setting Wallpaper 25 Selecting options or menus 26 Setting the display and sound 28 Setting the display type 28 Setting ...
User Manual Ver.1.0 (English)
Page 19
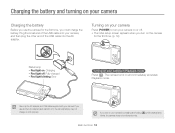
... camera for the first time. (p. 19) Status lamp • Red light on: Charging • Red light off . • The initial setup screen appears when you turn on your camera by pressing and holding [ ] until the status lamp blinks, the camera does not emit any sounds. If you... and USB cable supplied with your camera, and then plug the other end of the USB cable into the AC adapter. Charging the battery and turning on your camera Charging the battery Before you use another AC adapter (such as SAC-48), the camera battery may not charge or work properly...
... camera for the first time. (p. 19) Status lamp • Red light on: Charging • Red light off . • The initial setup screen appears when you turn on your camera by pressing and holding [ ] until the status lamp blinks, the camera does not emit any sounds. If you... and USB cable supplied with your camera, and then plug the other end of the USB cable into the AC adapter. Charging the battery and turning on your camera Charging the battery Before you use another AC adapter (such as SAC-48), the camera battery may not charge or work properly...
User Manual Ver.1.0 (English)
Page 20
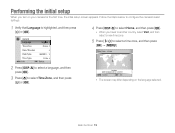
... to configure the camera's basic settings. 1 Verify that Language is highlighted, and then press [ ] or [ ]. 4 Press [ / ] to select Home, and then press [ ]. • When you turn on the language selected. Time Zone : Home 2 Press [ / ] to select a language, and then press [ ]. 3 Press [ ] to select Time Zone, and then press [ ] or [ ]. London Cancel...
... to configure the camera's basic settings. 1 Verify that Language is highlighted, and then press [ ] or [ ]. 4 Press [ / ] to select Home, and then press [ ]. • When you turn on the language selected. Time Zone : Home 2 Press [ / ] to select a language, and then press [ ]. 3 Press [ ] to select Time Zone, and then press [ ] or [ ]. London Cancel...
User Manual Ver.1.0 (English)
Page 30
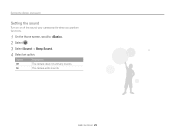
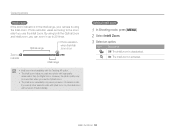
On The camera emits sounds. Setting the display and sound Setting the sound Turn on or off the sound your camera emits when you perform functions. 1 On the Home screen, scroll to . 2 Select . 3 Select Sound → Beep Sound. 4 Select an option. Basic functions 29 Option Description Off The camera does not emit any sounds.
On The camera emits sounds. Setting the display and sound Setting the sound Turn on or off the sound your camera emits when you perform functions. 1 On the Home screen, scroll to . 2 Select . 3 Select Sound → Beep Sound. 4 Select an option. Basic functions 29 Option Description Off The camera does not emit any sounds.
User Manual Ver.1.0 (English)
Page 33
However, the photo quality may be turned off automatically. On: The Intelli zoom is deactivated. Optical range Photo resolution when the Intelli zoom is on Zoom indicator Intelli range • Intelli zoom ...
However, the photo quality may be turned off automatically. On: The Intelli zoom is deactivated. Optical range Photo resolution when the Intelli zoom is on Zoom indicator Intelli range • Intelli zoom ...
User Manual Ver.1.0 (English)
Page 34
the shutter speed is hit or dropped, the display will be blurred by the vibration of the OIS sensor. If this occurs, turn off the camera, and then turn it on again. you capture night scenes) -- the battery is deactivated. Deactivate the OIS function when you move your images may not function properly...
the shutter speed is hit or dropped, the display will be blurred by the vibration of the OIS sensor. If this occurs, turn off the camera, and then turn it on again. you capture night scenes) -- the battery is deactivated. Deactivate the OIS function when you move your images may not function properly...
User Manual Ver.1.0 (English)
Page 36
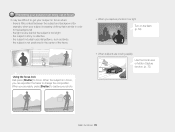
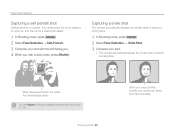
... subject is not positioned in the center of focus It may be difficult to get your photo. • When you capture photos in low light Turn on the flash. (p. 59) • When subjects are ready, press [Shutter] to capture your subject in color to change the composition. the subject includes horizontal...
... subject is not positioned in the center of focus It may be difficult to get your photo. • When you capture photos in low light Turn on the flash. (p. 59) • When subjects are ready, press [Shutter] to capture your subject in color to change the composition. the subject includes horizontal...
User Manual Ver.1.0 (English)
Page 63
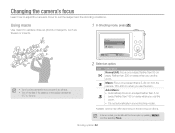
... then selecting Focus. In some shooting modes. Focus Normal (AF) Macro Back Select • Try to hold the camera firmly to prevent blurry photos. • Turn off the flash if the distance to the subject is less than 5 cm away.
... then selecting Focus. In some shooting modes. Focus Normal (AF) Macro Back Select • Try to hold the camera firmly to prevent blurry photos. • Turn off the flash if the distance to the subject is less than 5 cm away.
User Manual Ver.1.0 (English)
Page 67
... when it detects a smiling face. 1 In Shooting mode, press [ ]. 2 Select Face Detection → Smile Shot. 3 Compose your shot with the lens facing you. 4 When you turn Volume off in the center, the camera beeps rapidly. When faces are located in the sound settings, the camera will not emit a beep. (p. 125) Shooting...
... when it detects a smiling face. 1 In Shooting mode, press [ ]. 2 Select Face Detection → Smile Shot. 3 Compose your shot with the lens facing you. 4 When you turn Volume off in the center, the camera beeps rapidly. When faces are located in the sound settings, the camera will not emit a beep. (p. 125) Shooting...
User Manual Ver.1.0 (English)
Page 69
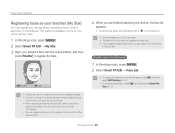
... each from the front, left, right, above, and below. • When capturing photos from the left, right, above, and below, instruct the subject not to turn his or her face more than 30 degrees. • You can register a face even if you capture only one photo of your favorite faces, press...
... each from the front, left, right, above, and below. • When capturing photos from the left, right, above, and below, instruct the subject not to turn his or her face more than 30 degrees. • You can register a face even if you capture only one photo of your favorite faces, press...
User Manual Ver.1.0 (English)
Page 76
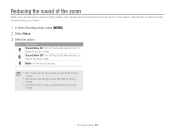
Shooting options 75 Sound Alive Off: Turn off the Sound Alive function to reduce the zoom noise. Reducing the sound of the zoom When you use the zoom while recording videos, the ... videos. Mute: Do not record sounds. • Do not block the microphone when you cannot set the Sound Alive options. Icon Description Sound Alive On: Turn on the Sound Alive function to record the zoom noise. Use the Sound Alive function to reduce the zoom noise. 1 In Video Shooting mode, press...
Shooting options 75 Sound Alive Off: Turn off the Sound Alive function to reduce the zoom noise. Reducing the sound of the zoom When you use the zoom while recording videos, the ... videos. Mute: Do not record sounds. • Do not block the microphone when you cannot set the Sound Alive options. Icon Description Sound Alive On: Turn on the Sound Alive function to record the zoom noise. Use the Sound Alive function to reduce the zoom noise. 1 In Video Shooting mode, press...
User Manual Ver.1.0 (English)
Page 80
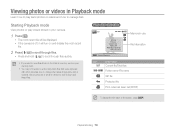
... view files stored in the internal memory, remove your memory card. • You may not be displayed. • If the camera is off, it will turn on the screen, press [ ]. Viewing photos or videos in Playback mode Learn how to play back photos or videos and how to unsupported sizes (image...
... view files stored in the internal memory, remove your memory card. • You may not be displayed. • If the camera is off, it will turn on the screen, press [ ]. Viewing photos or videos in Playback mode Learn how to play back photos or videos and how to unsupported sizes (image...
User Manual Ver.1.0 (English)
Page 95
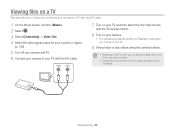
... your TV, and then select the A/V video source with the TV remote control. 8 Turn on your camera. • The camera automatically enters into Playback mode when you connect it to a TV. 9 View photos or play videos using the camera ... the A/V cable. 1 On the Home screen, scroll to . 2 Select . 3 Select Connectivity → Video Out. 4 Select the video signal output for your country or region. (p. 126) 5 Turn off your camera and TV. 6 Connect your camera to your TV settings.
... your TV, and then select the A/V video source with the TV remote control. 8 Turn on your camera. • The camera automatically enters into Playback mode when you connect it to a TV. 9 View photos or play videos using the camera ... the A/V cable. 1 On the Home screen, scroll to . 2 Select . 3 Select Connectivity → Video Out. 4 Select the video signal output for your country or region. (p. 126) 5 Turn off your camera and TV. 6 Connect your camera to your TV settings.
User Manual Ver.1.0 (English)
Page 97
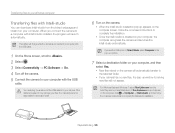
...cable is connected to a computer with the USB cable. 1 On the Home screen, scroll to . 2 Select . 3 Select Connectivity → PC Software → On. 4 Turn off the camera. 5 Connect the camera to your computer with the USB cable. If Run iLinker.exe does not appear on the computer, click →...Windows 7, select Run iLinker.exe from the linked webpage and install it may damage your files. You must plug the small end of data. 6 Turn on the camera. • When the Intelli-studio installation pop-up appears on the computer screen, follow the on your computer. Transferring files to ...
...cable is connected to a computer with the USB cable. 1 On the Home screen, scroll to . 2 Select . 3 Select Connectivity → PC Software → On. 4 Turn off the camera. 5 Connect the camera to your computer with the USB cable. If Run iLinker.exe does not appear on the computer, click →...Windows 7, select Run iLinker.exe from the linked webpage and install it may damage your files. You must plug the small end of data. 6 Turn on the camera. • When the Intelli-studio installation pop-up appears on the computer screen, follow the on your computer. Transferring files to ...
User Manual Ver.1.0 (English)
Page 99
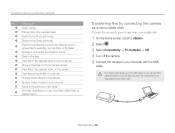
... a removable disk Connect the camera to your computer as a removable disk. 1 On the Home screen, scroll to . 2 Select . 3 Select Connectivity → PC Software → Off. 4 Turn off the camera. 5 Connect the camera to websites, such as thumbnails or on your camera. You must plug the small end of data. Transferring files...
... a removable disk Connect the camera to your computer as a removable disk. 1 On the Home screen, scroll to . 2 Select . 3 Select Connectivity → PC Software → Off. 4 Turn off the camera. 5 Connect the camera to websites, such as thumbnails or on your camera. You must plug the small end of data. Transferring files...
User Manual Ver.1.0 (English)
Page 100
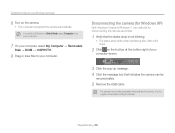
... Select Mode, select Computer in the pop-up message. 4 Click the message box that the status lamp is running. Transferring files to your Windows computer 6 Turn on the camera. • The computer recognizes the camera automatically. Playback/Editing 99 Wait until it stops. 2 Click on the tool bar at the bottom...
... Select Mode, select Computer in the pop-up message. 4 Click the message box that the status lamp is running. Transferring files to your Windows computer 6 Turn on the camera. • The computer recognizes the camera automatically. Playback/Editing 99 Wait until it stops. 2 Click on the tool bar at the bottom...


