Operating Instructions
Page 8
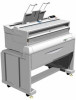
Printing is available in "User Tools" ⇒ P.40 ❖ Specification Auto Off mode Power consumption Default interval FW780 1.0 W 30 minute -Recycled Paper Please contact your sales or service representative for recommended recycled paper types that this machine model meets the ENERGY STAR...impact associated with environmental issues, such as Low-power mode. • Auto Off Mode To conserve energy, this mode, but if you use the copier, press the main switch. iv For how to change the default interval before entering Auto Off mode, see Auto Off Time in this product automatically...
Printing is available in "User Tools" ⇒ P.40 ❖ Specification Auto Off mode Power consumption Default interval FW780 1.0 W 30 minute -Recycled Paper Please contact your sales or service representative for recommended recycled paper types that this machine model meets the ENERGY STAR...impact associated with environmental issues, such as Low-power mode. • Auto Off Mode To conserve energy, this mode, but if you use the copier, press the main switch. iv For how to change the default interval before entering Auto Off mode, see Auto Off Time in this product automatically...
Operating Instructions
Page 10
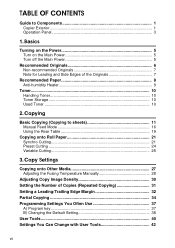
... of the Originals 7 Recommended Paper 8 Anti-humidity Heater 9 Toner...10 Handling Toner 10 Toner Storage 10 Used Toner 10 2. Copying Basic Copying (Copying to Components 1 Copier Exterior 1 Operation Panel 3 1. TABLE OF CONTENTS Guide to sheets 11 Manual Feed Mode 16 Using the Rear Table 19 Copying onto Roll Paper 21 Synchro...
... of the Originals 7 Recommended Paper 8 Anti-humidity Heater 9 Toner...10 Handling Toner 10 Toner Storage 10 Used Toner 10 2. Copying Basic Copying (Copying to Components 1 Copier Exterior 1 Operation Panel 3 1. TABLE OF CONTENTS Guide to sheets 11 Manual Feed Mode 16 Using the Rear Table 19 Copying onto Roll Paper 21 Synchro...

Operating Instructions
Page 11
... 50 Changing the Roll Paper Size 54 Removing the Roll Paper Holder 54 Setting the Roll Paper Holder 54 Loading A Roll Of Paper 56 5. Specifications Copier ...79 Roll Feeder 81 Options ...83 INDEX...84 vii Troubleshooting If Something Goes Wrong 61 If Indicator Lights Up 61 If Jams Occur 63 If... Black Streaks Appear on Copies 72 Daily Maintenance 73 Clean the Exposure Glass & the Platen Plate 73 Do's & Don'ts 74 Where to Put Your Copier 75 Machine Environment 75 Power connection 76 Access To Machine 77 6. 4.
... 50 Changing the Roll Paper Size 54 Removing the Roll Paper Holder 54 Setting the Roll Paper Holder 54 Loading A Roll Of Paper 56 5. Specifications Copier ...79 Roll Feeder 81 Options ...83 INDEX...84 vii Troubleshooting If Something Goes Wrong 61 If Indicator Lights Up 61 If Jams Occur 63 If... Black Streaks Appear on Copies 72 Daily Maintenance 73 Clean the Exposure Glass & the Platen Plate 73 Do's & Don'ts 74 Where to Put Your Copier 75 Machine Environment 75 Power connection 76 Access To Machine 77 6. 4.
Operating Instructions
Page 13
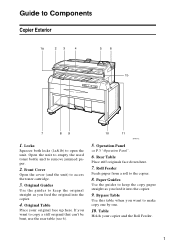
.... 3. Front Cover Open the cover (and the unit) to open the unit. Original Table Place your copier and the Roll Feeder. 1 Roll Feeder Feeds paper from a roll to Components Copier Exterior 1. If you want to make copy one by one. 10. Rear Table Place stiff originals face ... 7. Bypass Table Use this table when you want to copy a stiff original that can't be bent, use the rear table (see 6). 5. Guide to the copier. 8. Operation Panel ⇒ P.3 "Operation Panel". 6. Table Holds your original face up here. Original Guides Use the guides to remove jammed paper. 2. Open ...
.... 3. Front Cover Open the cover (and the unit) to open the unit. Original Table Place your copier and the Roll Feeder. 1 Roll Feeder Feeds paper from a roll to Components Copier Exterior 1. If you want to make copy one by one. 10. Rear Table Place stiff originals face ... 7. Bypass Table Use this table when you want to copy a stiff original that can't be bent, use the rear table (see 6). 5. Guide to the copier. 8. Operation Panel ⇒ P.3 "Operation Panel". 6. Table Holds your original face up here. Original Guides Use the guides to remove jammed paper. 2. Open ...
Operating Instructions
Page 14
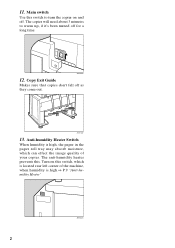
The anti-humidity heater prevents this switch, which can effect the image quality of the machine, when humidity is located rear left corner of your copies. Turn on and off. Copy Exit Guide Makes sure that copies don't fall off for a long time. 12. 11. Main switch Use this switch to warm up, if it's been turned off as they come out. 13. The copier will need about 3 minutes to turn the copier on this . Anti-humidity Heater Switch When humidity is high, the paper in the paper roll tray may absorb moisture, which is high.⇒ P.9 "Anti-humidity Heater" 2
The anti-humidity heater prevents this switch, which can effect the image quality of the machine, when humidity is located rear left corner of your copies. Turn on and off. Copy Exit Guide Makes sure that copies don't fall off for a long time. 12. 11. Main switch Use this switch to warm up, if it's been turned off as they come out. 13. The copier will need about 3 minutes to turn the copier on this . Anti-humidity Heater Switch When humidity is high, the paper in the paper roll tray may absorb moisture, which is high.⇒ P.9 "Anti-humidity Heater" 2
Operating Instructions
Page 15
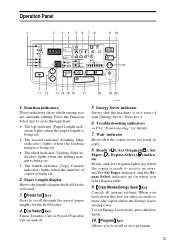
...{Clear Modes/Energy Saver} key Cancels all current settings. Troubleshooting indicators ⇒ P.61 "Troubleshooting" for three seconds or more, the copier enters the Energy Saver mode power. Function indicators These indicators show which setting you to receive an original.The Set Paper indicator and the... to recall or set . 2. Ready (d), Set Original(R), Set Paper (K), Bypass Select (a) indicator Ready and Set Original lights up when the copier is being set. • The fourth indicator (Copy Counter indicator) lights when the number of paper the Roll Feeder will send. 3. {Preset...
...{Clear Modes/Energy Saver} key Cancels all current settings. Troubleshooting indicators ⇒ P.61 "Troubleshooting" for three seconds or more, the copier enters the Energy Saver mode power. Function indicators These indicators show which setting you to receive an original.The Set Paper indicator and the... to recall or set . 2. Ready (d), Set Original(R), Set Paper (K), Bypass Select (a) indicator Ready and Set Original lights up when the copier is being set. • The fourth indicator (Copy Counter indicator) lights when the number of paper the Roll Feeder will send. 3. {Preset...
Operating Instructions
Page 16
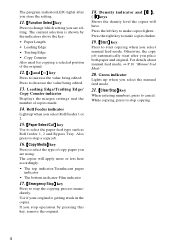
Press to decrease the value being edited. The copier will have. Density indicator and {i}, {j}keys Shows the density level the copies will apply more or less heat accordingly. • The top indicator-Translucent paper ... Mode" 20. Green indicator Lights up when you stop copying. 4 While copying, press to make copies lighter. The current selection is getting stuck in the copier. Press the right key to stop operation by the indicators above the key: • Paper Length • Leading Edge • Trailing Edge • Copy Counter...
Press to decrease the value being edited. The copier will have. Density indicator and {i}, {j}keys Shows the density level the copies will apply more or less heat accordingly. • The top indicator-Translucent paper ... Mode" 20. Green indicator Lights up when you stop copying. 4 While copying, press to make copies lighter. The current selection is getting stuck in the copier. Press the right key to stop operation by the indicators above the key: • Paper Length • Leading Edge • Trailing Edge • Copy Counter...
Operating Instructions
Page 20
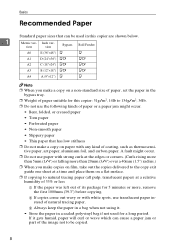
...; Non-smooth paper • Slippery paper • Thin paper that can cause a paper jam or part of the image not to be used for this copier are shown below. 1 Metric ver- C Always keep the paper in a bag when not using it gets humid, paper will curl or wave which can be... low stiffness ❒ Do not make a copy on a non-standard size of paper, set the paper in a sealed polyvinyl bag if not used in this copier: 51g/m2, 14lb to 134g/m2, 36lb. ❒ Do not use translucent paper instead of natural tracing paper.
...; Non-smooth paper • Slippery paper • Thin paper that can cause a paper jam or part of the image not to be used for this copier are shown below. 1 Metric ver- C Always keep the paper in a bag when not using it gets humid, paper will curl or wave which can be... low stiffness ❒ Do not make a copy on a non-standard size of paper, set the paper in a sealed polyvinyl bag if not used in this copier: 51g/m2, 14lb to 134g/m2, 36lb. ❒ Do not use translucent paper instead of natural tracing paper.

Operating Instructions
Page 23
... put the edge of your original or paper on the floor. ❒ When setting an original or paper longer than one sheet of them, the copier starts copying automatically. Note ❒ For acceptable types of original and paper, ⇒ P.6 "Recommended Originals"⇒ P.8 "Recommended Paper". ❒ If you use bypass teble, place...
... put the edge of your original or paper on the floor. ❒ When setting an original or paper longer than one sheet of them, the copier starts copying automatically. Note ❒ For acceptable types of original and paper, ⇒ P.6 "Recommended Originals"⇒ P.8 "Recommended Paper". ❒ If you use bypass teble, place...
Operating Instructions
Page 24
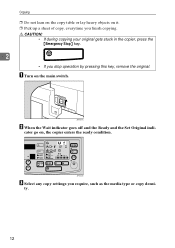
cator go on the main switch. ty. 12 A Turn on , the copier enters the ready condition. C Select any copy settings you stop operation by pressing this key, remove the original. R CAUTION: • If during copying your original gets stuck in the copier, press the {Emergency Stop} key. 2 • If you require, such as the media type or copy densi- B When the Wait indicator goes off and the Ready and the Set Original indi- Copying ❒ Do not lean on the copy table or lay heavy objects on it. ❒ Pick up a sheet of copy, everytime you finish copying.
cator go on the main switch. ty. 12 A Turn on , the copier enters the ready condition. C Select any copy settings you stop operation by pressing this key, remove the original. R CAUTION: • If during copying your original gets stuck in the copier, press the {Emergency Stop} key. 2 • If you require, such as the media type or copy densi- B When the Wait indicator goes off and the Ready and the Set Original indi- Copying ❒ Do not lean on the copy table or lay heavy objects on it. ❒ Pick up a sheet of copy, everytime you finish copying.

Operating Instructions
Page 25
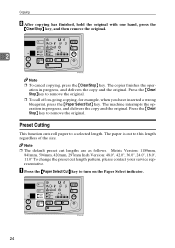
Basic Copying (Copying to sheets) Press the {Paper Select/Cut} key to keep the edge of the roll. ❒ If you select two roll feeder, select one of the original from slipping into the copier. D Open the guides to select either the Roll Feeder or Bypass Tray. 2 Note ❒ If you select the Bypass table, center the paper face up on the bypass table and slide the paper straight into the pa- per entrance. 13
Basic Copying (Copying to sheets) Press the {Paper Select/Cut} key to keep the edge of the roll. ❒ If you select two roll feeder, select one of the original from slipping into the copier. D Open the guides to select either the Roll Feeder or Bypass Tray. 2 Note ❒ If you select the Bypass table, center the paper face up on the bypass table and slide the paper straight into the pa- per entrance. 13
Operating Instructions
Page 26
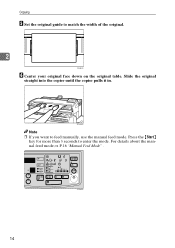
Copying E Set the original guide to feed manually, use the manual feed mode. For details about the manual feed mode,⇒ P.16 "Manual Feed Mode" . 14 Slide the original straight into the copier until the copier pulls it in. Note ❒ If you want to match the width of the original. 2 F Center your original face down on the original table. Press the {Start} key for more than 3 seconds to enter the mode.
Copying E Set the original guide to feed manually, use the manual feed mode. For details about the manual feed mode,⇒ P.16 "Manual Feed Mode" . 14 Slide the original straight into the copier until the copier pulls it in. Note ❒ If you want to match the width of the original. 2 F Center your original face down on the original table. Press the {Start} key for more than 3 seconds to enter the mode.

Operating Instructions
Page 27
I The copy is being sent back, the machine scans the original and starts copying. Note ❒ You must always pick up copies everytime, otherwise copy paper will pile up without rule. 15 Basic Copying (Copying to the rear table. G The original is fed through to sheets) 2 H When the original is delivered at the back of the copier.
I The copy is being sent back, the machine scans the original and starts copying. Note ❒ You must always pick up copies everytime, otherwise copy paper will pile up without rule. 15 Basic Copying (Copying to the rear table. G The original is fed through to sheets) 2 H When the original is delivered at the back of the copier.

Operating Instructions
Page 28
...the original, the original will turn itself to the initial settings (Auto Reset). per, the paper will be ejected automatically. ❒ If the copier is not used it will be ejected automatically. ❒ If you want to make larger sized copy and protect from the paper skew. If you... original in a certain interval after inserting the pa- This function helps you to make larger sized paper, you can preset the initial settings of the copier ⇒ P.38 "B) Changing the Default Setting" Manual Feed Mode When you have used for a long time, it , the machine resets itself off and...
...the original, the original will turn itself to the initial settings (Auto Reset). per, the paper will be ejected automatically. ❒ If the copier is not used it will be ejected automatically. ❒ If you want to make larger sized copy and protect from the paper skew. If you... original in a certain interval after inserting the pa- This function helps you to make larger sized paper, you can preset the initial settings of the copier ⇒ P.38 "B) Changing the Default Setting" Manual Feed Mode When you have used for a long time, it , the machine resets itself off and...
Operating Instructions
Page 30
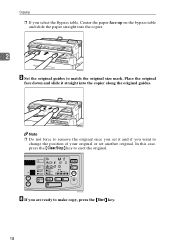
F If you want to change the position of your original or set it straight into the copier. 2 E Set the original guides to eject the original. Note ❒ Do not force to make copy, press the {Start} key. 18 Place the original face down and slide it and if you are ready to remove the original once you set another original. In this case, press the {Clear/Stop} key to match the original size mark. Copying ❒ If you select the Bypass table, Center the paper face up on the bypass table and slide the paper straight into the copier along the original guides.
F If you want to change the position of your original or set it straight into the copier. 2 E Set the original guides to eject the original. Note ❒ Do not force to make copy, press the {Start} key. 18 Place the original face down and slide it and if you are ready to remove the original once you set another original. In this case, press the {Clear/Stop} key to match the original size mark. Copying ❒ If you select the Bypass table, Center the paper face up on the bypass table and slide the paper straight into the copier along the original guides.
Operating Instructions
Page 33
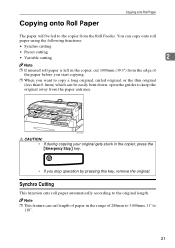
Synchro Cutting This function cuts roll paper automatically according to the original length. Note ❒ This feature can be fed to the copier from the paper entrance. You can copy onto roll paper using the following functions: • Synchro cutting • Preset cutting • Variable... cutting 2 Note ❒ If unused roll paper is left in the copier, cut length of paper in the copier, press the {Emergency Stop} key. • If you want to copy a long original, curled original, or the thin original (less...
Synchro Cutting This function cuts roll paper automatically according to the original length. Note ❒ This feature can be fed to the copier from the paper entrance. You can copy onto roll paper using the following functions: • Synchro cutting • Preset cutting • Variable... cutting 2 Note ❒ If unused roll paper is left in the copier, cut length of paper in the copier, press the {Emergency Stop} key. • If you want to copy a long original, curled original, or the thin original (less...

Operating Instructions
Page 35
G Center your original face down on . Slide the original straight into the copier until the copier pulls it in. For details about the manual feed mode, ⇒ P.16 "Manual Feed Mode". 23 Note ❒ Press the {Start}key if you select the manual feed mode. Copying onto Roll Paper E Set the original guides to match the width of the original. 2 F Make sure that the wait indicator goes off and the ready and the set original indicator go on the original table.
G Center your original face down on . Slide the original straight into the copier until the copier pulls it in. For details about the manual feed mode, ⇒ P.16 "Manual Feed Mode". 23 Note ❒ Press the {Start}key if you select the manual feed mode. Copying onto Roll Paper E Set the original guides to match the width of the original. 2 F Make sure that the wait indicator goes off and the ready and the set original indicator go on the original table.
Operating Instructions
Page 36
... original with one hand, press the {Clear/Stop} key, and then remove the original. 2 Note ❒ To cancel copying, press the {Clear/Stop} key. The copier finishes the oper- ation in progress, and delivers the copy and the original. Press the {Clear/ Stop}key to remove the original. The machine interrupts...
... original with one hand, press the {Clear/Stop} key, and then remove the original. 2 Note ❒ To cancel copying, press the {Clear/Stop} key. The copier finishes the oper- ation in progress, and delivers the copy and the original. Press the {Clear/ Stop}key to remove the original. The machine interrupts...
Operating Instructions
Page 40
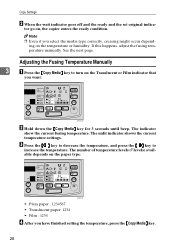
... set original indica- The indicator show the current fusing temperature. C Press the {i} key to decrease the temperature, and press the {j} key to turn on , the copier enters the ready condition. tor go on the Translucent or Film indicator that you select the media type correctly, creasing might occur depend- See the...
... set original indica- The indicator show the current fusing temperature. C Press the {i} key to decrease the temperature, and press the {j} key to turn on , the copier enters the ready condition. tor go on the Translucent or Film indicator that you select the media type correctly, creasing might occur depend- See the...
Operating Instructions
Page 46
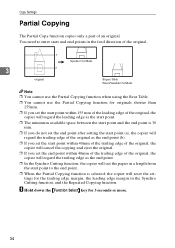
...❒ If you set the start point within 155 mm of the leading edge of the original, the copier will regard the leading edge as the start point. ❒ The minimum available space between the start point...is 30 mm. ❒ If you do not set the end point after setting the start point (a), the copier will regard the trailing edge of the original as the end point (b). ❒ If you set the start... point within 40mm of the trailing edge of the original, the copier will cancel the copying and eject the original. ❒ If you set the end point within 40mm of...
...❒ If you set the start point within 155 mm of the leading edge of the original, the copier will regard the leading edge as the start point. ❒ The minimum available space between the start point...is 30 mm. ❒ If you do not set the end point after setting the start point (a), the copier will regard the trailing edge of the original as the end point (b). ❒ If you set the start... point within 40mm of the trailing edge of the original, the copier will cancel the copying and eject the original. ❒ If you set the end point within 40mm of...


