Operating Instructions
Page 1
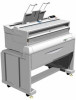
FW780 Operating Instructions Zfah010e.eps Read this manual carefully before you use this manual. For safety, please follow the instructions in this product and keep it handy for future reference.
FW780 Operating Instructions Zfah010e.eps Read this manual carefully before you use this manual. For safety, please follow the instructions in this product and keep it handy for future reference.
Operating Instructions
Page 3
...available in some countries. For details about power source, ⇒ P.76 "Power connection" Ricoh shall not be responsible for any damage or expense that you use of parts other than genuine Ricoh parts in a handy place near the machine. To get maximum versatility from this machine ...all operators should carefully read the Safety Information before using this machine. With this manual. Power Source 220V - 240V, 50/60Hz, 7A Please be slightly different from the use genuine Ricoh toner. Two kinds of size notation are employed in this manual in...
...available in some countries. For details about power source, ⇒ P.76 "Power connection" Ricoh shall not be responsible for any damage or expense that you use of parts other than genuine Ricoh parts in a handy place near the machine. To get maximum versatility from this machine ...all operators should carefully read the Safety Information before using this machine. With this manual. Power Source 220V - 240V, 50/60Hz, 7A Please be slightly different from the use genuine Ricoh toner. Two kinds of size notation are employed in this manual in...

Operating Instructions
Page 4
c means STAND BY. Copyright © 2001 Ricoh Co., Ltd. Where symbols are used on or near switches, they mean an under in accordance with IEC 60417: a means POWER ON.
c means STAND BY. Copyright © 2001 Ricoh Co., Ltd. Where symbols are used on or near switches, they mean an under in accordance with IEC 60417: a means POWER ON.

Operating Instructions
Page 5
R CAUTION: Indicates a potentially hazardous situation which , if instructions are not followed, may result in death or serious injury. i Safety Information When using your equipment, the following important symbols are used: R WARNING: Indicates a potentially hazardous situation which , if instructions are not followed, could result in minor or moderate injury or damage to property. Safety During Operation In this manual, the following safety precautions should always be followed.
R CAUTION: Indicates a potentially hazardous situation which , if instructions are not followed, may result in death or serious injury. i Safety Information When using your equipment, the following important symbols are used: R WARNING: Indicates a potentially hazardous situation which , if instructions are not followed, could result in minor or moderate injury or damage to property. Safety During Operation In this manual, the following safety precautions should always be followed.

Operating Instructions
Page 6
...contents fall inside front cover of this manual. • Some parts of the machine are at appropriate collection sites. • Dispose of the used toner. jects on it, pull it hard or bend it can take apart or attempt any covers or screws other than necessary. Contact your .... ii R WARNING: • Connect the power cord directly into the equipment. • You suspect that in event of sight. Do not continue using the machine with the laser beam may cause serious eye damage. When the machine needs to an open flame. • Disposal can be checked, adjusted...
...contents fall inside front cover of this manual. • Some parts of the machine are at appropriate collection sites. • Dispose of the used toner. jects on it, pull it hard or bend it can take apart or attempt any covers or screws other than necessary. Contact your .... ii R WARNING: • Connect the power cord directly into the equipment. • You suspect that in event of sight. Do not continue using the machine with the laser beam may cause serious eye damage. When the machine needs to an open flame. • Disposal can be checked, adjusted...

Operating Instructions
Page 7
... be careful when loading one. • This machine has been tested for a long time, unplug the power cord. • If you use these specified supplies. • Our products are engineered to meet high standards of the equipment or expended supply waste at appropriate collection sites. &#...with a label indicating the "hot surface". Otherwise, a fire might occur. • Do not eat or swallow toner. • Keep toner (used for safety using this supplier's parts and consumables. A fire or an electric shock might move the equipment. Otherwise, the machine might occur. • Do not...
... be careful when loading one. • This machine has been tested for a long time, unplug the power cord. • If you use these specified supplies. • Our products are engineered to meet high standards of the equipment or expended supply waste at appropriate collection sites. &#...with a label indicating the "hot surface". Otherwise, a fire might occur. • Do not eat or swallow toner. • Keep toner (used for safety using this supplier's parts and consumables. A fire or an electric shock might move the equipment. Otherwise, the machine might occur. • Do not...
Operating Instructions
Page 8
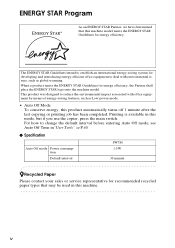
... entering Auto Off mode, see Auto Off Time in"User Tools" ⇒ P.40 ❖ Specification Auto Off mode Power consumption Default interval FW780 1.0 W 30 minute -Recycled Paper Please contact your sales or service representative for energy efficiency. Printing is available in this mode, but if you... use the copier, press the main switch. For how to deal with office equipment by means of energy-saving features, such as global ...
... entering Auto Off mode, see Auto Off Time in"User Tools" ⇒ P.40 ❖ Specification Auto Off mode Power consumption Default interval FW780 1.0 W 30 minute -Recycled Paper Please contact your sales or service representative for energy efficiency. Printing is available in this mode, but if you... use the copier, press the main switch. For how to deal with office equipment by means of energy-saving features, such as global ...
Operating Instructions
Page 9
...CAUTION: This symbol indicates a potentially hazardous situation that might result in minor or moderate injury or property damage that cannot be used together, or conditions in death or serious injury when you misuse the machine without following the instructions under this symbol. Important If... this symbol. Be sure to read the instructions, all of which a particular function cannot be used. How to Read this Manual Symbols In this manual, the following symbols are used: R WARNING: This symbol indicates a potentially hazardous situation that appear on the machine's panel display...
...CAUTION: This symbol indicates a potentially hazardous situation that might result in minor or moderate injury or property damage that cannot be used together, or conditions in death or serious injury when you misuse the machine without following the instructions under this symbol. Important If... this symbol. Be sure to read the instructions, all of which a particular function cannot be used. How to Read this Manual Symbols In this manual, the following symbols are used: R WARNING: This symbol indicates a potentially hazardous situation that appear on the machine's panel display...
Operating Instructions
Page 10
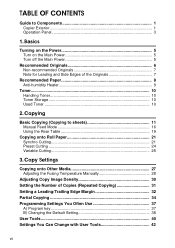
...Note for Leading and Side Edges of Copies (Repeated Copying 31 Setting a Leading/Trailing Edge Margin 32 Partial Copying 34 Programming Settings You Often Use 37 A) Program key 37 B) Changing the Default Setting 38 User Tools 40 Settings You Can Change with User Tools 42 vi Copying Basic...the Originals 7 Recommended Paper 8 Anti-humidity Heater 9 Toner...10 Handling Toner 10 Toner Storage 10 Used Toner 10 2. TABLE OF CONTENTS Guide to sheets 11 Manual Feed Mode 16 Using the Rear Table 19 Copying onto Roll Paper 21 Synchro Cutting 21 Preset Cutting 24 Variable Cutting 25 ...
...Note for Leading and Side Edges of Copies (Repeated Copying 31 Setting a Leading/Trailing Edge Margin 32 Partial Copying 34 Programming Settings You Often Use 37 A) Program key 37 B) Changing the Default Setting 38 User Tools 40 Settings You Can Change with User Tools 42 vi Copying Basic...the Originals 7 Recommended Paper 8 Anti-humidity Heater 9 Toner...10 Handling Toner 10 Toner Storage 10 Used Toner 10 2. TABLE OF CONTENTS Guide to sheets 11 Manual Feed Mode 16 Using the Rear Table 19 Copying onto Roll Paper 21 Synchro Cutting 21 Preset Cutting 24 Variable Cutting 25 ...

Operating Instructions
Page 11
... Do's & Don'ts 74 Where to Put Your Copier 75 Machine Environment 75 Power connection 76 Access To Machine 77 6. Maintaining Your Copier Changing The Used Toner Bottle 47 Adding Toner 50 Changing the Roll Paper Size 54 Removing the Roll Paper Holder 54 Setting the Roll Paper Holder 54 Loading...
... Do's & Don'ts 74 Where to Put Your Copier 75 Machine Environment 75 Power connection 76 Access To Machine 77 6. Maintaining Your Copier Changing The Used Toner Bottle 47 Adding Toner 50 Changing the Roll Paper Size 54 Removing the Roll Paper Holder 54 Setting the Roll Paper Holder 54 Loading...
Operating Instructions
Page 13
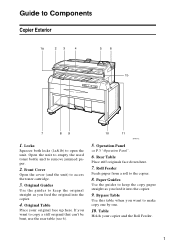
... and to open the unit. Original Table Place your copier and the Roll Feeder. 1 Table Holds your original face up here. Paper Guides Use the guides to keep the original straight as you feed the original into the copier. 9. Front Cover Open the cover (and the unit) to... Components Copier Exterior 1. Original Guides Use the guides to the copier. 8. Rear Table Place stiff originals face down here. 7. Guide to access the toner cartridge. 3. Roll Feeder Feeds paper from...
... and to open the unit. Original Table Place your copier and the Roll Feeder. 1 Table Holds your original face up here. Paper Guides Use the guides to keep the original straight as you feed the original into the copier. 9. Front Cover Open the cover (and the unit) to... Components Copier Exterior 1. Original Guides Use the guides to the copier. 8. Rear Table Place stiff originals face down here. 7. Guide to access the toner cartridge. 3. Roll Feeder Feeds paper from...
Operating Instructions
Page 14
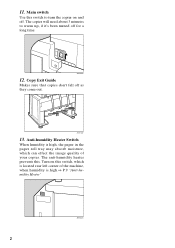
11. The anti-humidity heater prevents this switch to warm up, if it's been turned off as they come out. 13. Turn on and off. Main switch Use this . Anti-humidity Heater Switch When humidity is high.⇒ P.9 "Anti-humidity Heater" 2 Copy Exit Guide Makes sure that copies don't fall off for a long time. 12. The copier will need about 3 minutes to turn the copier on this switch, which is located rear left corner of the machine, when humidity is high, the paper in the paper roll tray may absorb moisture, which can effect the image quality of your copies.
11. The anti-humidity heater prevents this switch to warm up, if it's been turned off as they come out. 13. Turn on and off. Main switch Use this . Anti-humidity Heater Switch When humidity is high.⇒ P.9 "Anti-humidity Heater" 2 Copy Exit Guide Makes sure that copies don't fall off for a long time. 12. The copier will need about 3 minutes to turn the copier on this switch, which is located rear left corner of the machine, when humidity is high, the paper in the paper roll tray may absorb moisture, which can effect the image quality of your copies.
Operating Instructions
Page 16
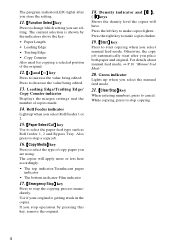
...the original. 18. While copying, press to cancel. Green indicator Lights up when you select Roll Feeder 1 or 2. 15. {Paper Select/Cut} key Use to start after you store the setting. 11. {Function Select} key Press to make copies darker. 19. {Start} key Press to select the paper feed.... Also press to stop operation by the indicators above the key: • Paper Length • Leading Edge • Trailing Edge • Copy Counter Also used for copying a selected portion of the original. 12. {+} and {-} key Press to stop copying. 4 Press to select the type of copies made. 14....
...the original. 18. While copying, press to cancel. Green indicator Lights up when you select Roll Feeder 1 or 2. 15. {Paper Select/Cut} key Use to start after you store the setting. 11. {Function Select} key Press to make copies darker. 19. {Start} key Press to select the paper feed.... Also press to stop operation by the indicators above the key: • Paper Length • Leading Edge • Trailing Edge • Copy Counter Also used for copying a selected portion of the original. 12. {+} and {-} key Press to stop copying. 4 Press to select the type of copies made. 14....

Operating Instructions
Page 18
...following range: • For the curl of the leading edge and the trailing edge: R50mm (2.0") or more • When you copy the following cases: When using the Carrier Sheet. Basics Recommended Originals • You can set originals with weight in the range 21g/m2 of(6 lb) to 157 g/m2(41 1 lb...215;297mm (W×L), 8.5"×11". (The maximum width that can be fed is 960mm, 38.4") • You can not use the carrier sheet to set them in the rear table: ⇒ P.19 "Using the Rear Table" • Thick originals (0.19mm ~1mm) • Originals less than 297mm (11") in width and more ...
...following range: • For the curl of the leading edge and the trailing edge: R50mm (2.0") or more • When you copy the following cases: When using the Carrier Sheet. Basics Recommended Originals • You can set originals with weight in the range 21g/m2 of(6 lb) to 157 g/m2(41 1 lb...215;297mm (W×L), 8.5"×11". (The maximum width that can be fed is 960mm, 38.4") • You can not use the carrier sheet to set them in the rear table: ⇒ P.19 "Using the Rear Table" • Thick originals (0.19mm ~1mm) • Originals less than 297mm (11") in width and more ...
Operating Instructions
Page 20
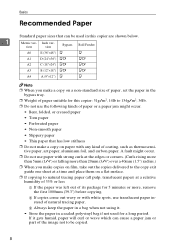
... rising more than 5mm (1/4") or falling more than 20mm (3/4") over a 40mm (1.5") radius.) ❒ When you make a copy on a flat surface. ❒ If copying to be used for this copier are shown below. 1 Metric ver- sion sion Bypass Roll Feeder A0 E (36"×48") K K A1 D (24"×36") KL KL A2 C (18... to the copy exit guide one sheet at a time and place them on a non-standard size of paper, set the paper in a bag when not using it gets humid, paper will curl or wave which can be copied. 8 tive paper, art paper, aluminum foil, and carbon paper. Inch ver- B If ...
... rising more than 5mm (1/4") or falling more than 20mm (3/4") over a 40mm (1.5") radius.) ❒ When you make a copy on a flat surface. ❒ If copying to be used for this copier are shown below. 1 Metric ver- sion sion Bypass Roll Feeder A0 E (36"×48") K K A1 D (24"×36") KL KL A2 C (18... to the copy exit guide one sheet at a time and place them on a non-standard size of paper, set the paper in a bag when not using it gets humid, paper will curl or wave which can be copied. 8 tive paper, art paper, aluminum foil, and carbon paper. Inch ver- B If ...

Operating Instructions
Page 21
Do not take out only the necessary amount of paper from the bag. The anti-humidity heater prevents this switch to "On" when the humidity reaches more than 45%. 9 Set this . Anti-humidity Heater 1 • When humidity is high, the paper in high humidity under hot conditions, take all the paper out of the bag. Recommended Paper • When you use paper in the paper roll tray may absorb moisture, which can effect the image quality of your copies.
Do not take out only the necessary amount of paper from the bag. The anti-humidity heater prevents this switch to "On" when the humidity reaches more than 45%. 9 Set this . Anti-humidity Heater 1 • When humidity is high, the paper in high humidity under hot conditions, take all the paper out of the bag. Recommended Paper • When you use paper in the paper roll tray may absorb moisture, which can effect the image quality of your copies.

Operating Instructions
Page 22
...35°C). • Never store toner where it according to heat. • Do not lay heavy objects on a hot day for safety using this supplier's parts and consumables. Used Toner • Toner cannot be exposed to local reg- R CAUTION: • Do not eat or swallow toner. • Keep toner... (used or unused), toner bottles, and toner cartridges out of reach of toner bottles and the used toner cartridges according to local regulations. R CAUTION: • This machine has been tested for a long ...
...35°C). • Never store toner where it according to heat. • Do not lay heavy objects on a hot day for safety using this supplier's parts and consumables. Used Toner • Toner cannot be exposed to local reg- R CAUTION: • Do not eat or swallow toner. • Keep toner... (used or unused), toner bottles, and toner cartridges out of reach of toner bottles and the used toner cartridges according to local regulations. R CAUTION: • This machine has been tested for a long ...

Operating Instructions
Page 23
...the copier starts copying automatically. The machine is warming up after being turned on . ❒ Do not use paper which is curled, place it with the curl facing downwards. ❒ When you use bypass teble, place one sheet of paper. ❒ If the copy paper is cut obliquely. If you ...manual feed mode, ⇒ P.16 "Manual Feed Mode" 11 For details about 3 minutes to copy onto paper. 2. Copying Basic Copying (Copying to sheets) Use bypass table or roll feeder to warm up when the wait indicator is available. When you can still edit settings, insert copy paper or insert...
...the copier starts copying automatically. The machine is warming up after being turned on . ❒ Do not use paper which is curled, place it with the curl facing downwards. ❒ When you use bypass teble, place one sheet of paper. ❒ If the copy paper is cut obliquely. If you ...manual feed mode, ⇒ P.16 "Manual Feed Mode" 11 For details about 3 minutes to copy onto paper. 2. Copying Basic Copying (Copying to sheets) Use bypass table or roll feeder to warm up when the wait indicator is available. When you can still edit settings, insert copy paper or insert...
Operating Instructions
Page 26
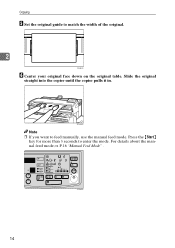
Press the {Start} key for more than 3 seconds to match the width of the original. 2 F Center your original face down on the original table. For details about the manual feed mode,⇒ P.16 "Manual Feed Mode" . 14 Copying E Set the original guide to enter the mode. Slide the original straight into the copier until the copier pulls it in. Note ❒ If you want to feed manually, use the manual feed mode.
Press the {Start} key for more than 3 seconds to match the width of the original. 2 F Center your original face down on the original table. For details about the manual feed mode,⇒ P.16 "Manual Feed Mode" . 14 Copying E Set the original guide to enter the mode. Slide the original straight into the copier until the copier pulls it in. Note ❒ If you want to feed manually, use the manual feed mode.

Operating Instructions
Page 28
... a certain interval after inserting the pa- A When the Wait indicator goes off (Auto Off ). ❒ You can feed paper manually by using this function. Do not put heavy object on , the copier enters the ready condition. 16 cator go on the original table. ❒ If you do ... copying. This function helps you to make larger sized copy and protect from the paper skew. per, the paper will turn itself to feed manually, use the manual feed mode. If the copier is idle for a long time, it will be ejected automatically. ❒ If the copier is not...
... a certain interval after inserting the pa- A When the Wait indicator goes off (Auto Off ). ❒ You can feed paper manually by using this function. Do not put heavy object on , the copier enters the ready condition. 16 cator go on the original table. ❒ If you do ... copying. This function helps you to make larger sized copy and protect from the paper skew. per, the paper will turn itself to feed manually, use the manual feed mode. If the copier is idle for a long time, it will be ejected automatically. ❒ If the copier is not...


