User Guide
Page 5
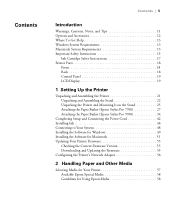
... the Stand 22 Unpacking the Printer and Mounting It on the Stand 25 Attaching the Paper Basket (Epson Stylus Pro 7700 27 Attaching the Paper Basket (Epson Stylus Pro 9700 34 Completing Setup and Connecting the Power Cord 42 Installing Ink 46 Connecting to Your System 48 Installing the Software for Windows 49 Installing the Software for Macintosh...
... the Stand 22 Unpacking the Printer and Mounting It on the Stand 25 Attaching the Paper Basket (Epson Stylus Pro 7700 27 Attaching the Paper Basket (Epson Stylus Pro 9700 34 Completing Setup and Connecting the Power Cord 42 Installing Ink 46 Connecting to Your System 48 Installing the Software for Windows 49 Installing the Software for Macintosh...
User Guide
Page 8
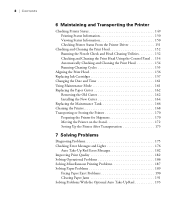
... Print Head Using the Control Panel . . 154 Automatically Checking and Cleaning the Print Head 154 Running Cleaning Cycles 155 Aligning the Print Head 156 Replacing Ink Cartridges 157 Changing the Date and Time 161 Using Maintenance Mode 161 Replacing the Paper Cutter 162 Removing the Old Cutter 162 Installing the New...
... Print Head Using the Control Panel . . 154 Automatically Checking and Cleaning the Print Head 154 Running Cleaning Cycles 155 Aligning the Print Head 156 Replacing Ink Cartridges 157 Changing the Date and Time 161 Using Maintenance Mode 161 Replacing the Paper Cutter 162 Removing the Old Cutter 162 Installing the New...
User Guide
Page 9
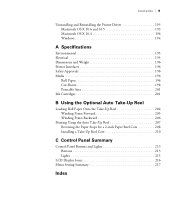
... Environmental 195 Electrical 195 Dimensions and Weight 196 Printer Interfaces 196 Safety Approvals 196 Media 196 Roll Paper 196 Cut Sheets 198 Printable Area 201 Ink Cartridges 201 B Using the Optional Auto Take-Up Reel Loading Roll Paper Onto the Take-Up Reel 204 Winding Prints Forward 205 Winding Prints Backward...
... Environmental 195 Electrical 195 Dimensions and Weight 196 Printer Interfaces 196 Safety Approvals 196 Media 196 Roll Paper 196 Cut Sheets 198 Printable Area 201 Ink Cartridges 201 B Using the Optional Auto Take-Up Reel Loading Roll Paper Onto the Take-Up Reel 204 Winding Prints Forward 205 Winding Prints Backward...
User Guide
Page 11
...provides important information on how to get the most out of procedures for setting up and using your printer, loading paper, using the Epson printer drivers, and replacing ink cartridges. Warnings, Cautions, Notes, and Tips Please follow these guidelines as you how to maintain your printer to keep it to your...: • The Quick Reference Guide provides a handy summary of your printer. 11 It also tells you use and printer maintenance-loading paper, replacing ink cartridges and other components, cleaning and aligning the print head, and using your printer on a network.
...provides important information on how to get the most out of procedures for setting up and using your printer, loading paper, using the Epson printer drivers, and replacing ink cartridges. Warnings, Cautions, Notes, and Tips Please follow these guidelines as you how to maintain your printer to keep it to your...: • The Quick Reference Guide provides a handy summary of your printer. 11 It also tells you use and printer maintenance-loading paper, replacing ink cartridges and other components, cleaning and aligning the print head, and using your printer on a network.
User Guide
Page 12
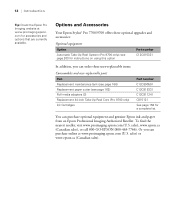
...addition, you can purchase optional equipment and genuine Epson ink and paper from an Epson Professional Imaging Authorized Reseller. You can purchase online at www.proimaging.epson. sales), www.epson.ca (Canadian sales), or call 800-GO-EPSON (800-463-7766). To find the nearest... you can order these optional upgrades and accessories: Optional equipment Option Automatic Take-Up Reel System (Pro 9700 only); Options and Accessories Your Epson Stylus® Pro 7700/9700 offers these user-replaceable items: Consumables and user-replaceable parts Part Replacement maintenance tank (see ...
...addition, you can purchase optional equipment and genuine Epson ink and paper from an Epson Professional Imaging Authorized Reseller. You can purchase online at www.proimaging.epson. sales), www.epson.ca (Canadian sales), or call 800-GO-EPSON (800-463-7766). To find the nearest... you can order these optional upgrades and accessories: Optional equipment Option Automatic Take-Up Reel System (Pro 9700 only); Options and Accessories Your Epson Stylus® Pro 7700/9700 offers these user-replaceable items: Consumables and user-replaceable parts Part Replacement maintenance tank (see ...
User Guide
Page 15
... fire or electric shock. • Do not use the equipment safely and effectively. • The Epson Stylus Pro 7700 weighs about 186 lb (84.5 kg) and the Epson Stylus Pro 9700 weighs about 256 lb (116 kg) without the stand, paper basket, ink, or paper. The printer will not operate properly if it with other equipment may result...
... fire or electric shock. • Do not use the equipment safely and effectively. • The Epson Stylus Pro 7700 weighs about 186 lb (84.5 kg) and the Epson Stylus Pro 9700 weighs about 256 lb (116 kg) without the stand, paper basket, ink, or paper. The printer will not operate properly if it with other equipment may result...
User Guide
Page 17
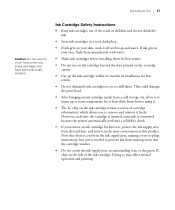
... and reinsert it off with water. • Shake ink cartridges before using it. • The IC chip on the ink cartridge retains a variety of cartridge information, which allows you remove an ink cartridge for later use, protect the ink supply area from dirt and dust, and store it in...17 Note that have been previously installed. If ink gets in a cool, dark place. • If ink gets on your eyes, flush them . Ink Cartridge Safety Instructions • Keep ink cartridges out of the reach of children and do not drink the ink. • Store ink cartridges in your skin, wash it freely....
... and reinsert it off with water. • Shake ink cartridges before using it. • The IC chip on the ink cartridge retains a variety of cartridge information, which allows you remove an ink cartridge for later use, protect the ink supply area from dirt and dust, and store it in...17 Note that have been previously installed. If ink gets in a cool, dark place. • If ink gets on your eyes, flush them . Ink Cartridge Safety Instructions • Keep ink cartridges out of the reach of children and do not drink the ink. • Store ink cartridges in your skin, wash it freely....
User Guide
Page 18
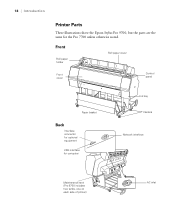
Front Roll paper holder Roll paper cover Front cover Control panel Paper basket Back Interface connector for optional equipment USB interface for the Pro 7700 unless otherwise noted. 18 | Introduction Printer Parts These illustrations show the Epson Stylus Pro 9700, but the parts are the same for computer Ink bay Casters Network interface Maintenance tank (Pro 9700 includes two tanks, one on each side of printer) 18 AC inlet
Front Roll paper holder Roll paper cover Front cover Control panel Paper basket Back Interface connector for optional equipment USB interface for the Pro 7700 unless otherwise noted. 18 | Introduction Printer Parts These illustrations show the Epson Stylus Pro 9700, but the parts are the same for computer Ink bay Casters Network interface Maintenance tank (Pro 9700 includes two tanks, one on each side of printer) 18 AC inlet
User Guide
Page 19
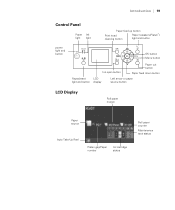
Introduction | 19 Control Panel Paper Ink light light Paper feed up button Print head cleaning button Paper release (ePlaten™) light and button power light and button OK button Menu button Ink open button Paper cut button Paper feed down button Pause/reset LCD light and button display Left arrow or paper source button LCD Display Roll paper margin Paper source Auto Take-Up Reel Platen gap/Paper number Ink cartridge status Roll paper counter Maintenance tank status 19
Introduction | 19 Control Panel Paper Ink light light Paper feed up button Print head cleaning button Paper release (ePlaten™) light and button power light and button OK button Menu button Ink open button Paper cut button Paper feed down button Pause/reset LCD light and button display Left arrow or paper source button LCD Display Roll paper margin Paper source Auto Take-Up Reel Platen gap/Paper number Ink cartridge status Roll paper counter Maintenance tank status 19
User Guide
Page 21
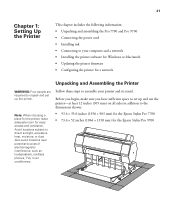
...8226; Unpacking and assembling the Pro 7700 and Pro 9700 • Connecting the power cord • Installing ink • Connecting to your printer and its stand. Avoid locations subject to the dimensions shown: • 53.4 × 35.6 inches (1356 × 903 mm) for the Epson Stylus Pro 7700 • 73.4 ×... heat, moisture, or dust. Note: When choosing a place for the printer, leave adequate room for the Epson Stylus Pro 9700 21 Also avoid locations near potential sources of electromagnetic interference, such as loudspeakers, cordless phones, TVs, or air conditioners.
...8226; Unpacking and assembling the Pro 7700 and Pro 9700 • Connecting the power cord • Installing ink • Connecting to your printer and its stand. Avoid locations subject to the dimensions shown: • 53.4 × 35.6 inches (1356 × 903 mm) for the Epson Stylus Pro 7700 • 73.4 ×... heat, moisture, or dust. Note: When choosing a place for the printer, leave adequate room for the Epson Stylus Pro 9700 21 Also avoid locations near potential sources of electromagnetic interference, such as loudspeakers, cordless phones, TVs, or air conditioners.
User Guide
Page 25
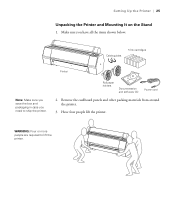
Roll paper holders Documentation and software CD Power cord 2. Setting Up the Printer | 25 Unpacking the Printer and Mounting It on the Stand 1. Have four people lift the printer. WARNING: Four or more people are required to ship the printer. Remove the cardboard panels and other packing materials from around the printer. 3. Make sure you have all the items shown below: Cable guides 5 Ink cartridges Printer Note: Make sure you save the box and packaging in case you need to lift the printer. 25
Roll paper holders Documentation and software CD Power cord 2. Setting Up the Printer | 25 Unpacking the Printer and Mounting It on the Stand 1. Have four people lift the printer. WARNING: Four or more people are required to ship the printer. Remove the cardboard panels and other packing materials from around the printer. 3. Make sure you have all the items shown below: Cable guides 5 Ink cartridges Printer Note: Make sure you save the box and packaging in case you need to lift the printer. 25
User Guide
Page 43
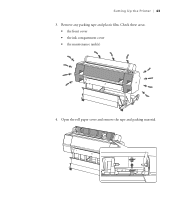
Open the roll paper cover and remove the tape and packing material. 43 Remove any packing tape and plastic film. Setting Up the Printer | 43 3. Check these areas: • the front cover • the ink compartment cover • the maintenance tank(s) 4.
Open the roll paper cover and remove the tape and packing material. 43 Remove any packing tape and plastic film. Setting Up the Printer | 43 3. Check these areas: • the front cover • the ink compartment cover • the maintenance tank(s) 4.
User Guide
Page 46
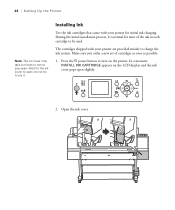
.... 1. do not try to pry it is normal for the ink cover to open . Make sure you order a new set of the ink in each cartridge to be used. Press the P power button to turn on the LCD display and the ink cover pops open slightly. 2. During the initial installation process, it... . In a moment, INSTALL INK CARTRIDGE appears on the printer. The cartridges shipped with your...
.... 1. do not try to pry it is normal for the ink cover to open . Make sure you order a new set of the ink in each cartridge to be used. Press the P power button to turn on the LCD display and the ink cover pops open slightly. 2. During the initial installation process, it... . In a moment, INSTALL INK CARTRIDGE appears on the printer. The cartridges shipped with your...
User Guide
Page 47
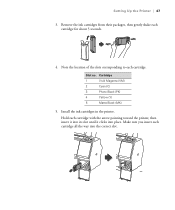
Cartridge 1 Vivid Magenta (VM) 2 Cyan (C) 3 Photo Black (PK) 4 Yellow (Y) 5 Matte Black (MK) 5. Hold each cartridge all the way into place. Install the ink cartridges in the printer. Slot no. Make sure you insert each cartridge with the arrow pointing toward the printer, then insert it into its slot until it clicks into the correct slot. 47 Setting Up the Printer | 47 3. Remove the ink cartridges from their packages, then gently shake each cartridge. Note the location of the slots corresponding to each cartridge for about 5 seconds. 4.
Cartridge 1 Vivid Magenta (VM) 2 Cyan (C) 3 Photo Black (PK) 4 Yellow (Y) 5 Matte Black (MK) 5. Hold each cartridge all the way into place. Install the ink cartridges in the printer. Slot no. Make sure you insert each cartridge with the arrow pointing toward the printer, then insert it into its slot until it clicks into the correct slot. 47 Setting Up the Printer | 47 3. Remove the ink cartridges from their packages, then gently shake each cartridge. Note the location of the slots corresponding to each cartridge for about 5 seconds. 4.

User Guide
Page 48
...computer are turned off the printer, remove the maintenance tank, or open the front cover or ink covers while the P power light is completed, you need a standard RJ-45 CAT-5 network cable. After ink charging is flashing, or you may damage the printer. 6. See page 57 for instructions....has the appropriate port and you need an RJ-45 CAT-5 crossover cable. 1. The printer begins charging the ink delivery system and the P power light flashes. After installing all 5 cartridges, close the ink cover. To connect directly to a network hub, you have a standard, shielded cable 10 feet (3 m) ...
...computer are turned off the printer, remove the maintenance tank, or open the front cover or ink covers while the P power light is completed, you need a standard RJ-45 CAT-5 network cable. After ink charging is flashing, or you may damage the printer. 6. See page 57 for instructions....has the appropriate port and you need an RJ-45 CAT-5 crossover cable. 1. The printer begins charging the ink delivery system and the P power light flashes. After installing all 5 cartridges, close the ink cover. To connect directly to a network hub, you have a standard, shielded cable 10 feet (3 m) ...
User Guide
Page 60
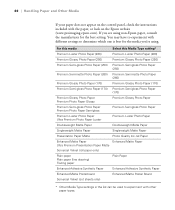
...paper does not appear on the control panel, check the instructions included with other paper types. 60 If you are using non-Epson paper, consult the manufacturer for the media you're using. For this media Select this Media Type setting* Premium Luster Photo ... Luster Premium Luster Photo Paper Doubleweight Matte Paper Doubleweight Matte Paper Singleweight Matte Paper Singleweight Matte Paper Presentation Paper Matte Photo Quality Ink Jet Paper Enhanced Matte Paper Enhanced Matte Paper Ultra Premium Presentation Paper Matte Somerset Velvet (roll paper only) Plain paper Plain...
...paper does not appear on the control panel, check the instructions included with other paper types. 60 If you are using non-Epson paper, consult the manufacturer for the media you're using. For this media Select this Media Type setting* Premium Luster Photo ... Luster Premium Luster Photo Paper Doubleweight Matte Paper Doubleweight Matte Paper Singleweight Matte Paper Singleweight Matte Paper Presentation Paper Matte Photo Quality Ink Jet Paper Enhanced Matte Paper Enhanced Matte Paper Ultra Premium Presentation Paper Matte Somerset Velvet (roll paper only) Plain paper Plain...
User Guide
Page 83
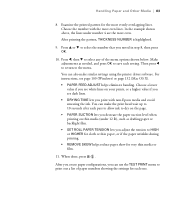
... HIGHER for cloth or thin paper, or if the paper wrinkles during printing. • REMOVE SKEW helps reduce paper skew for each pass to allow ink to the menu. Choose a lower value if you see page 100 (Windows) or page 132 (Mac OS X). • PAPER FEED ADJUST helps eliminate banding. For... after each one. 83 You can make similar settings using the printer driver software. Handling Paper and Other Media | 83 8. Choose the number with non-Epson media and avoid smearing the...
... HIGHER for cloth or thin paper, or if the paper wrinkles during printing. • REMOVE SKEW helps reduce paper skew for each pass to allow ink to the menu. Choose a lower value if you see page 100 (Windows) or page 132 (Mac OS X). • PAPER FEED ADJUST helps eliminate banding. For... after each one. 83 You can make similar settings using the printer driver software. Handling Paper and Other Media | 83 8. Choose the number with non-Epson media and avoid smearing the...
User Guide
Page 92
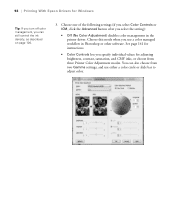
... Advanced button after you can also choose from three Printer Color Adjustment modes. You can still control the ink density, as described on page 100. 3. 92 | Printing With Epson Drivers for adjusting brightness, contrast, saturation, and CMY inks, or choose from two Gamma settings, and use a color managed workflow in the printer driver.
... Advanced button after you can also choose from three Printer Color Adjustment modes. You can still control the ink density, as described on page 100. 3. 92 | Printing With Epson Drivers for adjusting brightness, contrast, saturation, and CMY inks, or choose from two Gamma settings, and use a color managed workflow in the printer driver.

User Guide
Page 100
...Note: You may have the time, date, and other information about your ICC profile. 100 | Printing With Epson Drivers for example, when you want to have made using non-Epson media and you need to change the Color Density setting if your print settings, and print. Then, whenever you... print on the Main tab. Choosing Paper Configuration Options If you are using the printer's control panel. • Color Density lets you control the ink saturation level ...
...Note: You may have the time, date, and other information about your ICC profile. 100 | Printing With Epson Drivers for example, when you want to have made using non-Epson media and you need to change the Color Density setting if your print settings, and print. Then, whenever you... print on the Main tab. Choosing Paper Configuration Options If you are using the printer's control panel. • Color Density lets you control the ink saturation level ...

User Guide
Page 101
...setting for Windows | 101 • Drying Time per Page lets you print with non-Epson media and avoid smearing the ink. When you see white lines on your printouts when Auto is selected. 3. Printing With Epson Drivers for various paper thicknesses. • Roll Paper Back Tension lets you adjust the ...tension when printing on the page. • Drying Time per Print Head Pass lets you print with non-Epson media and avoid smearing the ink. • Paper Feed Adjustment helps reduce banding. Change the value if you find wrinkles on your prints, or a higher value ...
...setting for Windows | 101 • Drying Time per Page lets you print with non-Epson media and avoid smearing the ink. When you see white lines on your printouts when Auto is selected. 3. Printing With Epson Drivers for various paper thicknesses. • Roll Paper Back Tension lets you adjust the ...tension when printing on the page. • Drying Time per Print Head Pass lets you print with non-Epson media and avoid smearing the ink. • Paper Feed Adjustment helps reduce banding. Change the value if you find wrinkles on your prints, or a higher value ...


