
User Guide
Page 2
...Pro are trademarks; Epson disclaims any and all rights in any form or by any consumable products other printers. This information is not responsible for damages, losses, costs, or expenses incurred by Seiko Epson Corporation. © 2009 Epson America, Inc. 11/09 CPD- 27720 Epson is subject to strictly comply with these Epson printers...of this information as Original Epson Products or Epson Approved Products by purchaser or third parties as a result of: accident, misuse, or abuse of Seiko Epson Corporation. Trademarks Epson, Epson Stylus, UltraChrome, and MicroWeave are...
...Pro are trademarks; Epson disclaims any and all rights in any form or by any consumable products other printers. This information is not responsible for damages, losses, costs, or expenses incurred by Seiko Epson Corporation. © 2009 Epson America, Inc. 11/09 CPD- 27720 Epson is subject to strictly comply with these Epson printers...of this information as Original Epson Products or Epson Approved Products by purchaser or third parties as a result of: accident, misuse, or abuse of Seiko Epson Corporation. Trademarks Epson, Epson Stylus, UltraChrome, and MicroWeave are...
User Guide
Page 5
... 18 Control Panel 19 LCD Display 19 1 Setting Up the Printer Unpacking and Assembling the Printer 21 Unpacking and Assembling the Stand 22 Unpacking the Printer and Mounting It on the Stand 25 Attaching the Paper Basket (Epson Stylus Pro 7700 27 Attaching the Paper Basket (Epson Stylus Pro 9700 34 Completing Setup and Connecting the Power Cord 42 Installing...
... 18 Control Panel 19 LCD Display 19 1 Setting Up the Printer Unpacking and Assembling the Printer 21 Unpacking and Assembling the Stand 22 Unpacking the Printer and Mounting It on the Stand 25 Attaching the Paper Basket (Epson Stylus Pro 7700 27 Attaching the Paper Basket (Epson Stylus Pro 9700 34 Completing Setup and Connecting the Power Cord 42 Installing...
User Guide
Page 6
...the Platen Gap for Thick or Thin Paper 76 Using the Paper Basket 77 Catching Printouts in Front of the Printer 77 Catching Printouts Under the Printer 79 Storing the Paper Basket 81 Optimizing the Settings for Your Paper 82 Creating Paper Configurations 82 Printing Your ...Paper Configurations 84 Selecting Paper Configurations 84 3 Printing With Epson Drivers for Windows Sizing Images for Borderless Printing on Roll Paper 86 ...
...the Platen Gap for Thick or Thin Paper 76 Using the Paper Basket 77 Catching Printouts in Front of the Printer 77 Catching Printouts Under the Printer 79 Storing the Paper Basket 81 Optimizing the Settings for Your Paper 82 Creating Paper Configurations 82 Printing Your ...Paper Configurations 84 Selecting Paper Configurations 84 3 Printing With Epson Drivers for Windows Sizing Images for Borderless Printing on Roll Paper 86 ...
User Guide
Page 11
...to avoid bodily injury. For additional information, see the following: • The Quick Reference Guide provides a handy summary of your printer to keep it to your printer for easy reference. • The on-screen Network Guide on the CD-ROM provides instructions for daily use this book: WARNINGS...Please follow these guidelines as you have a problem. 11 Introduction This User's Guide provides important information on setting up and using the Epson printer drivers, and replacing ink cartridges. It also tells you how to get the most out of procedures for setting up and using your...
...to avoid bodily injury. For additional information, see the following: • The Quick Reference Guide provides a handy summary of your printer to keep it to your printer for easy reference. • The on-screen Network Guide on the CD-ROM provides instructions for daily use this book: WARNINGS...Please follow these guidelines as you have a problem. 11 Introduction This User's Guide provides important information on setting up and using the Epson printer drivers, and replacing ink cartridges. It also tells you how to get the most out of procedures for setting up and using your...

User Guide
Page 13
...;) CD-ROM or DVD drive for information on how to locate your local service provider. support website (www.epson.com/support) or Canadian support website (www.epson.ca/support). Introduction | 13 Where To Get Help You can download drivers, firmware, and documentation, and get... Category 5 compatible cable Macintosh System Requirements To use your printer in your service contract. If you do not have your service contract, please visit the Ricoh Americas Corporation website at http://www.ricoh-usa.com for installing the printer software • For USB connection: a Windows-compliant USB...
...;) CD-ROM or DVD drive for information on how to locate your local service provider. support website (www.epson.com/support) or Canadian support website (www.epson.ca/support). Introduction | 13 Where To Get Help You can download drivers, firmware, and documentation, and get... Category 5 compatible cable Macintosh System Requirements To use your printer in your service contract. If you do not have your service contract, please visit the Ricoh Americas Corporation website at http://www.ricoh-usa.com for installing the printer software • For USB connection: a Windows-compliant USB...
User Guide
Page 15
... following safety instructions to make sure you have four people lift the printer. (See page 25.) • When setting up the printer, make sure you use the equipment safely and effectively. • The Epson Stylus Pro 7700 weighs about 186 lb (84.5 kg) and the Epson Stylus Pro 9700 weighs about 256 lb (116 kg) without the stand, paper...
... following safety instructions to make sure you have four people lift the printer. (See page 25.) • When setting up the printer, make sure you use the equipment safely and effectively. • The Epson Stylus Pro 7700 weighs about 186 lb (84.5 kg) and the Epson Stylus Pro 9700 weighs about 256 lb (116 kg) without the stand, paper...
User Guide
Page 18
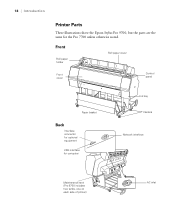
Front Roll paper holder Roll paper cover Front cover Control panel Paper basket Back Interface connector for optional equipment USB interface for the Pro 7700 unless otherwise noted. 18 | Introduction Printer Parts These illustrations show the Epson Stylus Pro 9700, but the parts are the same for computer Ink bay Casters Network interface Maintenance tank (Pro 9700 includes two tanks, one on each side of printer) 18 AC inlet
Front Roll paper holder Roll paper cover Front cover Control panel Paper basket Back Interface connector for optional equipment USB interface for the Pro 7700 unless otherwise noted. 18 | Introduction Printer Parts These illustrations show the Epson Stylus Pro 9700, but the parts are the same for computer Ink bay Casters Network interface Maintenance tank (Pro 9700 includes two tanks, one on each side of printer) 18 AC inlet
User Guide
Page 21
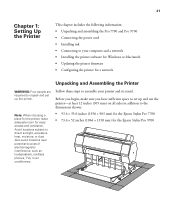
... required to unpack and set up the printer. Note: When choosing a place for the printer, leave adequate room for the Epson Stylus Pro 9700 21 21 Chapter 1: Setting Up the Printer This chapter includes the following information: • Unpacking and assembling the Pro 7700 and Pro 9700 • Connecting the power cord ...sure you have sufficient space to set up and use the printer-at least 12 inches (305 mm) on all sides in addition to the dimensions shown: • 53.4 × 35.6 inches (1356 × 903 mm) for the Epson Stylus Pro 7700 • 73.4 × 52 inches (1864 ×...
... required to unpack and set up the printer. Note: When choosing a place for the printer, leave adequate room for the Epson Stylus Pro 9700 21 21 Chapter 1: Setting Up the Printer This chapter includes the following information: • Unpacking and assembling the Pro 7700 and Pro 9700 • Connecting the power cord ...sure you have sufficient space to set up and use the printer-at least 12 inches (305 mm) on all sides in addition to the dimensions shown: • 53.4 × 35.6 inches (1356 × 903 mm) for the Epson Stylus Pro 7700 • 73.4 × 52 inches (1864 ×...
User Guide
Page 22
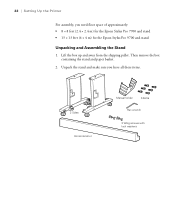
Lift the box up and away from the shipping pallet. Then remove the box containing the stand and paper basket. 2. Unpack the stand and make sure you need floor space of approximately: • 8 × 8 feet (2.4 × 2.4 m) for the Epson Stylus Pro 7700 and stand • 13 × 13 feet (4 × 4 m) for the Epson Stylus Pro 9700 and stand Unpacking and Assembling the Stand 1. 22 | Setting Up the Printer For assembly, you have all these items. 2 Sides Horizontal strut Manual holder 6 Bolts Hex wrench 2 Wing screws with lock washers 22
Lift the box up and away from the shipping pallet. Then remove the box containing the stand and paper basket. 2. Unpack the stand and make sure you need floor space of approximately: • 8 × 8 feet (2.4 × 2.4 m) for the Epson Stylus Pro 7700 and stand • 13 × 13 feet (4 × 4 m) for the Epson Stylus Pro 9700 and stand Unpacking and Assembling the Stand 1. 22 | Setting Up the Printer For assembly, you have all these items. 2 Sides Horizontal strut Manual holder 6 Bolts Hex wrench 2 Wing screws with lock washers 22
User Guide
Page 27
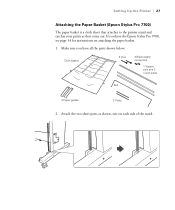
Attach the two short posts as they come out. Setting Up the Printer | 27 Attaching the Paper Basket (Epson Stylus Pro 7700) The paper basket is a cloth sheet that attaches to the printer stand and catches your prints as shown, one on attaching the paper basket. 1. If you have the Epson Stylus Pro 9700, see page 34 for instructions on each side of the stand. 27 Make sure you have all the parts shown below: Cloth basket 2 Pins 2 Black plastic connectors 1 Square pole and 2 round poles Rod 2 Paper guides 2 Posts 2.
Attach the two short posts as they come out. Setting Up the Printer | 27 Attaching the Paper Basket (Epson Stylus Pro 7700) The paper basket is a cloth sheet that attaches to the printer stand and catches your prints as shown, one on attaching the paper basket. 1. If you have the Epson Stylus Pro 9700, see page 34 for instructions on each side of the stand. 27 Make sure you have all the parts shown below: Cloth basket 2 Pins 2 Black plastic connectors 1 Square pole and 2 round poles Rod 2 Paper guides 2 Posts 2.
User Guide
Page 34
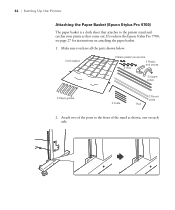
34 | Setting Up the Printer Attaching the Paper Basket (Epson Stylus Pro 9700) The paper basket is a cloth sheet that attaches to the front of the stand as they come out. Make sure you have all the parts shown below. Cloth basket 2 Black plastic connectors 4 Pins 2 Plastic end pieces 3 Square poles 5 Paper guides 4 Posts 2 Round poles Rod 2. Attach two of the posts to the printer stand and catches your prints as shown, one on attaching the paper basket. 1. If you have the Epson Stylus Pro 7700, see page 27 for instructions on each side. 34
34 | Setting Up the Printer Attaching the Paper Basket (Epson Stylus Pro 9700) The paper basket is a cloth sheet that attaches to the front of the stand as they come out. Make sure you have all the parts shown below. Cloth basket 2 Black plastic connectors 4 Pins 2 Plastic end pieces 3 Square poles 5 Paper guides 4 Posts 2 Round poles Rod 2. Attach two of the posts to the printer stand and catches your prints as shown, one on attaching the paper basket. 1. If you have the Epson Stylus Pro 7700, see page 27 for instructions on each side. 34
User Guide
Page 56
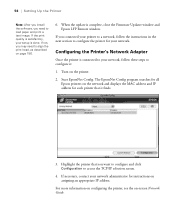
... section to load paper and print a test image. Start EpsonNet Config. The EpsonNet Config program searches for all Epson printers on the network and displays the MAC address and IP address for instructions on the printer. 2. Turn on assigning an appropriate IP address. If the print quality is satisfactory, your setup is complete...
... section to load paper and print a test image. Start EpsonNet Config. The EpsonNet Config program searches for all Epson printers on the network and displays the MAC address and IP address for instructions on the printer. 2. Turn on assigning an appropriate IP address. If the print quality is satisfactory, your setup is complete...
User Guide
Page 82
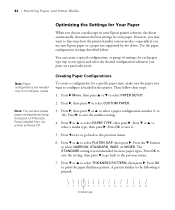
... You can create a special configuration, or group of settings, for each paper type (up to the following is loaded in your Epson printer software, the driver automatically determines the best settings for your paper. A pattern similar to ten types) and select the desired configuration ...whenever you choose a media type in the printer. Press d or u to select CUSTOM PAPER. 3. Press r, then press d to select THICKNESS PATTERN, then press r. Press d or u to...
... You can create a special configuration, or group of settings, for each paper type (up to the following is loaded in your Epson printer software, the driver automatically determines the best settings for your paper. A pattern similar to ten types) and select the desired configuration ...whenever you choose a media type in the printer. Press d or u to select CUSTOM PAPER. 3. Press r, then press d to select THICKNESS PATTERN, then press r. Press d or u to...
User Guide
Page 85
...following information: • Sizing images for borderless printing on page 86 to the right folder. 85 Chapter 3: Printing With Epson Drivers for Windows Your Epson Stylus Pro 7700 or Pro 9700 comes with drivers and utilities that may become available. You can create your own profiles if you have the required ...the color management features in Adobe Photoshop or other applications, or in the standard folder for color photos. When you install the Epson printer driver, the ready-made profiles are included, so you want to set basic printing properties. Make sure any profiles you can have...
...following information: • Sizing images for borderless printing on page 86 to the right folder. 85 Chapter 3: Printing With Epson Drivers for Windows Your Epson Stylus Pro 7700 or Pro 9700 comes with drivers and utilities that may become available. You can create your own profiles if you have the required ...the color management features in Adobe Photoshop or other applications, or in the standard folder for color photos. When you install the Epson printer driver, the ready-made profiles are included, so you want to set basic printing properties. Make sure any profiles you can have...
User Guide
Page 111
... features in Adobe® Photoshop® or other applications, or in the Printer Setup Utility. Tip: Check the Epson Pro Imaging website at www.proimaging.epson. ICC profiles for ColorSync® are located in the standard folder for Macintosh Your Epson Stylus Pro 7700 or Pro 9700 comes with drivers and utilities that may become available. You can create...
... features in Adobe® Photoshop® or other applications, or in the Printer Setup Utility. Tip: Check the Epson Pro Imaging website at www.proimaging.epson. ICC profiles for ColorSync® are located in the standard folder for Macintosh Your Epson Stylus Pro 7700 or Pro 9700 comes with drivers and utilities that may become available. You can create...

User Guide
Page 151
... folder. Press to access the printer utilities: • Windows 7 and Windows Vista: Click , select Control Panel, select Hardware and Sound, and click Printers. Click the Utility tab. • Mac OS X: Open the EPSON Printer Utility3 in your printer to run maintenance utilities by clicking... the Utility button in the printer and the level of the following to exit the menu. Click...
... folder. Press to access the printer utilities: • Windows 7 and Windows Vista: Click , select Control Panel, select Hardware and Sound, and click Printers. Click the Utility tab. • Mac OS X: Open the EPSON Printer Utility3 in your printer to run maintenance utilities by clicking... the Utility button in the printer and the level of the following to exit the menu. Click...

User Guide
Page 153
... Caution: Don't run a power cleaning cycle as described on the screen. 4. Click the Utility tab. • Mac OS X: Open the EPSON Printer Utility3 in the printer. • If any dots or segments are missing or deflected, as shown below, run a cleaning cycle as shown below, the print head ...; If the nozzles are still clogged after three cleaning cycles, run a cleaning cycle while thick media is loaded in your printer and click OK. Double-click Printers and Faxes. Select the Nozzle Check icon and follow the instructions on page 155. 153 Then print another nozzle check pattern...
... Caution: Don't run a power cleaning cycle as described on the screen. 4. Click the Utility tab. • Mac OS X: Open the EPSON Printer Utility3 in the printer. • If any dots or segments are missing or deflected, as shown below, run a cleaning cycle as shown below, the print head ...; If the nozzles are still clogged after three cleaning cycles, run a cleaning cycle while thick media is loaded in your printer and click OK. Double-click Printers and Faxes. Select the Nozzle Check icon and follow the instructions on page 155. 153 Then print another nozzle check pattern...
User Guide
Page 175
...most common problems, check the messages and lights on page 13. 175 See page 151 for more information. • If you're using the Epson printer driver and Status Monitor utility, check your software for possible solutions. • If none of ways to help you diagnose problems: • To... identify the most likely solutions until the problem is caused by the printer itself, print a status sheet from the control panel. This chapter provides instructions for the following the guidelines in this chapter or check the ...
...most common problems, check the messages and lights on page 13. 175 See page 151 for more information. • If you're using the Epson printer driver and Status Monitor utility, check your software for possible solutions. • If none of ways to help you diagnose problems: • To... identify the most likely solutions until the problem is caused by the printer itself, print a status sheet from the control panel. This chapter provides instructions for the following the guidelines in this chapter or check the ...

User Guide
Page 194
... the following: Windows 7 & Windows Vista: Click > Control Panel > Uninstall a program. Follow the on page 51 to uninstall your Macintosh. Select EPSON Printer Software in the program list and click Change/Remove. 2. Windows 1. If you want to reinstall your printer software, restart your software. 3. Open the Applications folder, then the Utilities folder. 2. Double-click...
... the following: Windows 7 & Windows Vista: Click > Control Panel > Uninstall a program. Follow the on page 51 to uninstall your Macintosh. Select EPSON Printer Software in the program list and click Change/Remove. 2. Windows 1. If you want to reinstall your printer software, restart your software. 3. Open the Applications folder, then the Utilities folder. 2. Double-click...
Quick Reference Guide
Page 5
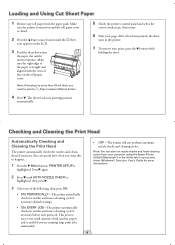
... of ink (and no paper) and is highlighted. Checking and Cleaning the Print Head Automatically Checking and Cleaning the Print Head The printer automatically checks the nozzles and cleans them if necessary. Note: You can specify how often you are running large print jobs unattended. ...Loading and Using Cut Sheet Paper 1 Remove any roll paper from your computer using the Epson Printer Utility3 (Macintosh®) or the Utility tab in the printer. 7 To remove your page. After it meets resistance. PRINTER SETUP is useful if you want this to use the Paper release (ePlaten) button. ...
... of ink (and no paper) and is highlighted. Checking and Cleaning the Print Head Automatically Checking and Cleaning the Print Head The printer automatically checks the nozzles and cleans them if necessary. Note: You can specify how often you are running large print jobs unattended. ...Loading and Using Cut Sheet Paper 1 Remove any roll paper from your computer using the Epson Printer Utility3 (Macintosh®) or the Utility tab in the printer. 7 To remove your page. After it meets resistance. PRINTER SETUP is useful if you want this to use the Paper release (ePlaten) button. ...


