User Guide
Page 8
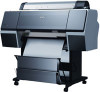
... 155 Aligning the Print Head 156 Replacing Ink Cartridges 157 Changing the Date and Time 161 Using Maintenance Mode 161 Replacing the Paper Cutter 162 Removing the Old Cutter 162 Installing the New Cutter 164 Replacing the Maintenance Tank 166 Cleaning the Printer 168 Transporting or Storing the Printer 170 Preparing the Printer for Shipment 170 Moving the Printer on the Stand 172 Setting Up the Printer After Transportation 173 7 Solving Problems Diagnosing Problems 175 Checking Error Messages and Lights 176 Auto...
... 155 Aligning the Print Head 156 Replacing Ink Cartridges 157 Changing the Date and Time 161 Using Maintenance Mode 161 Replacing the Paper Cutter 162 Removing the Old Cutter 162 Installing the New Cutter 164 Replacing the Maintenance Tank 166 Cleaning the Printer 168 Transporting or Storing the Printer 170 Preparing the Printer for Shipment 170 Moving the Printer on the Stand 172 Setting Up the Printer After Transportation 173 7 Solving Problems Diagnosing Problems 175 Checking Error Messages and Lights 176 Auto...
User Guide
Page 12
... Reel System (Pro 9700 only); sales) or www.epson.ca (Canadian sales). 12 12 | Introduction Tip: Check the Epson Pro Imaging website at www.proimaging.epson.com (U.S. Options and Accessories Your Epson Stylus® Pro 7700/9700 offers these user-replaceable items: Consumables and user-replaceable parts Part Replacement maintenance tank (see page 166) Replacement paper cutter (see page 203 for instructions on using this option Part number C12C815321 In addition, you can purchase online at www.proimaging...
... Reel System (Pro 9700 only); sales) or www.epson.ca (Canadian sales). 12 12 | Introduction Tip: Check the Epson Pro Imaging website at www.proimaging.epson.com (U.S. Options and Accessories Your Epson Stylus® Pro 7700/9700 offers these user-replaceable items: Consumables and user-replaceable parts Part Replacement maintenance tank (see page 166) Replacement paper cutter (see page 203 for instructions on using this option Part number C12C815321 In addition, you can purchase online at www.proimaging...
User Guide
Page 15
... the printer. (See page 25.) • When setting up the printer, make sure you use the equipment safely and effectively. • The Epson Stylus Pro 7700 weighs about 186 lb (84.5 kg) and the Epson Stylus Pro 9700 weighs about 256 lb (116 kg) without the stand, paper basket, ink, or paper. Introduction | 15 Important Safety Instructions Before using electrical outlets controlled by wall switches or timers. • Use only the power...
... the printer. (See page 25.) • When setting up the printer, make sure you use the equipment safely and effectively. • The Epson Stylus Pro 7700 weighs about 186 lb (84.5 kg) and the Epson Stylus Pro 9700 weighs about 256 lb (116 kg) without the stand, paper basket, ink, or paper. Introduction | 15 Important Safety Instructions Before using electrical outlets controlled by wall switches or timers. • Use only the power...
User Guide
Page 85
... black and white photo settings • Choosing paper configuration options • Saving, exporting, and importing groups of settings • Managing print jobs 85 Tip: Check the Epson Pro Imaging website at www.proimaging.epson. 85 Chapter 3: Printing With Epson Drivers for instructions. A color-managed workflow using Photoshop and a color-calibrated monitor will give you need to size your printer for instructions. See page 141 for color photos. This chapter includes the following information: • Sizing images for borderless printing on page...
... black and white photo settings • Choosing paper configuration options • Saving, exporting, and importing groups of settings • Managing print jobs 85 Tip: Check the Epson Pro Imaging website at www.proimaging.epson. 85 Chapter 3: Printing With Epson Drivers for instructions. A color-managed workflow using Photoshop and a color-calibrated monitor will give you need to size your printer for instructions. See page 141 for color photos. This chapter includes the following information: • Sizing images for borderless printing on page...
User Guide
Page 111
... page setup settings for instructions. 111 Chapter 4: Printing With Epson Drivers for ColorSync® are included, so you can use are located in the Printer Setup Utility. ICC profiles for Macintosh Your Epson Stylus Pro 7700 or Pro 9700 comes with drivers and utilities that may become available. Before you print, make sure you plan on printing borderless images on roll paper, check the guidelines on installing and configuring the printer driver, see page 51. If you also need...
... page setup settings for instructions. 111 Chapter 4: Printing With Epson Drivers for ColorSync® are included, so you can use are located in the Printer Setup Utility. ICC profiles for Macintosh Your Epson Stylus Pro 7700 or Pro 9700 comes with drivers and utilities that may become available. Before you print, make sure you plan on printing borderless images on roll paper, check the guidelines on installing and configuring the printer driver, see page 51. If you also need...
User Guide
Page 144
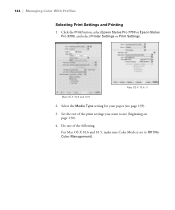
Mac OS X 10.4.11 Mac OS X 10.6 and 10.5 2. Click the Print button, select Epson Stylus Pro 7700 or Epson Stylus Pro 9700, and select Printer Settings or Print Settings. Set the rest of the following: For Mac OS X 10.6 and 10.5, make sure Color Mode is set to use (beginning on page 130). 4. Do one of the print settings you want to Off (No Color Management). 144 Select the Media Type setting for your paper (see page 139). 3. 144 | Managing Color With Profiles Selecting Print Settings and Printing 1.
Mac OS X 10.4.11 Mac OS X 10.6 and 10.5 2. Click the Print button, select Epson Stylus Pro 7700 or Epson Stylus Pro 9700, and select Printer Settings or Print Settings. Set the rest of the following: For Mac OS X 10.6 and 10.5, make sure Color Mode is set to use (beginning on page 130). 4. Do one of the print settings you want to Off (No Color Management). 144 Select the Media Type setting for your paper (see page 139). 3. 144 | Managing Color With Profiles Selecting Print Settings and Printing 1.
User Guide
Page 152
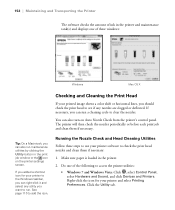
... Head Cleaning Utilities Follow these windows: Windows Mac OS X Checking and Cleaning the Print Head If your printer to the Windows taskbar, you can run a cleaning cycle to clear the nozzles. You can also run maintenance utilities by clicking the Utility button in the print job window or the icon on Auto Nozzle Check from the printer's control panel. Make sure paper is loaded in the printer. 2. Do one of the following to access the printer utilities: • Windows 7 and Windows...
... Head Cleaning Utilities Follow these windows: Windows Mac OS X Checking and Cleaning the Print Head If your printer to the Windows taskbar, you can run a cleaning cycle to clear the nozzles. You can also run maintenance utilities by clicking the Utility button in the print job window or the icon on Auto Nozzle Check from the printer's control panel. Make sure paper is loaded in the printer. 2. Do one of the following to access the printer utilities: • Windows 7 and Windows...
User Guide
Page 158
... color of opening the package. Open the ink cover all the way. Yields vary considerably based on images printed, print settings, paper type, frequency of use of 150, 350, and 700 ml cartridges. Use the following Epson UltraChrome® with the printer turned off. 158 sales), www.epson.ca (Canadian sales), or call 800-GO-EPSON (800-463-7766). When the red B Ink Check light is flashing and INK LOW appears on . You must replace the cartridge...
... color of opening the package. Open the ink cover all the way. Yields vary considerably based on images printed, print settings, paper type, frequency of use of 150, 350, and 700 ml cartridges. Use the following Epson UltraChrome® with the printer turned off. 158 sales), www.epson.ca (Canadian sales), or call 800-GO-EPSON (800-463-7766). When the red B Ink Check light is flashing and INK LOW appears on . You must replace the cartridge...
User Guide
Page 166
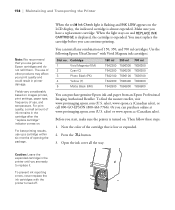
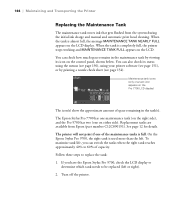
...). 2. Replacement tanks are available from the system during the initial ink charge and manual and automatic print head cleaning. On the Epson Stylus Pro 9700, the right tank is completely full, the printer stops working and MAINTENANCE TANK FULL appears on the control panel, shown below. The Epson Stylus Pro 7700 has one maintenance tank (on the right side), and the Pro 9700 has two (one tank icon appears on the Pro 7700 LCD display...
...). 2. Replacement tanks are available from the system during the initial ink charge and manual and automatic print head cleaning. On the Epson Stylus Pro 9700, the right tank is completely full, the printer stops working and MAINTENANCE TANK FULL appears on the control panel, shown below. The Epson Stylus Pro 7700 has one maintenance tank (on the right side), and the Pro 9700 has two (one tank icon appears on the Pro 7700 LCD display...

User Guide
Page 168
... printer and wait until the paper is clean. 2. Cleaning the Printer To keep your printer working at its best, clean it if it with lubricants; Press d several times until all the lights are soiled by ink on the roller, load inexpensive roll paper and press d to feed the paper without printing on the printer mechanism or electronic components. Open the front cover and use canned air or a soft lint-free cloth to carefully clean...
... printer and wait until the paper is clean. 2. Cleaning the Printer To keep your printer working at its best, clean it if it with lubricants; Press d several times until all the lights are soiled by ink on the roller, load inexpensive roll paper and press d to feed the paper without printing on the printer mechanism or electronic components. Open the front cover and use canned air or a soft lint-free cloth to carefully clean...
User Guide
Page 176
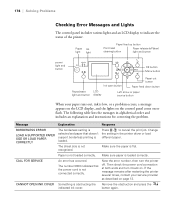
...lists the messages in the printer driver or load different paper. The sheet size is not loaded correctly. Change the setting in alphabetical order and includes an explanation and instructions for correcting the problem. Note the error number, then turn it back on. Remove the obstruction and press the button again. 176 Press to indicate the status of the printer: Paper Ink light light Paper feed up button Print head cleaning button Paper release (ePlaten) light and button power light and button OK button Menu button Pause/reset light and button Ink open button Paper cut button...
...lists the messages in the printer driver or load different paper. The sheet size is not loaded correctly. Change the setting in alphabetical order and includes an explanation and instructions for correcting the problem. Note the error number, then turn it back on. Remove the obstruction and press the button again. 176 Press to indicate the status of the printer: Paper Ink light light Paper feed up button Print head cleaning button Paper release (ePlaten) light and button power light and button OK button Menu button Pause/reset light and button Ink open button Paper cut button...
User Guide
Page 177
...REPLACING THE CUTTER UNIT FRONT COVER OPEN CLOSE FRONT COVER F/W INSTALL ERROR UPDATE FAILED RESTART THE PRINTER INK CARTRIDGE INK LOW REPLACE INK CARTRIDGE Explanation Response Head cleaning did not clear the nozzles. You may be using the wrong printer driver. Make sure you installed the correct driver for your printer. Replace the paper cutter; If cleaning doesn't start, cancel printing from the computer. Firmware update failed. Replace the ink cartridge; Press to cancel the print job and reset the printer. Press to clear the error and run the head...
...REPLACING THE CUTTER UNIT FRONT COVER OPEN CLOSE FRONT COVER F/W INSTALL ERROR UPDATE FAILED RESTART THE PRINTER INK CARTRIDGE INK LOW REPLACE INK CARTRIDGE Explanation Response Head cleaning did not clear the nozzles. You may be using the wrong printer driver. Make sure you installed the correct driver for your printer. Replace the paper cutter; If cleaning doesn't start, cancel printing from the computer. Firmware update failed. Replace the ink cartridge; Press to cancel the print job and reset the printer. Press to clear the error and run the head...

User Guide
Page 178
... genuine Epson ink cartridge; see page 166. 178 INK TOO LOW TO CLEAN REPLACE INK CARTRIDGE Not enough ink for printing. For the Pro 9700, note which tank needs replacement; see page 157. Select DECLINE and replace the ink cartridge with a genuine Epson ink cartridge. CONTINUE? error remains, replace the cartridge. INK CARTRIDGE ERROR PLEASE INSTALL THE CORRECT CARTRIDGE You tried to be Note the code number and contact your replaced soon. Close the cover. Print quality may be used with a genuine installed. see page 157. MAINTENANCE REQUEST A printer part...
... genuine Epson ink cartridge; see page 166. 178 INK TOO LOW TO CLEAN REPLACE INK CARTRIDGE Not enough ink for printing. For the Pro 9700, note which tank needs replacement; see page 157. Select DECLINE and replace the ink cartridge with a genuine Epson ink cartridge. CONTINUE? error remains, replace the cartridge. INK CARTRIDGE ERROR PLEASE INSTALL THE CORRECT CARTRIDGE You tried to be Note the code number and contact your replaced soon. Close the cover. Print quality may be used with a genuine installed. see page 157. MAINTENANCE REQUEST A printer part...

User Guide
Page 183
... advanced media control settings (page 119 for Mac OS X 10.6 & 10.5) or paper configuration settings (page 100 for Windows or page 133 for instructions. ◗ Align the print head; see if the RIP provides a method for instructions. ◗ Make sure the Media Type setting in the following table. Your print has vertical banding. See page 82. ◗ Turn off the High Speed setting. See page 108 for adjusting the paper feed. Check these suggestions help, try the solutions in the printer software...
... advanced media control settings (page 119 for Mac OS X 10.6 & 10.5) or paper configuration settings (page 100 for Windows or page 133 for instructions. ◗ Align the print head; see if the RIP provides a method for instructions. ◗ Make sure the Media Type setting in the following table. Your print has vertical banding. See page 82. ◗ Turn off the High Speed setting. See page 108 for adjusting the paper feed. Check these suggestions help, try the solutions in the printer software...

User Guide
Page 184
... ink indicators and light, and replace ink cartridges if your application or printer software are incorrect or missing. 184 | Solving Problems Problem Your print is face-up . ◗ Run a nozzle check and cleaning cycle; See page 152 for instructions. ◗ Align the print head, as described on page 157. ◗ Run a nozzle check and cleaning cycle. See page 82. ◗ Make sure the Media Type setting in the printer software is correct. ◗ Adjust the Color Density setting in the printer software...
... ink indicators and light, and replace ink cartridges if your application or printer software are incorrect or missing. 184 | Solving Problems Problem Your print is face-up . ◗ Run a nozzle check and cleaning cycle; See page 152 for instructions. ◗ Align the print head, as described on page 157. ◗ Run a nozzle check and cleaning cycle. See page 82. ◗ Make sure the Media Type setting in the printer software is correct. ◗ Adjust the Color Density setting in the printer software...

User Guide
Page 185
...-Epson media, you replace ink cartridges with a custom paper configuration, be sure to return the setting to adjust the paper thickness setting, drying time, or color density. See page 76 for Windows) to choose the correct setting. Use your printer software (page 119 for Mac OS X 10.6 & 10.5 or page 133 for Mac OS X 10.4.11or page 101 for instructions. ◗ Make sure the Media Type setting in the printer software is correct. ◗ Run a nozzle check and cleaning cycle (see page 152). ◗ Check...
...-Epson media, you replace ink cartridges with a custom paper configuration, be sure to return the setting to adjust the paper thickness setting, drying time, or color density. See page 76 for Windows) to choose the correct setting. Use your printer software (page 119 for Mac OS X 10.6 & 10.5 or page 133 for Mac OS X 10.4.11or page 101 for instructions. ◗ Make sure the Media Type setting in the printer software is correct. ◗ Run a nozzle check and cleaning cycle (see page 152). ◗ Check...

User Guide
Page 188
... printer. The printer continues to feed ◗ Press the Pause/reset button on page 156. ◗ Run a nozzle check and cleaning cycle; Follow the instructions on page 162 to a different network segment. 188 see page 152. cancelled a job. ◗ Make sure the paper source is less traffic on the network, or move the printer to replace the cutter. ◗ Make sure appears on the High Speed setting. Color images print in black only. ◗ Make...
... printer. The printer continues to feed ◗ Press the Pause/reset button on page 156. ◗ Run a nozzle check and cleaning cycle; Follow the instructions on page 162 to a different network segment. 188 see page 152. cancelled a job. ◗ Make sure the paper source is less traffic on the network, or move the printer to replace the cutter. ◗ Make sure appears on the High Speed setting. Color images print in black only. ◗ Make...
User Guide
Page 193
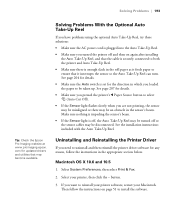
... the instructions on again after installing the Auto Take-Up Reel, and that the cable is securely connected to both the printer and Auto Take-Up Reel. • Make sure there is set for the direction in the roll paper as it feeds paper to ensure that may be taken up. Solving Problems | 193 Tip: Check the Epson Pro Imaging website at www.proimaging.epson. button. 3. If you turned the printer off...
... the instructions on again after installing the Auto Take-Up Reel, and that the cable is securely connected to both the printer and Auto Take-Up Reel. • Make sure there is set for the direction in the roll paper as it feeds paper to ensure that may be taken up. Solving Problems | 193 Tip: Check the Epson Pro Imaging website at www.proimaging.epson. button. 3. If you turned the printer off...
User Guide
Page 201
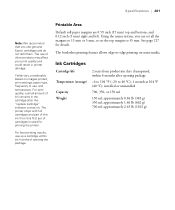
.... Yields vary considerably based on images printed, print settings, paper type, frequency of other products may affect your print quality and could result in the cartridge after opening the package. The printer ships with full cartridges and part of cartridges is used for details. Using the menu system, you use up a cartridge within 6 months after the "replace cartridge" indicator comes on some media. The borderless printing feature allows edge-to 40 °...
.... Yields vary considerably based on images printed, print settings, paper type, frequency of other products may affect your print quality and could result in the cartridge after opening the package. The printer ships with full cartridges and part of cartridges is used for details. Using the menu system, you use up a cartridge within 6 months after the "replace cartridge" indicator comes on some media. The borderless printing feature allows edge-to 40 °...
Quick Reference Guide
Page 10
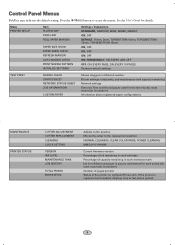
... PAGES Restores default settings TEST PRINT NOZZLE CHECK STATUS SHEET NETWORK STATUS SHEET JOB INFORMATION CUSTOM PAPER Shows clogged or deflected nozzles Printer settings, total prints, and maintenance tank capacity remaining Network settings Date and Time and Ink and paper used for each maintance tank Ink in milliliters and paper in each saved job; most recent job is number 0 Information about registered paper configurations MAINTENANCE PRINTER STATUS CUTTER ADJUSTMENT CUTTER REPLACEMENT CLEANING CLOCK SETTING VERSION INK LEVEL MAINTENANCE TANK JOB HISTORY TOTAL PRINTS EDM STATUS...
... PAGES Restores default settings TEST PRINT NOZZLE CHECK STATUS SHEET NETWORK STATUS SHEET JOB INFORMATION CUSTOM PAPER Shows clogged or deflected nozzles Printer settings, total prints, and maintenance tank capacity remaining Network settings Date and Time and Ink and paper used for each maintance tank Ink in milliliters and paper in each saved job; most recent job is number 0 Information about registered paper configurations MAINTENANCE PRINTER STATUS CUTTER ADJUSTMENT CUTTER REPLACEMENT CLEANING CLOCK SETTING VERSION INK LEVEL MAINTENANCE TANK JOB HISTORY TOTAL PRINTS EDM STATUS...

