Quick Guide
Page 16
... press the [OK] key. When all originals are scanned. CMF141 Depending on the machine's settings, you can change automatically according to the information registered for a specific entry by pressing the [ ][ ] keys to search for that destination in the Address Book. If necessary, you may see this step until all originals have...
... press the [OK] key. When all originals are scanned. CMF141 Depending on the machine's settings, you can change automatically according to the information registered for a specific entry by pressing the [ ][ ] keys to search for that destination in the Address Book. If necessary, you may see this step until all originals have...

Quick Guide
Page 26
... flash disk that appear differently depending on page 40. • Check the originals are suitable for the document differs from the ARDF or ADF" on a specific situation, such as paper sizes, paper types, or tray names. Press [FormFeed] to begin printing, or press [JobReset] to cancel the job. Dest. or write...
... flash disk that appear differently depending on page 40. • Check the originals are suitable for the document differs from the ARDF or ADF" on a specific situation, such as paper sizes, paper types, or tray names. Press [FormFeed] to begin printing, or press [JobReset] to cancel the job. Dest. or write...
Quick Guide
Page 54
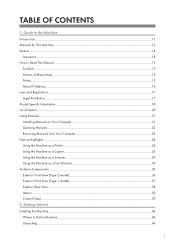
... Read This Manual...15 Symbols...15 Names of Major Items...15 Notes...15 About IP Address...16 Laws and Regulations...17 Legal Prohibition...17 Model-Specific Information...18 List of Option...20 Using Manuals...21 Installing Manuals on Your Computer...21 Opening Manuals...22 Removing Manuals from Your Computer 23 Feature...
... Read This Manual...15 Symbols...15 Names of Major Items...15 Notes...15 About IP Address...16 Laws and Regulations...17 Legal Prohibition...17 Model-Specific Information...18 List of Option...20 Using Manuals...21 Installing Manuals on Your Computer...21 Opening Manuals...22 Removing Manuals from Your Computer 23 Feature...
Quick Guide
Page 55
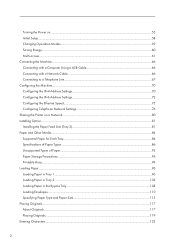
... Printer on a Network...80 Installing Option...81 Installing the Paper Feed Unit (Tray 2)...81 Paper and Other Media...84 Supported Paper for Each Tray...84 Specifications of Paper Types...86 Unsupported Types of Paper...93 Paper Storage Precautions...94 Printable Area...94 Loading Paper...96 Loading Paper in Tray 1...96 Loading...
... Printer on a Network...80 Installing Option...81 Installing the Paper Feed Unit (Tray 2)...81 Paper and Other Media...84 Supported Paper for Each Tray...84 Specifications of Paper Types...86 Unsupported Types of Paper...93 Paper Storage Precautions...94 Printable Area...94 Loading Paper...96 Loading Paper in Tray 1...96 Loading...

Quick Guide
Page 62
When LDAP Authentication is Specified 444 Specifying the LDAP Address Search Conditions 446 Specifications of the Machine...449 General Function Specifications...449 Printer Function Specifications...451 Copier Function Specifications...452 Scanner Function Specifications...452 Fax Function Specifications...454 Specifications of Options...457 Paper Feed Unit TK1080...457 Electromagnetic Interference...458 Copyright Information about Installed Applications 459 expat...459 JPEG LIBRARY...459 OpenLDAP 2.1...459 OpenSSL 0.9.8g...460 Trademarks...463 INDEX...465 9
When LDAP Authentication is Specified 444 Specifying the LDAP Address Search Conditions 446 Specifications of the Machine...449 General Function Specifications...449 Printer Function Specifications...451 Copier Function Specifications...452 Scanner Function Specifications...452 Fax Function Specifications...454 Specifications of Options...457 Paper Feed Unit TK1080...457 Electromagnetic Interference...458 Copyright Information about Installed Applications 459 expat...459 JPEG LIBRARY...459 OpenLDAP 2.1...459 OpenSSL 0.9.8g...460 Trademarks...463 INDEX...465 9
Quick Guide
Page 68
Read the information indicated by the symbol that corresponds to the region of Region A and Region B models are using, see p.18 "Model-Specific Information". Certain options might be available in this manual are using. It indicates where you can find further relevant information. [ ] Indicates the names of keys ...
Read the information indicated by the symbol that corresponds to the region of Region A and Region B models are using, see p.18 "Model-Specific Information". Certain options might be available in this manual are using. It indicates where you can find further relevant information. [ ] Indicates the names of keys ...
Quick Guide
Page 71
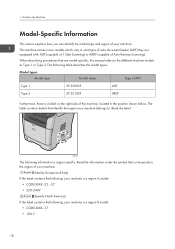
... XXXX -17 • 120 V 18 CMF003 The following information is a label on the right side of ADF Type 1 SP 3500SF ADF Type 2 SP 3510SF ARDF Furthermore, there is region-specific. Model types Model type Model name Type of the machine, located in what type of auto document feeder (ADF) they are... model-specific, this manual refers to the region of your machine. (mainly Europe and Asia) If the ...
... XXXX -17 • 120 V 18 CMF003 The following information is a label on the right side of ADF Type 1 SP 3500SF ADF Type 2 SP 3510SF ARDF Furthermore, there is region-specific. Model types Model type Model name Type of the machine, located in what type of auto document feeder (ADF) they are... model-specific, this manual refers to the region of your machine. (mainly Europe and Asia) If the ...

Quick Guide
Page 72
Model-Specific Information • Dimensions in this manual are given in two units of measure: metric and inch. If your machine is a Region B model, refer to the metric units. If your machine is a Region A model, refer to the inch units. 19
Model-Specific Information • Dimensions in this manual are given in two units of measure: metric and inch. If your machine is a Region B model, refer to the metric units. If your machine is a Region A model, refer to the inch units. 19

Quick Guide
Page 73
Guide to as Paper feed unit • For details about the specifications of this option, see p.457 "Specifications of option for this manual. Option List Paper Feed Unit TK1080 Referred to as in this machine, and how it is referred to the Machine List of Option This section provides a list of Options". 20 1.
Guide to as Paper feed unit • For details about the specifications of this option, see p.457 "Specifications of option for this manual. Option List Paper Feed Unit TK1080 Referred to as in this machine, and how it is referred to the Machine List of Option This section provides a list of Options". 20 1.
Quick Guide
Page 109
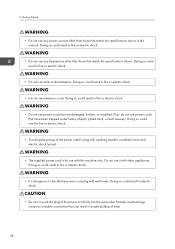
...Also, do not use extension cords. Doing so could result in fire or electric shock. • Do not use power cords that match the specifications shown in unsafe buildup of the power cord fully into the wall outlet. Getting Started • Do not use any power sources other than those... that match the specifications shown. Doing so could result in electric shock. • Be sure to handle the power cord plug with other appliances. Doing so could ...
...Also, do not use extension cords. Doing so could result in fire or electric shock. • Do not use power cords that match the specifications shown in unsafe buildup of the power cord fully into the wall outlet. Getting Started • Do not use any power sources other than those... that match the specifications shown. Doing so could result in electric shock. • Be sure to handle the power cord plug with other appliances. Doing so could ...
Quick Guide
Page 124
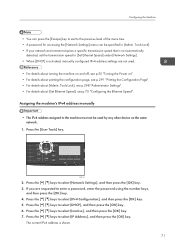
... the [OK] key. 7. The current IPv4 address is not automatically detected, set the transmission speed in [Admin. Tools Lock]. • If your network environment requires a specific transmission speed that is shown. 71 Press the [ ] [ ] keys to select [IP Address], and then press the [OK] key. Press the [ ] [ ] keys to select [Network...
... the [OK] key. 7. The current IPv4 address is not automatically detected, set the transmission speed in [Admin. Tools Lock]. • If your network environment requires a specific transmission speed that is shown. 71 Press the [ ] [ ] keys to select [IP Address], and then press the [OK] key. Press the [ ] [ ] keys to select [Network...

Quick Guide
Page 125
... the menu tree. • A password for configuring network settings differs depending on ". • For details about [Admin. Tools Lock]. • If your network environment requires a specific transmission speed that is not automatically detected, set the transmission speed in [Set Ethernet Speed] under "TCP/IP" on . 15. The current gateway address is...
... the menu tree. • A password for configuring network settings differs depending on ". • For details about [Admin. Tools Lock]. • If your network environment requires a specific transmission speed that is not automatically detected, set the transmission speed in [Set Ethernet Speed] under "TCP/IP" on . 15. The current gateway address is...
Quick Guide
Page 139
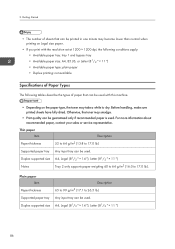
... bypass tray • Available paper size: A4, B5 JIS, or Letter (81/2 " × 11 ") • Available paper type: plain paper • Duplex printing: not available Specifications of Paper Types The following tables describe the types of paper that can be used with this machine. • Depending on the paper type, the...
... bypass tray • Available paper size: A4, B5 JIS, or Letter (81/2 " × 11 ") • Available paper type: plain paper • Duplex printing: not available Specifications of Paper Types The following tables describe the types of paper that can be used with this machine. • Depending on the paper type, the...

Quick Guide
Page 187
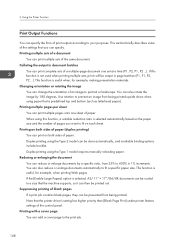
...]. 3. The [Print] dialog box appears. 134 Accessing the Printer Properties from an Application Windows You can configure printer settings for a specific application. The printer properties dialog box appears. • The settings you want to print. 2. If you are used as an example...Printers] Window • To change settings for the WordPad application provided with Windows 7. 1. To configure printer settings for a specific application, open the printer's properties in the printer properties dialog box are using an account that application. On the [File] menu, click...
...]. 3. The [Print] dialog box appears. 134 Accessing the Printer Properties from an Application Windows You can configure printer settings for a specific application. The printer properties dialog box appears. • The settings you want to print. 2. If you are used as an example...Printers] Window • To change settings for the WordPad application provided with Windows 7. 1. To configure printer settings for a specific application, open the printer's properties in the printer properties dialog box are using an account that application. On the [File] menu, click...
Quick Guide
Page 201
..., a suitable reduction ratio is selected automatically based on the paper size and the number of pages you can also rotate the image by a specific ratio, from 25% to fit a specific paper size. Use rotation to prevent an image from being printed upside down when using the Type 2 model can be done automatically...
..., a suitable reduction ratio is selected automatically based on the paper size and the number of pages you can also rotate the image by a specific ratio, from 25% to fit a specific paper size. Use rotation to prevent an image from being printed upside down when using the Type 2 model can be done automatically...

Quick Guide
Page 223
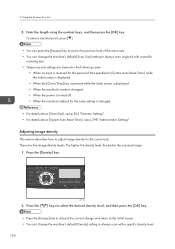
...". • For details about [System Auto Reset Timer], see p.298 "Administrator Settings". 170 Adjusting Image Density This section describes how to always make copies with a specific density level. • Temporary job settings are five image density levels. 4.
...". • For details about [System Auto Reset Timer], see p.298 "Administrator Settings". 170 Adjusting Image Density This section describes how to always make copies with a specific density level. • Temporary job settings are five image density levels. 4.

Quick Guide
Page 224
... pictures. Press the [Image Quality] key. Specifying Scan Settings Selecting the Document Type According to Original This section describes how to always make copies with a specific document type. • Temporary job settings are three document types: Mixed Select this mode for the original that are entirely or mainly photographs or pictures...
... pictures. Press the [Image Quality] key. Specifying Scan Settings Selecting the Document Type According to Original This section describes how to always make copies with a specific document type. • Temporary job settings are three document types: Mixed Select this mode for the original that are entirely or mainly photographs or pictures...
Quick Guide
Page 237
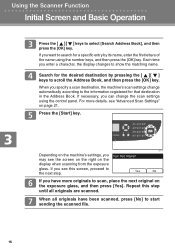
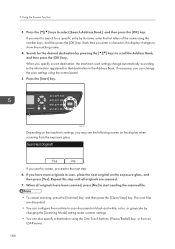
... original on the exposure glass, and then press [Yes]. If necessary, you may see this step until all originals have more originals to search for a specific entry by changing the [Scanning Mode] setting under scanner settings. • You can also specify a destination using the One Touch buttons, [Pause/Redial] key, or...
... original on the exposure glass, and then press [Yes]. If necessary, you may see this step until all originals have more originals to search for a specific entry by changing the [Scanning Mode] setting under scanner settings. • You can also specify a destination using the One Touch buttons, [Pause/Redial] key, or...
Quick Guide
Page 245
... to discard the current change and return to the initial screen. • You can change the machine's default [Density] setting to always scan originals with a specific density level. 192 To enter a decimal point, press [ ]. • You can press the [Escape] key to exit to the previous level of time specified in... no input is received for the period of the menu tree. • You can change the machine's default [Scan Size] setting to always scan with a specific scanning size. • Temporary job settings are five image density levels.
... to discard the current change and return to the initial screen. • You can change the machine's default [Density] setting to always scan originals with a specific density level. 192 To enter a decimal point, press [ ]. • You can press the [Escape] key to exit to the previous level of time specified in... no input is received for the period of the menu tree. • You can change the machine's default [Scan Size] setting to always scan with a specific scanning size. • Temporary job settings are five image density levels.

Quick Guide
Page 246
... pressed while the initial screen is displayed. • When the machine's mode is changed . 193 Specifying resolution This section describes how to always scan with a specific resolution level. • Temporary job settings are six resolution settings. Press the [Image Quality] key.
... pressed while the initial screen is displayed. • When the machine's mode is changed . 193 Specifying resolution This section describes how to always scan with a specific resolution level. • Temporary job settings are six resolution settings. Press the [Image Quality] key.


