Quick Guide
Page 1
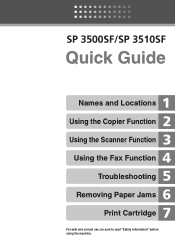
Quick Guide Names and Locations Using the Copier Function Using the Scanner Function Using the Fax Function Troubleshooting Removing Paper Jams Print Cartridge For safe and correct use, be sure to read "Safety Information" before using the machine.
Quick Guide Names and Locations Using the Copier Function Using the Scanner Function Using the Fax Function Troubleshooting Removing Paper Jams Print Cartridge For safe and correct use, be sure to read "Safety Information" before using the machine.
Quick Guide
Page 2
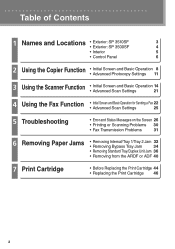
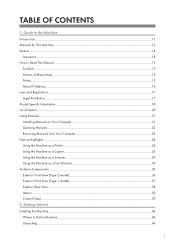
Table of Contents 1 Names and Locations • Exterior: SP 3510SF • Exterior: SP 3500SF 3 4 • Interior 5 • Control Panel 6 2 Using the Copier Function • Initial Screen and Basic Operation 8 • Advanced Photocopy Settings 11 3 Using the Scanner Function • Initial Screen and Basic Operation 14 • Advanced Scan Settings 21 4 Using the Fax Function •...
Table of Contents 1 Names and Locations • Exterior: SP 3510SF • Exterior: SP 3500SF 3 4 • Interior 5 • Control Panel 6 2 Using the Copier Function • Initial Screen and Basic Operation 8 • Advanced Photocopy Settings 11 3 Using the Scanner Function • Initial Screen and Basic Operation 14 • Advanced Scan Settings 21 4 Using the Fax Function •...

Quick Guide
Page 6
...: press Remains lit while the power is in the 5 [Start] key machine's memory. next level of the machine's current opera- 8 Alert indicator tion mode (copier, scanner, or fax). play the menu for configuring the set- specifying settings such as provided in standby mode: press to machine errors such as replacing a print...
...: press Remains lit while the power is in the 5 [Start] key machine's memory. next level of the machine's current opera- 8 Alert indicator tion mode (copier, scanner, or fax). play the menu for configuring the set- specifying settings such as provided in standby mode: press to machine errors such as replacing a print...

Quick Guide
Page 7
Press to select a scan or fax destina- tings", User Guide. 7 [Copy]/[Facsimile]/ [Scanner] key Press to select it. 9 [Density] key tion from the Address Book. Press to adjust image density for the current copy, scan, or fax job. 3 [...
Press to select a scan or fax destina- tings", User Guide. 7 [Copy]/[Facsimile]/ [Scanner] key Press to select it. 9 [Density] key tion from the Address Book. Press to adjust image density for the current copy, scan, or fax job. 3 [...

Quick Guide
Page 14
...E-mail, Scan to FTP, and Scan to Folder destinations must be disabled by entering a user name and passowrd. For details, see "Using the Scanner Function", User Guide. • To send files via e-mail, SMTP and DNS settings must be used . • If a USB flash disk ...important documents. • Certain types of USB flash disks cannot be configured properly in scanner mode. 1. For details, see "Administrator Settings", User Guide. 14 Current status or messages 2. Using the Scanner Function Initial Screen and Basic Operation The following is the initial screen in advance. ...
...E-mail, Scan to FTP, and Scan to Folder destinations must be disabled by entering a user name and passowrd. For details, see "Using the Scanner Function", User Guide. • To send files via e-mail, SMTP and DNS settings must be used . • If a USB flash disk ...important documents. • Certain types of USB flash disks cannot be configured properly in scanner mode. 1. For details, see "Administrator Settings", User Guide. 14 Current status or messages 2. Using the Scanner Function Initial Screen and Basic Operation The following is the initial screen in advance. ...
Quick Guide
Page 15
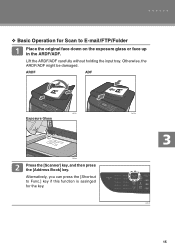
v Basic Operation for the key. Alternatively, you can press the [Shortcut to Func.] key if this function is assinged for Scan to E-mail/FTP/Folder Place the original face down on the exposure glass or face up in the ARDF/ADF. Otherwise, the ARDF/ADF might be damaged. Lift the ARDF/ADF carefully without holding the input tray. ARDF ADF CMF351 CMF350 Exposure Glass CMF048 Press the [Scanner] key, and then press the [Address Book] key. CMF140 15
v Basic Operation for the key. Alternatively, you can press the [Shortcut to Func.] key if this function is assinged for Scan to E-mail/FTP/Folder Place the original face down on the exposure glass or face up in the ARDF/ADF. Otherwise, the ARDF/ADF might be damaged. Lift the ARDF/ADF carefully without holding the input tray. ARDF ADF CMF351 CMF350 Exposure Glass CMF048 Press the [Scanner] key, and then press the [Address Book] key. CMF140 15
Quick Guide
Page 16
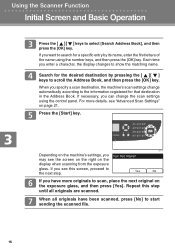
... right on the exposure glass, and then press [Yes]. If you enter a character, the display changes to start sending the scanned file. 16 Using the Scanner Function Initial Screen and Basic Operation Press the [ ][ ] keys to the next step. Repeat this screen, proceed to select [Search Address Book], and then press...
... right on the exposure glass, and then press [Yes]. If you enter a character, the display changes to start sending the scanned file. 16 Using the Scanner Function Initial Screen and Basic Operation Press the [ ][ ] keys to the next step. Repeat this screen, proceed to select [Search Address Book], and then press...
Quick Guide
Page 17
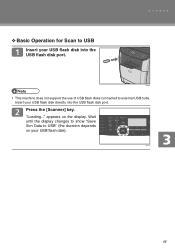
v Basic Operation for Scan to USB Insert your USB flash disk into the USB flash disk port. Press the [Scanner] key. Wait until the display changes to show "Save Scn Data to external USB hubs. "Loading..." CMF132 17 Insert your USB flash disk). appears on your USB flash disk directly into the USB flash disk port. CMF066 • This machine does not support the use of USB flash disks connected to USB" (the duration depends on the display.
v Basic Operation for Scan to USB Insert your USB flash disk into the USB flash disk port. Press the [Scanner] key. Wait until the display changes to show "Save Scn Data to external USB hubs. "Loading..." CMF132 17 Insert your USB flash disk). appears on your USB flash disk directly into the USB flash disk port. CMF066 • This machine does not support the use of USB flash disks connected to USB" (the duration depends on the display.
Quick Guide
Page 18
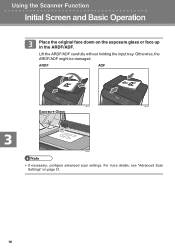
Using the Scanner Function Initial Screen and Basic Operation Place the original face down on page 21. 18 Otherwise, the ARDF/ADF might be damaged. ARDF ADF CMF351 CMF350 Exposure Glass CMF048 • If necessary, configure advanced scan settings. For more details, see "Advanced Scan Settings" on the exposure glass or face up in the ARDF/ADF. Lift the ARDF/ADF carefully without holding the input tray.
Using the Scanner Function Initial Screen and Basic Operation Place the original face down on page 21. 18 Otherwise, the ARDF/ADF might be damaged. ARDF ADF CMF351 CMF350 Exposure Glass CMF048 • If necessary, configure advanced scan settings. For more details, see "Advanced Scan Settings" on the exposure glass or face up in the ARDF/ADF. Lift the ARDF/ADF carefully without holding the input tray.
Quick Guide
Page 20
...; For information about how to configure the [Shortcut to the USB flash disk occurs, the scan job will be discarded. For details, see "Using the Scanner Function", User Guide. • For information about originals, see "Administrator Settings", User Guide. • You can also specify a destination using the One Touch buttons, [Pause... in black and white, color, or grayscale by changing the machine's default settings. For details, see "Removing Paper Jams" on page 32. 20 Using the Scanner Function Initial Screen and Basic Operation • To cancel scanning, press the...
...; For information about how to configure the [Shortcut to the USB flash disk occurs, the scan job will be discarded. For details, see "Using the Scanner Function", User Guide. • For information about originals, see "Administrator Settings", User Guide. • You can also specify a destination using the One Touch buttons, [Pause... in black and white, color, or grayscale by changing the machine's default settings. For details, see "Removing Paper Jams" on page 32. 20 Using the Scanner Function Initial Screen and Basic Operation • To cancel scanning, press the...
Quick Guide
Page 21
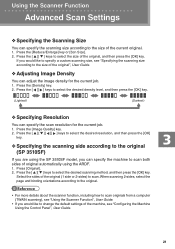
... are using the ARDF. 1. Select the sides of the original (1 side or 2-sides) to scan both sides of original automatically using the SP 3510SF model, you can specify the machine to scan. Press [Original]. 2. v Adjusting Image Density You can adjust the image density for the current...like to the size of the current original. 1. Press the [ ][ ] keys to the size of the original", User Guide. Using the Scanner Function Advanced Scan Settings v Specifying the Scanning Size You can specify the scanning size according to change the default settings of the machine, see "...
... are using the ARDF. 1. Select the sides of the original (1 side or 2-sides) to scan both sides of original automatically using the SP 3510SF model, you can specify the machine to scan. Press [Original]. 2. v Adjusting Image Density You can adjust the image density for the current...like to the size of the current original. 1. Press the [ ][ ] keys to the size of the original", User Guide. Using the Scanner Function Advanced Scan Settings v Specifying the Scanning Size You can specify the scanning size according to change the default settings of the machine, see "...

Quick Guide
Page 51
Quick Guide Names and Locations Using the Copier Function Using the Scanner Function Using the Fax Function Troubleshooting Removing Paper Jams Print Cartridge © 2011 EN GB EN US M119-8511
Quick Guide Names and Locations Using the Copier Function Using the Scanner Function Using the Fax Function Troubleshooting Removing Paper Jams Print Cartridge © 2011 EN GB EN US M119-8511
Quick Guide
Page 54
... Removing Manuals from Your Computer 23 Feature Highlights...24 Using the Machine as a Printer...24 Using the Machine as a Copier...26 Using the Machine as a Scanner...29 Using the Machine as a Fax Machine...33 Guide to Put the Machine...43 Unpacking...46 1 Getting Started Installing the Machine...43 Where to Components...
... Removing Manuals from Your Computer 23 Feature Highlights...24 Using the Machine as a Printer...24 Using the Machine as a Copier...26 Using the Machine as a Scanner...29 Using the Machine as a Fax Machine...33 Guide to Put the Machine...43 Unpacking...46 1 Getting Started Installing the Machine...43 Where to Components...
Quick Guide
Page 57
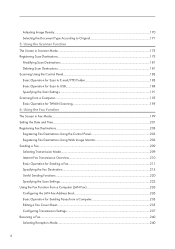
Using the Fax Function The Screen in Scanner Mode...173 Registering Scan Destinations...175 Modifying Scan Destinations...181 Deleting Scan Destinations...181 Scanning Using the Control Panel...183 Basic Operation for Scan to E-... Scan Settings...191 Scanning from a Computer 233 Editing a Fax Cover Sheet...235 Configuring Transmission Settings...237 Receiving a Fax...240 Selecting Reception Mode...240 4 Using the Scanner Function The Screen in Fax Mode...199 Setting the Date and Time...201 Registering Fax Destinations...203 Registering Fax Destinations Using the Control Panel 203...
Using the Fax Function The Screen in Scanner Mode...173 Registering Scan Destinations...175 Modifying Scan Destinations...181 Deleting Scan Destinations...181 Scanning Using the Control Panel...183 Basic Operation for Scan to E-... Scan Settings...191 Scanning from a Computer 233 Editing a Fax Cover Sheet...235 Configuring Transmission Settings...237 Receiving a Fax...240 Selecting Reception Mode...240 4 Using the Scanner Function The Screen in Fax Mode...199 Setting the Date and Time...201 Registering Fax Destinations...203 Registering Fax Destinations Using the Control Panel 203...
Quick Guide
Page 58
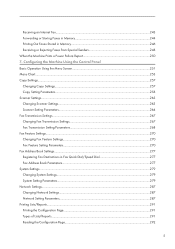
... Control Panel Basic Operation Using the Menu Screen...251 Menu Chart...253 Copy Settings...257 Changing Copy Settings...257 Copy Setting Parameters...258 Scanner Settings...263 Changing Scanner Settings...263 Scanner Setting Parameters...264 Fax Transmission Settings...267 Changing Fax Transmission Settings...267 Fax Transmission Setting Parameters...268 Fax Feature Settings...270 Changing...
... Control Panel Basic Operation Using the Menu Screen...251 Menu Chart...253 Copy Settings...257 Changing Copy Settings...257 Copy Setting Parameters...258 Scanner Settings...263 Changing Scanner Settings...263 Scanner Setting Parameters...264 Fax Transmission Settings...267 Changing Fax Transmission Settings...267 Fax Transmission Setting Parameters...268 Fax Feature Settings...270 Changing...
Quick Guide
Page 59
... the IPv6 Settings...331 Configuring the Network Application Settings 332 6 Reading the Fax Journal...295 Reading the TX/RX Standby File List...296 Reading the Scanner Journal...297 Administrator Settings...298 Changing Administrator Settings...298 Administrator Setting Parameters...298 Printer Feature Settings...304 Changing Printer Feature Settings...304 Printer Feature Setting...
... the IPv6 Settings...331 Configuring the Network Application Settings 332 6 Reading the Fax Journal...295 Reading the TX/RX Standby File List...296 Reading the Scanner Journal...297 Administrator Settings...298 Changing Administrator Settings...298 Administrator Setting Parameters...298 Printer Feature Settings...304 Changing Printer Feature Settings...304 Printer Feature Setting...

Quick Guide
Page 61
... the Machine Again After It Has Been Inactive for a Long Period 426 Where to Inquire...429 Consumables...430 Print Cartridge...430 11. Copier Problems...390 Scanner Problems...392 Fax Problems...393 Error and Status Messages on the Computer 436 Enabling and Disabling IPsec Using the Control Panel 438 Using the LDAP...
... the Machine Again After It Has Been Inactive for a Long Period 426 Where to Inquire...429 Consumables...430 Print Cartridge...430 11. Copier Problems...390 Scanner Problems...392 Fax Problems...393 Error and Status Messages on the Computer 436 Enabling and Disabling IPsec Using the Control Panel 438 Using the LDAP...

Quick Guide
Page 62
When LDAP Authentication is Specified 444 Specifying the LDAP Address Search Conditions 446 Specifications of the Machine...449 General Function Specifications...449 Printer Function Specifications...451 Copier Function Specifications...452 Scanner Function Specifications...452 Fax Function Specifications...454 Specifications of Options...457 Paper Feed Unit TK1080...457 Electromagnetic Interference...458 Copyright Information about Installed Applications 459 expat...459 JPEG LIBRARY...459 OpenLDAP 2.1...459 OpenSSL 0.9.8g...460 Trademarks...463 INDEX...465 9
When LDAP Authentication is Specified 444 Specifying the LDAP Address Search Conditions 446 Specifications of the Machine...449 General Function Specifications...449 Printer Function Specifications...451 Copier Function Specifications...452 Scanner Function Specifications...452 Fax Function Specifications...454 Specifications of Options...457 Paper Feed Unit TK1080...457 Electromagnetic Interference...458 Copyright Information about Installed Applications 459 expat...459 JPEG LIBRARY...459 OpenLDAP 2.1...459 OpenSSL 0.9.8g...460 Trademarks...463 INDEX...465 9
Quick Guide
Page 65
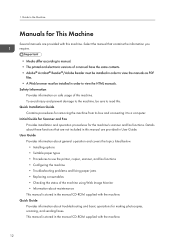
... Provides information on safe usage of the machine using Web Image Monitor • Information about troubleshooting and basic operations for the machine's scanner and fax functions. Details about general operation and covers the topics listed below. • Installing options • Suitable paper types &#...installed in order to view the manuals as PDF files. • A Web browser must be sure to use the printer, copier, scanner, and fax functions • Configuring the machine • Troubleshooting problems and fixing paper jams • Replacing consumables • Checking the...
... Provides information on safe usage of the machine using Web Image Monitor • Information about troubleshooting and basic operations for the machine's scanner and fax functions. Details about general operation and covers the topics listed below. • Installing options • Suitable paper types &#...installed in order to view the manuals as PDF files. • A Web browser must be sure to use the printer, copier, scanner, and fax functions • Configuring the machine • Troubleshooting problems and fixing paper jams • Replacing consumables • Checking the...

Quick Guide
Page 66
This manual is stored in the driver CD-ROM supplied with the machine. 13 Manuals for This Machine Driver Installation Guide Contains procedures for installing the printer drivers (PCL6 and PostScript 3) and scanner driver (TWAIN).
This manual is stored in the driver CD-ROM supplied with the machine. 13 Manuals for This Machine Driver Installation Guide Contains procedures for installing the printer drivers (PCL6 and PostScript 3) and scanner driver (TWAIN).


