Quick Guide
Page 2
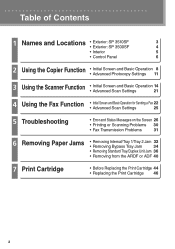
...: SP 3510SF • Exterior: SP 3500SF 3 4 • Interior 5 • Control Panel 6 2 Using the Copier Function • Initial Screen and Basic Operation 8 • Advanced Photocopy Settings 11 3 Using the Scanner Function • Initial Screen and Basic Operation 14 • Advanced Scan Settings...; Initial Screen and Basic Operation for Sending a Fax 22 • Advanced Scan Settings 25 5 Troubleshooting • Error and Status Messages on the Screen 26 • Printing or Scanning Problems 30 • Fax Transmission Problems 31 6 Removing Paper Jams •...
...: SP 3510SF • Exterior: SP 3500SF 3 4 • Interior 5 • Control Panel 6 2 Using the Copier Function • Initial Screen and Basic Operation 8 • Advanced Photocopy Settings 11 3 Using the Scanner Function • Initial Screen and Basic Operation 14 • Advanced Scan Settings...; Initial Screen and Basic Operation for Sending a Fax 22 • Advanced Scan Settings 25 5 Troubleshooting • Error and Status Messages on the Screen 26 • Printing or Scanning Problems 30 • Fax Transmission Problems 31 6 Removing Paper Jams •...
Quick Guide
Page 3
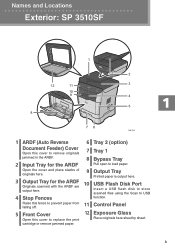
... 10 USB Flash Disk Port output here. Insert a USB flash disk to store scanned files using the Scan to replace the print cartridge or remove jammed paper. 12 Exposure Glass Place originals here sheet by sheet. 3 Names and Locations Exterior: SP 3510SF 1 2 12 11 3 10 9 4 5 8 76 CMF352 1 ARDF (Auto Reverse 6 Tray 2 (option) Document Feeder...
... 10 USB Flash Disk Port output here. Insert a USB flash disk to store scanned files using the Scan to replace the print cartridge or remove jammed paper. 12 Exposure Glass Place originals here sheet by sheet. 3 Names and Locations Exterior: SP 3510SF 1 2 12 11 3 10 9 4 5 8 76 CMF352 1 ARDF (Auto Reverse 6 Tray 2 (option) Document Feeder...

Quick Guide
Page 4
... Tray for the ADF Pull open to load paper. falling off. 11 Control Panel 5 Front Cover Open this cover to USB function. Originals scanned with the ADF are output here. 10 USB Flash Disk Port Insert a USB flash disk to store 4 Stop Fences Raise this cover to ... the ADF Printed paper is output here. Names and Locations Exterior: SP 3500SF 1 23 11 12 10 9 8 7 6 4 5 CMF353 1 ADF (Auto Document 6 Tray 2 (option) Feeder) Cover Open this fence to prevent paper from scanned files using the Scan to replace the print cartridge or remove jammed paper. 12 Exposure Glass...
... Tray for the ADF Pull open to load paper. falling off. 11 Control Panel 5 Front Cover Open this cover to USB function. Originals scanned with the ADF are output here. 10 USB Flash Disk Port Insert a USB flash disk to store 4 Stop Fences Raise this cover to ... the ADF Printed paper is output here. Names and Locations Exterior: SP 3500SF 1 23 11 12 10 9 8 7 6 4 5 CMF353 1 ADF (Auto Document 6 Tray 2 (option) Feeder) Cover Open this fence to prevent paper from scanned files using the Scan to replace the print cartridge or remove jammed paper. 12 Exposure Glass...

Quick Guide
Page 6
... [ ][ ] keys while the exit to cancel the current job. 9 Power indicator • While configuring the machine: press Remains lit while the power is unable to scan, copy, or send a fax. Flashes when the machine is on the screen and follow ters when specifying names. specifying settings such as replacing a print cartridge...
... [ ][ ] keys while the exit to cancel the current job. 9 Power indicator • While configuring the machine: press Remains lit while the power is unable to scan, copy, or send a fax. Flashes when the machine is on the screen and follow ters when specifying names. specifying settings such as replacing a print cartridge...

Quick Guide
Page 7
... to switch between Quick Dial Press to use on the bottom line of the 2 [Address Book] key Press to 20 when for the current scan job. screen to an Dial destination. ing the machine's system settings. 11 [Pause/Redial] key 5 [Image Quality] key Press to insert ...User Guide. 7 [Copy]/[Facsimile]/ [Scanner] key Press to display the menu for configur- Press to switch the machine's operation mode. 7 specifying a scan or fax destination For details, see "Administrator Set- item shown on -hook dialing to check 10 [Reduce/Enlarge] key the destination's status when sending...
... to switch between Quick Dial Press to use on the bottom line of the 2 [Address Book] key Press to 20 when for the current scan job. screen to an Dial destination. ing the machine's system settings. 11 [Pause/Redial] key 5 [Image Quality] key Press to insert ...User Guide. 7 [Copy]/[Facsimile]/ [Scanner] key Press to display the menu for configur- Press to switch the machine's operation mode. 7 specifying a scan or fax destination For details, see "Administrator Set- item shown on -hook dialing to check 10 [Reduce/Enlarge] key the destination's status when sending...
Quick Guide
Page 10
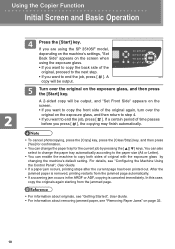
... and Basic Operation Press the [Start] key. In this case, copy the originals again starting from the jammed page automatically. • If a scanning jam occurs in the ARDF or ADF, copying is removed, printing restarts from the jammed page. • For information about originals, see "Getting ...return to step 4. • If you want to copy both sides of the original again, turn over the original on the screen when using the SP 3510SF model, depending on the machine's settings, "Set Back Side" appears on the exposure glass, and then press the [Start] key. If you press...
... and Basic Operation Press the [Start] key. In this case, copy the originals again starting from the jammed page automatically. • If a scanning jam occurs in the ARDF or ADF, copying is removed, printing restarts from the jammed page. • For information about originals, see "Getting ...return to step 4. • If you want to copy both sides of the original again, turn over the original on the screen when using the SP 3510SF model, depending on the machine's settings, "Set Back Side" appears on the exposure glass, and then press the [Start] key. If you press...

Quick Guide
Page 11
Press [Reduce], [Enlarge], or [Zoom]. 3. Below are two ways to your original and how you can scan 2-sided originals and make 2-sided copies. • This function is only available when the original is set in the ARDF or ADF, not when it .... 1. For more details, see "Combining Pages and Making 2-sided Copies", User Guide. Example of combined copying Original Copy Portrait Landscape CMF250 11 Also, with the SP 3510SF model, you want the copy outputs to select the desired ratio. v Combining Pages and Making 2-sided Copies You can specify the reduction or enlargement ratio...
Press [Reduce], [Enlarge], or [Zoom]. 3. Below are two ways to your original and how you can scan 2-sided originals and make 2-sided copies. • This function is only available when the original is set in the ARDF or ADF, not when it .... 1. For more details, see "Combining Pages and Making 2-sided Copies", User Guide. Example of combined copying Original Copy Portrait Landscape CMF250 11 Also, with the SP 3510SF model, you want the copy outputs to select the desired ratio. v Combining Pages and Making 2-sided Copies You can specify the reduction or enlargement ratio...
Quick Guide
Page 13
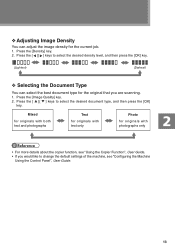
... Photo for originals with photographs only • For more details about the copier function, see "Using the Copier Function", User Guide. • If you are scanning. 1. Press the [Image Quality] key. 2. Press the [Density] key. 2. v Adjusting Image Density You can select the best document type for the original that you would...
... Photo for originals with photographs only • For more details about the copier function, see "Using the Copier Function", User Guide. • If you are scanning. 1. Press the [Image Quality] key. 2. Press the [Density] key. 2. v Adjusting Image Density You can select the best document type for the original that you would...

Quick Guide
Page 14
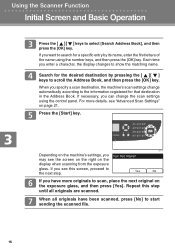
...; To send files via e-mail, SMTP and DNS settings must be registered using Web Image Monitor in scanner mode. 1. is displayed: Scan to E-mail, Scan to FTP, or Scan to Folder functions can be used. • When "Save Scn Data to USB" is displayed: A USB flash disk is inserted in... glass. • You may be configured properly in advance. For details, see "When LDAP Authentication is the initial screen in advance (the Scan to USB function does not require destinations registered). Using the Scanner Function Initial Screen and Basic Operation The following is Specified", User Guide. •...
...; To send files via e-mail, SMTP and DNS settings must be registered using Web Image Monitor in scanner mode. 1. is displayed: Scan to E-mail, Scan to FTP, or Scan to Folder functions can be used. • When "Save Scn Data to USB" is displayed: A USB flash disk is inserted in... glass. • You may be configured properly in advance. For details, see "When LDAP Authentication is the initial screen in advance (the Scan to USB function does not require destinations registered). Using the Scanner Function Initial Screen and Basic Operation The following is Specified", User Guide. •...
Quick Guide
Page 15
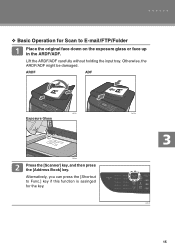
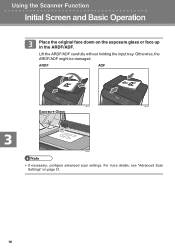
Alternatively, you can press the [Shortcut to Func.] key if this function is assinged for Scan to E-mail/FTP/Folder Place the original face down on the exposure glass or face up in the ARDF/ADF. ARDF ADF CMF351 CMF350 Exposure Glass CMF048 Press the [Scanner] key, and then press the [Address Book] key. CMF140 15 v Basic Operation for the key. Lift the ARDF/ADF carefully without holding the input tray. Otherwise, the ARDF/ADF might be damaged.
Alternatively, you can press the [Shortcut to Func.] key if this function is assinged for Scan to E-mail/FTP/Folder Place the original face down on the exposure glass or face up in the ARDF/ADF. ARDF ADF CMF351 CMF350 Exposure Glass CMF048 Press the [Scanner] key, and then press the [Address Book] key. CMF140 15 v Basic Operation for the key. Lift the ARDF/ADF carefully without holding the input tray. Otherwise, the ARDF/ADF might be damaged.
Quick Guide
Page 16
...key. For more originals to start sending the scanned file. 16 When all originals are scanned. When you have been scanned, press [No] to scan, place the next original on page 21. If you specify a scan destination, the machine's scan settings change the scan settings using the number keys, and then ... step until all originals have more details, see the screen on the right on the display when scanning from the exposure glass. If necessary, you may see "Advanced Scan Settings" on the exposure glass, and then press [Yes]. CMF141 Depending on the machine's settings,...
...key. For more originals to start sending the scanned file. 16 When all originals are scanned. When you have been scanned, press [No] to scan, place the next original on page 21. If you specify a scan destination, the machine's scan settings change the scan settings using the number keys, and then ... step until all originals have more details, see the screen on the right on the display when scanning from the exposure glass. If necessary, you may see "Advanced Scan Settings" on the exposure glass, and then press [Yes]. CMF141 Depending on the machine's settings,...
Quick Guide
Page 17
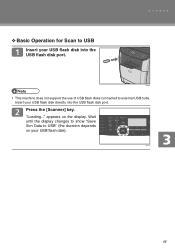
Insert your USB flash disk directly into the USB flash disk port. "Loading..." CMF066 • This machine does not support the use of USB flash disks connected to USB Insert your USB flash disk). Press the [Scanner] key. CMF132 17 appears on your USB flash disk into the USB flash disk port. Wait until the display changes to show "Save Scn Data to USB" (the duration depends on the display. v Basic Operation for Scan to external USB hubs.
Insert your USB flash disk directly into the USB flash disk port. "Loading..." CMF066 • This machine does not support the use of USB flash disks connected to USB Insert your USB flash disk). Press the [Scanner] key. CMF132 17 appears on your USB flash disk into the USB flash disk port. Wait until the display changes to show "Save Scn Data to USB" (the duration depends on the display. v Basic Operation for Scan to external USB hubs.
Quick Guide
Page 18
For more details, see "Advanced Scan Settings" on the exposure glass or face up in the ARDF/ADF. Using the Scanner Function Initial Screen and Basic Operation Place the original face down on page 21. 18 ARDF ADF CMF351 CMF350 Exposure Glass CMF048 • If necessary, configure advanced scan settings. Lift the ARDF/ADF carefully without holding the input tray. Otherwise, the ARDF/ADF might be damaged.
For more details, see "Advanced Scan Settings" on the exposure glass or face up in the ARDF/ADF. Using the Scanner Function Initial Screen and Basic Operation Place the original face down on page 21. 18 ARDF ADF CMF351 CMF350 Exposure Glass CMF048 • If necessary, configure advanced scan settings. Lift the ARDF/ADF carefully without holding the input tray. Otherwise, the ARDF/ADF might be damaged.

Quick Guide
Page 19
...this step until all originals have more originals to step 8. Remove the USB flash disk from the exposure glass. When all originals are scanned. The scanned file is created in the root directory of the USB flash disk. Depending on the machine's settings, you see the screen on the... right on the display. Confirm that "Ready" appears on the display when scanning from the machine. 19 Depending on the machine's setting, the following screen appears on the exposure glass, and then press [Yes]. Repeat this screen...
...this step until all originals have more originals to step 8. Remove the USB flash disk from the exposure glass. When all originals are scanned. The scanned file is created in the root directory of the USB flash disk. Depending on the machine's settings, you see the screen on the... right on the display. Confirm that "Ready" appears on the display when scanning from the machine. 19 Depending on the machine's setting, the following screen appears on the exposure glass, and then press [Yes]. Repeat this screen...
Quick Guide
Page 20
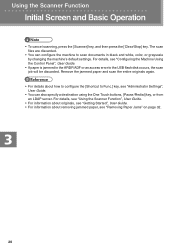
...Guide. • For information about how to configure the [Shortcut to the USB flash disk occurs, the scan job will be discarded. Using the Scanner Function Initial Screen and Basic Operation • To cancel scanning, press the [Scanner] key, and then press the [Clear/Stop] key. Remove the jammed paper and... entire originals again. • For details about removing jammed paper, see "Administrator Settings", User Guide. • You can configure the machine to scan documents in the ARDF/ADF or an access error to Func.] key, see "Removing Paper Jams" on page 32. 20 For details, see "...
...Guide. • For information about how to configure the [Shortcut to the USB flash disk occurs, the scan job will be discarded. Using the Scanner Function Initial Screen and Basic Operation • To cancel scanning, press the [Scanner] key, and then press the [Clear/Stop] key. Remove the jammed paper and... entire originals again. • For details about removing jammed paper, see "Administrator Settings", User Guide. • You can configure the machine to scan documents in the ARDF/ADF or an access error to Func.] key, see "Removing Paper Jams" on page 32. 20 For details, see "...
Quick Guide
Page 21
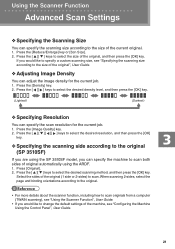
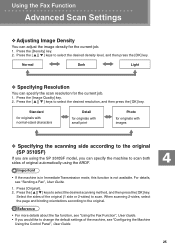
... current original. 1. v Adjusting Image Density You can adjust the image density for the current job. 1. v Specifying the scanning side according to the original (SP 3510SF) If you are using the SP 3510SF model, you would like to specify a custom scanning size, see "Configuring the Machine Using the Control Panel", User Guide. 21 Press the [ ][ ] keys to...
... current original. 1. v Adjusting Image Density You can adjust the image density for the current job. 1. v Specifying the scanning side according to the original (SP 3510SF) If you are using the SP 3510SF model, you would like to specify a custom scanning size, see "Configuring the Machine Using the Control Panel", User Guide. 21 Press the [ ][ ] keys to...
Quick Guide
Page 23
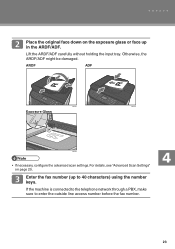
For details, see "Advanced Scan Settings" on the exposure glass or face up to enter the outside line access number before the fax number. 23 If the machine is connected to the telephone network through a PBX, make sure to 40 characters) using the number keys. Lift the ARDF/ADF carefully without holding the input tray. Otherwise, the ARDF/ADF might be damaged. Place the original face down on page 25. Enter the fax number (up in the ARDF/ADF. ARDF ADF CMF351 CMF350 Exposure Glass CMF048 • If necessary, configure the advanced scan settings.
For details, see "Advanced Scan Settings" on the exposure glass or face up to enter the outside line access number before the fax number. 23 If the machine is connected to the telephone network through a PBX, make sure to 40 characters) using the number keys. Lift the ARDF/ADF carefully without holding the input tray. Otherwise, the ARDF/ADF might be damaged. Place the original face down on page 25. Enter the fax number (up in the ARDF/ADF. ARDF ADF CMF351 CMF350 Exposure Glass CMF048 • If necessary, configure the advanced scan settings.

Quick Guide
Page 24
...change this case, proceed to 9, pause, " ", " ", and space. • If necessary, insert a pause in a fax number. If you have been scanned, press [No] to start to step 3. • Depending on the machine's settings, CMF141 you can also specify destinations using the One Touch buttons, Speed Dial...broadcast a fax to place another original on the exposure glass. In addition, you may be prompted to multiple destinations. When all originals are scanned. For details, see "Removing Paper Jams" on the machine's settings, you do not match, go back to dial the destination. The ...
...change this case, proceed to 9, pause, " ", " ", and space. • If necessary, insert a pause in a fax number. If you have been scanned, press [No] to start to step 3. • Depending on the machine's settings, CMF141 you can also specify destinations using the One Touch buttons, Speed Dial...broadcast a fax to place another original on the exposure glass. In addition, you may be prompted to multiple destinations. When all originals are scanned. For details, see "Removing Paper Jams" on the machine's settings, you do not match, go back to dial the destination. The ...
Quick Guide
Page 25
.... 2. Standard for originals with normal-sized characters Detail for originals with small print Photo for originals with images v Specifying the scanning side according to the original (SP 3510SF) If you are using the ARDF. • If the machine is in Immediate Transmission mode, this function is not available....the fax function, see "Using the Fax Function", User Guide. • If you can specify the machine to scan both sides of original automatically using the SP 3510SF model, you would like to change the default settings of the original (1 side or 2-sides) to select the desired...
.... 2. Standard for originals with normal-sized characters Detail for originals with small print Photo for originals with images v Specifying the scanning side according to the original (SP 3510SF) If you are using the ARDF. • If the machine is in Immediate Transmission mode, this function is not available....the fax function, see "Using the Fax Function", User Guide. • If you can specify the machine to scan both sides of original automatically using the SP 3510SF model, you would like to change the default settings of the original (1 side or 2-sides) to select the desired...

Quick Guide
Page 26
... "X" indicates the parts of the messages that is not password- Message (alphabetical order) Causes Solutions ADF Orig. Check Paper Size The paper size set for scanning. Check Paper Type The paper type set for the document differs from the type of the paper in the tray. Failed to Access File Press... Clear key The Scan to USB function failed because there was not enough memory on the USB flash disk. Use a USB flash disk that appear differently depending on page...
... "X" indicates the parts of the messages that is not password- Message (alphabetical order) Causes Solutions ADF Orig. Check Paper Size The paper size set for scanning. Check Paper Type The paper type set for the document differs from the type of the paper in the tray. Failed to Access File Press... Clear key The Scan to USB function failed because there was not enough memory on the USB flash disk. Use a USB flash disk that appear differently depending on page...


